DIY and Crafts
Creative Glowing Crafts for Kids: DIY Lanterns, Galaxy Jars and Bee Lights

DIY glowing crafts for kids are a fun way to combine creativity, art, and STEM learning. These easy craft ideas include glowing bee lights, galaxy light jars, firework lanterns, love bugs, and solar bee lights. Children can enjoy hands-on activities, explore light concepts, develop fine motor skills, and create magical glowing decorations.
DIY Glowing Bee Lights Craft for Kids

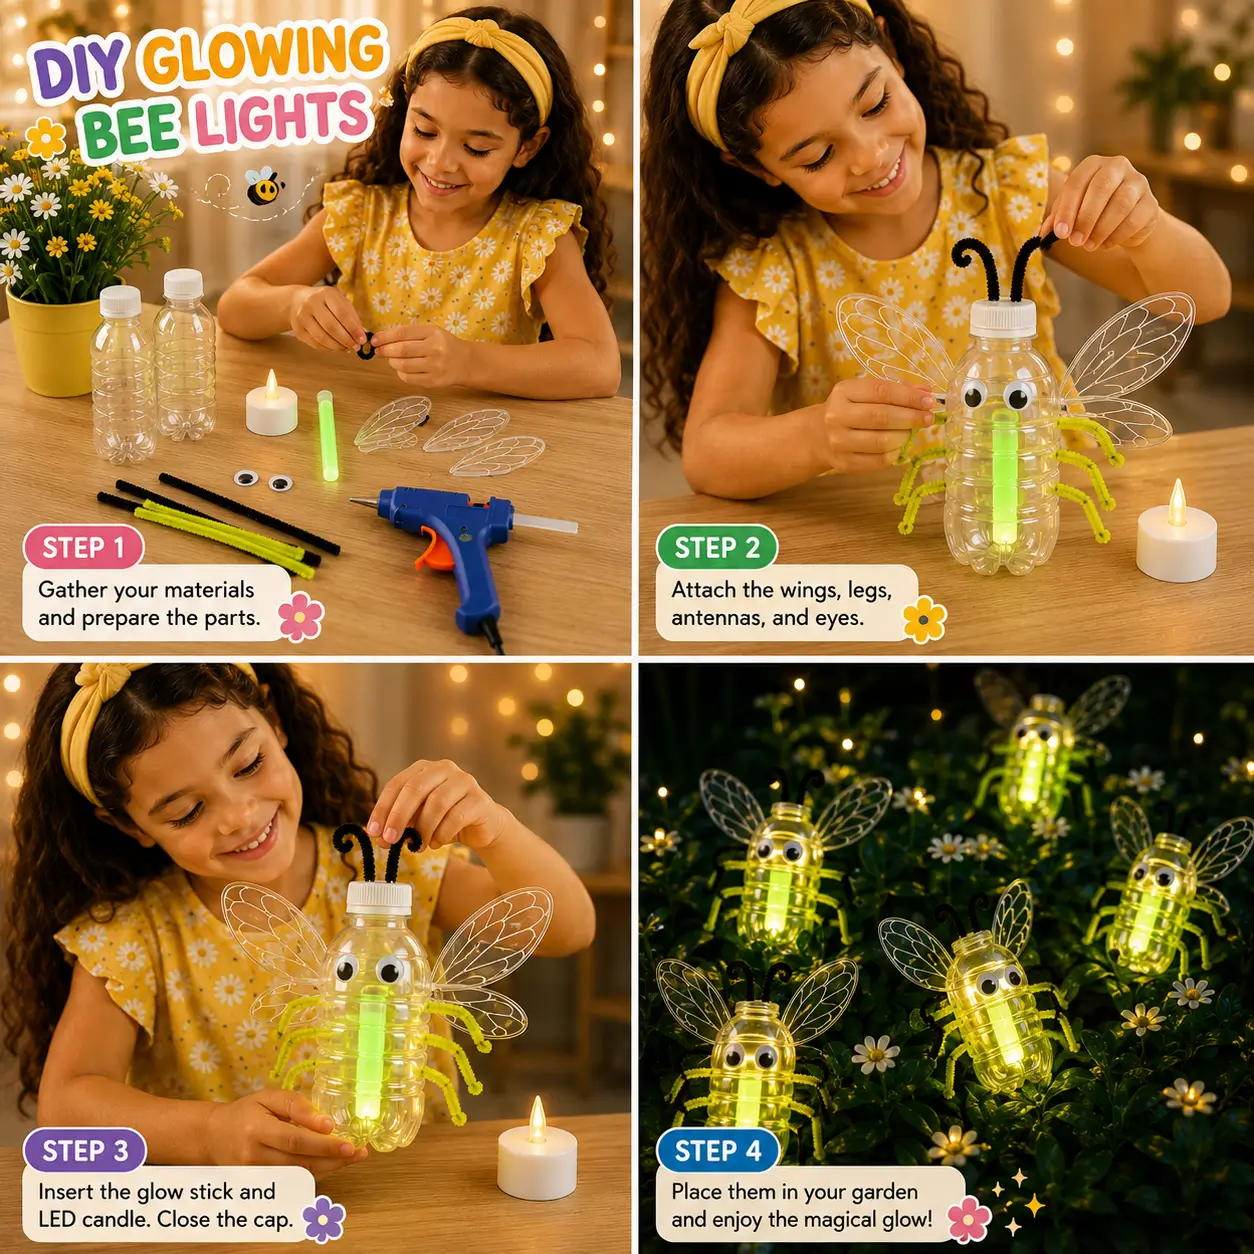
Cute DIY glowing bee lights made from recycled plastic bottles, glow sticks, and simple craft supplies for a fun kids’ activity.
Materials Required
-
- Small plastic bottles with caps
- Green glow sticks
- LED tea light candles
- Black pipe cleaners
- Yellow pipe cleaners
- Googly eyes
- Transparent craft wings (plastic or acetate)
- Hot glue gun and glue sticks
- Scissors
- Pencil or marker (optional for tracing)
Steps of Making
Step 1: Gather the Materials
Collect all the required supplies, including plastic bottles, glow sticks, pipe cleaners, wings, googly eyes, and glue. Clean and dry the bottles before starting.
Step 2: Create the Bee Body
Attach the transparent wings to the sides of the bottle using glue. Add googly eyes to the front and bend black pipe cleaners into antenna shapes before attaching them to the cap.
Step 3: Add Legs and Glow
Twist yellow pipe cleaners around the sides of the bottle to create bee legs. Insert a glow stick or place a small LED light inside the bottle and close the cap securely.
Step 4: Display Your Glowing Bees
Turn on the LED light or activate the glow stick and place the bees in a garden, bedroom, classroom, or outdoor evening display to enjoy their magical glow.
Safety Tips
- Adult supervision is recommended when using a hot glue gun.
- Use child-safe scissors for younger children.
- Avoid opening or cutting glow sticks.
- Ensure LED lights are battery-operated and cool to the touch.
- Keep small craft materials away from very young children to prevent choking hazards.
- Work on a clean, flat surface to prevent spills and accidents.
Why This Craft Is Great for Kids
- Encourages creativity and imaginative play.
- Teaches the importance of recycling and reusing materials.
- Develops fine motor skills through cutting, gluing, and assembling.
- Improves hand-eye coordination and concentration.
- Provides a fun introduction to simple light and glow concepts.
- Creates a decorative craft that children can proudly display.
- Offers an engaging screen-free activity for home or classroom learning.
DIY Galaxy Light Jar Craft for Kids
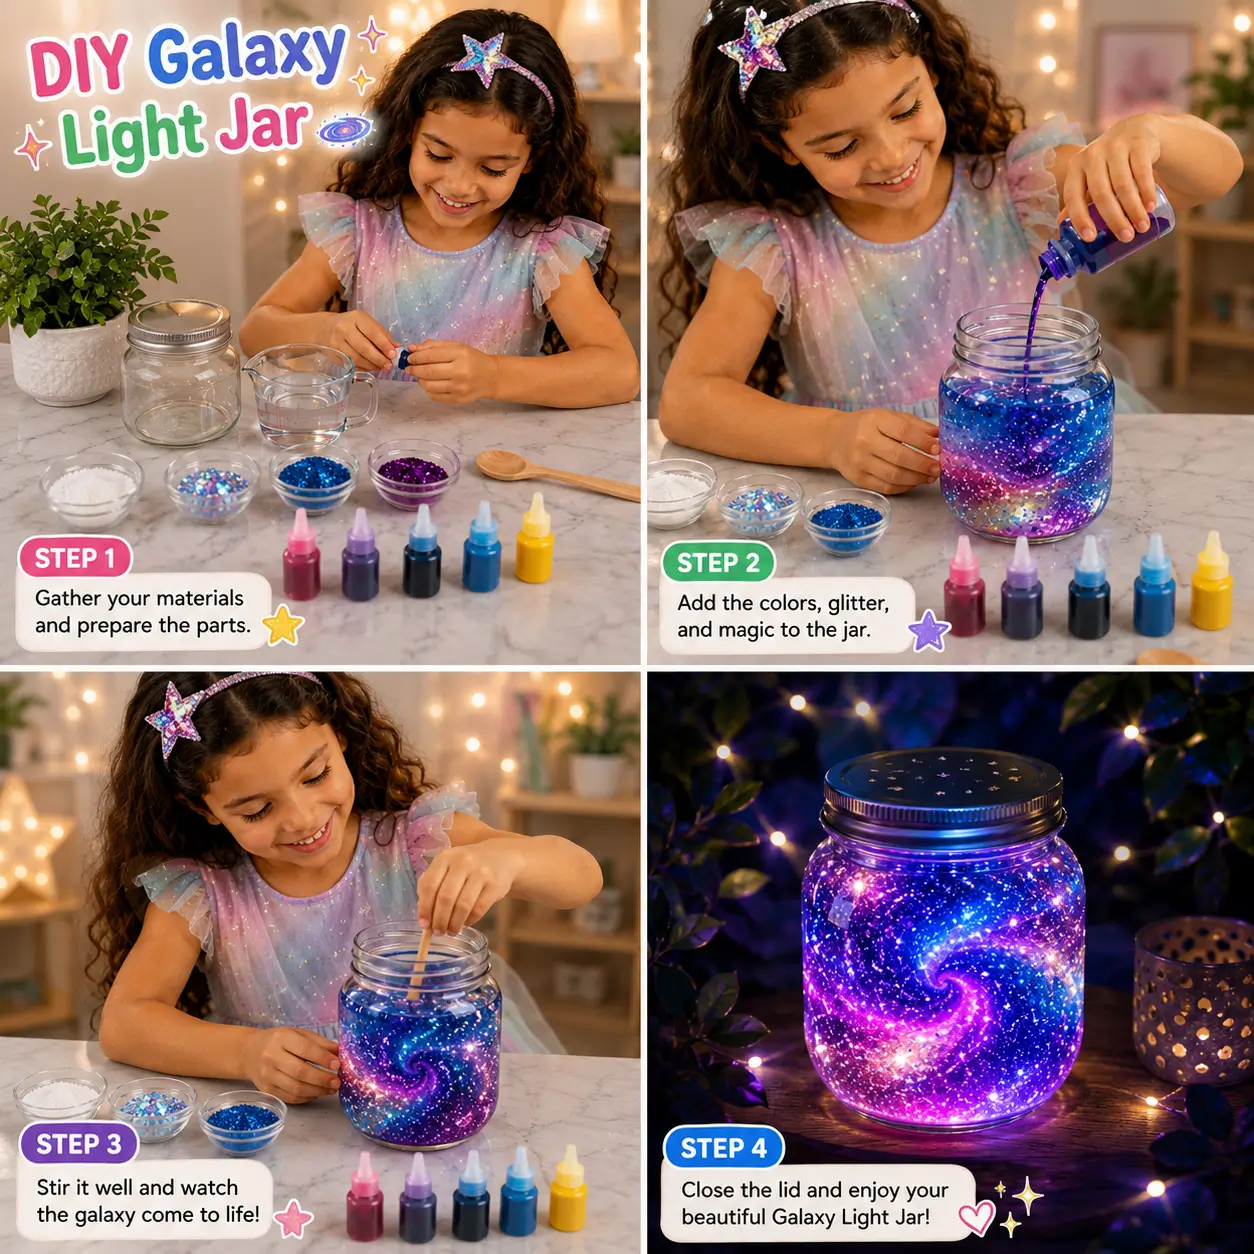
Magical DIY Galaxy Light Jar craft made with glitter and colorful liquids to create a glowing galaxy effect.
Materials Required
- Clear glass or plastic jar with lid
- Water
- Clear glue or glycerin
- Fine glitter (blue, purple, silver, pink)
- Food coloring or liquid watercolor paints
- Cotton balls (optional for cloud effect)
- Wooden craft stick or spoon
- Small LED fairy lights or LED tea light
- Small bowls for mixing
- Measuring cup
Steps of Making
Step 1: Gather the Materials
Collect all supplies, including the jar, water, glitter, colors, glue, and LED lights. Make sure the jar is clean and dry.
Step 2: Create the Galaxy Colors
Fill the jar with water and add a small amount of glue or glycerin. Mix in different food coloring shades such as blue, purple, pink, and black. Add glitter to create sparkling stars.
Step 3: Stir and Build the Galaxy
Use a wooden stick to gently stir the mixture. If desired, add small pieces of cotton to create nebula-like clouds and layer different colors for a galaxy effect.
Step 4: Add the Light and Display
Place LED fairy lights or an LED tea light inside or beneath the jar. Secure the lid and enjoy your glowing galaxy masterpiece.
Safety Tips
- Use only battery-operated LED lights; never use real candles.
- Adult supervision is recommended when handling glass jars.
- Avoid overfilling the jar to prevent spills.
- Ensure the lid is tightly closed before shaking.
- Keep small glitter and decorative items away from toddlers.
- Clean up spills immediately to prevent slippery surfaces.
Why This Craft Is Great for Kids
- Encourages creativity and artistic expression.
- Introduces basic science concepts such as color mixing and light.
- Develops fine motor skills through pouring and stirring.
- Enhances sensory exploration with colors and textures.
- Promotes focus, patience, and attention to detail.
- Creates a beautiful handmade decoration for bedrooms or classrooms.
- Provides a fun combination of art, science, and imaginative learning.
DIY Light-Up Love Bug Craft for Kids
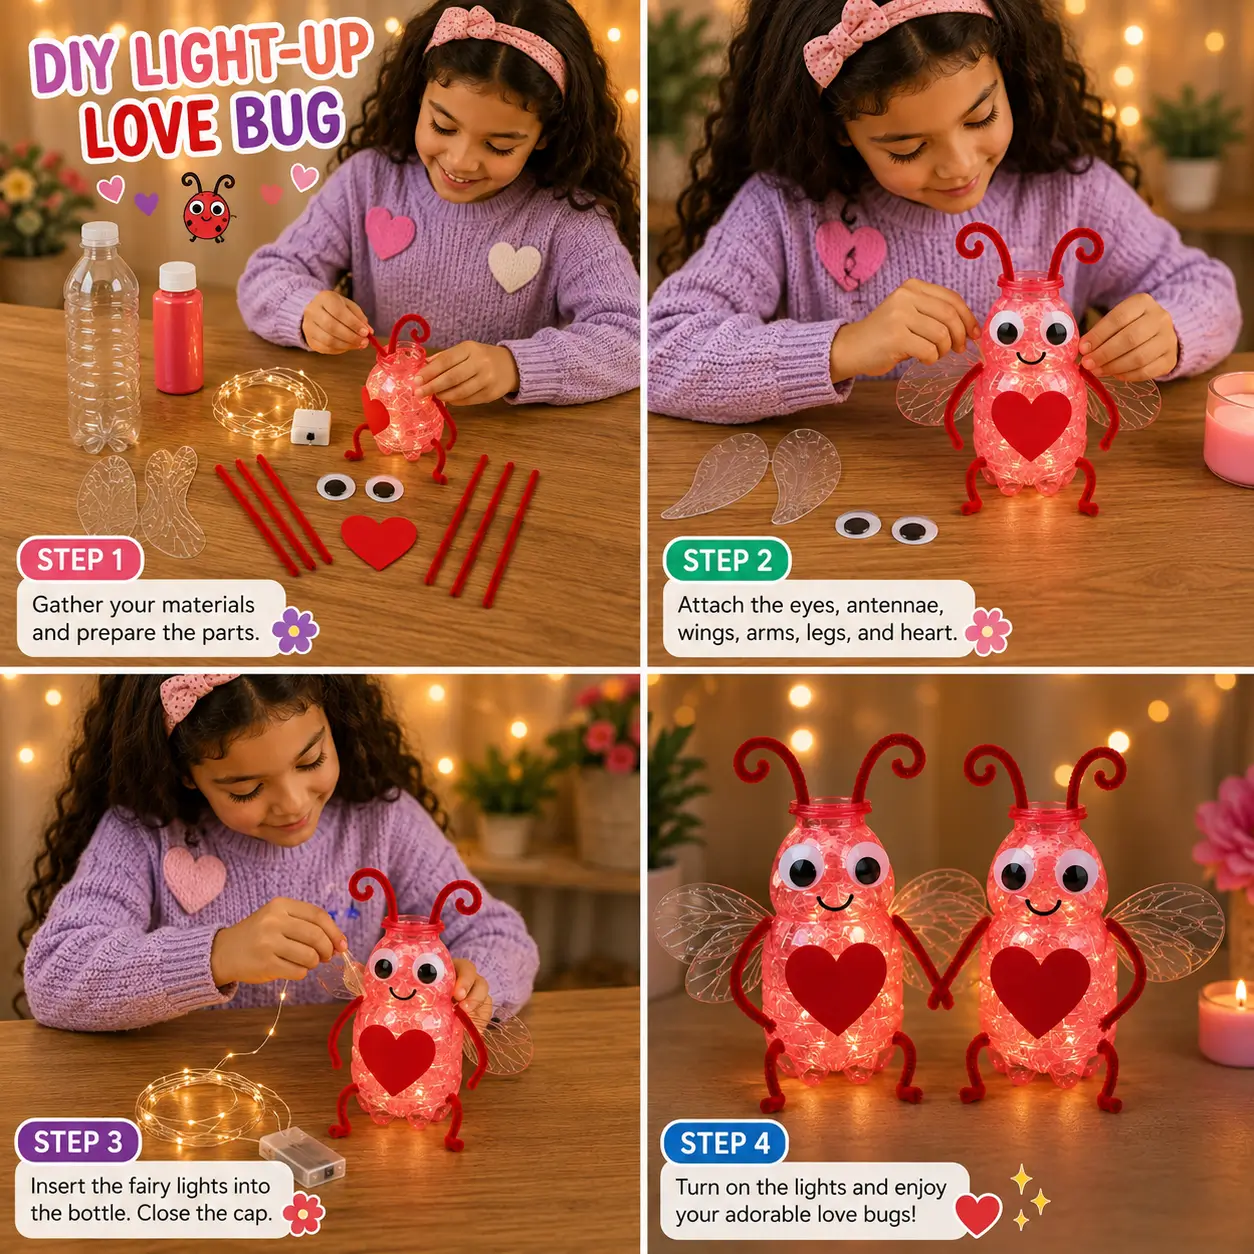
Adorable DIY Light-Up Love Bug craft made from recycled plastic bottles and fairy lights, perfect for kids’ creativity and Valentine’s Day fun.
Materials Required
- Small plastic bottle with cap
- Battery-operated fairy lights
- Pink or red paint
- Paintbrush
- Red pipe cleaners
- Googly eyes
- Transparent craft wings (plastic or acetate)
- Red foam or felt heart cutout
- Hot glue gun and glue sticks
- Scissors
- Black marker (optional)
- Decorative stickers or glitter (optional)
Steps of Making
Step 1: Gather the Materials
Collect all the supplies and clean the plastic bottle thoroughly. Paint the bottle pink or red if desired and allow it to dry completely.
Step 2: Decorate the Love Bug
Attach the googly eyes, heart shape, wings, antennae, arms, and legs using glue. Bend the pipe cleaners to create curly antennae and bug legs.
Step 3: Add the Fairy Lights
Carefully place the battery-operated fairy lights inside the bottle. Arrange the lights evenly so the bottle glows beautifully from all sides. Secure the cap tightly.
Step 4: Turn On and Display
Switch on the fairy lights and watch your adorable love bug shine. Display it on a desk, shelf, classroom table, or as a festive decoration.
Safety Tips
- Adult supervision is recommended when using hot glue guns.
- Use only battery-operated LED fairy lights.
- Do not use real candles inside or near the craft.
- Ensure wires and battery packs remain dry.
- Handle scissors carefully and use child-safe versions when possible.
- Keep small craft items away from young children who may put them in their mouths.
Why This Craft Is Great for Kids
- Encourages creativity and imaginative thinking.
- Promotes recycling and environmental awareness.
- Develops fine motor skills through cutting, gluing, and assembling.
- Improves hand-eye coordination and concentration.
- Introduces basic concepts of light and simple electronics.
- Creates a cute handmade decoration children can proudly display.
- Makes a wonderful Valentine’s Day, friendship, or classroom craft activity.
DIY Solar Bee String Lights Craft for Kids
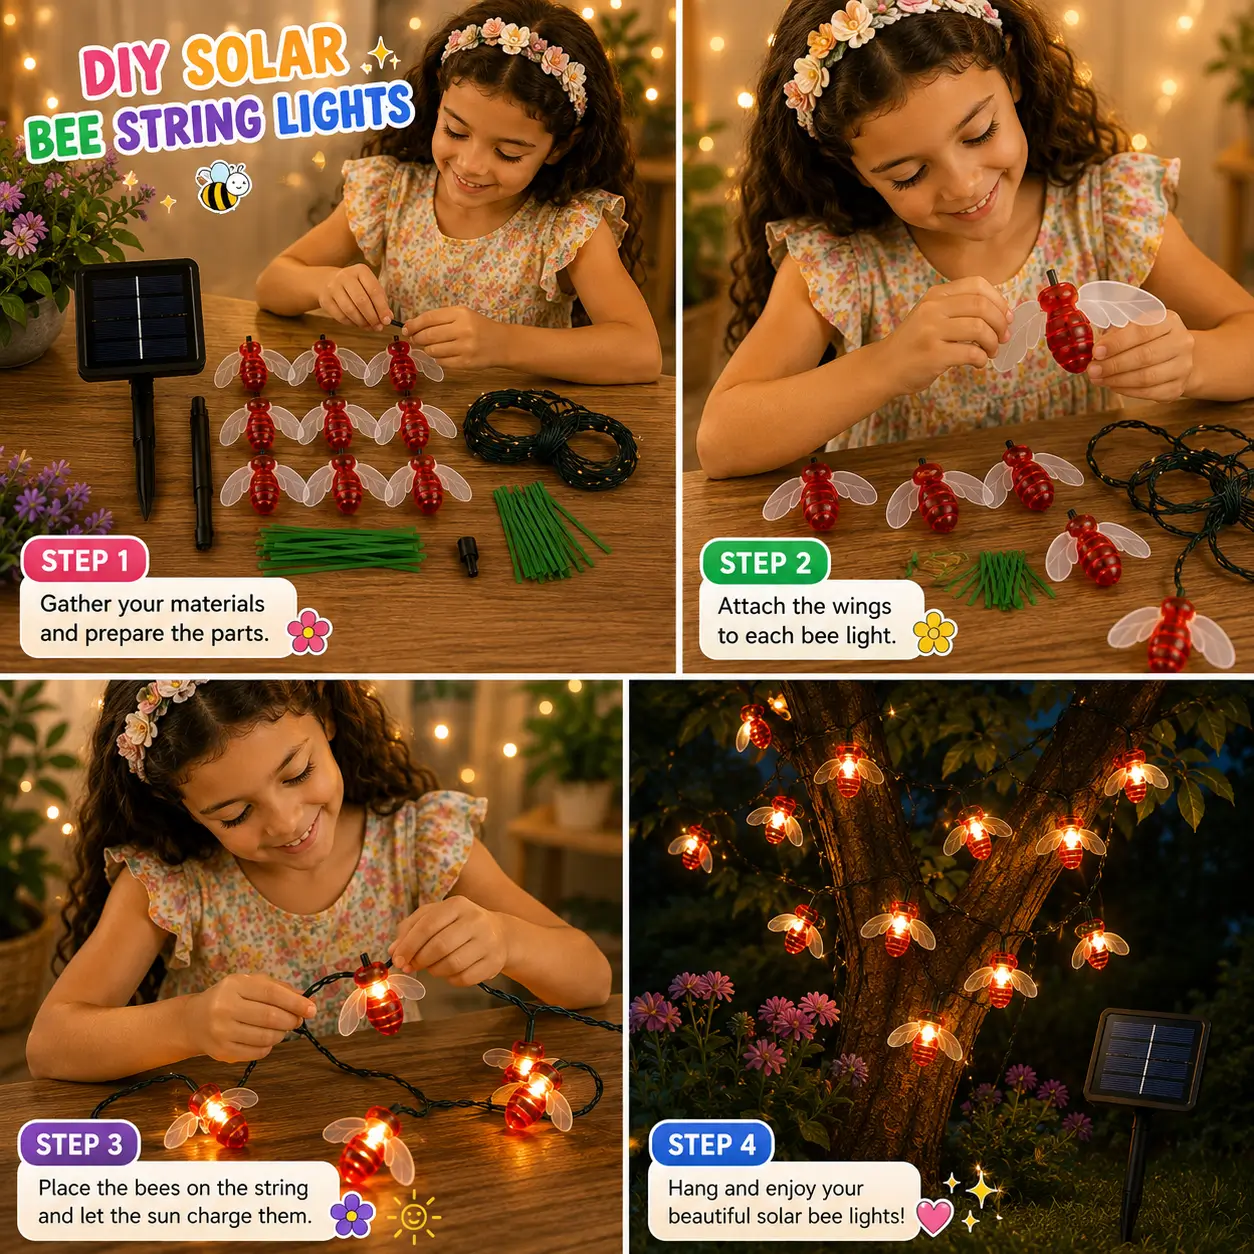
A fun and creative solar-powered bee light craft that transforms ordinary string lights into adorable glowing bees for gardens, patios, and outdoor spaces.
Materials Required
- Solar-powered string lights
- Bee-shaped plastic or wooden light covers
- White craft foam or plastic sheets for wings
- Green pipe cleaners
- Hot glue gun and glue sticks
- Scissors
- Black marker
- Pencil
- Small paintbrush (optional)
- Acrylic paint (optional)
- Outdoor tree branch, fence, or garden hook for hanging
Steps of Making
Step 1: Gather and Prepare Materials
Collect all the supplies needed for the project. Arrange the solar string lights, bee bodies, wings, pipe cleaners, and glue on a clean workspace.
Step 2: Create the Bee Decorations
Cut wing shapes from white craft foam or plastic sheets. Attach two wings to each bee body using glue. Allow them to dry completely before moving to the next step.
Step 3: Attach Bees to the Light String
Carefully secure each bee decoration around a light bulb on the solar string. Make sure the bulb remains visible so the glowing effect shines through the bee body.
Step 4: Display Your Bee Lights
Hang the completed bee string lights on a tree, fence, porch, or garden area. Place the solar panel where it can receive plenty of sunlight during the day.
Step 5: Enjoy the Glow
Wait until evening and watch your adorable bee lights illuminate the outdoor space with a warm and magical glow.
Safety Tips
- Adult supervision is recommended when using hot glue guns.
- Use child-safe scissors for cutting wings and decorations.
- Ensure electrical parts remain dry during assembly.
- Do not pull or twist the light wires excessively.
- Place the solar panel in a secure location to prevent tripping hazards.
- Keep small craft pieces away from very young children.
Why This Craft Is Great for Kids
- Encourages creativity and imaginative design.
- Introduces children to solar energy and eco-friendly technology.
- Develops fine motor skills through cutting and assembling.
- Enhances problem-solving and planning abilities.
- Creates a beautiful outdoor decoration kids can proudly display.
- Provides a fun STEM-inspired learning experience.
- Promotes outdoor exploration and appreciation of nature.
DIY Firework Jar Lights Craft for Kids

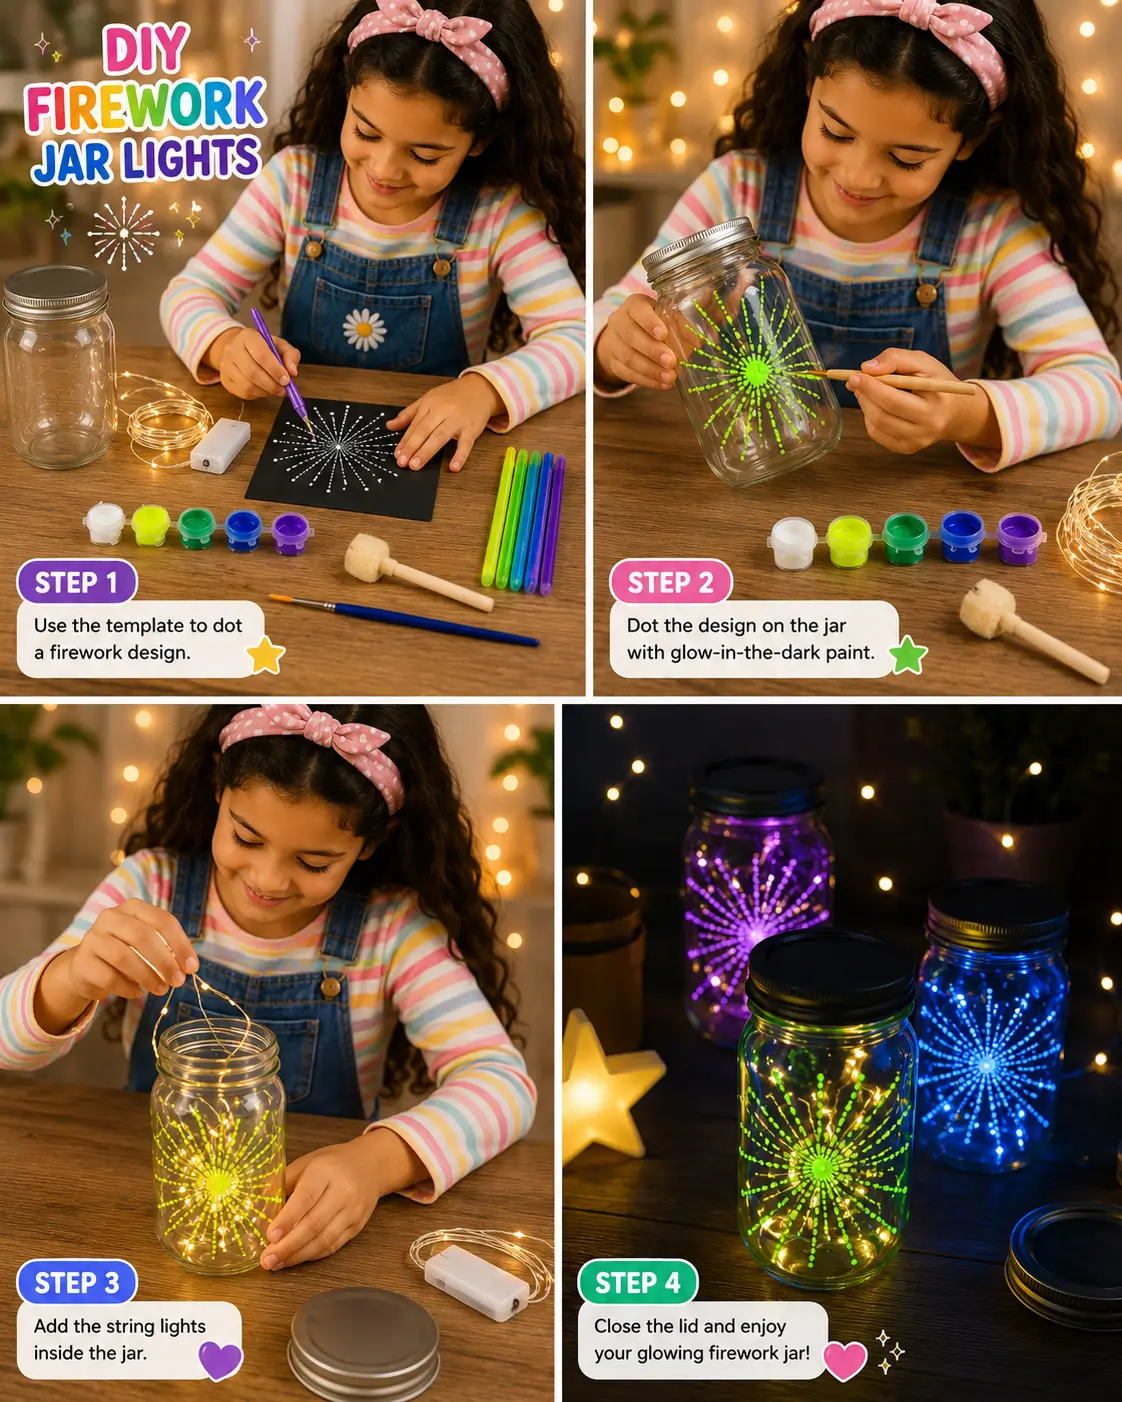
Turn an ordinary mason jar into a dazzling firework lantern with colorful glow paint and fairy lights. This fun craft creates a magical glowing decoration perfect for bedrooms, parties, and celebrations.
Materials Required
- Clear glass mason jar with lid
- Battery-operated fairy lights or string lights
- Glow-in-the-dark paint (multiple colors)
- Acrylic paint (optional)
- Dotting tools, cotton swabs, or paintbrushes
- Firework design template
- Black cardstock or paper (for practice)
- Pencil
- Paper towels
- Small paint palette
- Protective table covering
Steps of Making
Step 1: Create the Firework Design
Practice drawing a firework pattern on paper using dots and lines. Use a template if needed to help create a symmetrical design.
Step 2: Paint the Jar
Carefully dot the firework design onto the outside of the mason jar using glow-in-the-dark paint. Create colorful bursts by adding dots that radiate outward from the center.
Step 3: Allow the Paint to Dry
Let the painted design dry completely according to the paint manufacturer’s instructions. Add extra layers if you want brighter colors.
Step 4: Add the Lights
Place the battery-operated fairy lights inside the jar. Arrange them evenly so the light spreads throughout the firework design.
Step 5: Finish and Display
Close the lid securely and turn on the lights. Place the glowing jar on a table, shelf, or bedside stand to enjoy its beautiful firework effect.
Safety Tips
- Adult supervision is recommended when handling glass jars.
- Use battery-operated lights instead of plug-in lights for safety.
- Avoid using real candles inside the jar.
- Handle paint carefully and wash hands after crafting.
- Keep small batteries and light components away from young children.
- Work on a protected surface to prevent paint stains.
Why This Craft Is Great for Kids
- Encourages creativity and artistic expression.
- Develops fine motor skills through dot painting.
- Improves hand-eye coordination and concentration.
- Introduces children to light and color effects.
- Creates a beautiful handmade decoration they can proudly display.
- Promotes patience while designing and drying artwork.
- Provides a fun STEM and art-based learning experience.
FAQs
Q1. What age group are these DIY light crafts suitable for?
Answer: These crafts are generally suitable for children aged 5–12 years. Younger children may need adult assistance with cutting, gluing, and handling small craft materials.
Q2. Are these glowing crafts safe for kids?
Answer: Yes, these crafts are safe when made using battery-operated LED lights and child-friendly materials. Adult supervision is recommended when using scissors, hot glue guns, or glass containers.
Q3. Can I use real candles instead of LED lights?
Answer: No. For safety reasons, always use battery-operated LED lights, fairy lights, or LED tea lights. Real candles can create fire hazards and should not be used in these crafts.
Q4. What skills do children learn from these craft activities?
Answer: Kids develop creativity, fine motor skills, hand-eye coordination, concentration, problem-solving abilities, and basic STEM knowledge through crafting and decorating.
Q5. Can recycled materials be used for these projects?
Answer: Yes. Many of these crafts use recycled plastic bottles, jars, and other reusable materials, helping children learn about recycling and environmental responsibility.
Q6. Are these crafts suitable for classroom activities?
Answer: Absolutely. These projects are excellent for classrooms, art lessons, STEM activities, summer camps, and group crafting sessions because they are easy, engaging, and educational.
Q7. How long do these light crafts take to make?
Answer: Most of these projects can be completed in about 20–45 minutes, depending on the design, drying time, and level of decoration.
These DIY glowing crafts for kids offer a perfect blend of art, creativity, and STEM learning. From glowing bee lights and galaxy jars to solar-powered decorations and firework lanterns, each project encourages imagination, recycling, and hands-on exploration. These easy kids’ craft activities create beautiful handmade displays while helping children develop valuable skills through fun and engaging learning experiences. Keep up with what’s new—follow our Telegram group for regular updates.