DIY and Crafts
DIY Lantern Crafts for Kids: Easy Mason Jar, Butterfly and Hanging Lantern Ideas

Lantern crafts are a wonderful way for children to combine creativity with colorful decoration. These DIY lantern projects, featuring mason jar lanterns, butterfly designs, and hanging lantern ideas, encourage artistic expression and hands-on learning. Kids will enjoy crafting glowing creations that add charm and brightness to any space.
DIY Floral Tissue Paper Mason Jar Lanterns for Kids

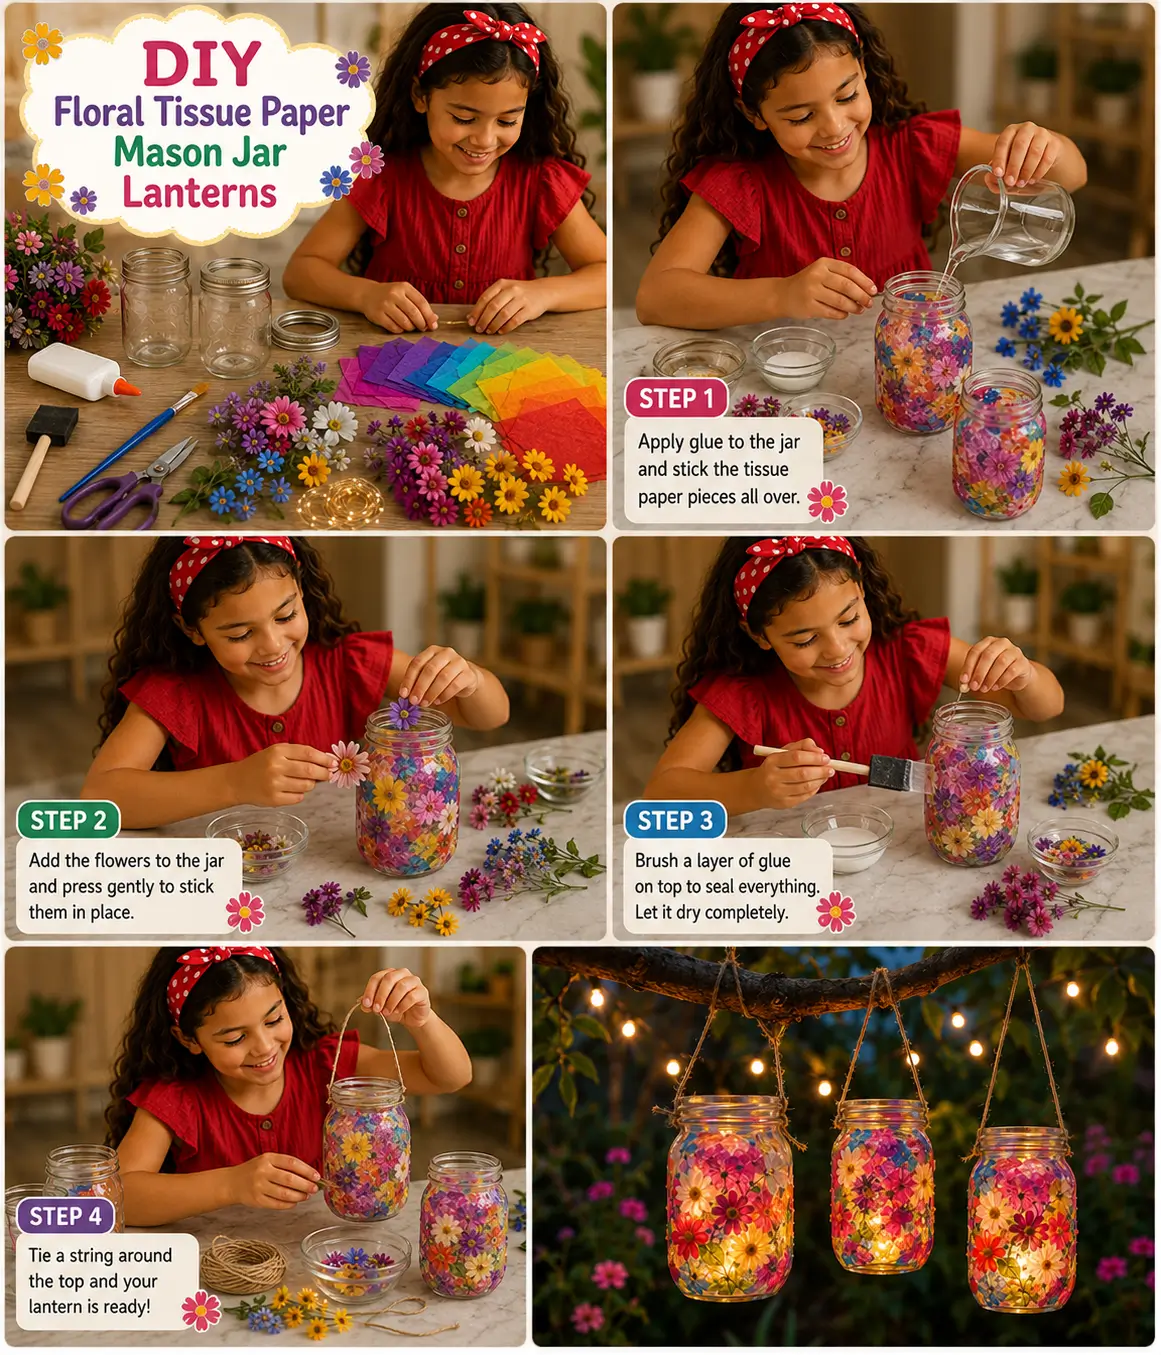
Create beautiful floral tissue paper mason jar lanterns with kids using simple craft supplies. This easy DIY project transforms ordinary jars into colorful glowing decorations perfect for bedrooms, gardens, and special occasions.
Materials Required
- Mason jars (clean and dry)
- Colorful tissue paper sheets
- White craft glue or Mod Podge
- Small bowl for glue
- Foam brush or paintbrush
- Decorative flower stickers, paper flowers, or pressed flowers
- Scissors
- Twine, string, ribbon, or decorative wire for handles
- LED tealight candles or fairy lights
- Protective table covering (optional)
Steps of Making
Step 1: Prepare the Tissue Paper
Cut or tear colorful tissue paper into small squares or irregular pieces. Mixing different colors creates a vibrant stained-glass effect.
Step 2: Apply Tissue Paper to the Jar
Brush a thin layer of glue onto the outside of the mason jar. Place tissue paper pieces over the glued area, slightly overlapping them until the jar is covered.
Step 3: Add Floral Decorations
Attach flower stickers, paper flowers, or pressed flowers onto the tissue-covered jar. Press gently to ensure they stick properly.
Step 4: Seal the Design
Brush another thin layer of glue over the entire decorated surface. This helps seal the tissue paper and flowers in place. Allow the jar to dry completely.
Step 5: Create a Handle
Tie twine, ribbon, or decorative wire securely around the rim of the jar to create a hanging handle if desired.
Step 6: Add the Light
Place an LED tealight candle or battery-operated fairy lights inside the jar. Watch the colorful lantern glow beautifully.
Safety Tips
- Use battery-operated LED lights instead of real candles to prevent fire hazards.
- Adult supervision is recommended when using scissors.
- Ensure jars are free from cracks or sharp edges before crafting.
- Use non-toxic, child-safe glue and craft materials.
- Allow glue to dry fully before placing lights inside the lantern.
- Keep small decorative items away from very young children who may put them in their mouths.
Why This Craft Is Great for Kids
- Encourages Creativity
- Develops Fine Motor Skills
- Easy and Budget-Friendly
- Teaches Crafting Techniques
- Creates Functional Art
- Perfect for Special Occasions
DIY Butterfly & Floral Tissue Paper Mason Jar Lanterns


Turn ordinary mason jars into magical glowing lanterns with colorful tissue paper, butterfly decorations, and flowers. This fun and easy craft is perfect for kids and makes beautiful handmade décor.
Materials Required
- Mason jars
- Colored tissue paper sheets
- White craft glue or Mod Podge
- Foam brush or paintbrush
- Butterfly stickers or butterfly cutouts
- Flower stickers or paper flowers
- Small bowl for glue
- Scissors
- Decorative glitter (optional)
- Twine, ribbon, pipe cleaners, or decorative wire
- LED tealight candles or fairy lights
- Protective work surface
Steps of Making
Step 1: Cover the Jar with Tissue Paper
Tear or cut tissue paper into small pieces. Apply glue to the outside of the mason jar and stick the tissue paper pieces all around, overlapping colors for a stained-glass look.
Step 2: Add Decorative Elements
Attach butterfly stickers, flower stickers, or paper cutouts onto the tissue-covered jar. Arrange them creatively to create a colorful design.
Step 3: Seal the Decoration
Brush a thin layer of glue over the entire jar to secure the tissue paper and decorations. Allow the jar to dry completely.
Step 4: Create a Lantern Handle
Wrap decorative wire, ribbon, or pipe cleaners around the rim of the jar and form a handle for hanging.
Step 5: Light Up the Lantern
Place an LED tealight or battery-operated fairy lights inside the jar to create a warm glowing effect.
Safety Tips
- Use only battery-operated LED lights inside the lantern.
- Adult supervision is recommended when using scissors or wire.
- Choose non-toxic, child-safe craft supplies.
- Ensure the glue is fully dry before placing lights inside the jar.
- Check mason jars for chips or cracks before use.
- Keep small decorative items away from toddlers.
Why This Craft Is Great for Kids
- Boosts Creativity
- Improves Fine Motor Skills
- Encourages Artistic Expression
- Easy and Engaging
- Creates Beautiful Home Décor
- Supports Learning Through Crafting
DIY Butterfly Lantern Craft for Kids

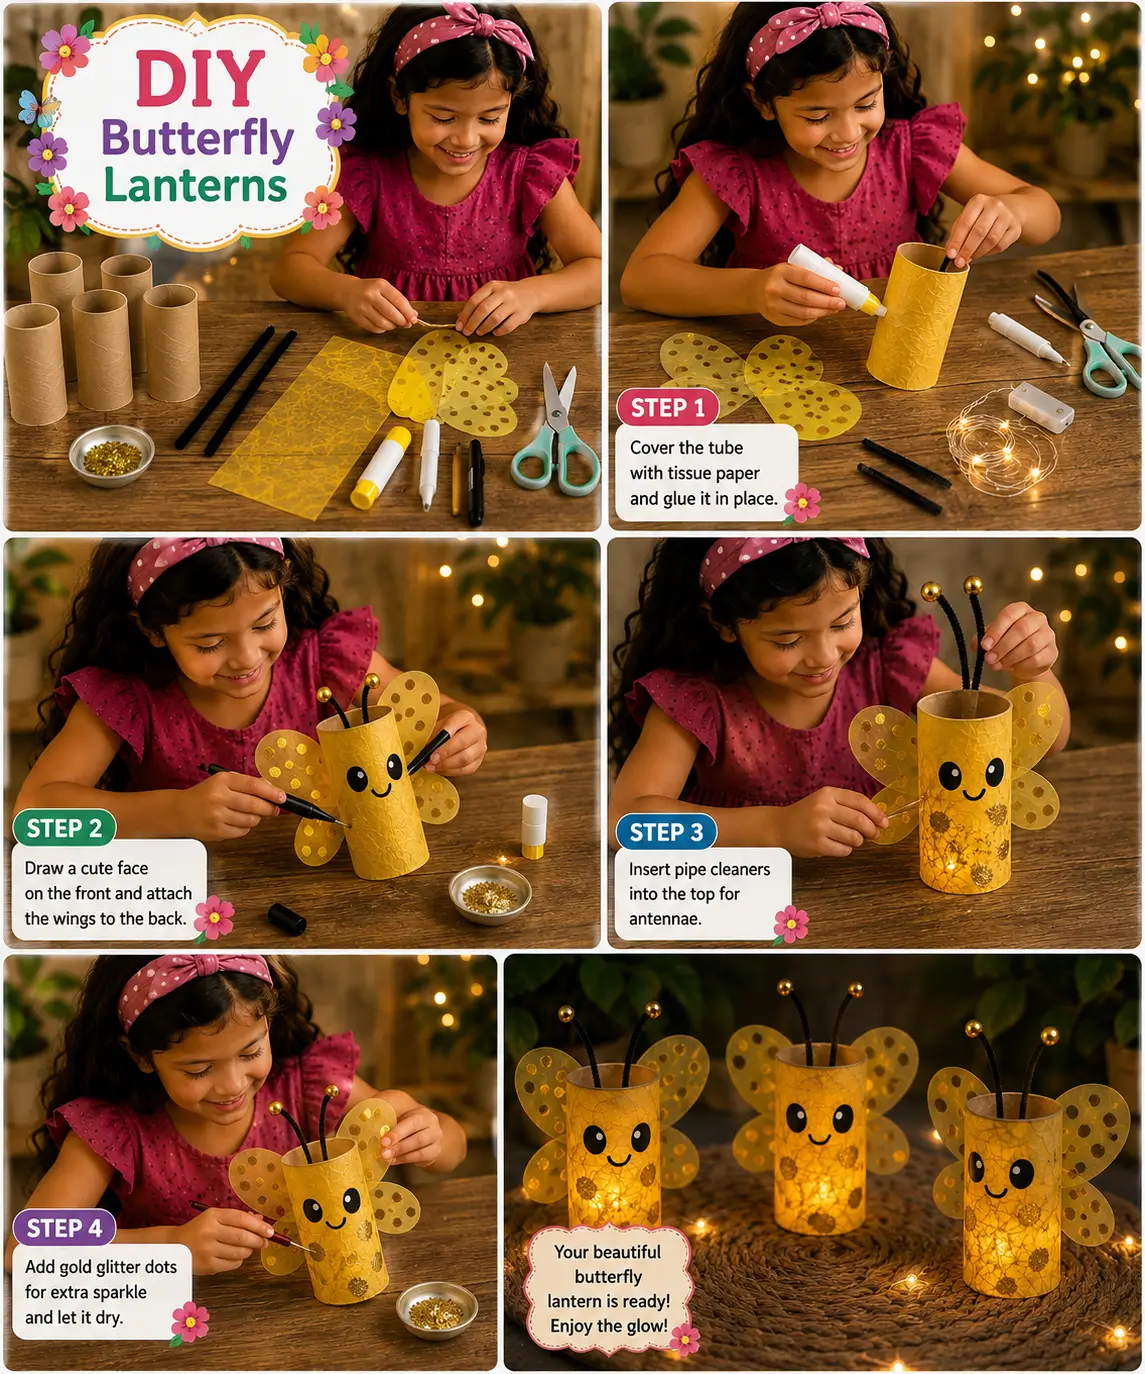
Create a glowing butterfly lantern from a cardboard tube using tissue paper, wings, and fairy lights.
Materials Required
- Cardboard tubes (toilet paper or paper towel rolls)
- Yellow tissue paper
- Craft glue or glue stick
- Scissors
- Black marker
- Black pipe cleaners
- Gold beads or pom-poms
- Yellow or gold craft paper
- Glitter or sequins
- Battery-operated LED tea light or fairy lights
- Pencil for tracing wing shapes
Steps of Making
Step 1: Cover the Tube
Wrap the cardboard tube with yellow tissue paper and secure it with glue. Allow it to dry.
Step 2: Create the Butterfly
Cut butterfly wings from craft paper. Draw a cute face on the front of the tube and glue the wings to the back.
Step 3: Add Antennae
Insert or glue pipe cleaners to the top of the tube. Attach beads or pom-poms to the ends.
Step 4: Decorate
Add glitter dots, sequins, or decorative patterns to the lantern. Let everything dry completely.
Step 5: Light It Up
Place a battery-operated LED light inside the tube and enjoy the warm butterfly glow.
Safety Tips
- Use child-safe scissors.
- Adult supervision is recommended when cutting materials.
- Use only battery-operated LED lights.
- Avoid candles or open flames.
- Keep small beads away from very young children.
Why This Craft Is Great for Kids
- Encourages creativity and self-expression.
- Develops fine motor skills through cutting and gluing.
- Promotes recycling by reusing cardboard tubes.
- Improves hand-eye coordination.
- Creates a fun decorative item children can proudly display.
DIY Yarn Wrapped Hanging Lanterns for Kids


Transform simple paper cups into colorful hanging lanterns using yarn, beads, and creative decorations.
Materials Required
- Paper cups
- Colorful yarn
- Craft glue
- Decorative foam flowers
- Rainbow foam stickers or cutouts
- String or twine
- Colorful beads
- Scissors
- Hole punch (optional)
- Battery-operated fairy lights or LED lights
Steps of Making
Step 1: Wrap the Cup
Apply glue to the paper cup and wrap colorful yarn around it until fully covered.
Step 2: Decorate the Lantern
Attach foam flowers, rainbow decorations, leaves, or other embellishments to personalize the lantern.
Step 3: Add Beaded Strands
Thread colorful beads onto strings and attach them around the bottom edge of the cup.
Step 4: Create a Hanger
Attach a sturdy piece of string to the top of the lantern so it can be hung.
Step 5: Display and Glow
Place a battery-operated LED light inside and hang your lantern in a safe location.
Safety Tips
- Use child-safe glue and scissors.
- Adults should assist with hole punching if needed.
- Secure bead strands firmly to prevent pieces from falling off.
- Use only battery-operated lights.
- Keep small beads away from toddlers.
Why This Craft Is Great for Kids
- Strengthens fine motor and threading skills.
- Encourages color recognition and design creativity.
- Introduces simple crafting techniques.
- Helps develop patience and concentration.
- Produces a beautiful handmade decoration kids can proudly showcase.
DIY Beaded Hanging Lanterns Craft for Kids – Step-by-Step Tutorial

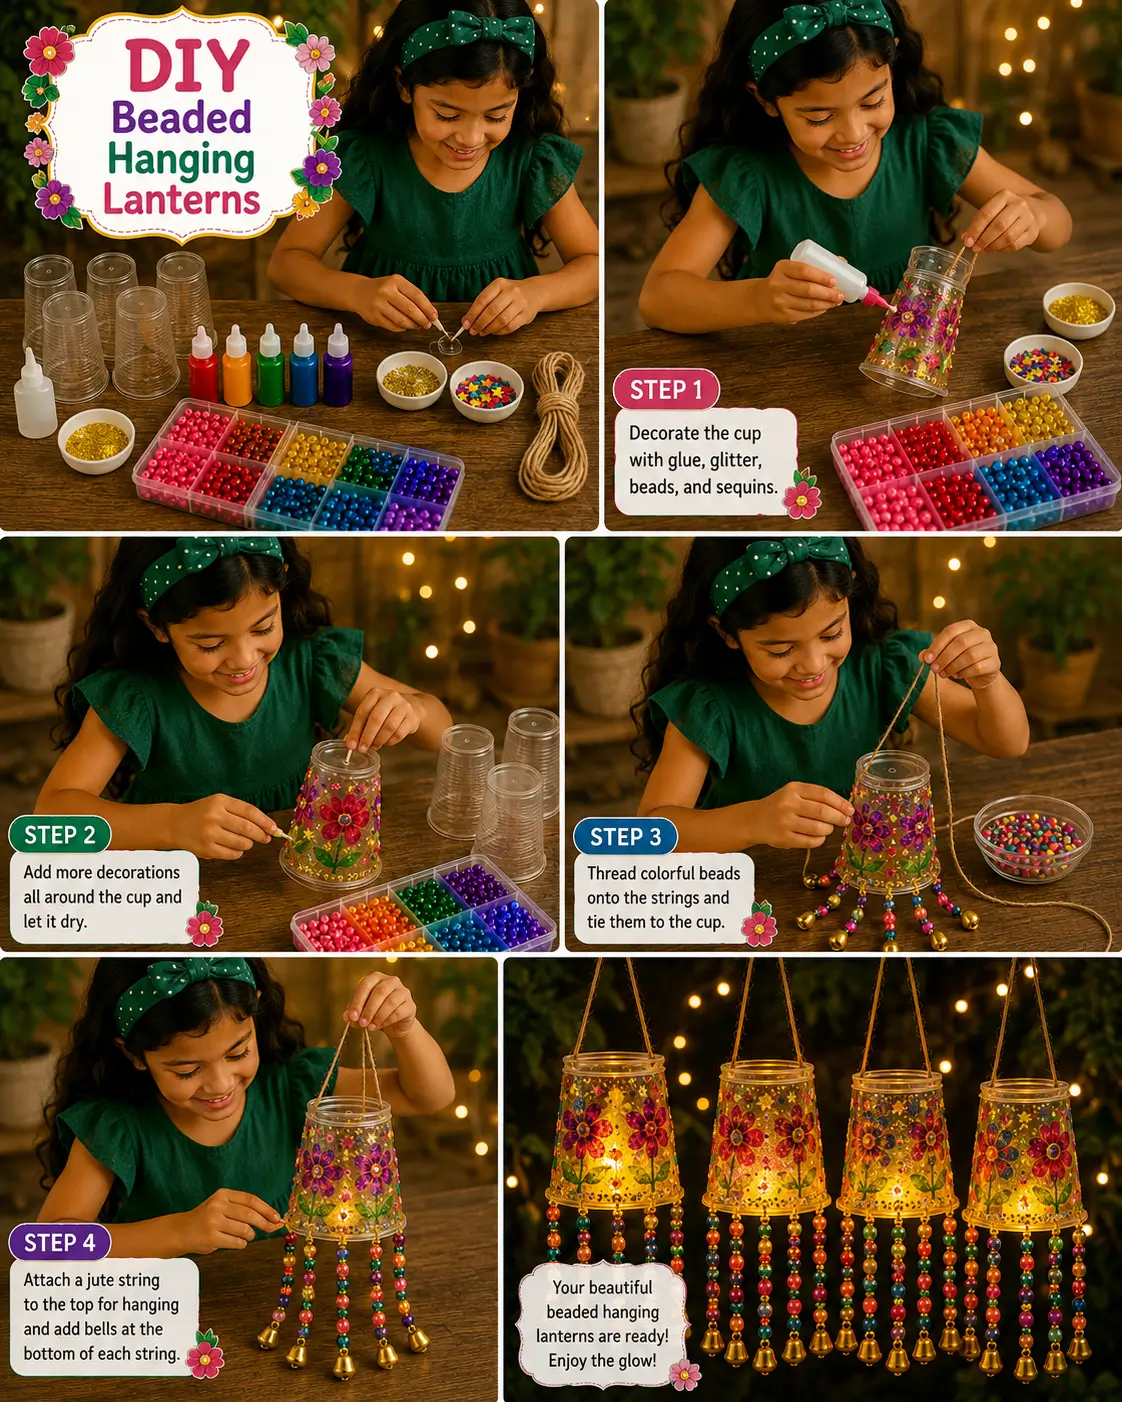
This creative lantern craft encourages children to follow step-by-step instructions, strengthen fine motor skills, and build confidence through hands-on learning and artistic expression.
Materials Required
- Clear plastic cups
- Colorful beads
- Sequins and glitter
- Craft glue
- Decorative paint or markers (optional)
- Jute twine or strong string
- Small bells (optional)
- Hole punch (adult assistance recommended)
- Battery-operated LED lights
Steps for Making
Step 1: Decorate the Cup
Apply glue to the outside of a clear plastic cup. Add glitter, sequins, beads, and decorative designs.
Step 2: Add More Decorations
Continue decorating until the cup is fully covered with colorful patterns. Allow it to dry completely.
Step 3: Create Beaded Strands
Thread colorful beads onto pieces of string and tie knots to keep them secure. Attach bells to the ends if desired.
Step 4: Attach the Strands
Secure the beaded strands around the rim of the cup.
Step 5: Add Hanging String
Attach a longer piece of twine or string to create a hanging loop at the top.
Step 6: Insert the Light
Place a battery-operated LED light inside the lantern.
Step 7: Hang and Enjoy
Hang the lantern in a safe indoor location and enjoy its colorful glow.
Safety Tips
- Use child-safe craft glue whenever possible.
- Adult supervision is recommended when using scissors or hole punches.
- Avoid using real candles inside plastic cups.
- Keep small beads away from very young children to prevent choking hazards.
- Ensure all strings are securely attached before hanging.
Why This Craft Is Great for Kids
- Promotes creativity and imaginative design.
- Strengthens fine motor skills through beading activities.
- Helps children learn color matching and pattern making.
- Encourages focus and attention to detail.
- Creates attractive decorations for parties and bedrooms.
- Provides a rewarding hands-on crafting experience.
DIY Mason Jar Floral Lantern Craft for Kids – Easy Decorative Lantern Project

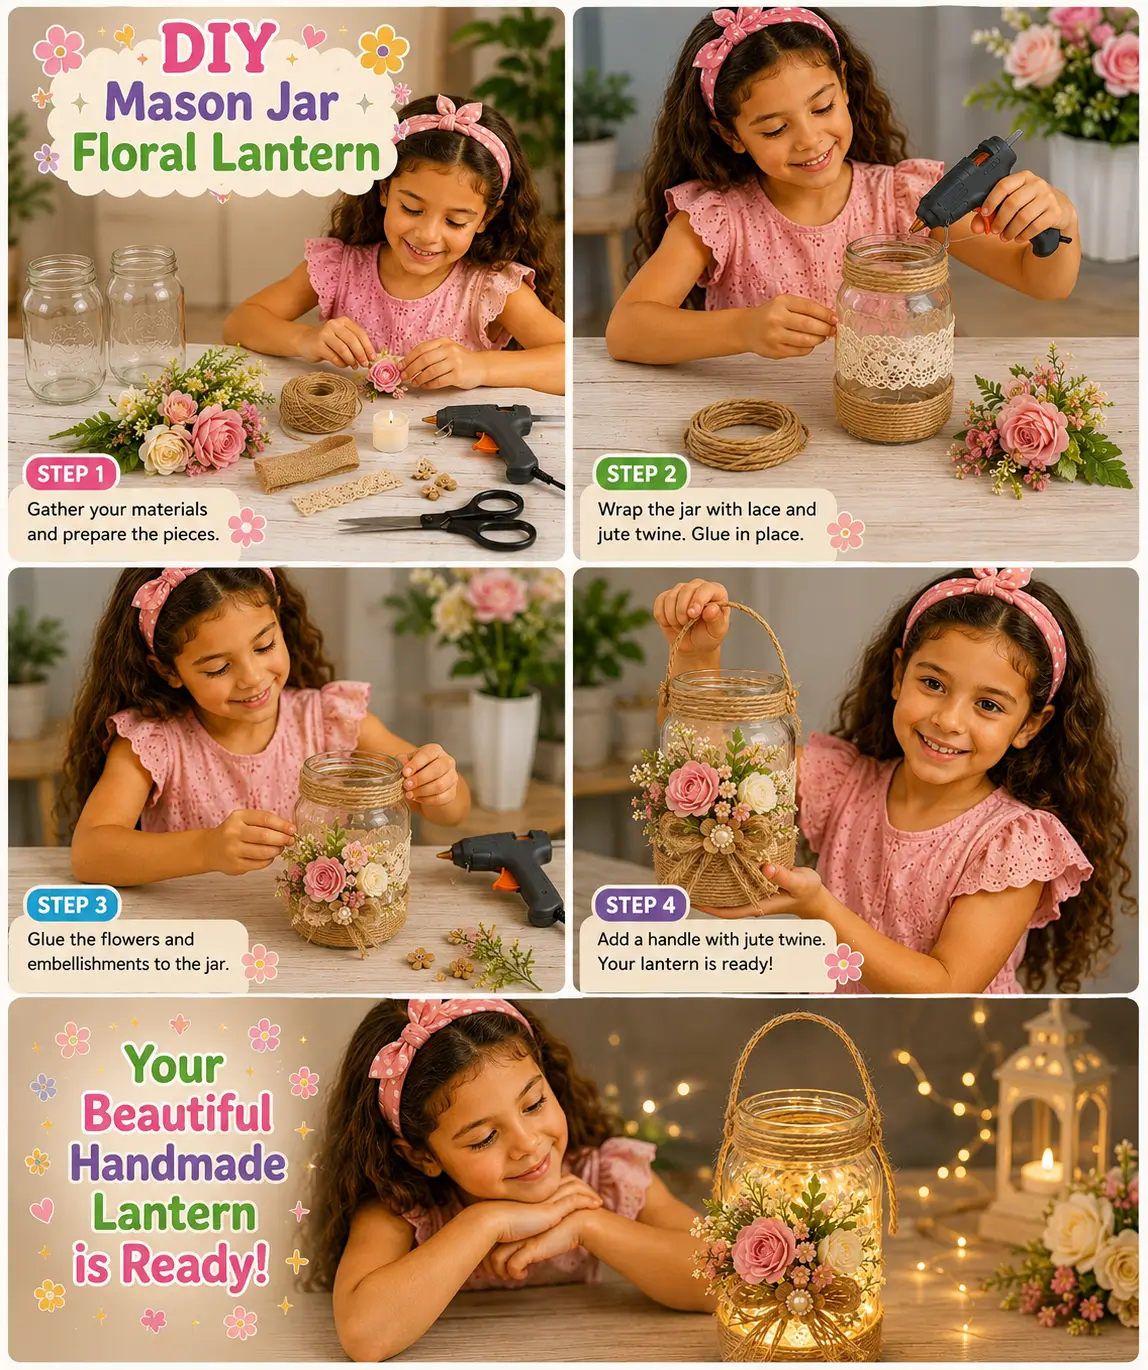
This craft activity helps children improve listening and sequencing skills while supporting creativity, problem-solving, and vocabulary development through guided learning.
Materials Required
- 1 clean mason jar
- Artificial flowers and greenery
- Lace ribbon or trim
- Jute twine
- Hot glue gun (adult supervision required)
- Scissors
- Decorative embellishments (optional)
- Battery-operated LED tea light
Steps of Making
Step 1: Gather Materials
Collect all supplies, including the mason jar, flowers, lace ribbon, twine, scissors, glue gun, and LED candle.
Step 2: Decorate the Jar
Wrap lace ribbon around the center of the mason jar and secure it with glue. Add jute twine around the top and bottom sections for a rustic look.
Step 3: Add Floral Decorations
Arrange artificial flowers and greenery on the front of the jar. Glue them in place and add any decorative embellishments you like.
Step 4: Create the Handle
Twist jute twine into a sturdy handle and attach both ends securely near the top rim of the jar.
Step 5: Add the Light
Place a battery-operated LED tea light inside the jar.
Step 6: Display Your Lantern
Turn on the LED light and enjoy the warm glow of your handmade floral lantern.
Safety Tips
- Always have an adult handle or supervise the use of a hot glue gun.
- Use battery-operated LED candles instead of real candles.
- Keep scissors pointed away from yourself and others.
- Allow glue to cool before touching decorated areas.
- Work on a protected crafting surface.
Why This Craft Is Great for Kids
- Encourages creativity and self-expression.
- Develops fine motor and hand-eye coordination skills.
- Teaches basic crafting and decorating techniques.
- Creates a beautiful handmade decoration.
- Helps build patience and concentration.
- Makes a thoughtful handmade gift
FAQs
Q1. What age group are these DIY lantern crafts suitable for?
Answer: These lantern crafts are ideal for kids aged 4 years and above with adult supervision. Older children can complete most steps independently.
Q2. Can I use real candles inside the lanterns?
Answer: No. Always use battery-operated LED tealights or fairy lights to ensure safety and prevent fire hazards.
Q3. What type of glue works best for tissue paper lanterns?
Answer: White craft glue, school glue, or Mod Podge works well for attaching tissue paper and sealing decorations.
Q4. Can I use recycled jars and containers for these crafts?
Answer: Yes. Clean mason jars, plastic cups, cardboard tubes, and other recycled containers are great for creating eco-friendly lantern crafts.
Q5. How long does it take to make a DIY lantern?
Answer: Most lantern projects take between 30 and 60 minutes, depending on the design and drying time.
Q6. What skills do children learn from lantern-making activities?
Answer: These crafts help improve fine motor skills, hand-eye coordination, creativity, concentration, and problem-solving abilities.
Q7. Can these lanterns be used for parties and special occasions?
Answer: Absolutely. DIY lanterns make beautiful decorations for birthdays, festivals, garden parties, family gatherings, and holiday celebrations.
These DIY lantern crafts for kids combine creativity, learning, and hands-on fun in one exciting activity. From floral mason jar lanterns to butterfly and beaded lantern designs, each project encourages artistic expression and skill development. Create these easy kids’ crafts to make unique decorations, gifts, and glowing memories together. Stay updated with the latest news and announcements in our Telegram group.