DIY and Crafts
Creative DIY Crafts for Kids Using Recycled Materials

DIY crafts for kids are a fun way to encourage creativity, recycling, and hands-on learning. These easy craft ideas include glowing bee lights, bottle spiders, wind chimes, galaxy seashells, flower suncatchers, and starry lanterns. Children can develop fine motor skills, imagination, and problem-solving abilities while creating beautiful handmade decorations.
DIY Glowing Bee Light Craft for Kids

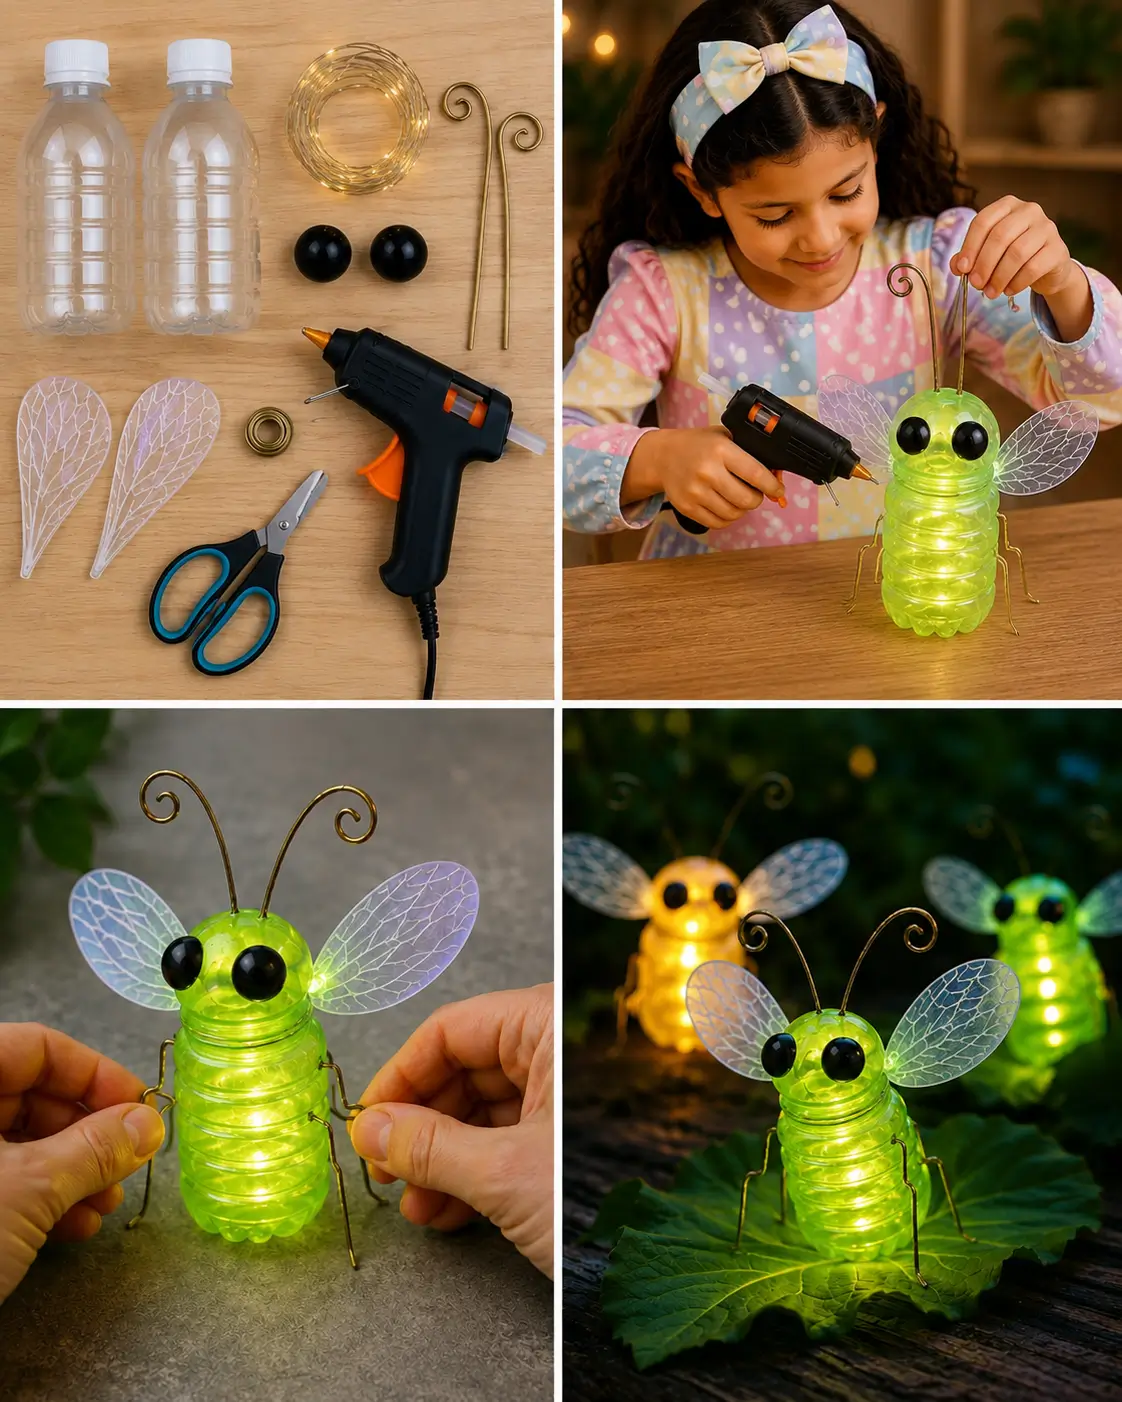
Turn a recycled plastic bottle into an adorable glowing bee lantern with fairy lights and simple craft materials.
Materials Required
- Small plastic bottle with cap
- Battery-operated fairy lights
- Yellow or green translucent paint (optional)
- Large black craft beads or foam balls for eyes
- Transparent decorative craft wings
- Gold or brown craft wire
- Hot glue gun and glue sticks
- Scissors
- Wire cutters (adult use)
- Marker pen
Steps of Making
Step 1: Prepare the Bottle
Clean and dry the plastic bottle thoroughly. If desired, paint the bottle with translucent yellow or green paint and allow it to dry completely.
Step 2: Insert the Fairy Lights
Carefully place the battery-operated fairy lights inside the bottle. Leave the battery pack accessible through the opening or attached to the back.
Step 3: Create the Bee Eyes
Attach two large black beads or foam balls near the top front of the bottle using hot glue to form the bee’s eyes.
Step 4: Add the Wings
Glue transparent decorative wings to both sides of the bottle. Position them evenly so the bee looks balanced.
Step 5: Make the Antennae
Bend two pieces of craft wire into curly antenna shapes. Insert or glue them onto the bottle cap area.
Step 6: Create the Legs
Cut and bend additional craft wire into six bee legs. Attach three legs to each side of the bottle using hot glue.
Step 7: Secure Everything
Check all glued pieces and reinforce any loose parts. Allow the glue to cool completely.
Step 8: Turn On the Lights
Switch on the fairy lights and watch your glowing bee come to life with a magical glow.
Safety Tips
- Adult supervision is recommended when using hot glue guns.
- Use battery-operated LED lights only.
- Be careful when handling scissors and craft wire.
- Ensure small parts like beads are kept away from very young children.
- Check that the fairy lights remain cool during use.
Why This Craft Is Great for Kids
- Encourages creativity and imagination.
- Promotes recycling and environmental awareness.
- Develops fine motor skills and hand-eye coordination.
- Introduces simple engineering and design concepts.
- Creates a fun decorative night light for bedrooms or classrooms.
- Provides a rewarding hands-on crafting experience that children can proudly display.
DIY Recycled Bottle Spider Craft for Kids

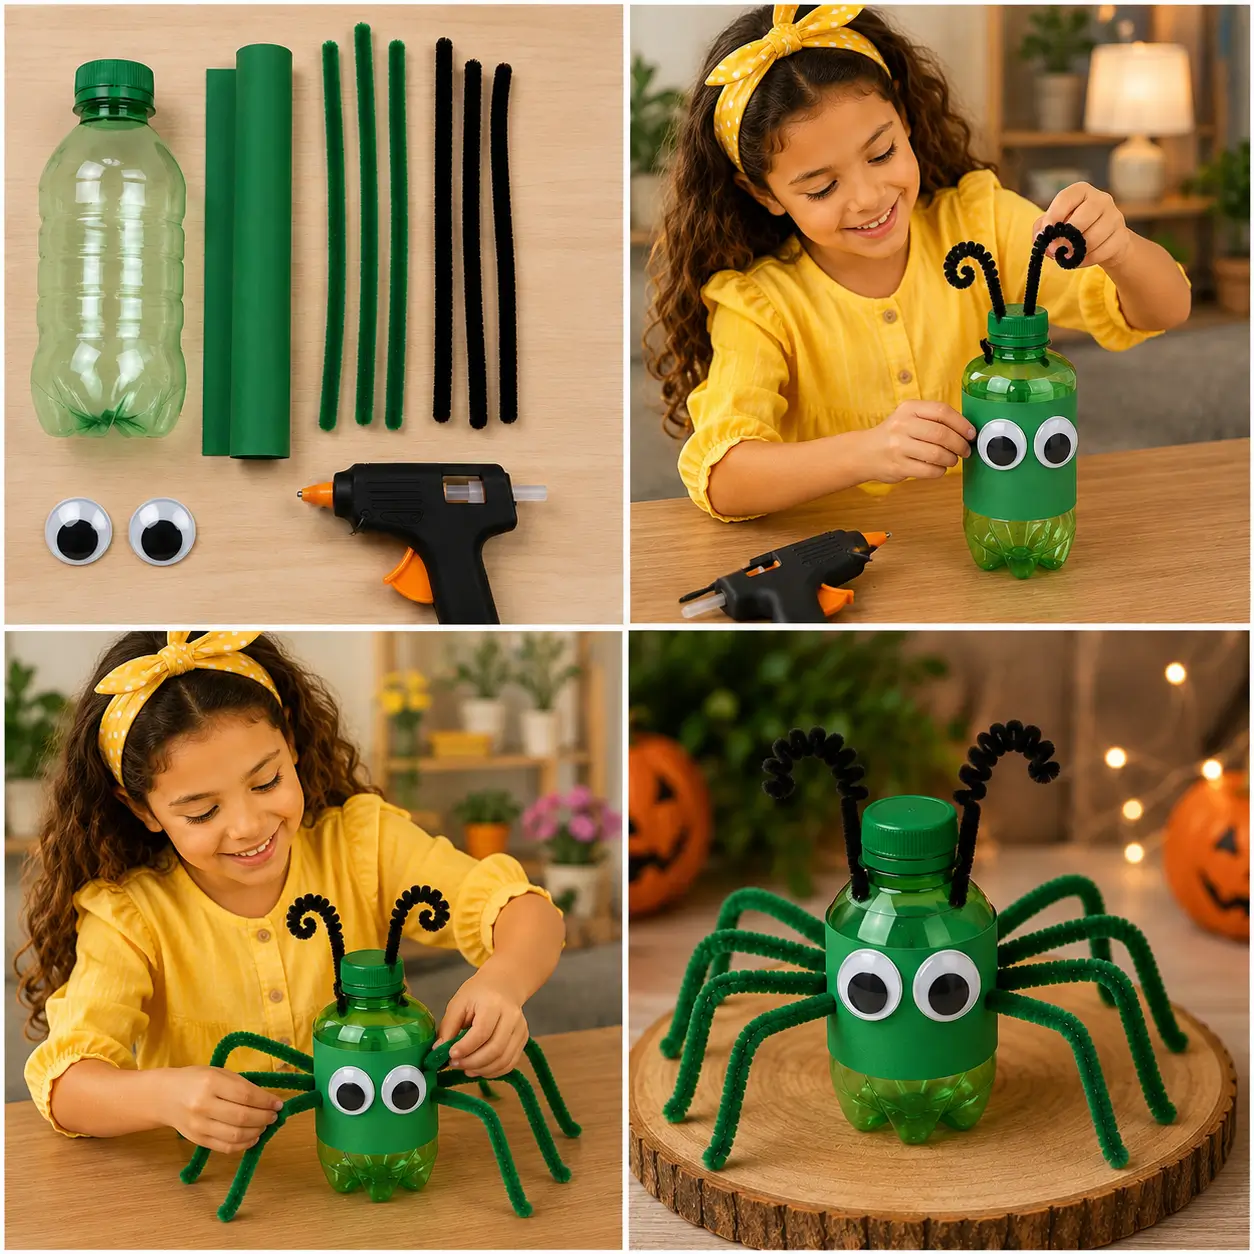
Create a fun and friendly spider using a recycled plastic bottle, pipe cleaners, and googly eyes for a simple kids’ craft activity.
Materials Required
- Small plastic bottle with cap
- Green craft paper or foam sheet
- 8 green pipe cleaners
- 2 black pipe cleaners
- 2 large googly eyes
- Hot glue gun and glue sticks
- Scissors
- Marker pencil
- Tape (optional)
Steps of Making
Step 1: Clean the Bottle
Wash and dry the plastic bottle thoroughly. Remove any labels for a neat appearance.
Step 2: Wrap the Spider Body
Cut a strip of green craft paper wide enough to wrap around the middle of the bottle. Glue it securely in place.
Step 3: Add the Eyes
Attach the googly eyes to the front of the bottle using glue. Position them close together for a cute spider face.
Step 4: Make the Antennae
Curl the ends of two black pipe cleaners. Attach them near the bottle cap to create fun decorative antennae.
Step 5: Create the Spider Legs
Bend eight green pipe cleaners into leg shapes. Make gentle curves so the spider can stand steadily.
Step 6: Attach the Legs
Glue four legs on each side of the bottle. Space them evenly for a balanced look.
Step 7: Shape and Adjust
Adjust the legs and antennae until the spider stands properly and looks symmetrical.
Step 8: Display Your Spider
Place your finished spider on a table, shelf, or classroom display for everyone to enjoy.
Safety Tips
- Adult supervision is recommended when using hot glue guns.
- Handle scissors carefully while cutting paper.
- Keep small items like googly eyes away from toddlers.
- Allow glue to cool completely before handling the craft.
- Work on a protected surface to avoid glue spills.
Why This Craft Is Great for Kids
- Encourages recycling and environmental awareness.
- Develops fine motor skills through cutting and assembling.
- Enhances creativity and imaginative play.
- Improves hand-eye coordination and concentration.
- Uses inexpensive and easily available materials.
- Creates a fun decoration that kids will be proud to display.
DIY Recycled Tin Can Wind Chime Craft for Kids
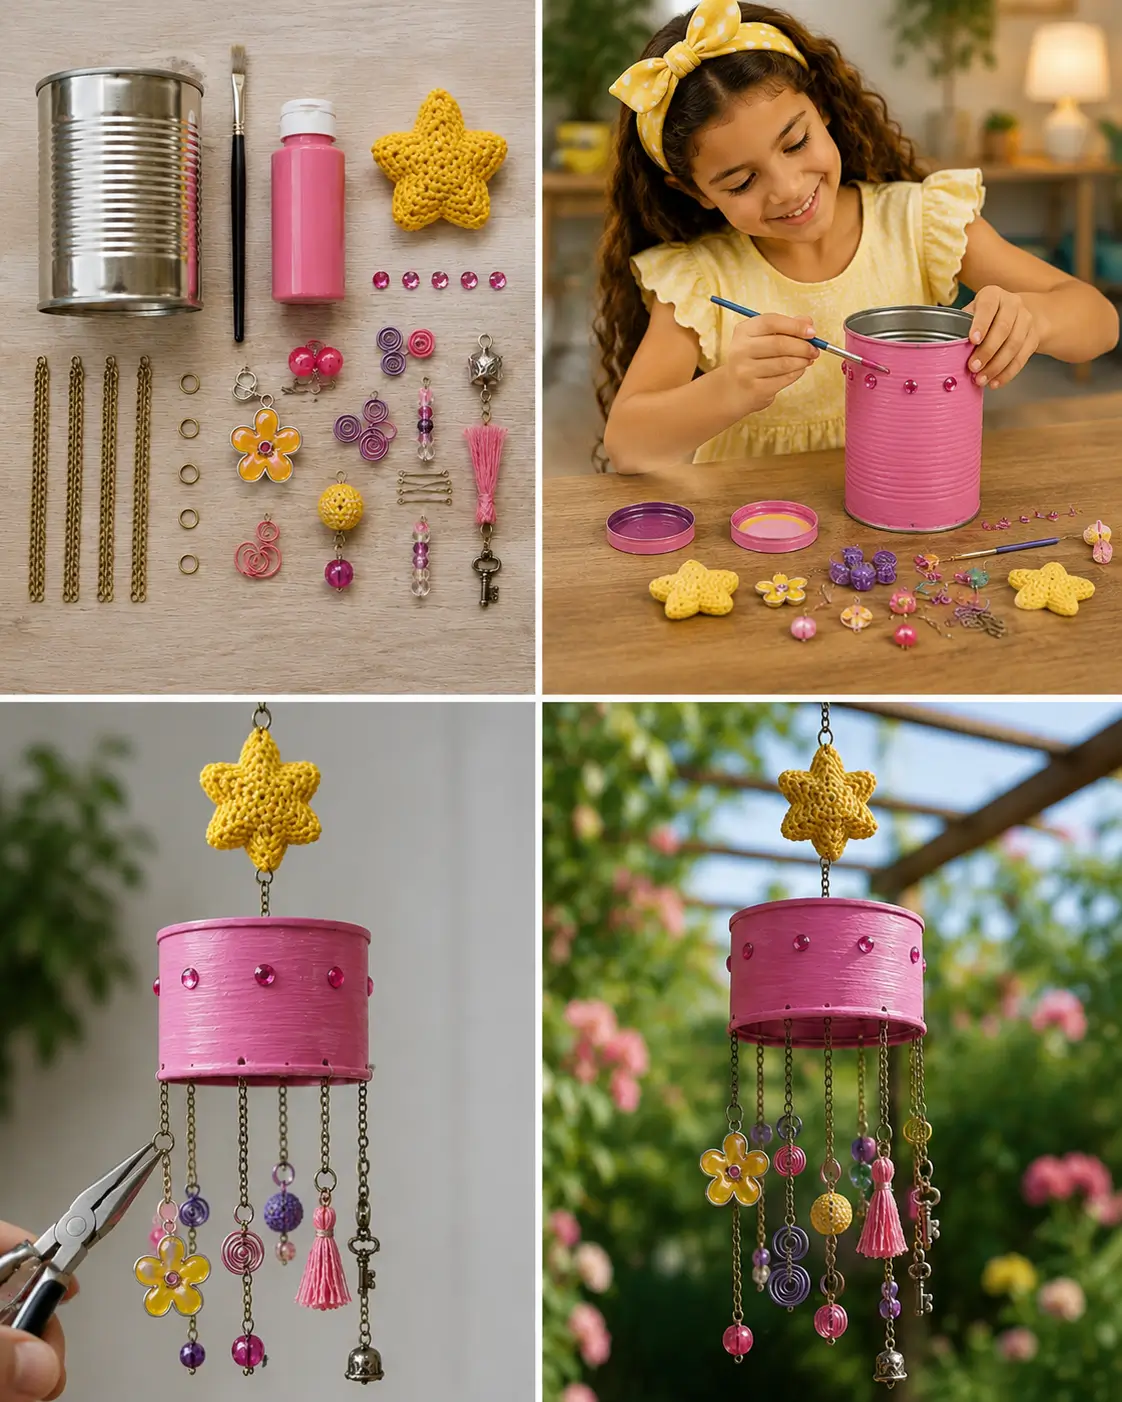
Transform a recycled tin can into a colorful hanging wind chime using beads, charms, and decorative chains.
Materials Required
- Empty tin can (clean and dry)
- Acrylic paint (pink or favorite color)
- Paintbrush
- Decorative beads
- Charms and pendants
- Small tassels
- Metal chains or jewelry chains
- Jump rings
- Decorative gems or rhinestones
- Strong string or wire
- Hole punch or nail and hammer (adult use)
- Jewelry pliers
- Hot glue gun and glue sticks
- Hanging hook or loop
Steps of Making
Step 1: Prepare the Tin Can
Wash the tin can thoroughly, remove labels, and ensure there are no sharp edges.
Step 2: Paint the Can
Apply acrylic paint evenly over the outside of the can. Let it dry completely and add a second coat if needed.
Step 3: Decorate the Surface
Glue decorative gems, rhinestones, or small embellishments around the can for extra color and sparkle.
Step 4: Create Hanging Holes
With adult assistance, make several evenly spaced holes around the bottom edge of the can and one hole in the center of the top for hanging.
Step 5: Prepare the Decorations
Attach beads, charms, tassels, and pendants to chains using jump rings and pliers.
Step 6: Attach the Chains
Secure the decorated chains to the holes around the can. Vary the lengths for a more decorative look.
Step 7: Add the Top Hanger
Thread strong wire or string through the top hole and create a loop for hanging.
Step 8: Display Your Wind Chime
Hang the finished wind chime in a garden, balcony, porch, or near a window where it can move gently in the breeze.
Safety Tips
- Adult supervision is required when making holes in the can.
- Check the can carefully for sharp edges before crafting.
- Use child-safe paints and craft materials.
- Handle pliers and hot glue guns with care.
- Keep small beads and charms away from very young children.
Why This Craft Is Great for Kids
- Teaches the value of recycling and reusing materials.
- Encourages creativity and personal expression.
- Develops fine motor skills and hand-eye coordination.
- Introduces basic jewelry-making and crafting techniques.
- Creates a beautiful handmade decoration for home or garden.
- Builds confidence through completing a functional art project.
DIY Galaxy Glitter Seashell Craft for Kids

Kids can transform ordinary seashells into magical galaxy-inspired decorations with glitter, paint, and creativity.
Materials Required
- Large seashells (clean and dry)
- White acrylic paint or primer
- Blue acrylic paint
- Purple acrylic paint
- Dark blue or black acrylic paint
- Fine glitter (silver, blue, and purple)
- Paintbrushes
- Small mixing bowl or palette
- Craft glue or Mod Podge
- Clear sealant spray (optional, adult use only)
- Paper towels or newspaper for workspace protection
Steps of Making
Step 1: Prepare the Seashells
Wash the seashells thoroughly and allow them to dry completely. Cover your work area with newspaper or a craft mat.
Step 2: Apply a Base Coat
Paint the seashells with a thin layer of white paint. Let them dry completely before moving to the next step.
Step 3: Create Galaxy Colors
Mix blue, purple, and dark blue paints. Dab the colors onto the shells using a sponge or brush, blending them together to create a galaxy effect.
Step 4: Add Sparkling Details
While the paint is slightly wet, sprinkle fine glitter over the surface. Add extra glitter glue in some areas for a starry look.
Step 5: Paint Tiny Stars
Use a small brush to add tiny white dots and speckles across the shell to resemble stars in space.
Step 6: Let Everything Dry
Place the shells on a flat surface and allow them to dry completely.
Step 7: Seal the Design
For a glossy finish, an adult can apply a clear craft sealant to protect the artwork.
Step 8: Display Your Creations
Arrange the finished galaxy seashells in a decorative tray, jar, or beach-themed display.
Safety Tips
- Use non-toxic, child-safe paints and glues.
- Protect clothing with an apron or old shirt.
- Keep glitter away from eyes and mouth.
- Adult supervision is recommended when using sealants or spray products.
- Wash hands thoroughly after crafting.
- Keep small craft supplies away from very young children.
Why This Craft Is Great for Kids
- Encourages creativity and artistic expression.
- Helps develop fine motor skills through painting and decorating.
- Introduces children to color blending techniques.
- Provides a fun way to explore space and galaxy themes.
- Builds patience and concentration while creating detailed designs.
- Creates beautiful handmade decorations that children can proudly display.
DIY Flower Resin Suncatcher Craft for Kids

Create beautiful flower-shaped suncatchers that sparkle in the sunlight using glitter, resin, and crystal charms.
Materials Required
- Flower-shaped silicone molds
- Clear craft resin or UV resin (adult supervision required)
- Pink, purple, and blue resin pigments
- Fine glitter and holographic glitter
- Mixing cups and stirring sticks
- Measuring cup
- Toothpicks or craft sticks
- Crystal beads and hanging pendants
- Small jump rings
- Nylon cord or string
- Tweezers
- Disposable gloves
- Protective table covering
Steps of Making
Step 1: Prepare the Workspace
Cover your table with a protective sheet and gather all materials before starting.
Step 2: Mix the Resin
With adult assistance, mix the resin according to the package instructions. Divide it into small cups.
Step 3: Add Color
Add pink, purple, and blue pigments to different cups of resin. Stir gently until evenly colored.
Step 4: Add Glitter
Mix fine glitter into each color to create a sparkling effect.
Step 5: Fill the Flower Molds
Carefully pour the colored resin into the flower-shaped silicone molds. Swirl colors together for a dreamy blended look.
Step 6: Remove Air Bubbles
Use a toothpick to gently pop any visible bubbles on the surface.
Step 7: Cure the Resin
Allow the resin to cure completely according to the product instructions.
Step 8: Remove from Molds
Once hardened, carefully remove the flower shapes from the molds.
Step 9: Attach Crystal Charms
Use jump rings to connect crystal beads and pendants to the bottom of each flower.
Step 10: Add Hanging Cord
Thread a cord through the top hole and tie securely for hanging.
Step 11: Display Your Suncatchers
Hang the finished flower suncatchers in a sunny window, garden, or patio area.
Safety Tips
- Adult supervision is required when working with resin.
- Always wear disposable gloves when handling uncured resin.
- Work in a well-ventilated area.
- Avoid direct skin or eye contact with resin.
- Keep small beads and charms away from young children.
- Follow all manufacturer safety instructions carefully.
- Wash hands thoroughly after crafting.
Why This Craft Is Great for Kids
- Encourages creativity and artistic design skills.
- Teaches color mixing and decorative techniques.
- Develops fine motor skills through detailed assembly.
- Improves patience while waiting for resin to cure.
- Creates beautiful handmade decorations.
- Helps children gain confidence by completing a stunning craft project.
- Makes wonderful gifts for family and friends.
DIY Starry Mason Jar Lantern Craft for Kids

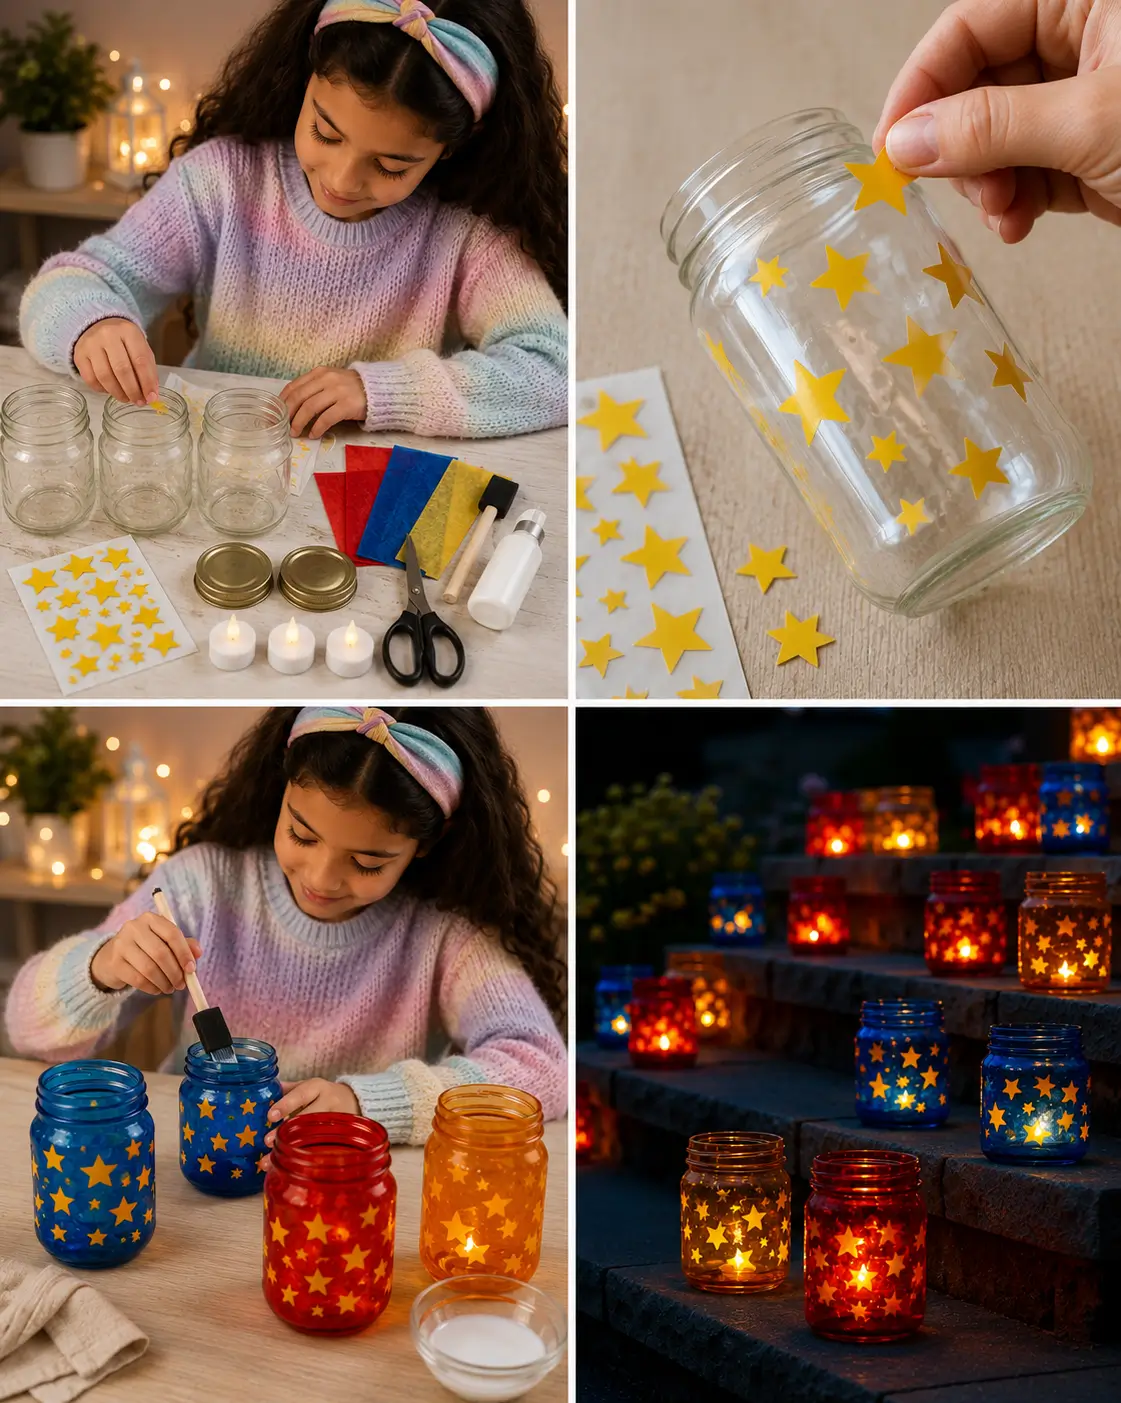
Turn ordinary mason jars into magical starry lanterns that glow beautifully with colorful tissue paper and LED lights.
Materials Required
- Clean glass mason jars with lids
- Colorful tissue paper (blue, red, yellow, orange, purple)
- Star stickers or star-shaped cutouts
- White craft glue
- Small bowl of water
- Foam brush or paintbrush
- Scissors
- Battery-operated LED tealights or fairy lights
- Pencil (optional)
- Protective table covering
Steps of Making
Step 1: Prepare the Jars
Wash and dry the mason jars thoroughly to remove dust and fingerprints.
Step 2: Add Star Stickers
Place star stickers randomly around the outside of each jar. These will create glowing star shapes later.
Step 3: Prepare the Glue Mixture
Mix equal parts white glue and water in a small bowl.
Step 4: Cut Tissue Paper
Cut colorful tissue paper into small squares or rectangles.
Step 5: Cover the Jars
Brush the glue mixture onto the jar and carefully apply tissue paper pieces over the surface.
Step 6: Seal the Tissue Paper
Apply another thin layer of glue mixture over the tissue paper to secure it.
Step 7: Allow to Dry
Leave the jars to dry completely for several hours.
Step 8: Remove Star Stickers
Carefully peel off the star stickers to reveal clear star-shaped windows.
Step 9: Add the Light
Place a battery-operated LED tealight or fairy lights inside each jar.
Step 10: Display Your Lanterns
Arrange the finished lanterns on a table, shelf, patio, or window for a magical glowing effect.
Safety Tips
- Use battery-operated LED lights instead of real candles.
- Adult supervision is recommended when using scissors.
- Handle glass jars carefully to avoid breakage.
- Keep small stickers and craft supplies away from young children.
- Allow glue to dry fully before adding lights.
- Work on a protected surface to avoid spills.
Why This Craft Is Great for Kids
- Encourages creativity and imagination.
- Develops fine motor skills through cutting and decorating.
- Introduces simple crafting and design techniques.
- Teaches patience while waiting for projects to dry.
- Creates beautiful handmade decorations.
- Provides a fun screen-free activity.
FAQs
Q1. What age group is suitable for these DIY craft projects?
Answer: These DIY crafts are generally suitable for children aged 5–12 years. Younger kids may need adult assistance with cutting, gluing, and handling small craft materials.
Q2. Are these recycled crafts safe for kids?
Answer: Yes, these crafts are safe when made with child-friendly materials and proper supervision. Adults should assist when using hot glue guns, scissors, wire, resin, or other sharp tools.
Q3. What skills do children learn from these craft activities?
Answer: Kids develop creativity, fine motor skills, hand-eye coordination, concentration, problem-solving abilities, and confidence while creating fun handmade projects.
Q4. Can I use recycled materials for these crafts?
Answer: Absolutely! Many of these projects use recycled bottles, tin cans, jars, and other household items, helping children learn about recycling and environmental responsibility.
Q5. Are LED lights safer than candles for lantern crafts?
Answer: Yes, battery-operated LED lights are much safer than real candles. They stay cool, reduce fire risks, and are ideal for children’s craft projects.
Q6. Can these crafts be used as classroom activities?
Answer: Yes, these DIY craft ideas are perfect for classrooms, homeschool lessons, summer camps, art projects, and creative learning activities.
Q7. How long do these craft projects take to complete?
Answer: Most projects can be completed in 30–90 minutes, depending on the materials used and drying or curing times required.
These DIY crafts for kids are a wonderful way to combine creativity, learning, and recycling. From glowing bee lights and bottle spiders to colorful wind chimes, galaxy seashells, flower suncatchers, and mason jar lanterns, each project helps children develop fine motor skills, imagination, and confidence while enjoying fun, hands-on, screen-free craft activities. Be the first to know—join our Telegram group for fresh updates and insights.