DIY and Crafts
Creative DIY Wind Chime Craft Ideas for Kids Using Recycled Materials

Wind chime crafts are a wonderful way to combine creativity, recycling, and hands-on learning for kids. These colorful DIY wind chime projects use simple materials like beads, tin cans, branches, tassels, and decorative ornaments to create beautiful handmade decorations. While crafting, children can strengthen fine motor skills, improve concentration, and explore artistic expression in a fun and engaging way.
DIY Beaded Tin Can Wind Chime Craft for Kids


Create a beautiful DIY Beaded Tin Can Wind Chime with recycled materials. This fun craft encourages creativity, fine motor skills, and eco-friendly learning for kids.
Materials Required
- Empty tin cans (clean and dry)
- Colorful acrylic beads
- Strong string, twine, or jute rope
- Metal spoons or forks (optional for sound)
- Paint and paintbrushes
- Decorative stickers or floral designs
- Hammer and nail (adult supervision required)
- Scissors
- Craft glue
- Wooden branch or sturdy stick
- Pliers (optional)
Steps of Making
Step 1: Gather and Prepare Materials
Collect clean tin cans, colorful beads, strings, utensils, and decorating supplies. Wash and dry the cans thoroughly before starting.
Step 2: Decorate the Tin Cans
Paint the cans with bright colors and floral patterns. Allow them to dry completely before moving to the next step.
Step 3: Add Beads and Hanging Pieces
Create beaded strings by threading colorful beads onto the string. Attach spoons, forks, or additional beads at the ends for decoration and sound.
Step 4: Attach Strings to the Cans
With adult assistance, make small holes in the bottom of each can. Tie the beaded strings securely through the holes.
Step 5: Hang the Cans on a Branch
Tie each decorated can to a sturdy branch or wooden stick using twine. Space them evenly for a balanced look.
Step 6: Display Your Wind Chime
Hang the finished wind chime outdoors on a porch, balcony, garden hook, or near a window where it can gently sway in the breeze.
Safety Tips
- Adult supervision is required when using hammers, nails, scissors, or pliers.
- Ensure all tin can edges are smooth and free from sharp metal pieces.
- Use non-toxic paints and craft materials suitable for children.
- Tie knots securely to prevent beads or decorations from falling off.
- Work on a stable surface while assembling the wind chime.
Why This Craft Is Great for Kids
- Encourages creativity and artistic expression.
- Teaches the importance of recycling and reusing materials.
- Improves fine motor skills through threading and tying.
- Develops patience, focus, and problem-solving abilities.
- Introduces basic concepts of sound and movement.
- Creates a colorful handmade decoration kids can proudly display.
- Provides a fun family or classroom crafting experience.
DIY Beaded Branch Wind Chime Craft for Kids
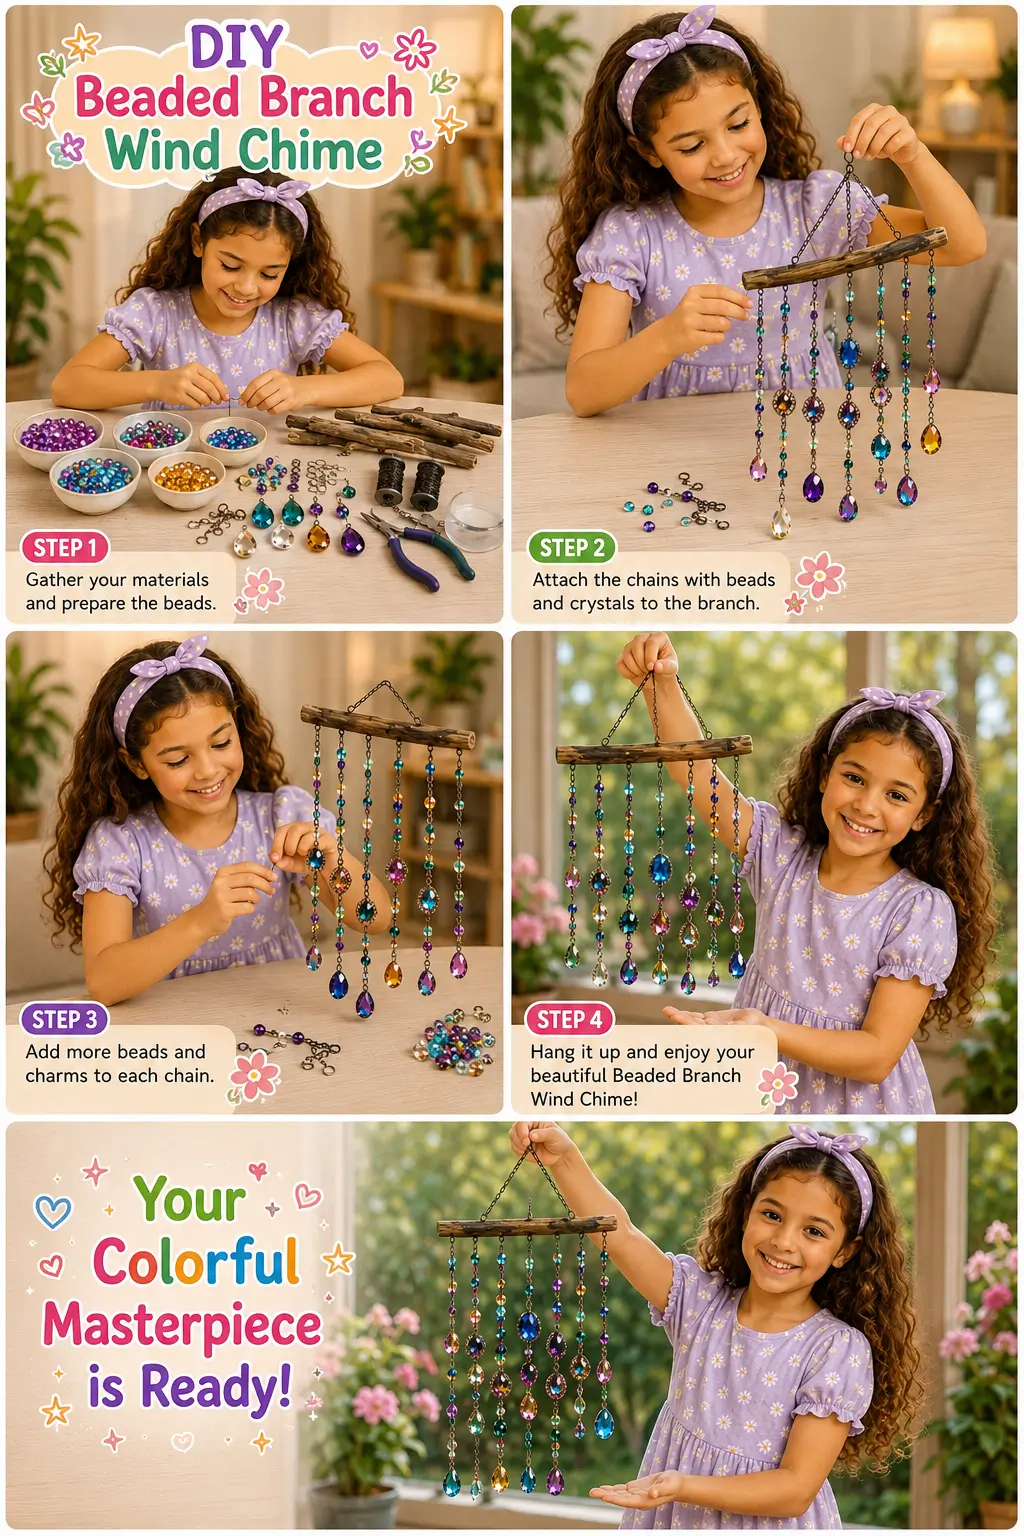
Create a dazzling DIY Beaded Branch Wind Chime with colorful beads and crystals. This engaging craft helps kids develop creativity, fine motor skills, and crafting confidence while making a beautiful decoration.
Materials Required
- Sturdy tree branch or driftwood
- Colorful beads
- Crystal pendants or acrylic gems
- Jewelry chain or strong string
- Jump rings
- Wire cutters or scissors
- Pliers
- Craft wire (optional)
- Hanging chain or twine
- Decorative charms (optional)
Steps of Making
Step 1: Gather Your Materials
Collect a sturdy branch, colorful beads, crystal pendants, chains, and all the necessary crafting tools.
Step 2: Create Beaded Strands
Thread beads and crystals onto chains or strings in different color patterns. Secure each strand with knots or jump rings.
Step 3: Attach Strands to the Branch
Evenly space the beaded strands along the branch and secure them firmly using jump rings, wire, or strong knots.
Step 4: Add Extra Decorations
Attach decorative charms, crystal drops, or additional beads to make the wind chime more colorful and unique.
Step 5: Add a Hanging Loop
Tie a sturdy chain or twine to both ends of the branch to create a hanger for the wind chime.
Step 6: Display Your Wind Chime
Hang the completed wind chime near a sunny window, porch, balcony, or garden area where it can sparkle and move with the breeze.
Safety Tips
- Adult supervision is recommended when using pliers, wire cutters, or metal chains.
- Check that beads and small parts are not accessible to very young children.
- Secure all knots and connections tightly before hanging.
- Use lightweight materials to prevent the wind chime from becoming too heavy.
- Handle crystal pendants carefully to avoid breakage.
Why This Craft Is Great for Kids
- Enhances creativity and self-expression.
- Strengthens fine motor skills through threading and assembling.
- Encourages pattern recognition and color exploration.
- Introduces basic design and crafting techniques.
- Builds patience, concentration, and problem-solving skills.
- Creates a beautiful handmade decoration for home or garden.
- Provides a relaxing and rewarding crafting experience.
DIY Colorful Tin Can Wind Chime Craft for Kids

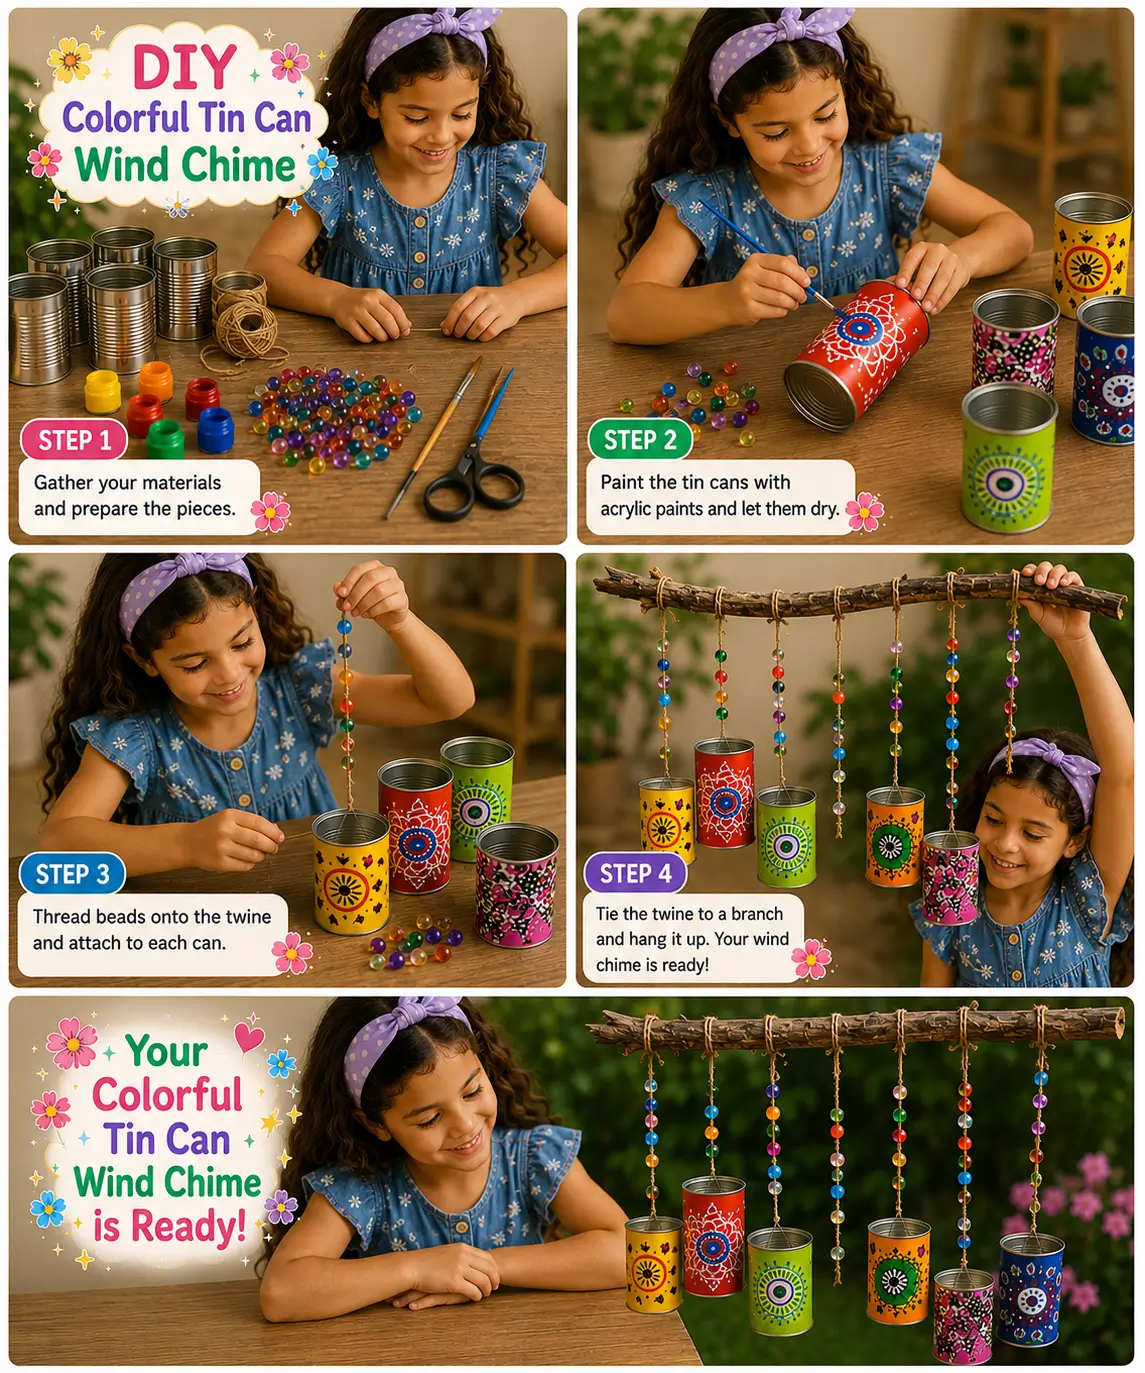
Turn recycled tin cans into a bright and colorful wind chime while helping kids develop creativity, fine motor skills, and eco-friendly crafting habits.
Materials Required
- Empty tin cans (clean and dry)
- Acrylic paints
- Paintbrushes
- Colorful beads
- Twine or strong string
- Wooden branch or stick
- Scissors
- Craft glue (optional)
- Nail and hammer (adult use only)
- Decorative stickers or markers (optional)
Steps of Making
Step 1: Gather Materials
Collect clean tin cans, paints, beads, twine, and a sturdy branch. Arrange everything on your workspace.
Step 2: Paint the Tin Cans
Decorate each tin can with colorful designs and patterns. Let the paint dry completely.
Step 3: Thread the Beads
String colorful beads onto pieces of twine. Create several beaded strands for each can.
Step 4: Attach Beads to the Cans
With adult assistance, make holes in the cans and tie the beaded strands securely to them.
Step 5: Hang the Cans
Tie each decorated can to a wooden branch, spacing them evenly for a balanced look.
Step 6: Display Your Wind Chime
Hang the finished wind chime outdoors or near a window where it can gently sway in the breeze.
Safety Tips
- Adult supervision is required when making holes in the cans.
- Smooth any sharp edges before crafting.
- Use child-safe, non-toxic paints and supplies.
- Keep small beads away from very young children.
- Ensure all knots are tied securely before hanging.
Why This Craft Is Great for Kids
- Encourages creativity and artistic expression.
- Promotes recycling and environmental awareness.
- Improves fine motor and hand-eye coordination skills.
- Teaches basic crafting and design techniques.
- Develops patience, focus, and problem-solving abilities.
- Creates a colorful handmade decoration children can proudly display.
DIY Glowing Bug Wind Chime Craft for Kids


This glowing bug wind chime craft helps kids develop creativity, fine motor skills, and problem-solving abilities while making a magical light-up decoration.
Materials Required
- Clear plastic ornament balls or transparent craft containers
- Battery-operated fairy lights
- Craft wire or pipe cleaners
- Transparent plastic sheets for wings
- Black pom-poms or googly eyes
- Twine or string
- Scissors
- Hot glue or craft glue
- Small branch or wooden dowel for hanging
- Pencil and marker (optional)
Steps of Making
Step 1: Gather Materials
Collect all the supplies and prepare the ornament ball, wings, eyes, fairy lights, and hanging strings.
Step 2: Create the Bug Body
Attach the wings, eyes, and pipe-cleaner legs to the clear ornament ball to form a bug shape.
Step 3: Add the Lights
Carefully place the battery-operated fairy lights inside the ornament body and close it securely.
Step 4: Attach the Hanging String
Tie a piece of twine to the top of the glowing bug so it can be suspended easily.
Step 5: Make More Bugs
Repeat the process to create several glowing bugs in different sizes or styles.
Step 6: Assemble the Wind Chime
Tie the glowing bugs to a branch or wooden dowel, spacing them evenly across the length.
Step 7: Display Your Creation
Hang the finished glowing bug wind chime in a bedroom, patio, garden, or covered outdoor area and enjoy its magical glow.
Safety Tips
- Adult supervision is recommended when using scissors or hot glue.
- Use battery-operated LED fairy lights only.
- Ensure battery packs remain dry and protected from moisture.
- Secure all pieces tightly to prevent parts from falling off.
- Keep small craft materials away from young children.
- Avoid using glass ornaments that may break.
Why This Craft Is Great for Kids
- Encourages creativity and imaginative play.
- Improves fine motor and assembly skills.
- Introduces simple STEM concepts related to light and design.
- Develops problem-solving and planning abilities.
- Promotes focus, patience, and attention to detail.
- Creates a beautiful handmade decoration kids can proudly display.
- Provides an engaging screen-free activity for home or classroom learning.
DIY Beaded Wind Chime Craft for Kids

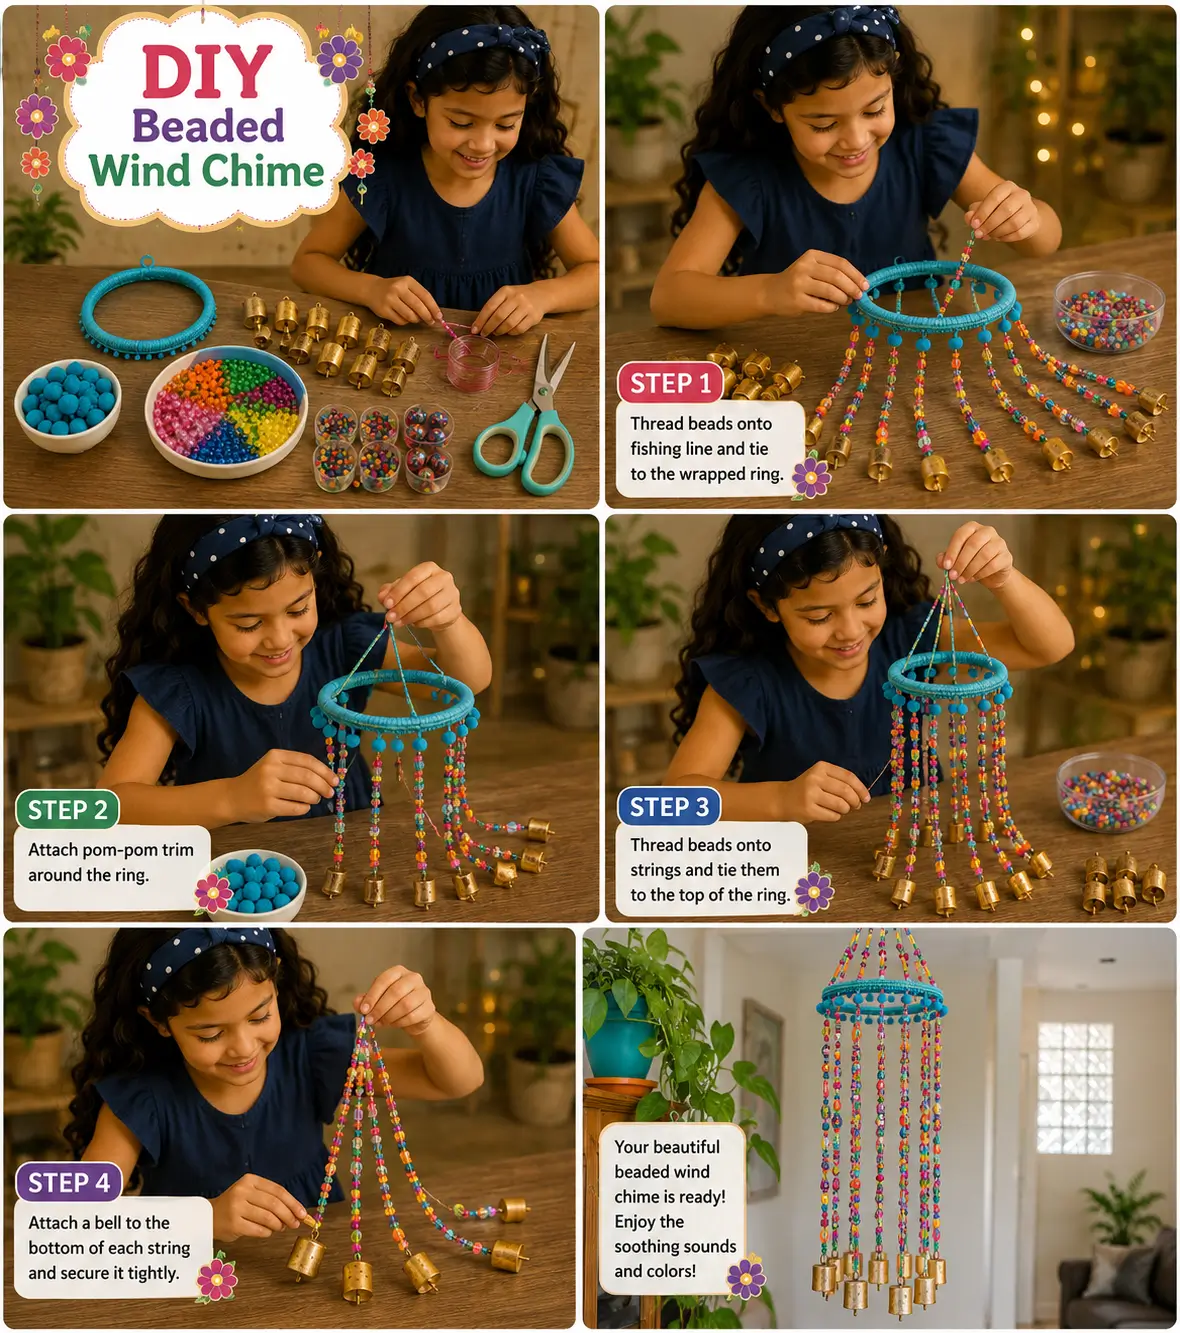
Making a beaded wind chime helps children strengthen fine motor skills, practice pattern-making, and express creativity while creating a beautiful handmade decoration.
Materials Required
- Assorted colorful beads
- Crystal or acrylic pendant drops
- Strong nylon thread or craft string
- Metal ring, wooden hoop, or key ring
- Scissors
- Small bells (optional)
- Decorative charms (optional)
Steps of Making
Step 1: Gather the Supplies
Collect all the beads, strings, pendants, and hoop needed for the project.
Step 2: Cut the Strings
Cut several pieces of string to different lengths depending on how long you want the wind chime strands to be.
Step 3: Thread the Beads
String colorful beads onto each piece of thread. Create fun color patterns and combinations.
Step 4: Add Decorative Pendants
Attach crystal drops, bells, or charms to the bottom of each beaded strand for extra decoration.
Step 5: Tie Strands to the Hoop
Securely tie each completed strand around the hoop or ring, spacing them evenly.
Step 6: Create a Hanging Loop
Attach three pieces of string to the top of the hoop and tie them together to make a hanging loop.
Step 7: Display Your Wind Chime
Hang the finished beaded wind chime near a window, porch, or in a room where it can catch light and movement.
Safety Tips
- Adult supervision is recommended when using scissors.
- Keep small beads away from children under three years old due to choking hazards.
- Tie knots tightly to prevent beads from falling off.
- Use child-safe crafting materials whenever possible.
- Ensure the wind chime is securely hung to prevent it from falling.
Why This Craft Is Great for Kids
- Strengthens fine motor and threading skills.
- Encourages creativity and artistic expression.
- Helps children learn color recognition and pattern creation.
- Improves focus, patience, and concentration.
- Develops hand-eye coordination.
- Creates a beautiful handmade decoration.
- Provides a fun screen-free learning activity.
DIY Beaded Tassel Wind Chime Craft for Kids
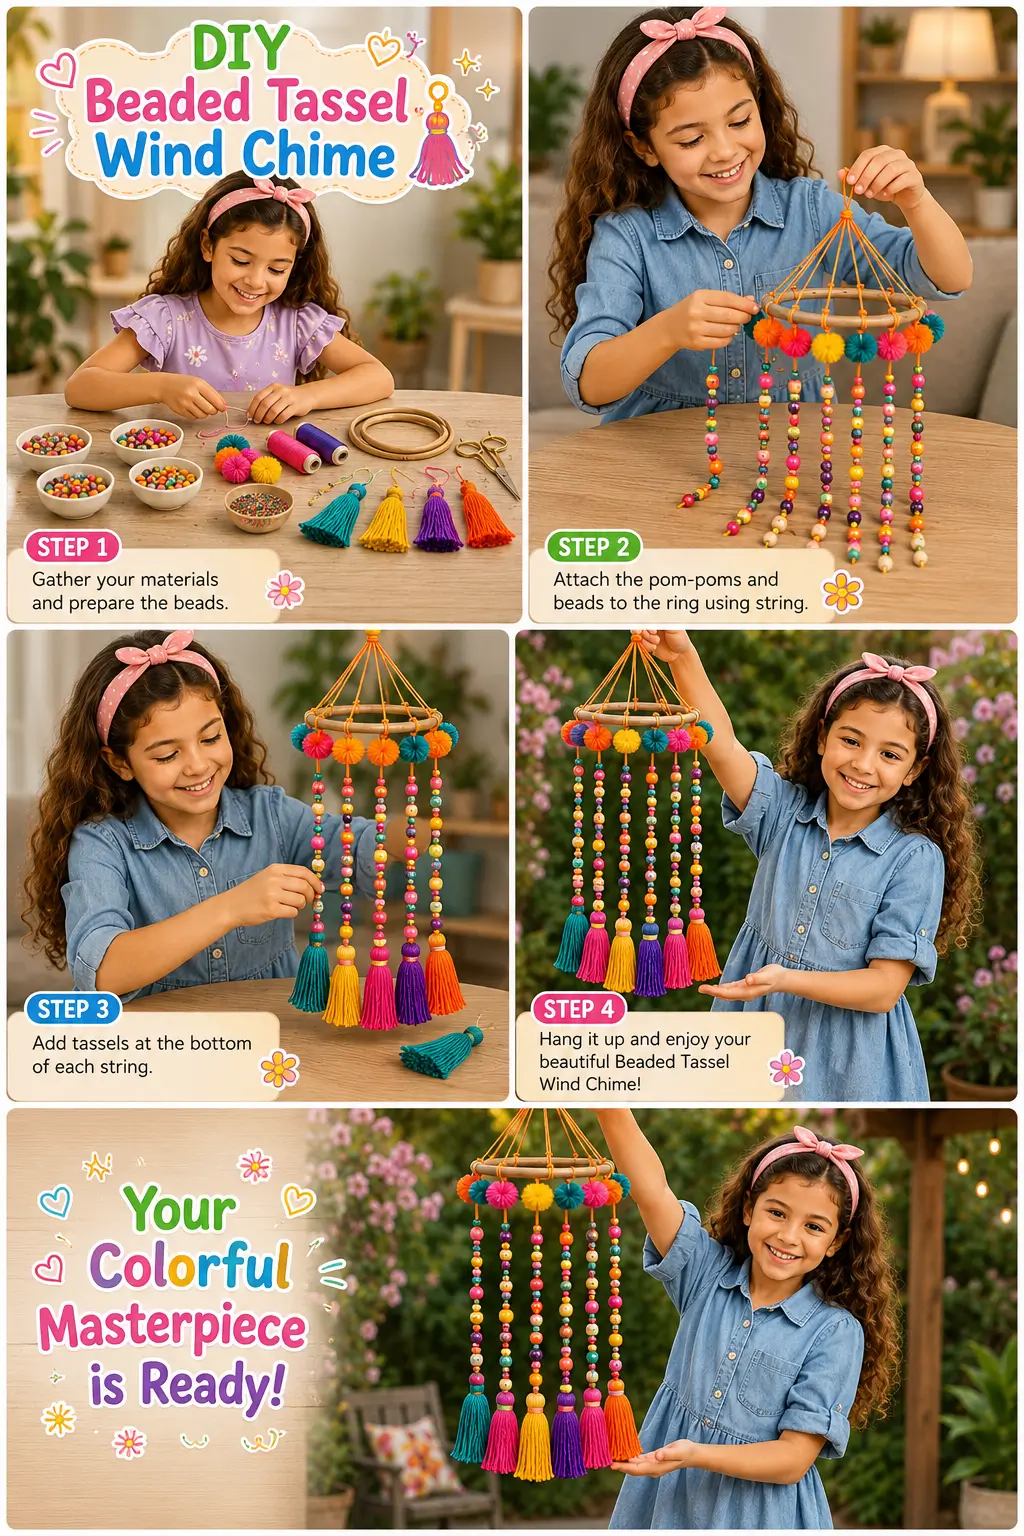
This DIY Beaded Tassel Wind Chime helps children develop fine motor skills, creativity, color recognition, and hand-eye coordination while making a beautiful decorative craft.
Materials Required
- Wooden embroidery hoop or craft ring
- Colorful beads (assorted sizes and colors)
- Colorful tassels
- Pom-poms
- Strong craft string or yarn
- Scissors
- Needle for beading (optional)
- Glue (optional for extra security)
Steps of Making
Step 1: Gather Your Materials
Collect all the supplies, including beads, tassels, pom-poms, string, and a wooden hoop. Cut several lengths of string for hanging the bead strands.
Step 2: Decorate the Hoop
Attach colorful pom-poms evenly around the wooden hoop using string or glue. This creates a bright decorative border for the wind chime.
Step 3: Add Beaded Strands
Thread colorful beads onto the prepared strings. Create different color patterns and lengths for a vibrant look. Tie the beaded strings securely around the hoop.
Step 4: Attach Tassels
Tie a colorful tassel to the bottom of each beaded strand. Make sure all knots are tight so the tassels stay in place.
Step 5: Create the Hanging Loop
Attach several strings to the top of the hoop and tie them together to form a hanging loop.
Step 6: Display Your Wind Chime
Hang the finished beaded tassel wind chime in a bedroom, playroom, classroom, or covered outdoor area and enjoy its colorful appearance.
Safety Tips
- Adult supervision is recommended when using scissors.
- Keep small beads away from toddlers and young children to avoid choking hazards.
- Use child-safe scissors whenever possible.
- Ensure all knots are tied securely before hanging the craft.
- Avoid hanging the wind chime in areas with strong winds where it may become damaged.
Why This Craft Is Great for Kids
- Enhances fine motor skills through threading and tying.
- Encourages creativity and color-matching abilities.
- Improves concentration and patience.
- Develops hand-eye coordination.
- Promotes independent crafting and problem-solving skills.
- Creates a beautiful handmade decoration children can proudly display.
- Provides a fun screen-free learning activity for home or classroom use.
DIY Rainbow Bead Wind Chime Craft for Kids

Create a beautiful rainbow bead wind chime with colorful beads and a glass jar. This fun craft helps kids develop creativity, fine motor skills, and hand-eye coordination while making a decorative handmade project.
Materials Required
- Clean glass jar
- Assorted rainbow-colored beads
- Craft wire or jewelry wire
- Strong craft glue
- Wire cutters (adult assistance recommended)
- Tea light candle or LED tea light
- Small pliers
- Scissors
- Decorative hanging hook or branch (optional)
Steps of Making
Step 1: Gather Materials
Collect all the required supplies, including the glass jar, colorful beads, wire, glue, and tools. Make sure the jar is clean and dry before starting.
Step 2: Decorate the Jar
Apply glue around the jar and carefully attach rows of colorful beads to create a rainbow pattern. Allow the glue to dry completely.
Step 3: Make the Hanging Handle
Thread beads onto craft wire to create decorative strands. Shape the wire into a handle and securely attach it to both sides of the jar.
Step 4: Add the Light and Display
Place a tea light or LED candle inside the jar. Hang your rainbow bead wind chime in a safe place where it can catch the light and show off its colorful design.
Step 5: Enjoy Your Creation
Your beautiful rainbow bead wind chime is now ready to decorate a porch, window, garden area, or playroom.
Safety Tips
- Adult supervision is recommended when using wire cutters and pliers.
- Use child-safe, non-toxic craft glue.
- Avoid using real candles around young children; LED tea lights are safer.
- Be careful with small beads, as they may pose a choking hazard for younger children.
- Ensure all wire ends are bent inward to prevent scratches.
Why This Craft Is Great for Kids
- Encourages creativity through color selection and design.
- Improves fine motor skills by threading and placing beads.
- Develops hand-eye coordination and concentration.
- Introduces basic crafting and jewelry-making techniques.
- Creates a beautiful handmade decoration children can proudly display.
- Promotes patience and problem-solving while assembling the craft.
DIY Heart Wind Chime Craft for Kids

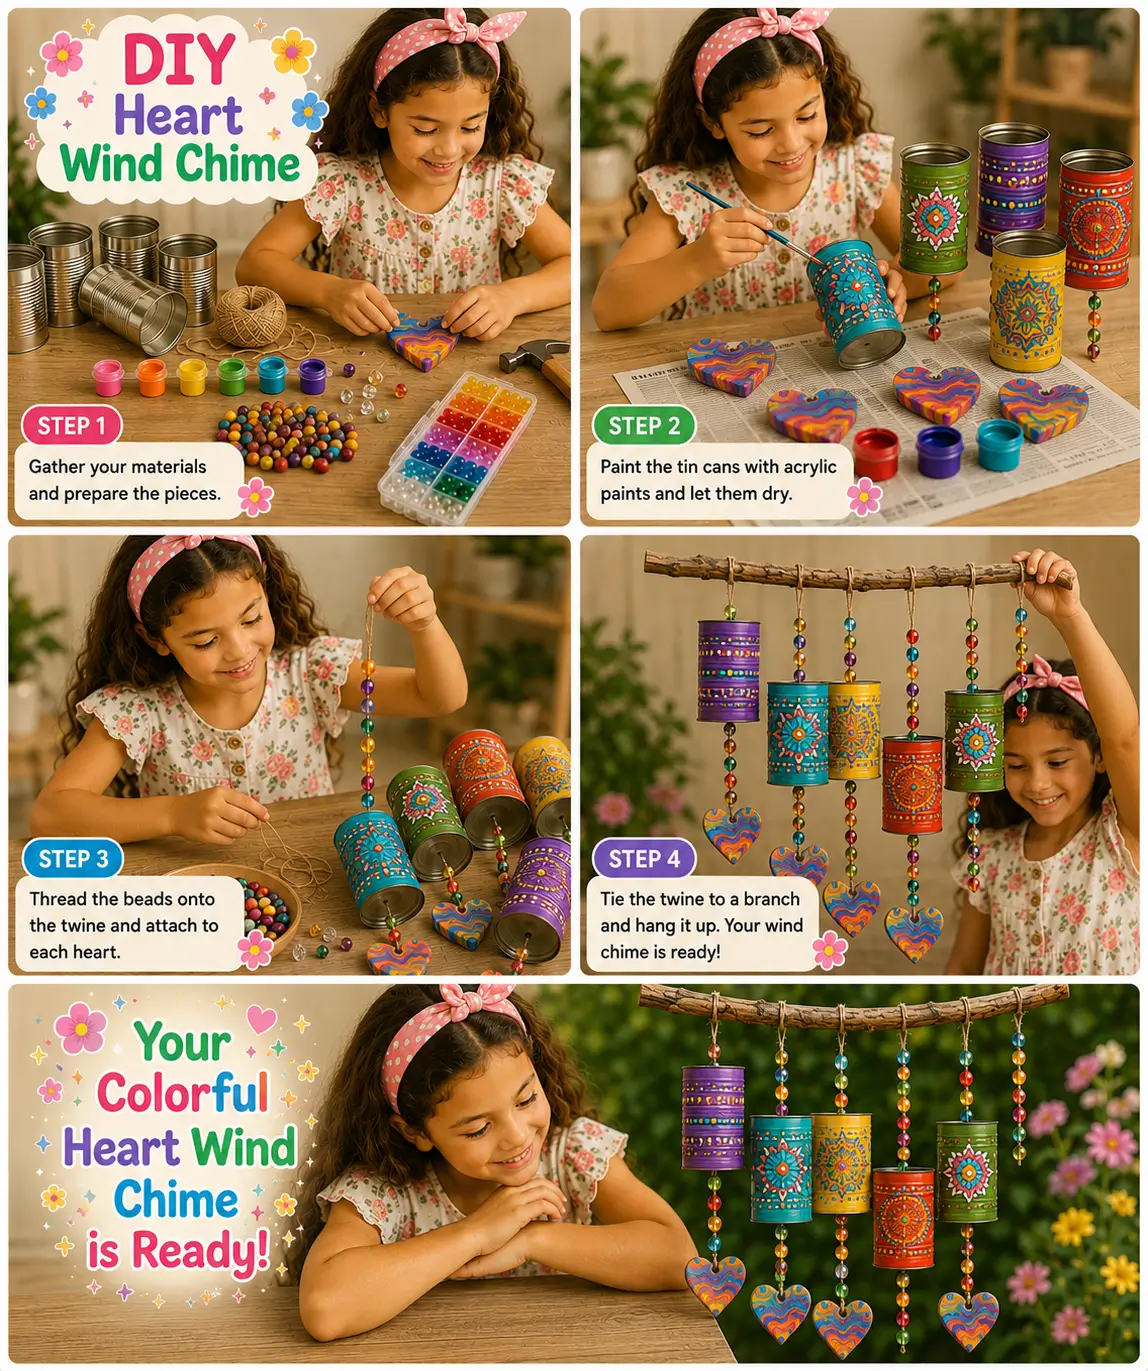
Create a colorful heart wind chime using recycled tin cans, beads, and heart ornaments. This fun craft encourages creativity, recycling awareness, and fine motor skill development in children.
Materials Required
- Empty tin cans (cleaned and dried)
- Acrylic paints in various colors
- Paintbrushes
- Colorful beads
- Twine, jute rope, or strong string
- Heart-shaped wooden or clay ornaments
- Scissors
- Hole punch or nail and hammer (adult use only)
- Decorative stick or tree branch
- Craft glue
- Protective newspaper or craft mat
Steps of Making
Step 1: Gather Materials
Collect all the supplies and prepare a clean workspace. Wash and dry the tin cans thoroughly before decorating.
Step 2: Paint the Tin Cans
Paint each tin can with colorful acrylic paints and decorative patterns. Let the paint dry completely before moving to the next step.
Step 3: Add Beads and Hearts
Thread colorful beads onto twine and attach heart-shaped ornaments at the ends. Secure the strands firmly.
Step 4: Assemble the Wind Chime
Tie the decorated cans and beaded heart strands to a sturdy branch or stick. Space them evenly to create a balanced wind chime.
Step 5: Hang and Enjoy
Hang your finished wind chime in a garden, balcony, porch, or near a window where it can gently move with the breeze.
Safety Tips
- Adult supervision is required when making holes in the tin cans.
- Smooth any sharp can edges before crafting.
- Use non-toxic, child-safe paints and glue.
- Keep small beads away from toddlers to prevent choking hazards.
- Allow paint and glue to dry fully before handling.
Why This Craft Is Great for Kids
- Encourages creative expression through painting and decorating.
- Teaches recycling by reusing empty tin cans.
- Improves fine motor skills and hand-eye coordination.
- Develops patience and concentration during assembly.
- Introduces basic crafting and design concepts.
- Creates a beautiful handmade decoration children can proudly display.
DIY Tin Can Wind Chime Craft for Kids

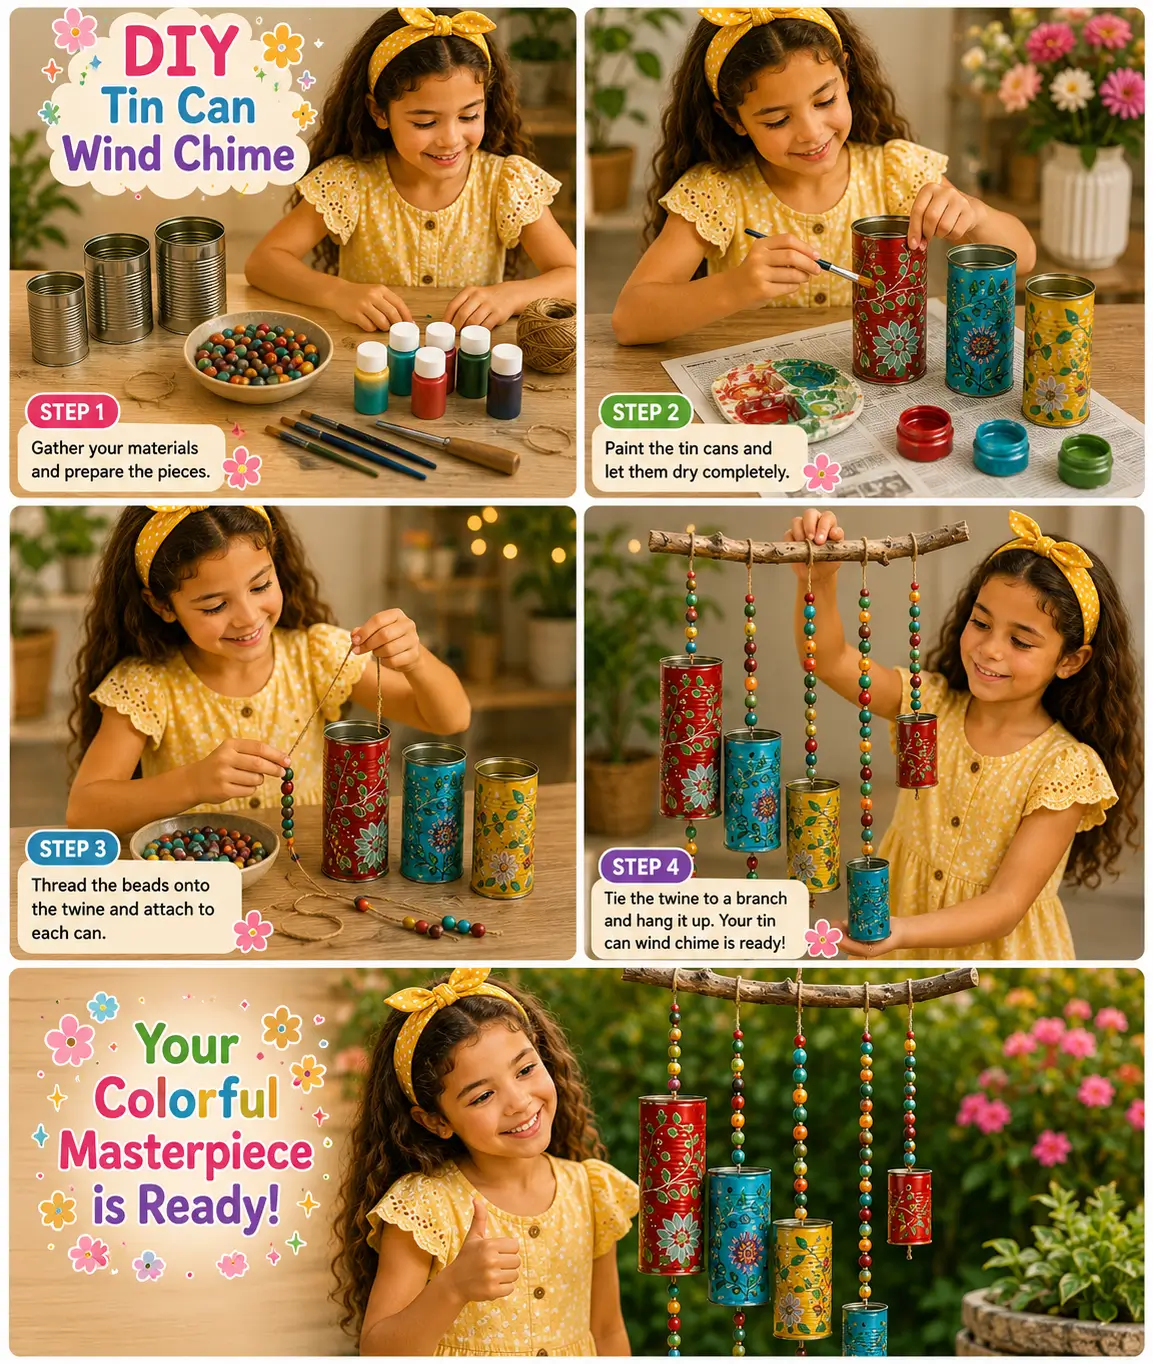
Turn recycled tin cans into a colorful wind chime! This creative craft helps kids develop artistic skills, fine motor coordination, and environmental awareness through fun hands-on crafting.
Materials Required
- Empty tin cans (cleaned and dried)
- Acrylic paints
- Paintbrushes
- Colorful beads
- Twine, string, or jute cord
- Wooden branch or sturdy stick
- Craft glue (optional)
- Scissors
- Hole punch or nail and hammer (adult use only)
- Newspaper or craft mat to protect the workspace
Steps of Making
Step 1: Gather Your Materials
Collect all the supplies and prepare a clean crafting area. Make sure the tin cans are washed, dried, and free from sharp edges.
Step 2: Paint the Tin Cans
Decorate each tin can with colorful paints, floral patterns, dots, or creative designs. Allow the paint to dry completely before handling.
Step 3: Add Beaded Strings
Thread colorful beads onto twine and tie them securely. Attach the beaded strands to the painted cans to create decorative hanging pieces.
Step 4: Assemble the Wind Chime
Tie each decorated can to a sturdy branch or stick at different lengths. Arrange them evenly so they hang beautifully.
Step 5: Hang and Display
Hang the completed wind chime outdoors on a porch, balcony, garden branch, or near a window where it can move gently in the breeze.
Safety Tips
- Always supervise children when working with tin cans.
- Smooth or cover any sharp edges before crafting.
- Adults should make holes in the cans if needed.
- Use non-toxic, child-safe paints and materials.
- Keep small beads away from young children to avoid choking hazards.
- Wash hands after painting and crafting.
Why This Craft Is Great for Kids
- Promotes recycling and environmental awareness.
- Encourages creativity through painting and decorating.
- Strengthens fine motor skills and hand-eye coordination.
- Develops concentration, patience, and problem-solving skills.
- Provides a fun introduction to DIY crafting and design.
- Creates a beautiful handmade decoration that kids can proudly display.
FAQs
Q1. What age group are these wind chime crafts suitable for?
Answer: Most of these wind chime crafts are suitable for children aged 5 years and above with adult supervision, especially when using tools such as scissors, wire cutters, or hammers.
Q2. Can I use recycled materials for these projects?
Answer: Yes! Many of these crafts use recycled materials such as tin cans, branches, jars, and household items, making them eco-friendly and budget-friendly activities.
Q3. Are wind chime crafts educational for kids?
Answer: Absolutely. Wind chime crafts help children develop fine motor skills, hand-eye coordination, creativity, problem-solving abilities, and an understanding of basic design concepts.
Q4. Where can I hang the finished wind chimes?
Answer: Wind chimes can be displayed on porches, balconies, gardens, patios, windows, playrooms, classrooms, or any covered outdoor area where they can gently move with the breeze.
Q5. What safety precautions should be followed?
Answer: Adult supervision is recommended when using sharp tools, metal cans, wire cutters, or hot glue. Always use child-safe materials and keep small beads away from very young children.
Q6. Can kids customize their wind chimes?
Answer: Yes! Children can personalize their wind chimes using different colors, beads, charms, tassels, paints, crystals, and decorative elements to create unique designs.
Let children discover the joy of crafting with these easy DIY wind chime ideas. Featuring colorful beads, playful tassels, recycled materials, and eye-catching designs, each project promotes creativity, fine motor skills, and environmental awareness. Once completed, the wind chimes become delightful handmade keepsakes that add beauty and personality to any space. Get creative with these easy kids’ crafts and make special decorations, meaningful gifts, and joyful memories together. Join our Telegram group to receive the latest announcements and updates.