DIY and Crafts
Easy Flower Crafts for Kids: Fun DIY Blooming Projects to Spark Creativity

Flower crafts are a fun way for kids to explore creativity while learning new skills. These easy flower crafts for kids include paper flower bouquets, crystal flowers, glowing flowers, floral suncatchers, and recycled flower projects. Through these DIY flower craft ideas, children can enjoy hands-on learning, improve fine motor skills, and create beautiful handmade decorations.
DIY Rainbow Crystal Rose Craft for Kids

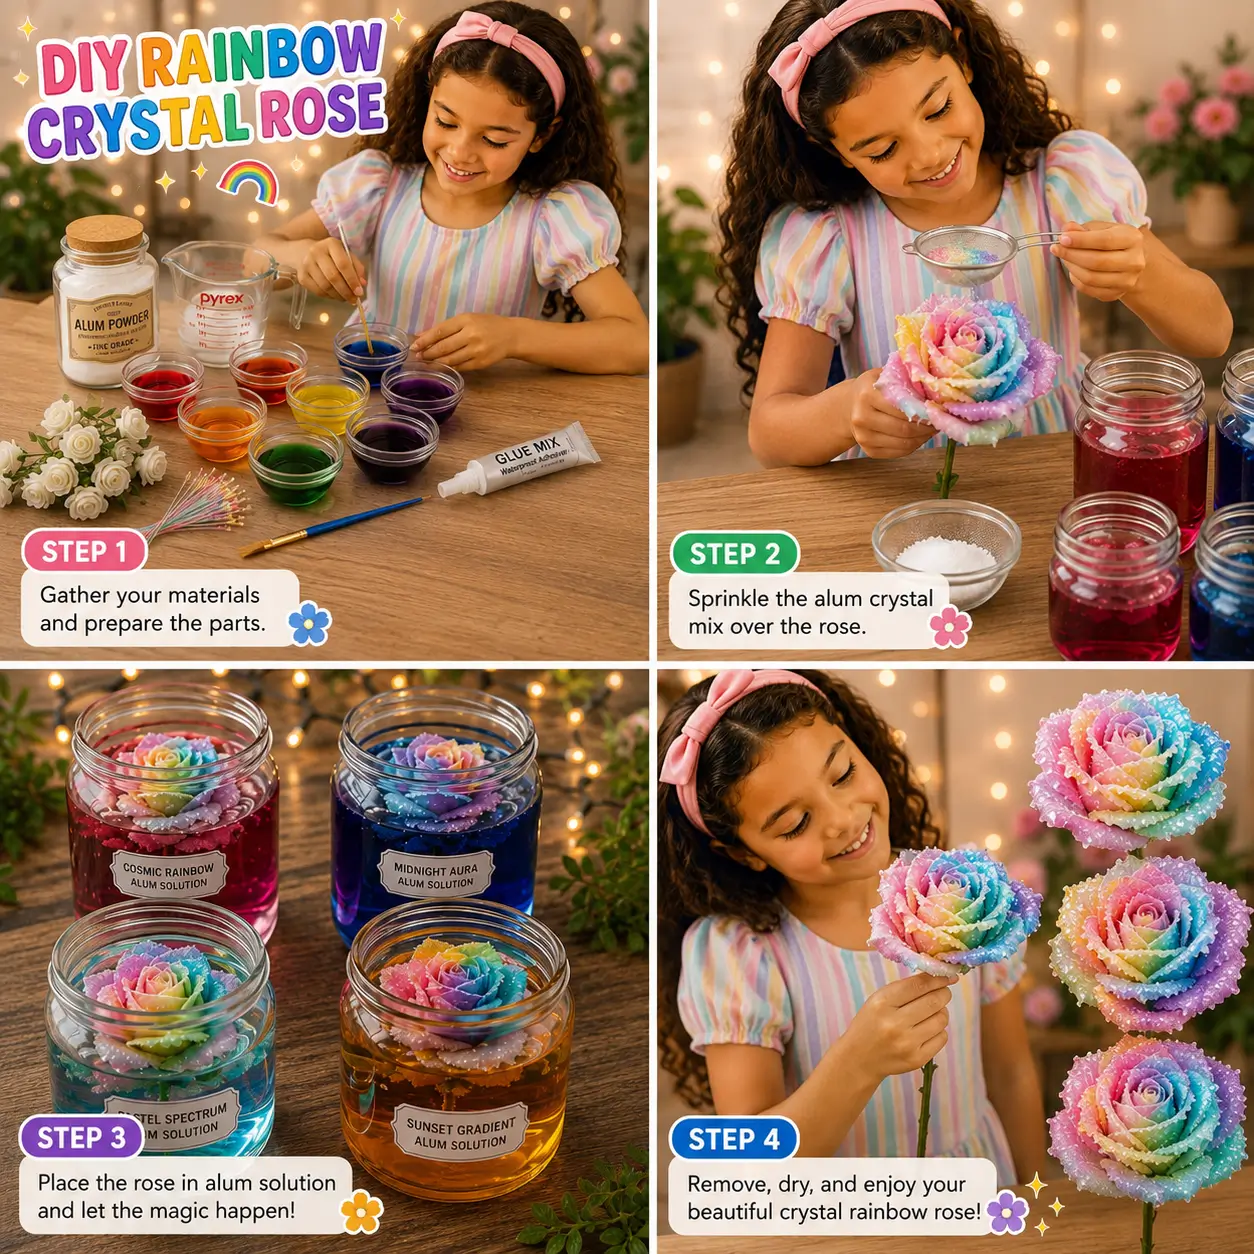
Create a sparkling Rainbow Crystal Rose with colorful crystals and simple materials for a fun science-meets-art craft project!
Materials Required
- Artificial white rose
- Alum powder
- Warm water
- Food coloring (red, orange, yellow, green, blue, and purple)
- Small bowls or cups
- Glass jars
- Stirring sticks or spoons
- Fine sieve (optional)
- Measuring cup
- Paper towels
- Adult supervision
Steps of Making
Step 1: Prepare the Materials
- Gather all supplies.
- Mix warm water with food coloring in separate bowls.
- Prepare the white artificial rose.
Step 2: Add Crystal Mixture
- Mix alum powder into warm water until dissolved.
- Carefully sprinkle or coat the rose petals with some alum crystals.
- Make sure the petals are evenly covered.
Step 3: Soak the Rose
- Place the rose into jars containing colored alum solutions.
- Leave the rose undisturbed for several hours or overnight.
- Crystals will begin forming on the petals.
Step 4: Remove and Dry
- Carefully remove the rose from the solution.
- Let it dry completely on paper towels.
- Enjoy your sparkling rainbow crystal rose!
Safety Tips
- Always perform this activity with adult supervision.
- Do not eat or taste alum powder or colored solutions.
- Wash hands thoroughly after completing the craft.
- Avoid getting the solution in eyes or mouth.
- Handle glass jars carefully to prevent breakage.
- Keep materials away from younger children and pets.
Why This Craft Is Great for Kids
- Encourages creativity and artistic expression.
- Introduces basic crystal-growing science concepts.
- Helps children learn about colors and color mixing.
- Develops fine motor skills through careful handling.
- Promotes patience while waiting for crystals to grow.
- Creates a beautiful decorative craft children can proudly display.
DIY Magic Glow Flowers Craft for Kids
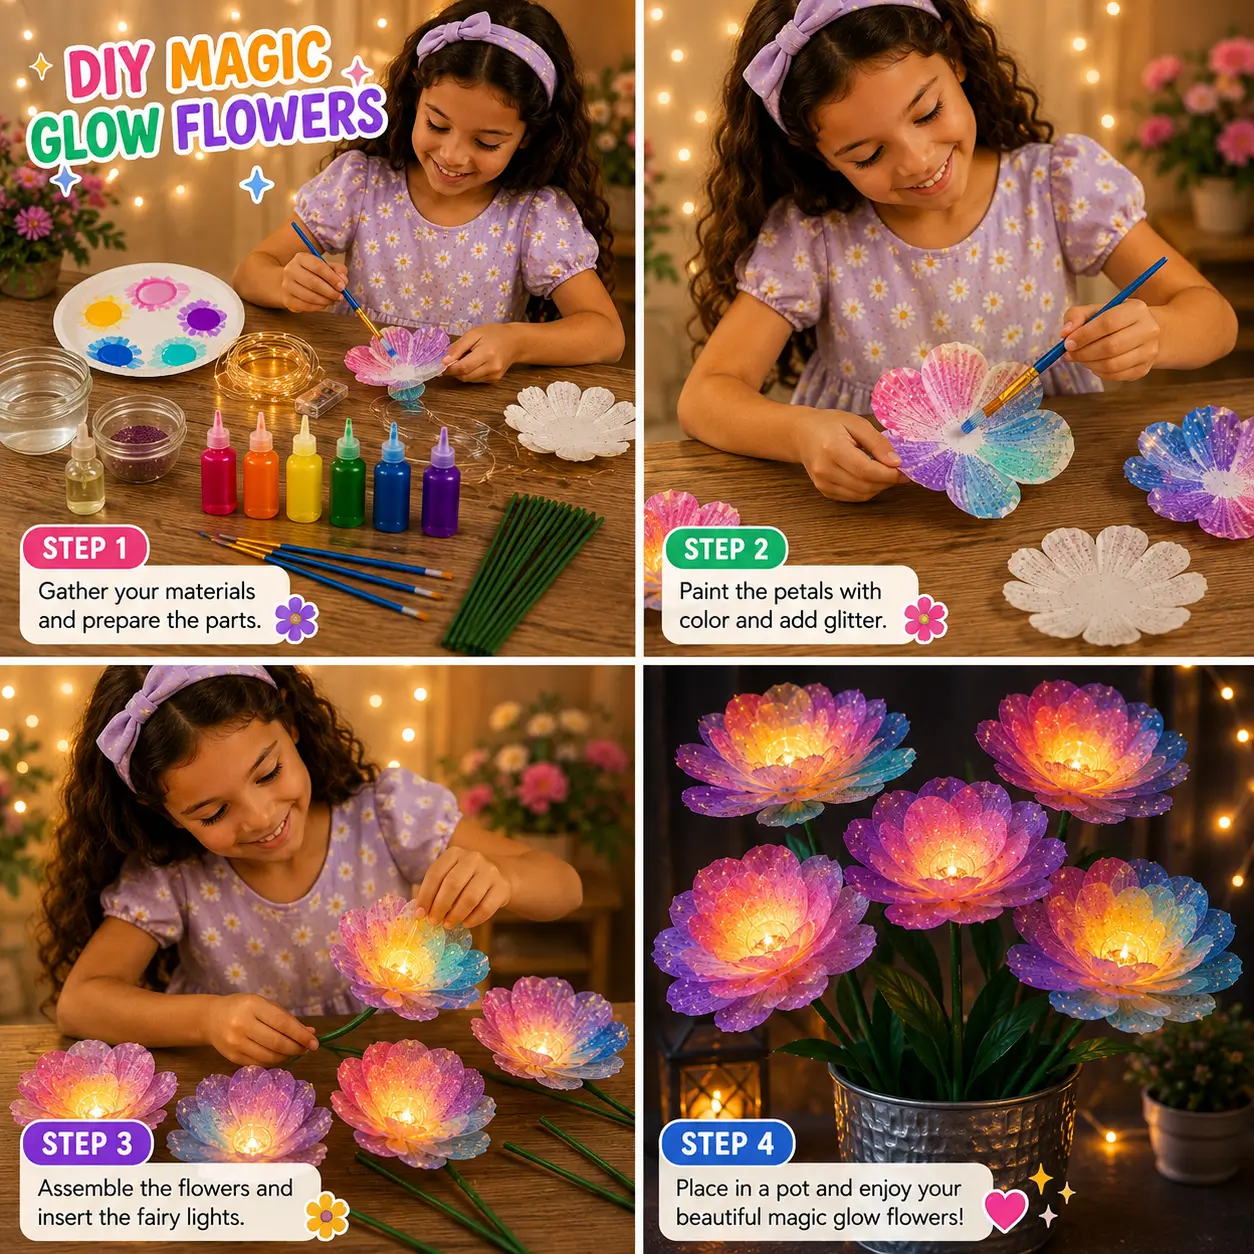
Create beautiful DIY Magic Glow Flowers using paper petals, colors, glitter, and fairy lights for a magical decorative craft.
Materials Required
- White paper flower cutouts
- Acrylic paints or watercolor paints
- Paintbrushes
- Glitter (optional)
- Green craft sticks, straws, or floral stems
- LED fairy lights (battery-operated)
- Glue or hot glue (adult supervision required)
- Scissors
- Small flower pot or container
- Decorative stones or paper filler (optional)
Steps of Making
Step 1: Prepare the Materials
Gather all your supplies, including flower cutouts, paints, brushes, glitter, stems, and fairy lights.
Step 2: Paint the Petals
Color the flower petals using bright shades such as pink, purple, blue, yellow, and orange. Blend colors for a rainbow effect and sprinkle glitter while the paint is still wet.
Step 3: Assemble the Flowers
Allow the petals to dry completely. Attach the petals to form flowers and fix them onto green stems. Carefully place a small LED fairy light in the center of each flower.
Step 4: Arrange and Display
Place the finished flowers into a decorative pot or vase. Turn on the fairy lights and enjoy your beautiful glowing flower bouquet.
Safety Tips
- Use only battery-operated LED lights, as they remain cool and safe.
- Adult supervision is recommended when using scissors or hot glue.
- Keep small craft items away from very young children.
- Ensure hands are dry when handling battery packs.
- Do not leave lights switched on for long periods without supervision.
Why This Craft Is Great for Kids
- Encourages creativity and artistic expression.
- Helps improve fine motor skills through painting and assembly.
- Introduces basic crafting and design techniques.
- Builds patience and concentration.
- Creates a beautiful handmade decoration kids can proudly display.
- Combines art and light for an exciting STEM-inspired craft experience.
Crystal Flower Bloom Ornament Craft for Kids

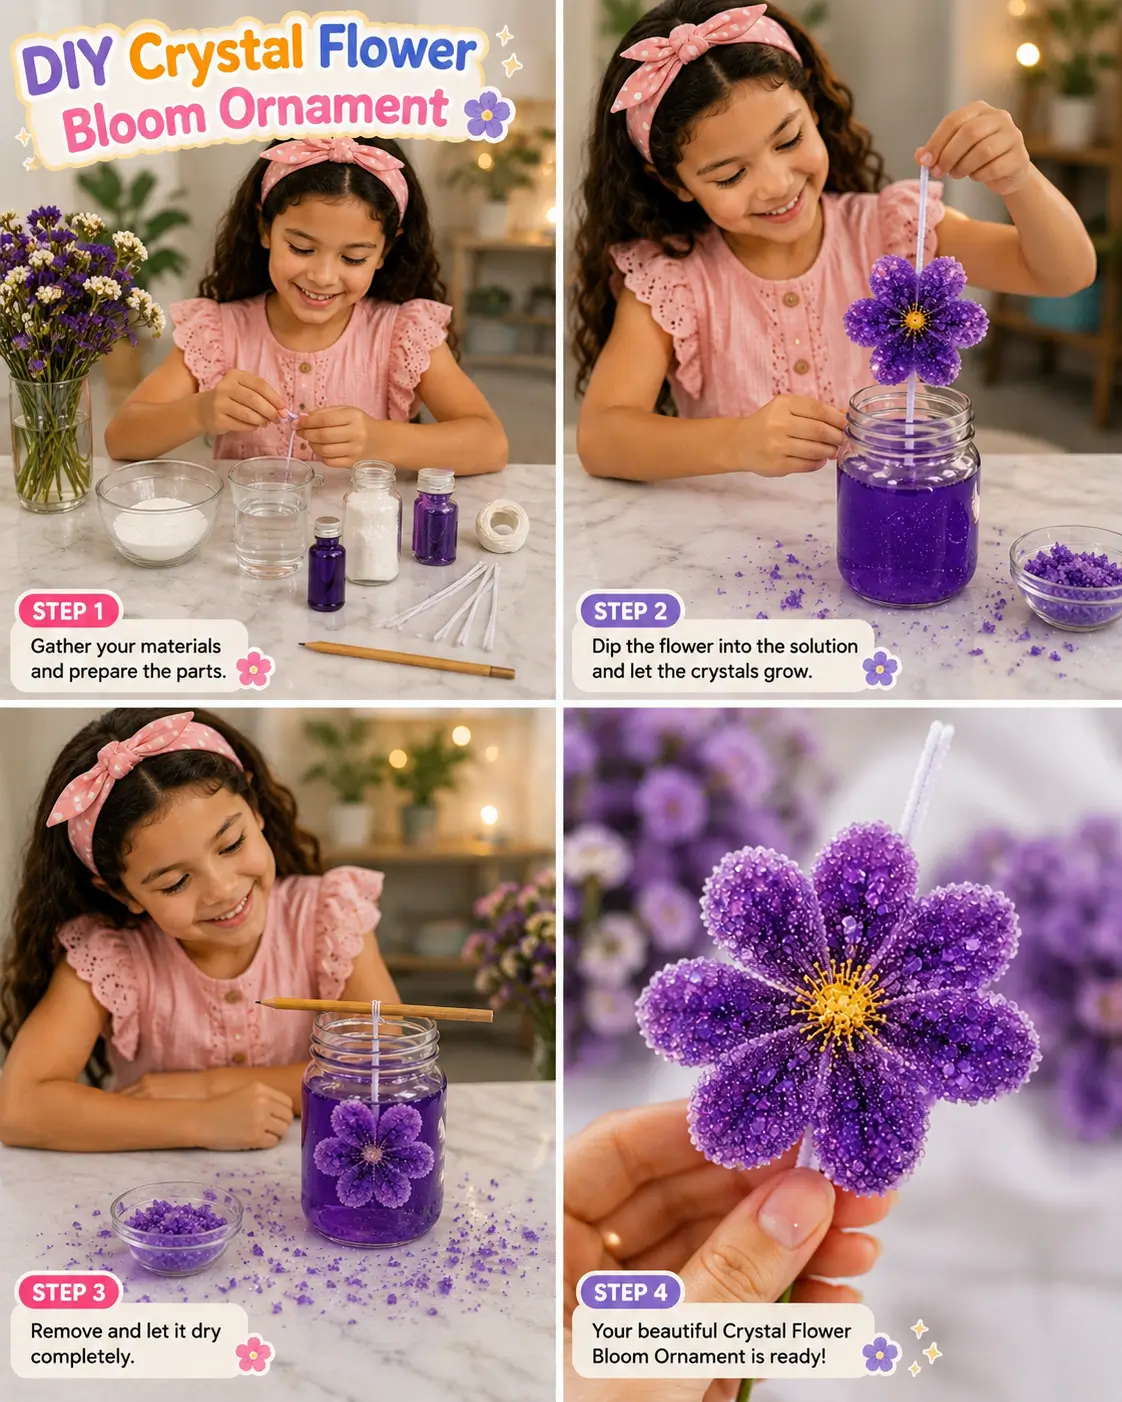
Create a sparkling Crystal Flower Bloom Ornament with simple materials and watch beautiful crystals grow on your handmade flower!
Materials Required
- Purple pipe cleaners
- White pipe cleaner (for hanging loop)
- Pencil or wooden stick
- Glass jar or mason jar
- Borax powder (adult supervision required)
- Hot water
- Purple food coloring (optional)
- Measuring cup
- Spoon for stirring
- Scissors
- String or ribbon (optional)
Steps of Making
Step 1: Create the Flower
- Twist purple pipe cleaners into a flower shape with petals.
- Attach a white pipe cleaner at the top for hanging.
- Make sure the flower fits inside the jar without touching the sides.
Step 2: Prepare the Crystal Solution
- Fill the jar with hot water.
- Add Borax powder and stir until dissolved.
- Add a few drops of purple food coloring if desired.
- Continue stirring until the solution is saturated.
Step 3: Grow the Crystals
- Tie the flower to a pencil or stick.
- Place the pencil across the top of the jar so the flower hangs in the solution.
- Make sure the flower does not touch the bottom or sides.
- Leave undisturbed overnight or for 12–24 hours.
Step 4: Remove and Dry
- Carefully remove the flower from the solution.
- Place it on paper towels and allow it to dry completely.
- Once dry, your sparkling crystal flower ornament is ready to display!
Safety Tips
- Adult supervision is required when handling hot water.
- Adults should prepare and pour the crystal solution.
- Do not taste or consume any craft materials.
- Wash hands thoroughly after the activity.
- Keep Borax and other chemicals away from young children and pets.
- Use glass jars carefully to avoid breakage.
Why This Craft Is Great for Kids
- Encourages creativity and artistic expression.
- Introduces basic science concepts, such as crystal formation.
- Develops observation and patience skills.
- Improves fine motor skills through flower shaping.
- Promotes curiosity and hands-on STEM learning.
- Creates a beautiful handmade ornament children can proudly display.
DIY Floral Suncatchers Craft for Kids
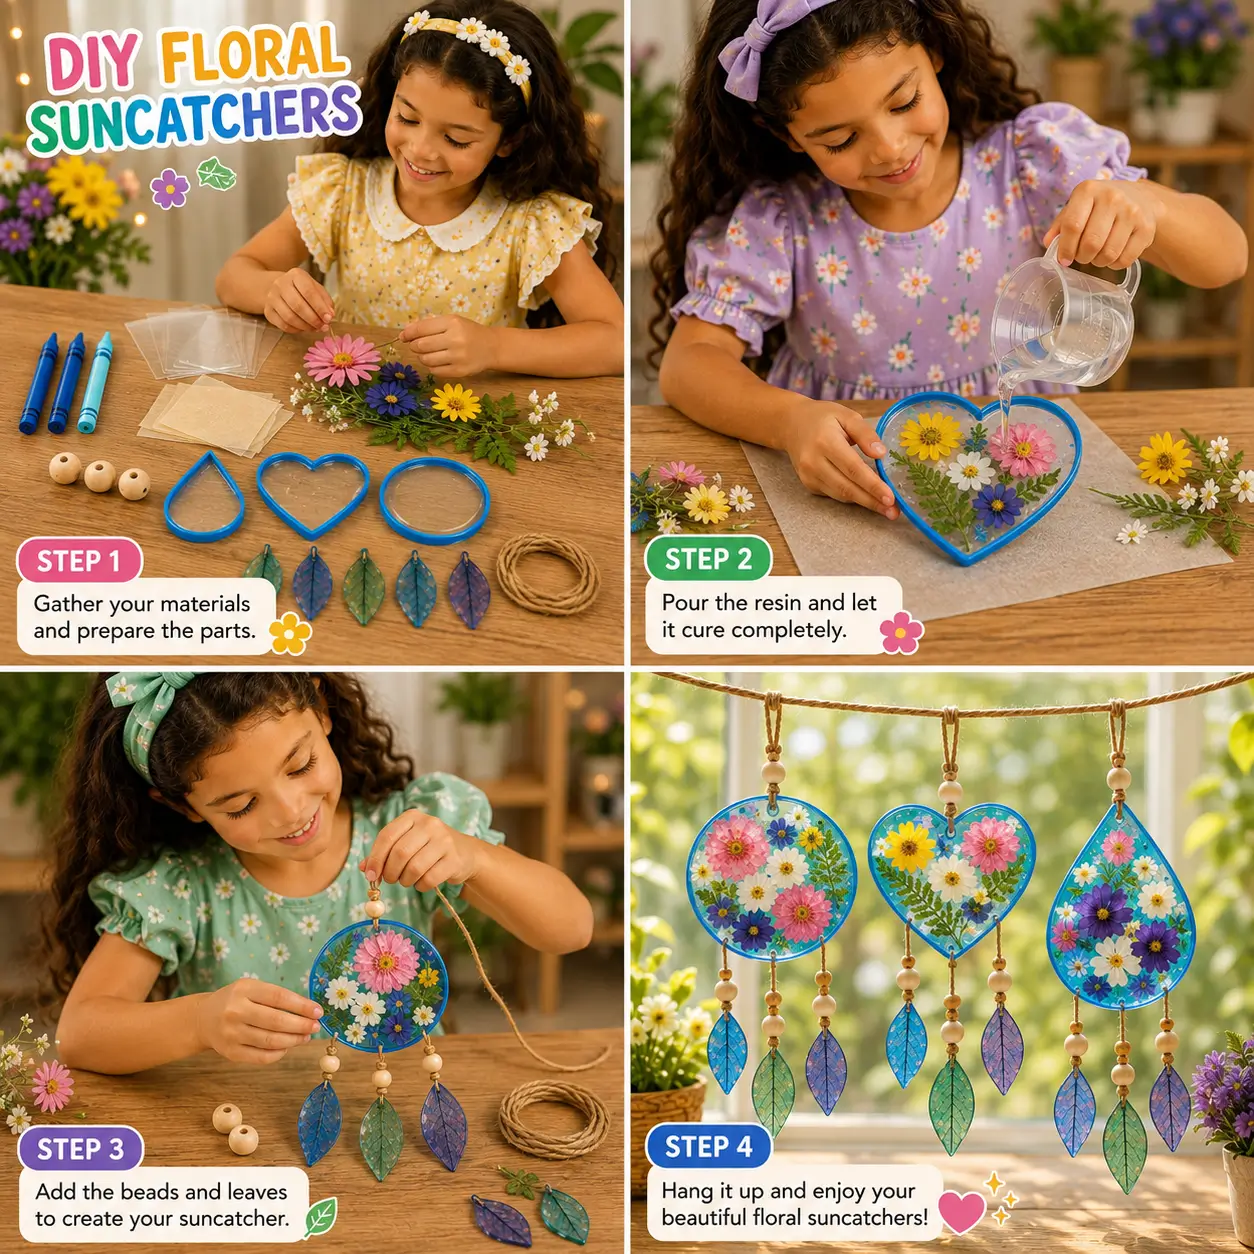
Create beautiful floral suncatchers with flowers, beads, and colorful leaf charms for a bright and cheerful window decoration!
Materials Required
- Clear plastic or resin suncatcher molds (heart, circle, teardrop shapes)
- Pressed flowers and leaves
- Clear resin or clear craft gel (adult supervision required)
- Mixing cup and stirring stick
- Wooden beads
- Decorative leaf charms or acrylic leaf pendants
- Twine, jute string, or ribbon
- Wax paper or silicone mat
- Scissors
- Hole punch (if needed)
- Gloves for handling resin
Steps of Making
Step 1: Prepare the Materials
Gather all your supplies. Select colorful flowers and leaves, and arrange them by size and color. Place your molds on a protected work surface.
Step 2: Arrange and Fill
Carefully place the flowers and leaves inside the molds to create a decorative pattern. Slowly pour the clear resin over the arrangement until everything is covered.
Step 3: Decorate the Suncatcher
Allow the resin to cure completely according to the product instructions. Once hardened, attach beads and decorative leaf charms using twine or string.
Step 4: Add Hanging String
Tie a loop at the top of each suncatcher for hanging. Display them near a sunny window where the colors can shine beautifully.
Safety Tips
- Adult supervision is required when working with resin.
- Wear gloves to protect hands from sticky materials.
- Work in a well-ventilated area.
- Use child-safe scissors.
- Keep small beads and charms away from very young children.
- Follow all safety instructions provided with the resin product.
Why This Craft Is Great for Kids
- Encourages creativity and artistic expression.
- Helps develop fine motor skills and hand-eye coordination.
- Introduces children to natural materials like flowers and leaves.
- Promotes patience while waiting for the craft to cure and dry.
- Creates a beautiful handmade decoration kids can proudly display.
- Encourages appreciation of nature and colors.
DIY CD Holographic Flowers Craft
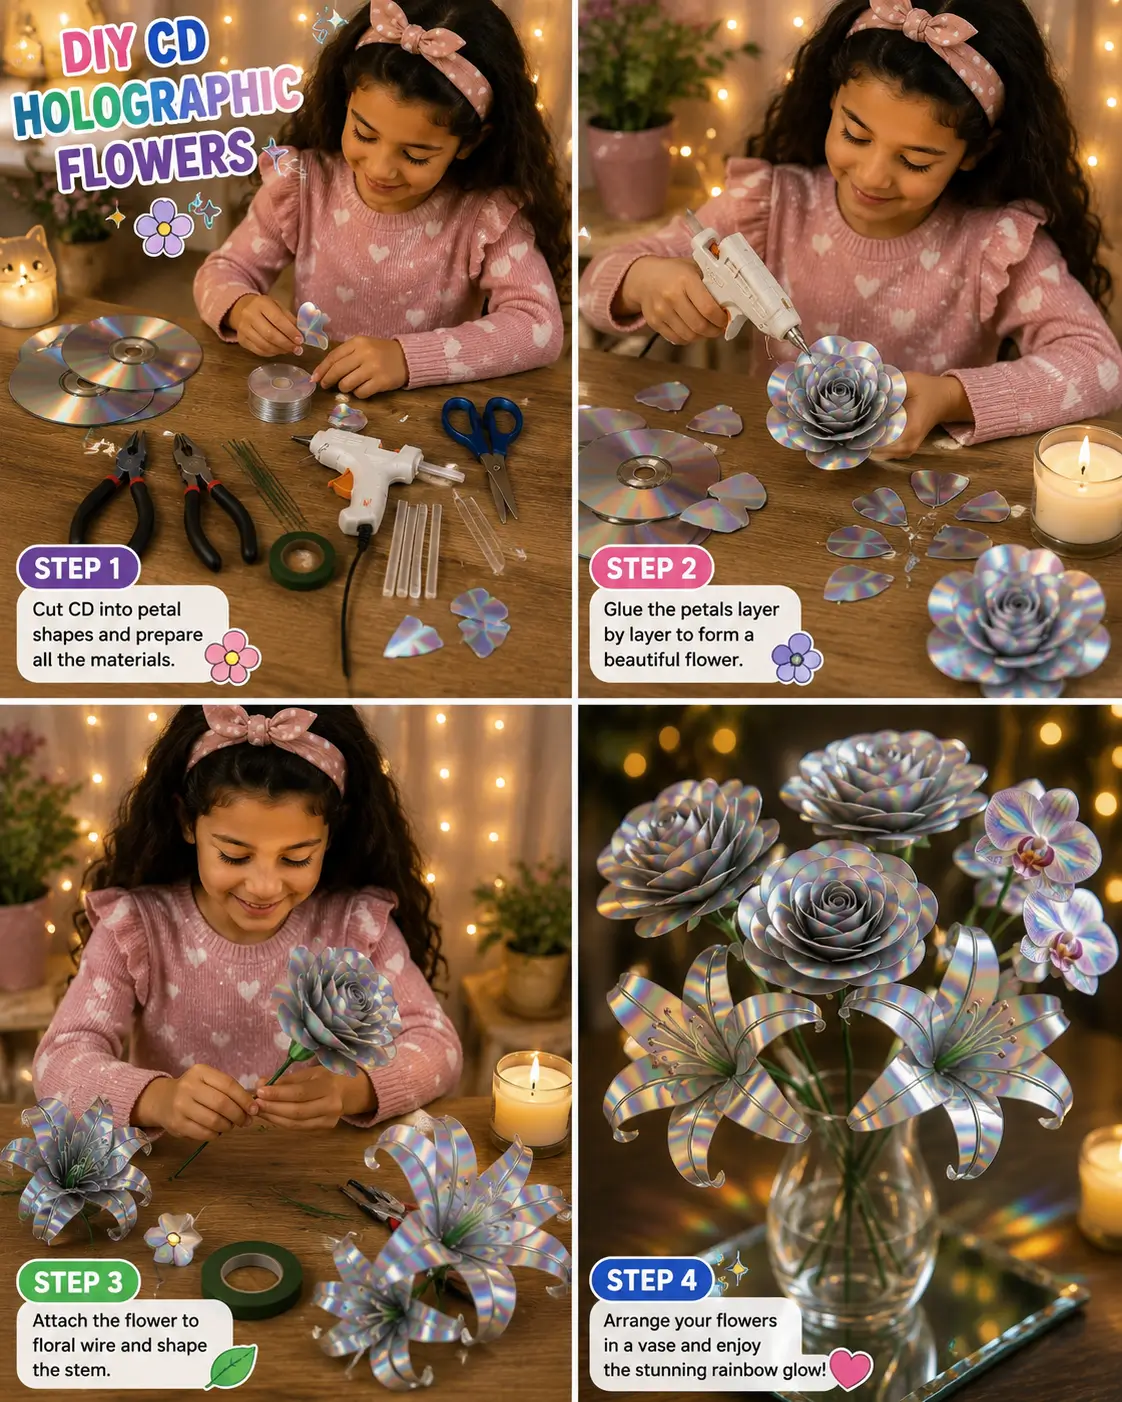
Turn old CDs into dazzling holographic flowers with this creative recycled craft that shines with beautiful rainbow colors.
Materials Required
- Old CDs or DVDs
- Strong scissors or craft cutters (adult assistance required)
- Hot glue gun and glue sticks
- Floral wire or stem wire
- Green floral tape
- Needle-nose pliers
- Wire cutters
- Pencil or marker
- Flower petal templates
- Small decorative beads (optional)
- Vase or jar for display
Steps of Making
Step 1: Prepare the Petals
Draw flower petal shapes on old CDs and carefully cut them out. Gather all materials and sort the petals by size.
Step 2: Build the Flower
Start with the smallest petals and glue them together layer by layer. Continue adding larger petals around the outside to form a realistic flower shape.
Step 3: Create the Stem
Attach floral wire securely to the back of each flower. Wrap the wire with green floral tape to create a neat and natural-looking stem.
Step 4: Make Different Flower Designs
Experiment with various petal shapes to create roses, lilies, orchids, or fantasy flowers using the holographic CD pieces.
Step 5: Arrange the Bouquet
Place all the finished flowers into a vase. Adjust the stems and flower positions to create a balanced arrangement.
Step 6: Display and Enjoy
Set your sparkling holographic bouquet on a table, shelf, or windowsill where the rainbow reflections can shine beautifully.
Safety Tips
- Adult supervision is required when cutting CDs, as the edges can be sharp.
- Use safety scissors whenever possible.
- Handle hot glue guns carefully to avoid burns.
- Wear safety glasses when cutting hard plastic materials.
- Clean up small CD pieces immediately to prevent scratches or injuries.
- Work on a sturdy, protected surface.
Why This Craft Is Great for Kids
- Encourages creativity and artistic expression.
- Teaches the importance of recycling and reusing materials.
- Improves fine motor skills and hand-eye coordination.
- Helps children explore colors, light reflections, and design.
- Builds patience, concentration, and problem-solving skills.
- Creates a unique decoration that can be displayed for years.
Paper-flower-bouquet-craft
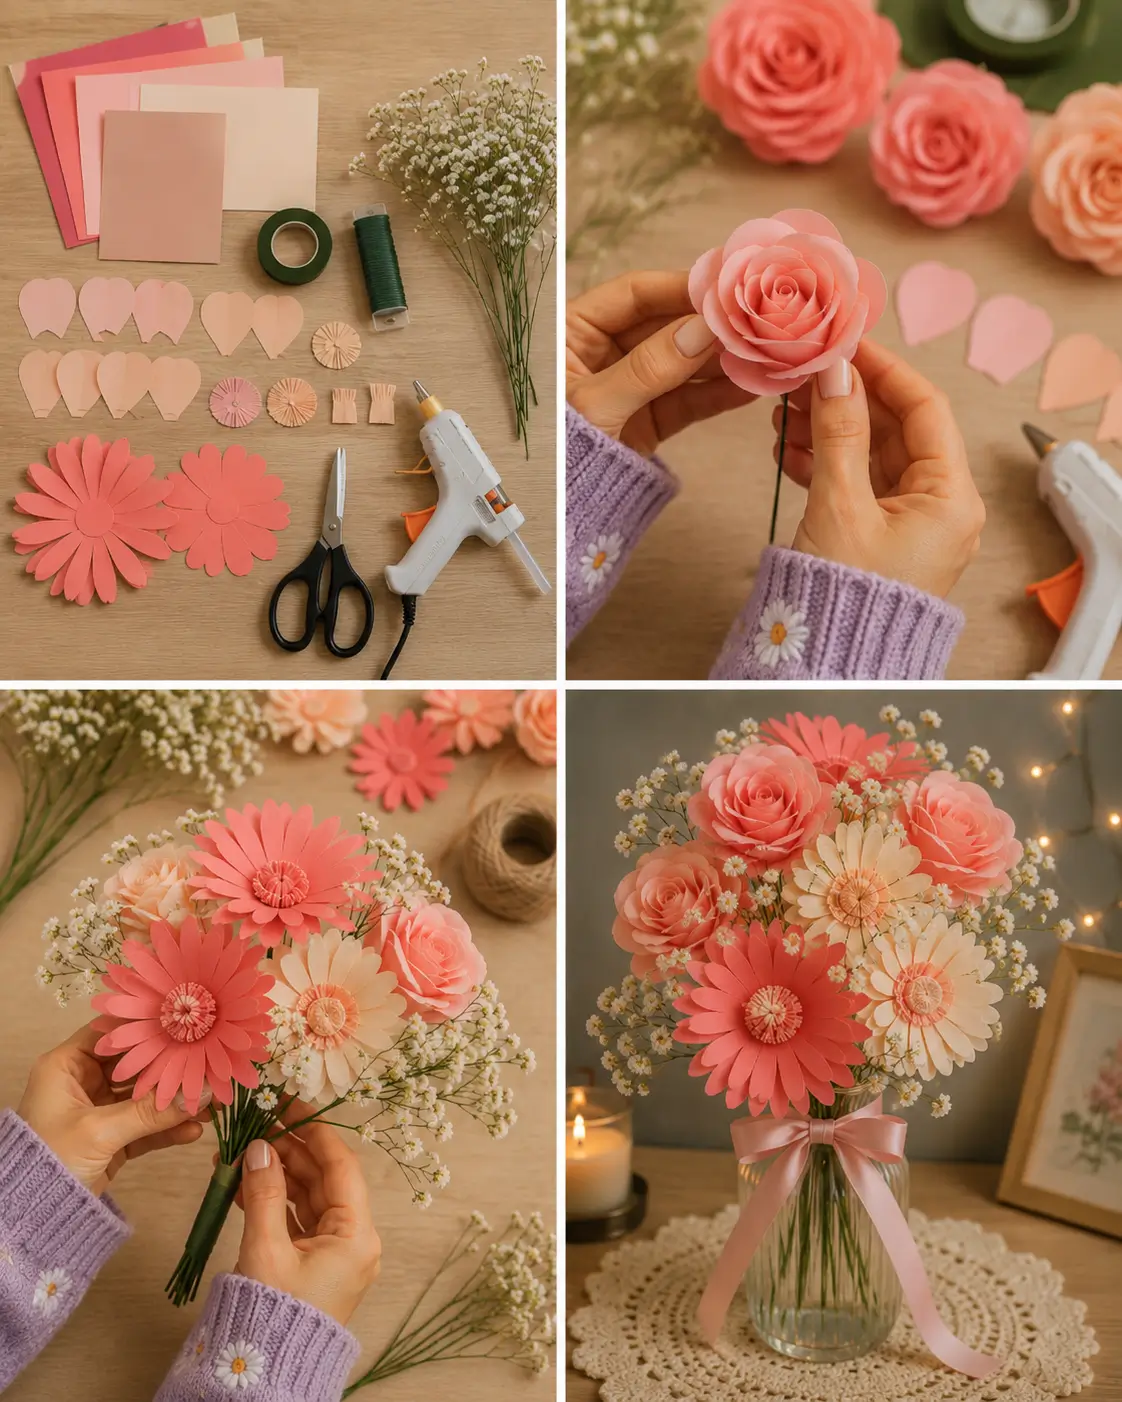
Learn how to make a gorgeous paper flower bouquet using colorful craft paper, floral wire, and simple supplies for a lasting handmade decoration.
Materials Required
- Pink, peach, cream, and coral craft paper
- Green floral wire
- Floral tape
- Hot glue gun and glue sticks
- Scissors
- Pencil
- Flower petal templates
- Daisy flower templates
- Baby’s breath flowers (real or artificial)
- Decorative ribbon
- Glass vase or jar
- Optional: Paper curling tool or toothpick
Steps of Making
Step 1: Prepare the Flower Pieces
Cut rose petals, daisy petals, flower centers, and leaf shapes from colored craft paper using templates.
Step 2: Make the Paper Roses
Roll and layer the rose petals around a center bud. Glue each petal carefully to create a realistic rose shape.
Step 3: Create the Daisy Flowers
Stack the daisy petal layers and glue them together. Add a decorative paper center to complete the flower.
Step 4: Attach the Stems
Secure floral wire to each flower using hot glue. Wrap the wire with floral tape to create neat green stems.
Step 5: Assemble the Bouquet
Arrange the roses, daisies, and baby’s breath flowers together. Adjust the placement until the bouquet looks full and balanced.
Step 6: Display the Finished Bouquet
Tie a ribbon around the stems or place the bouquet in a vase. Your beautiful paper flower arrangement is ready to display!
Safety Tips
- Always use scissors carefully and under adult supervision.
- Hot glue guns can become very hot; ask an adult for help when using them.
- Keep small paper pieces away from young children.
- Work on a clean and stable surface.
- Store scissors and glue safely after crafting.
Why This Craft Is Great for Kids
- Encourages creativity and imagination.
- Strengthens fine motor skills and hand coordination.
- Helps children explore colors, shapes, and flower designs.
- Develops patience, concentration, and problem-solving skills.
- Makes a thoughtful handmade gift for family and friends.
- Creates a long-lasting decoration that can brighten any room.
Beautiful Paper Flower Bouquet Craft for Kids

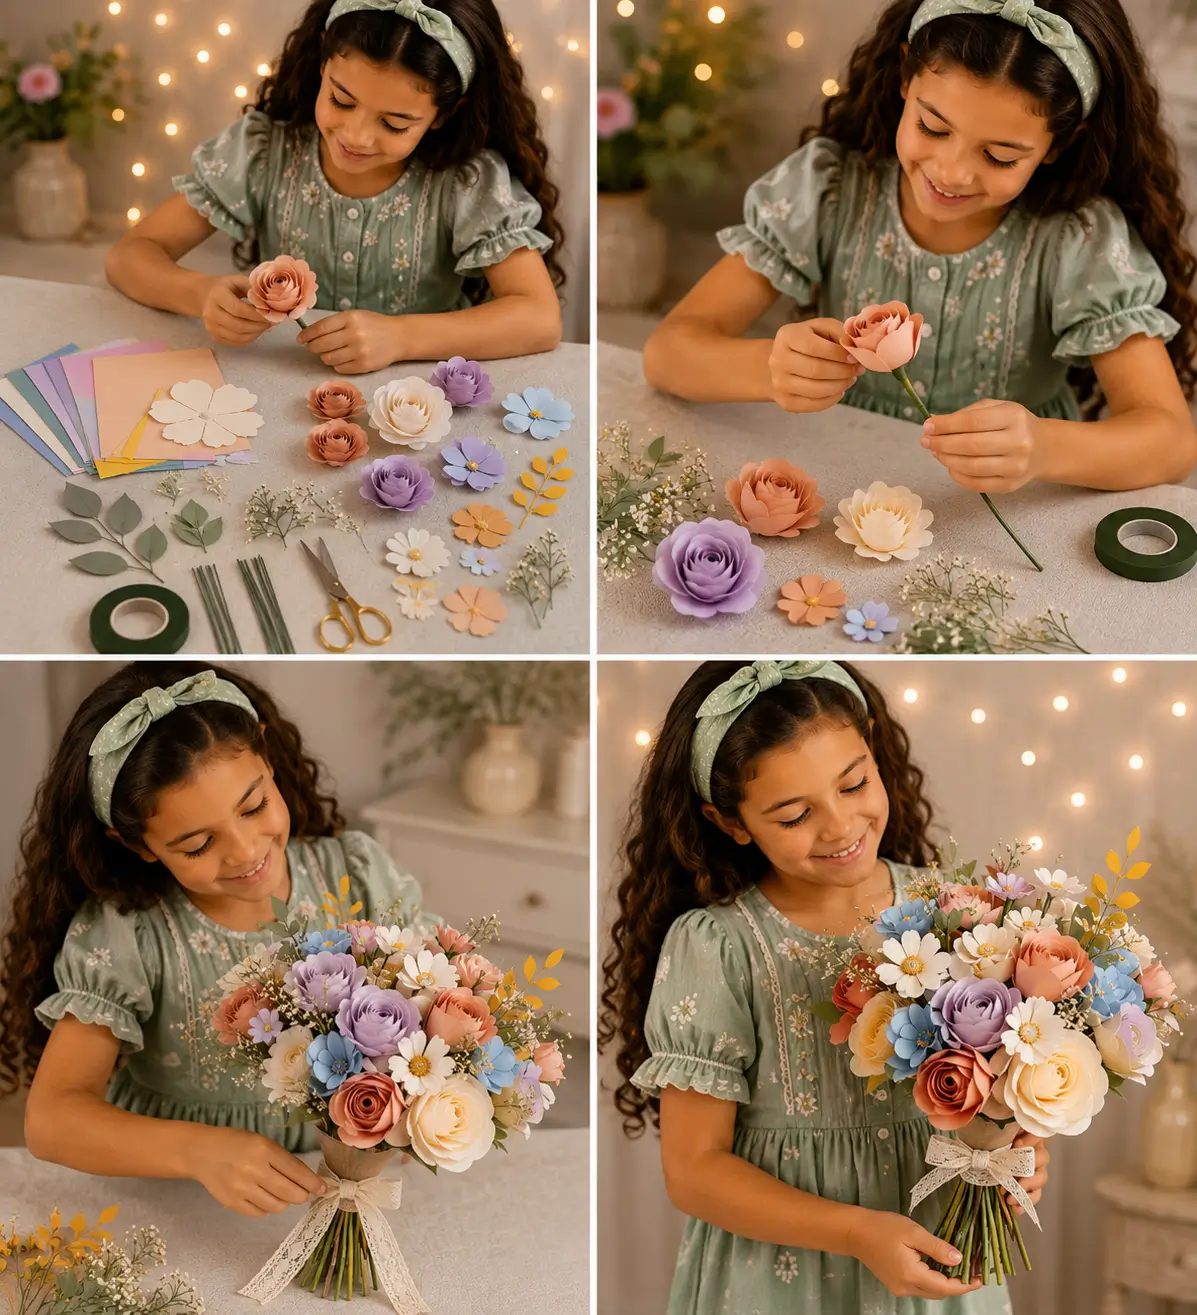
Create a stunning handmade paper flower bouquet with colorful paper blooms and simple craft supplies.
Materials Required
- Colored craft paper or cardstock
- Flower petal templates (optional)
- Green floral wire or craft stems
- Floral tape
- Scissors
- Glue or glue stick
- Pencil
- Decorative leaves (paper or artificial)
- Small decorative flowers (optional)
- Ribbon or lace for tying the bouquet
- Beads or gems for flower centers (optional)
Steps of Making
Step 1: Prepare the Petals
Cut flower petals of different sizes from colored craft paper. Create several layers for fuller flowers.
Step 2: Shape the Petals
Gently curl the edges of the petals using a pencil to give them a realistic flower shape.
Step 3: Make the Flower Center
Roll a small strip of paper tightly to form the flower center and glue it in place.
Step 4: Build the Flower
Glue the petals around the center one layer at a time until the flower looks full and beautiful.
Step 5: Attach the Stem
Secure a floral wire or craft stem to the back of each flower using glue and floral tape.
Step 6: Add Leaves
Cut leaves from green paper and attach them to the stems.
Step 7: Create More Flowers
Make flowers in different colors and sizes to create variety in the bouquet.
Step 8: Arrange the Bouquet
Gather all the flowers together and arrange them into a pleasing bouquet shape.
Step 9: Tie the Bouquet
Wrap the stems with ribbon or lace and tie a neat bow around the bouquet.
Step 10: Display or Gift
Your colorful paper flower bouquet is ready to display or give as a thoughtful handmade gift.
Safety Tips
- Use child-safe scissors.
- Adult supervision is recommended when using floral wire.
- Be careful when handling sharp wire ends.
- Use non-toxic glue suitable for children.
- Keep small decorative items away from very young children to prevent choking hazards.
Why This Craft Is Great for Kids
- Encourages creativity and artistic expression.
- Improves fine motor and hand-eye coordination skills.
- Teaches patience and step-by-step crafting.
- Helps children learn about flower shapes and colors.
- Makes a beautiful handmade gift for family and friends.
- Boosts confidence by creating a finished project they can proudly display.
FAQ
Q1. What age group are these flower crafts suitable for?
Answer: These flower crafts are ideal for children aged 5–12 years, with adult supervision for activities involving hot glue, crystals, or resin.
Q2. What skills do kids learn from flower crafts?
Answer: Kids develop creativity, fine motor skills, hand-eye coordination, patience, concentration, and problem-solving abilities.
Q3. Are these flower crafts safe for children?
Answer: Yes, most flower crafts are safe when child-friendly materials are used, and adults supervise activities involving sharp tools or chemicals.
Q4. Which flower craft is best for beginners?
Answer: Paper flower bouquets and magic glow flowers are excellent beginner-friendly crafts that require simple materials and easy steps.
Q5. Can these crafts be used for school projects?
Answer: Absolutely! Flower crafts are perfect for school art projects, science fairs, STEM activities, classroom decorations, and exhibitions.
Q6. What materials are commonly used in flower crafts?
Answer: Common materials include craft paper, glue, scissors, floral wire, paint, beads, pipe cleaners, artificial flowers, and decorative supplies.
These easy flower crafts for kids offer a wonderful blend of creativity, learning, and fun. Whether making paper bouquets, crystal flowers, glowing blooms, or colorful suncatchers, children gain valuable skills while creating beautiful handmade decorations. Try these DIY flower craft ideas to inspire imagination and encourage enjoyable screen-free activities. Get the latest updates first by joining our Telegram group.