Drawing
Easy & Simple Handprint Dog Painting For Kids

This fun and easy handprint dog painting project is perfect for kids of all ages! With the help of a few simple supplies, your little ones will have a blast creating their very own paw-some artwork!
Welcome to this easy and simple handprint dog painting for kids tutorial! This tutorial is designed to help kids of all ages create a fun and unique painting using their own handprints as the main form. With just a few supplies, kids will be able to make a creative painting that they can be proud of. With step-by-step instructions, it’s easy to follow. So grab some paint, paper, and a brush, and let’s get started!
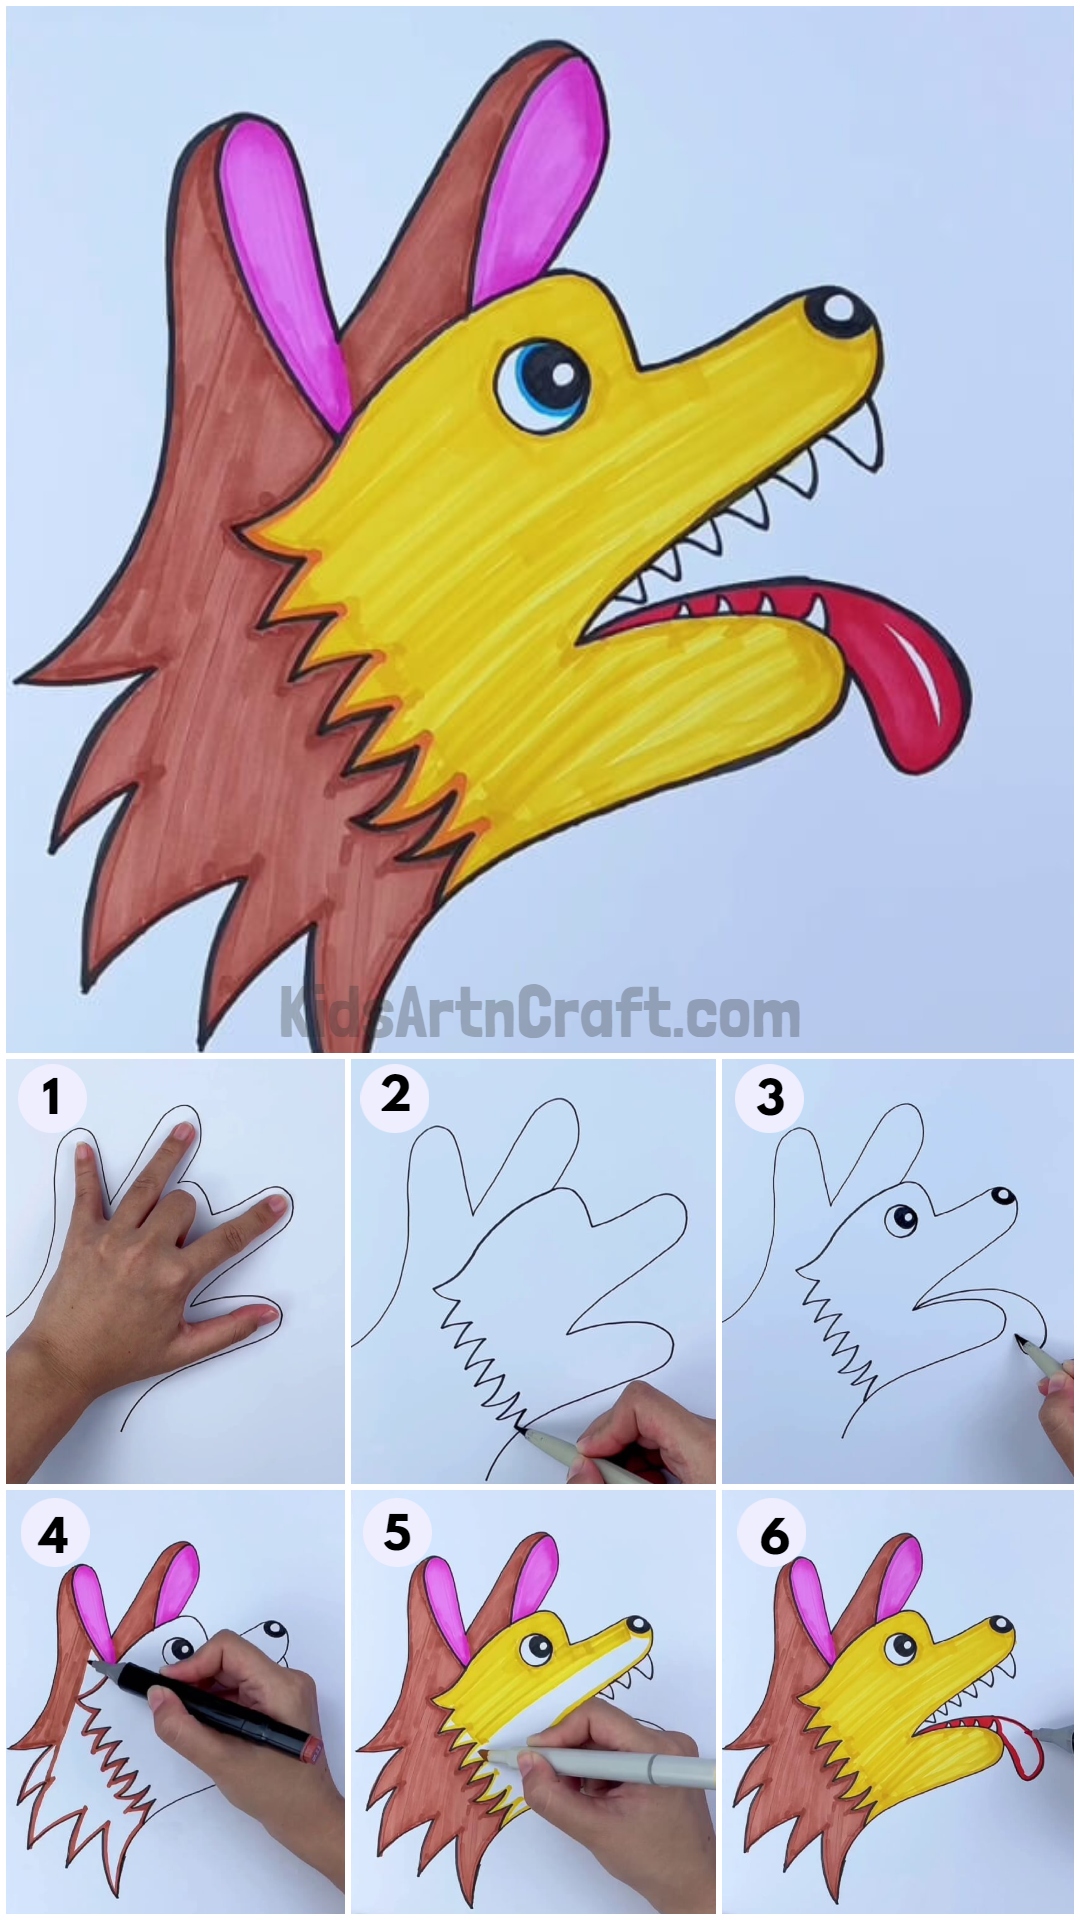
Handprint Dog Painting Art Idea For Kids

Read More: Cloud & Rainbow Paper Craft for Kids – Step-by-Step Tutorial
Material Required:-
To make a Handprint Dog Painting
- A4-size white sheet
- Black Marker Pen
- Pink, Brown, Red & Blue Marker Pens
- Yellow Highlighter
Instructions:-
Creating An Awesome Craft With a White A4 Sheet and a Black Pen – Step 1

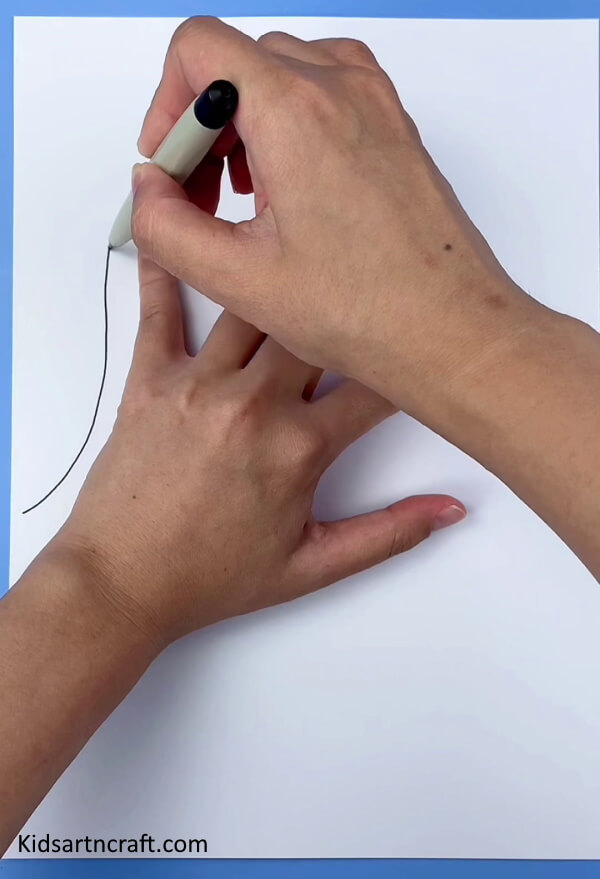
Let’s start making this awesome craft by taking a White A4 Sheet. Fold your middle finger and place your left hand on the paper in a similar fashion as shown in the above image (or watch the step-2 image).
Take a black pen and start drawing the outline of your fingers. Do this while keeping the pen in touch with your hand so that the drawing takes the shape of your fingers.
Drawing Fingers with One Continuous Line – Step 2

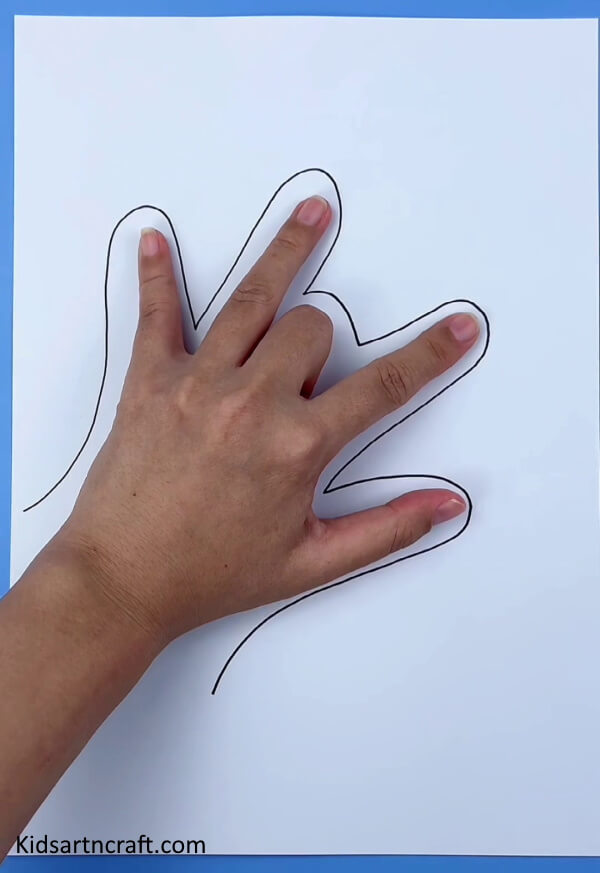
Slowly & Carefully draw the full shape of your fingers in one go, without lifting the pen from the paper. You need to outline one side of the wrist to the other.
Creating an Outline with Your Left Hand – Step 3
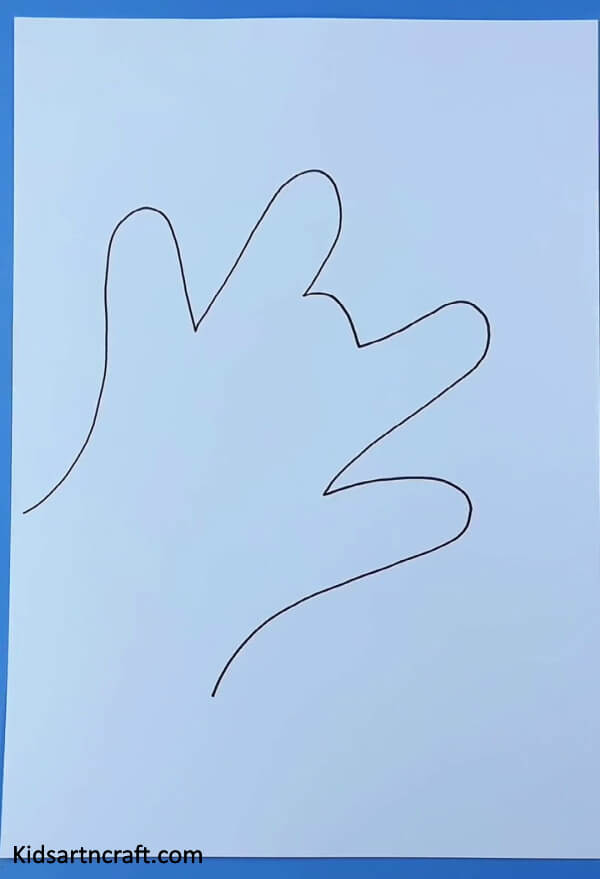
After lifting your left hand from the paper, the outlining will look something like this.
Drawing a Zig-Zag Facial Hair Pattern – Step 4

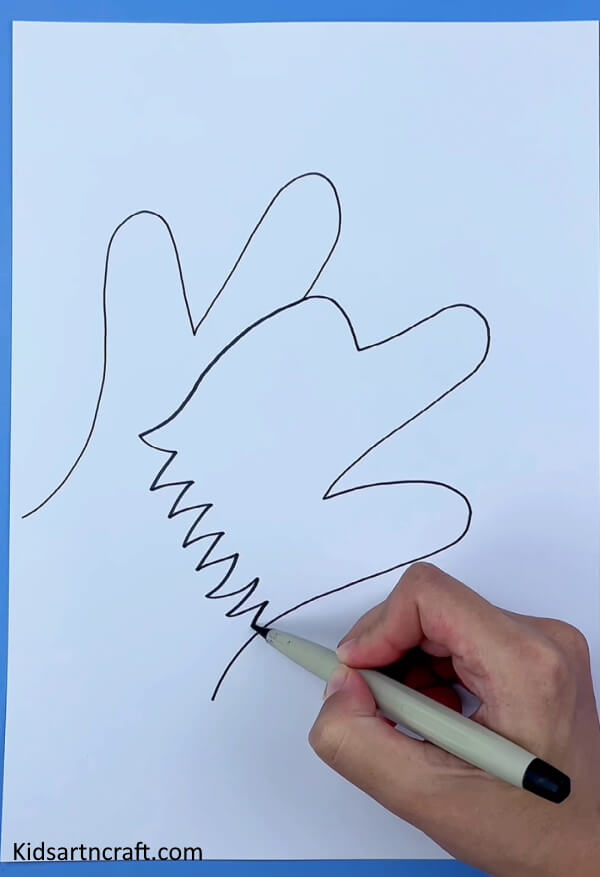
Now, draw a line from the start of the middle finger to the start of the thumb with a zig-zag pattern in between (for facial hair pattern).
Creating a Detailed Eye for a Dog Drawing – Step 5

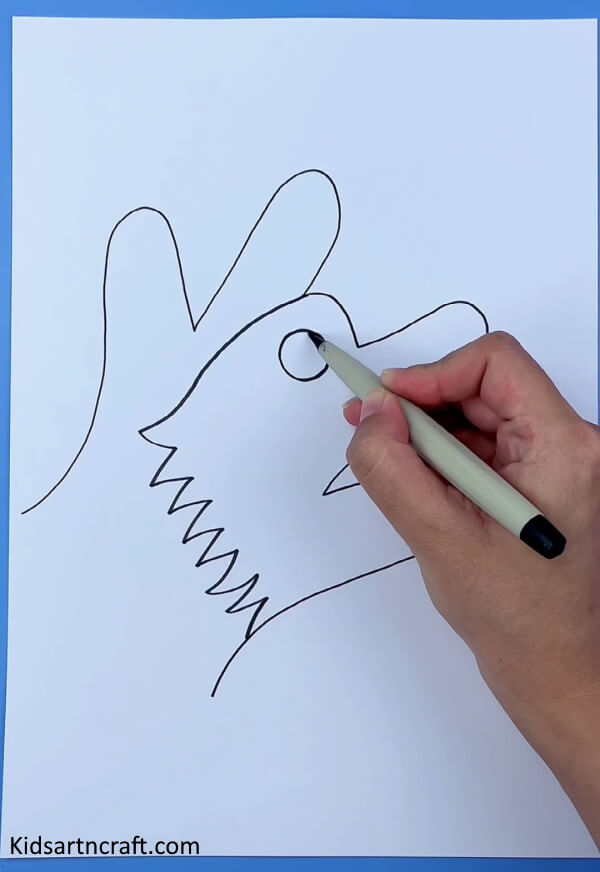
Now, draw a circle using a black pen for the eye of the dog. And shade it properly for a detailed look of the eye. As shown in step 6.
How to Draw a Dog Nose Tip – Step 6
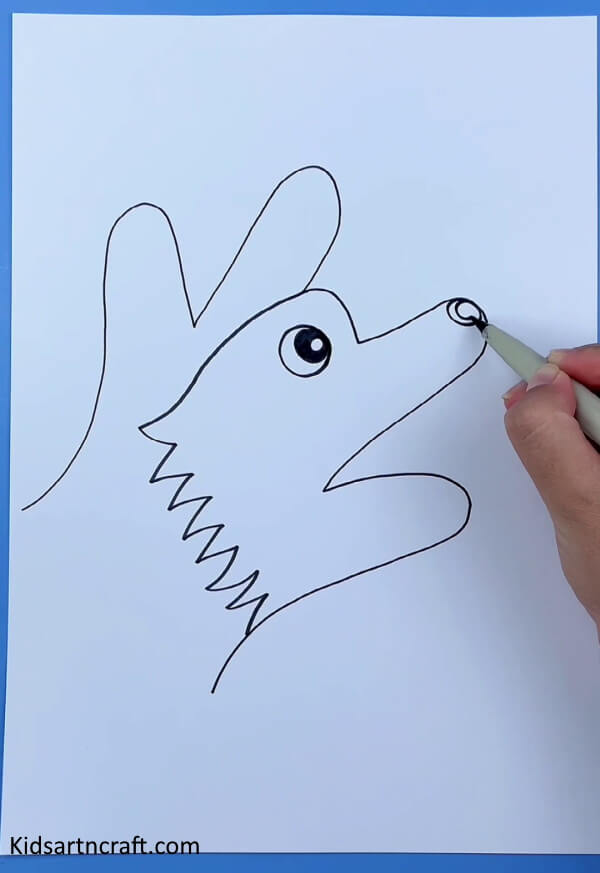
Draw another circle at the end of the index finger for the nose tip of the dog. Shade it as shown in the image above.
Drawing the Tongue: A Step-by-Step Guide – Step 7
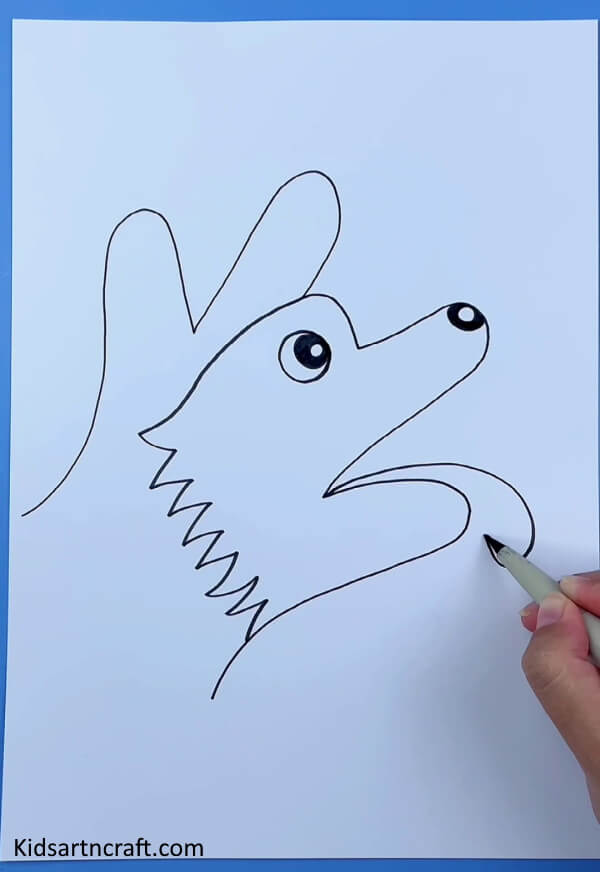
Now comes the tongue part, draw a curved line starting from the place where the index finger and thumb are meeting.
Drawing the Dog’s Teeth – Step 8

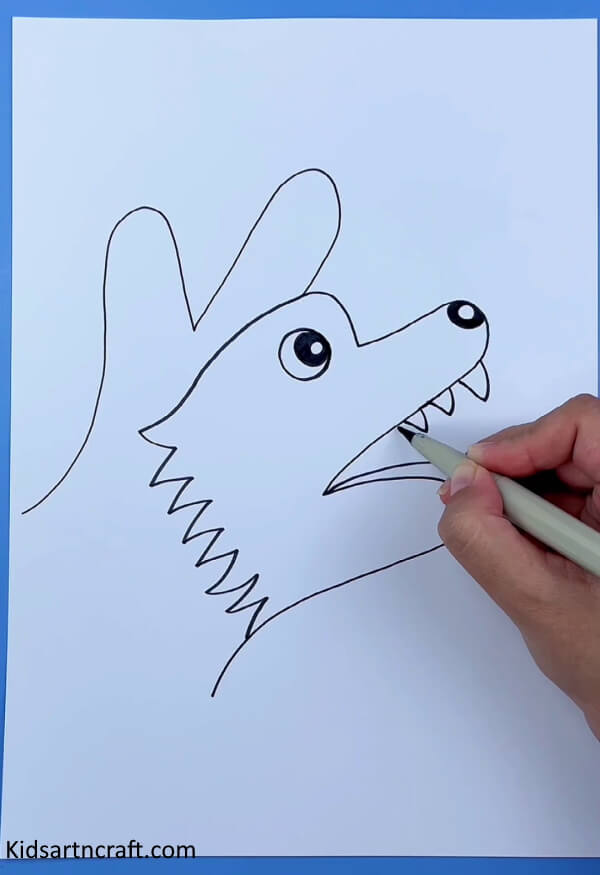
In this step, we will draw the teeth of the dog. Make small V-shapes below the index finger at little gaps. Make such 5-6 V’s for the upper jaw.
Constructing Inverted V’s for the Dog’s Lower Jaw – Step 9

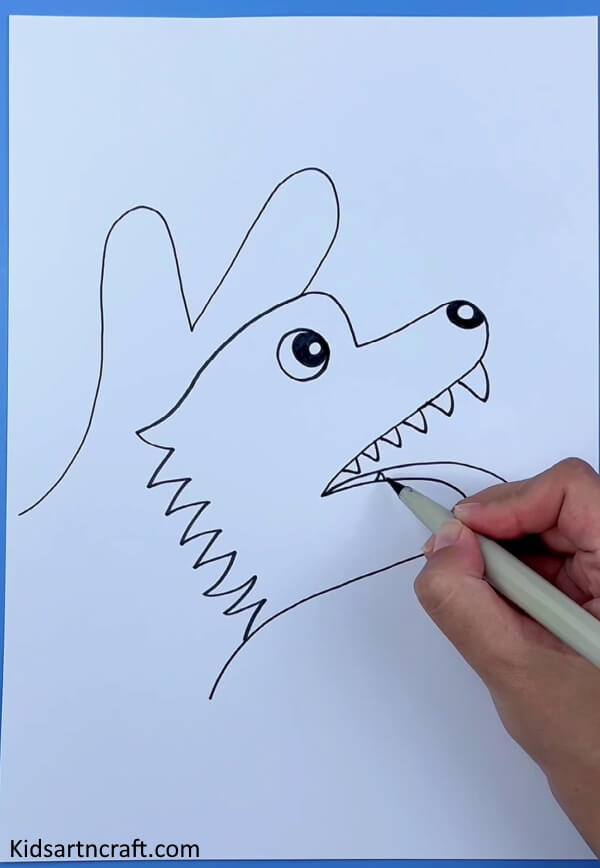
Make similar inverted V’s for the lower jaw of the dog.
Adding Extra Detailing with Small Curves – Step 10

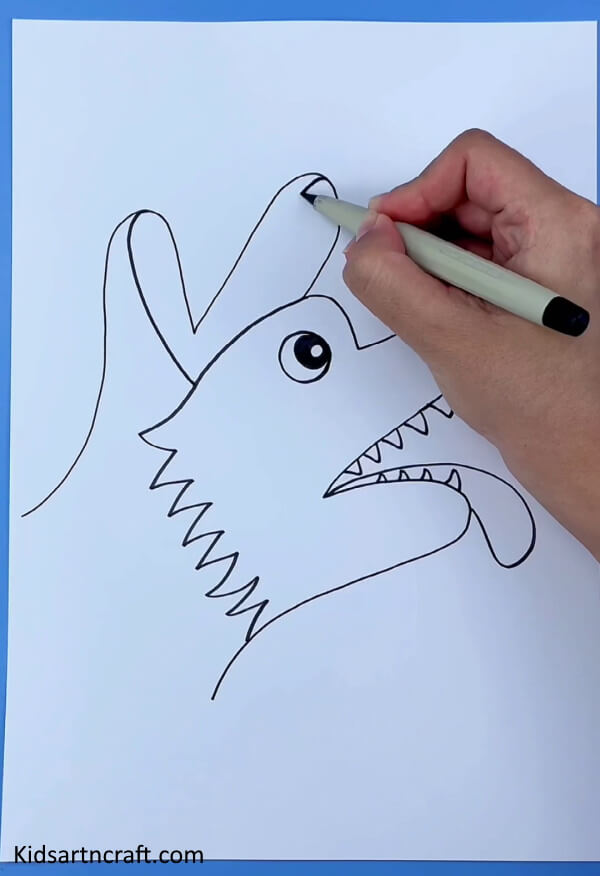
Now, draw 2 small curves for extra detailing. One from the middle of the pinky finger and another from the ring finger, as shown in the above image.
Drawing a Zig-Zag Pattern for Neck Hair – Step 11

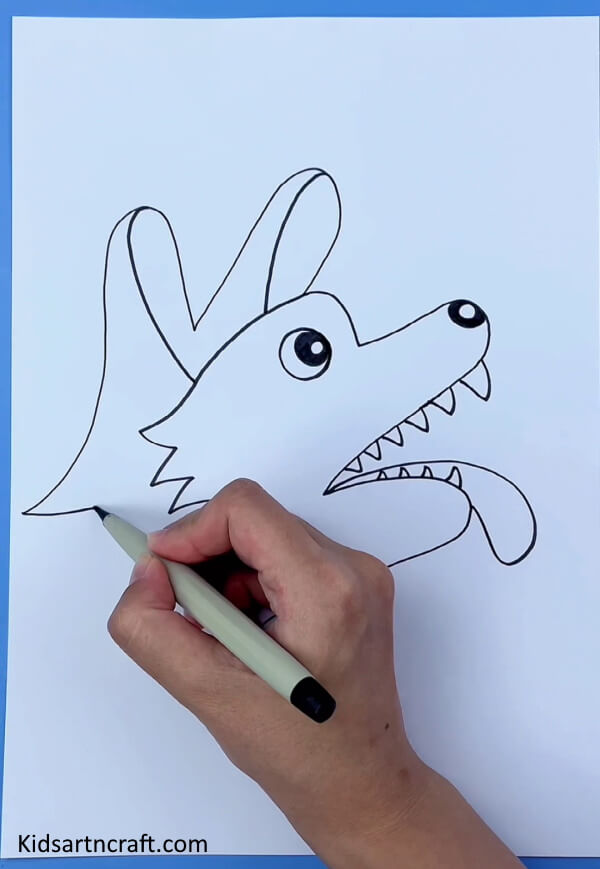
Now, draw a zig-zag pattern from one end of the wrist to the other end of the wrist for the neck hair.
Coloring the Ears with a Pink Marker – Step 12
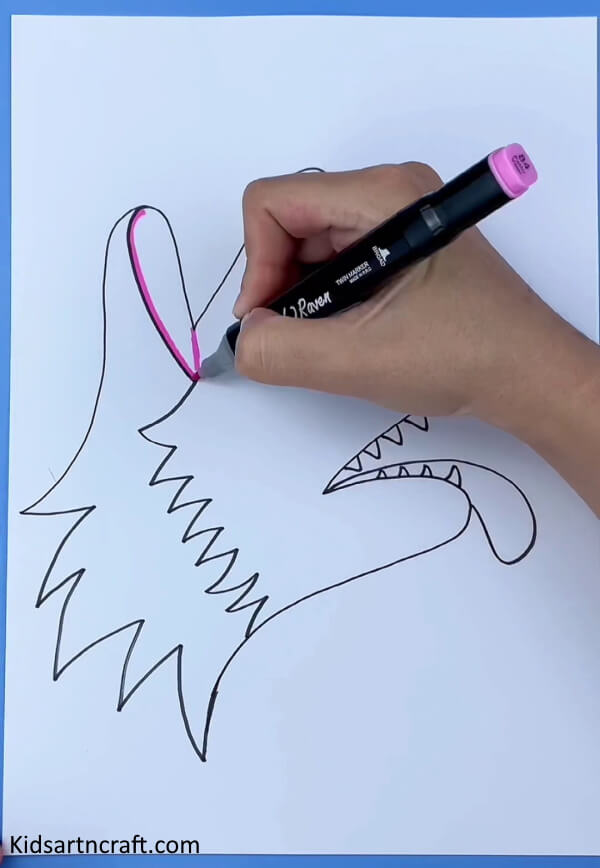
Now comes the part of the coloring.
Take a pink marker and shade the inner part of the ears.
Coloring the Dog’s Hair with a Brown Marker – Step 13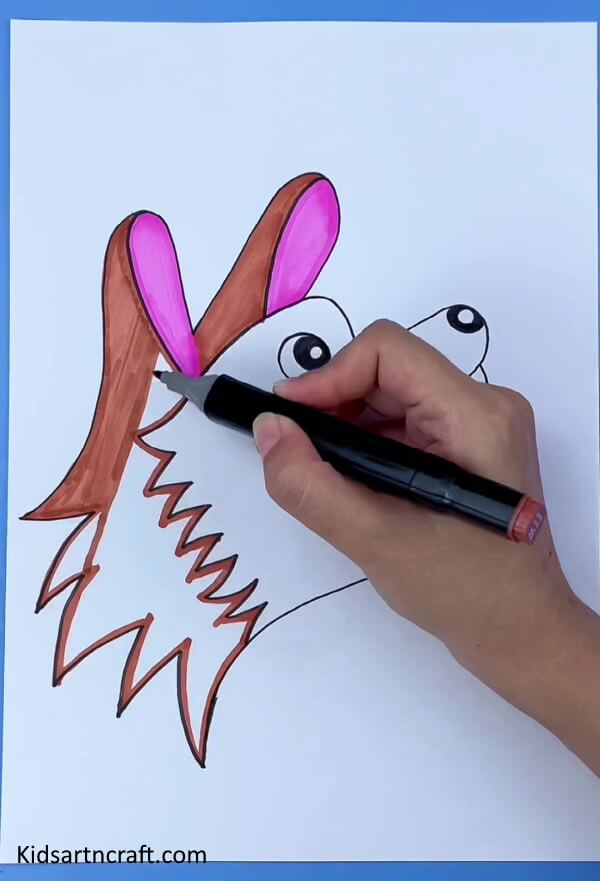

Next, take a brown marker for coloring the dog’s hair.
Start by outlining the edges first, and then color in between those brown lines. Take the above image for reference.
Highlighting the Zig-Zag Line – Step 14

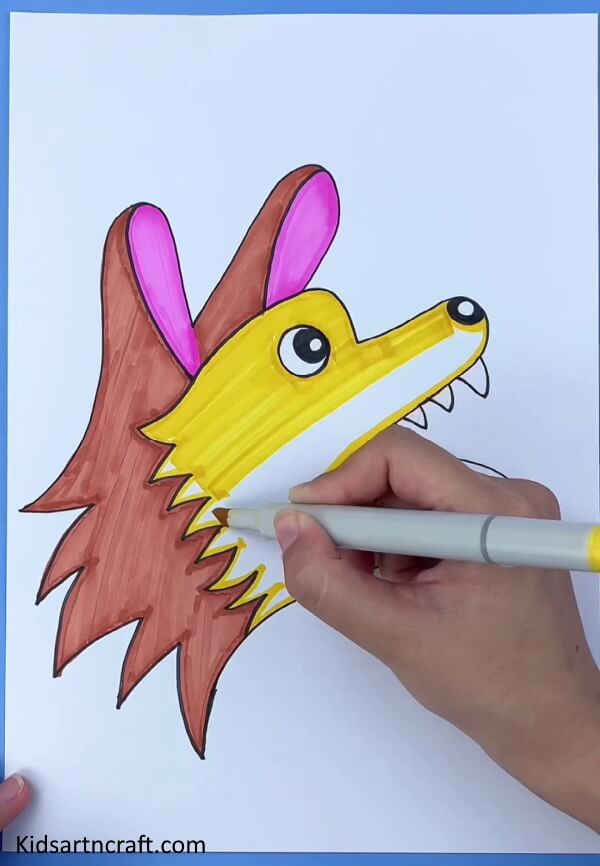
Now, take a yellow highlighter for the face part on the right side of the zig-zag line. Color the edges first and then fill in the yellow color for proper shading.
Coloring the Tongue Carefully with a Red Marker – Step 15
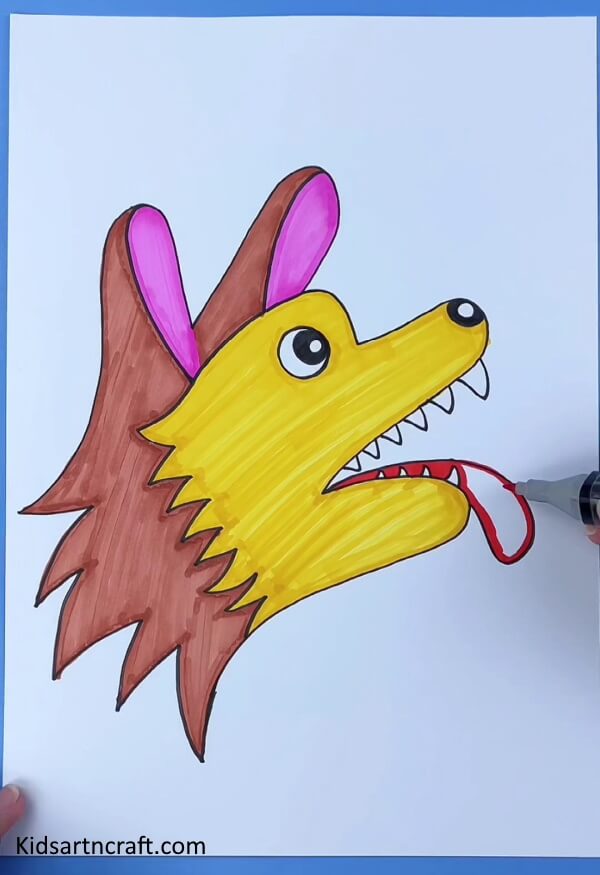
In this step, take a red colored marker and color the tongue part carefully. Make sure you don’t color outside the edges.
Leave a narrow white space in between the tongue to create a proper shading effect.
An Easy Hack to Make a Fun Craft in Minutes! – Final Steps
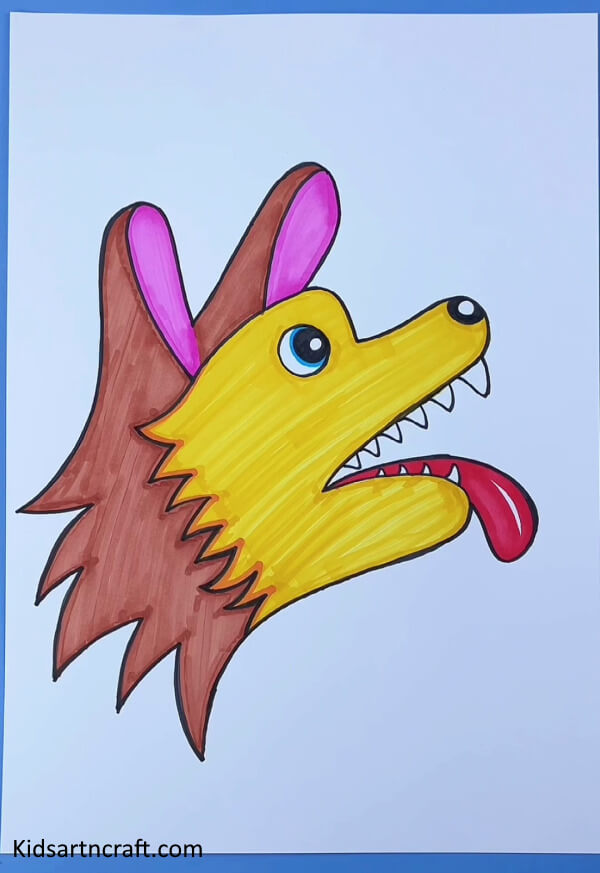
At last, use a blue color marker for the eyes. Draw a narrow blue curve around the cornea of the eye.
Easy Handprint Dog Painting for Kids | Cute DIY Animal Art Craft

Learn how to make an easy handprint dog painting with this fun DIY animal art tutorial for kids. Create cute dog artwork using colorful handprints and simple painting techniques perfect for preschool activities, classroom projects, daycare learning, and home fun. This creative craft helps improve imagination, creativity, and fine motor skills in children.
Fun Handprint Dog Painting for Kids
Handprint dog painting is a creative art activity that allows children to turn their hand shapes into adorable dog artwork. This simple painting idea is perfect for preschoolers and young artists who enjoy exploring colors and creating unique designs. Kids can make cute puppy faces while developing their imagination and artistic skills.
Creative Ideas for Handprint Dog Art
- Create different puppy designs using hand outlines.
- Add colorful backgrounds with parks, homes, or nature scenes.
- Make cute dog faces with different expressions.
- Design handmade pet-themed greeting cards.
- Create an animal art collection using handprint techniques.
Why Kids Love Handprint Dog Painting
Handprint painting makes artwork more personal because children use their own hand shapes to create something special. This activity encourages kids to experiment with colors, add creative details, and enjoy the process of making handmade art.
Skills Children Develop Through This Activity
- Improves hand-eye coordination and motor skills.
- Encourages creativity and self-expression.
- Develops color recognition and design skills.
- Builds confidence through creative work.
- Improves focus while adding small details.
Ways to Decorate Handprint Dog Paintings
- Add collars, ears, spots, and facial features.
- Use different colors to create unique puppies.
- Draw backgrounds like gardens or playgrounds.
- Combine painting with drawing and coloring.
- Add decorative elements to make artwork special.
Learning Opportunities with Dog-Themed Art
Children can learn about pets, animal care, and different dog breeds while creating their paintings. Parents and teachers can use this activity to encourage conversations about animals and make art sessions more educational and enjoyable.
Creative Ways to Display Dog Artwork
- Create a wall display of children’s artwork.
- Decorate rooms with handmade paintings.
- Add paintings to an art scrapbook.
- Give handmade dog art as a special gift.
- Create a classroom animal-themed display.
FAQs
Q1. What materials are needed for handprint dog painting?
Answer: Children need paper, paint, markers, and a brush to create a simple handprint dog painting.
Q2. Is handprint dog painting suitable for preschoolers?
Answer: Yes. This activity is suitable for preschool and kindergarten children as it supports creativity and hands-on learning.
Q3. Can children use different colors for dog paintings?
Answer: Yes. Kids can use different colors to design imaginative puppies and create unique artwork.
Q4. How does handprint art help children?
Answer: Handprint art supports creativity, coordination, concentration, and confidence while allowing children to explore artistic expression.
Handprint dog painting is a fun and creative activity that helps kids explore art through imagination. This simple project encourages creativity, improves skills, and allows children to create adorable pet-themed artwork. Inspire creativity and curiosity with easy craft ideas and fun educational activities. Follow us on Telegram, Facebook & YouTube.
Reviewed By Yash Sharma
More Articles from Kids’ Art & Craft
- Glitter Foam Sheet Crafts Ideas
- DIY Painting Hacks for Kids – Flower Making Step-by-Step Tutorial
- DIY Beads Coaster Crafts For Kids
- Recycled Winter Craft Ideas For Kids
- Easy Santa Claus Craft Ideas For Kids