Paper Crafts
How to Make Paper Tulip Step by Step Instructions Easy Tutorial

The large, bright-colored (for example, red, white, pink, or even yellow), spring-blooming flowers are indeed a treat to the eyes. Yes, I’m talking about the beautiful tulips. Flowers, no matter what size, shape, color, etc, in themselves are a definition of delicacy and beauty. To inculcate these qualities in our art and craft, one MUST try making these pretty entities with paper. So let us know how to make paper tulips step by step using an easy tutorial.
How to Make A Paper Tulip
Materials Required:
- A4 sized sheet(green)
- A pair of scissors
- Pencil
- Glue
- Craft paper of the color of the flower

Initiation:
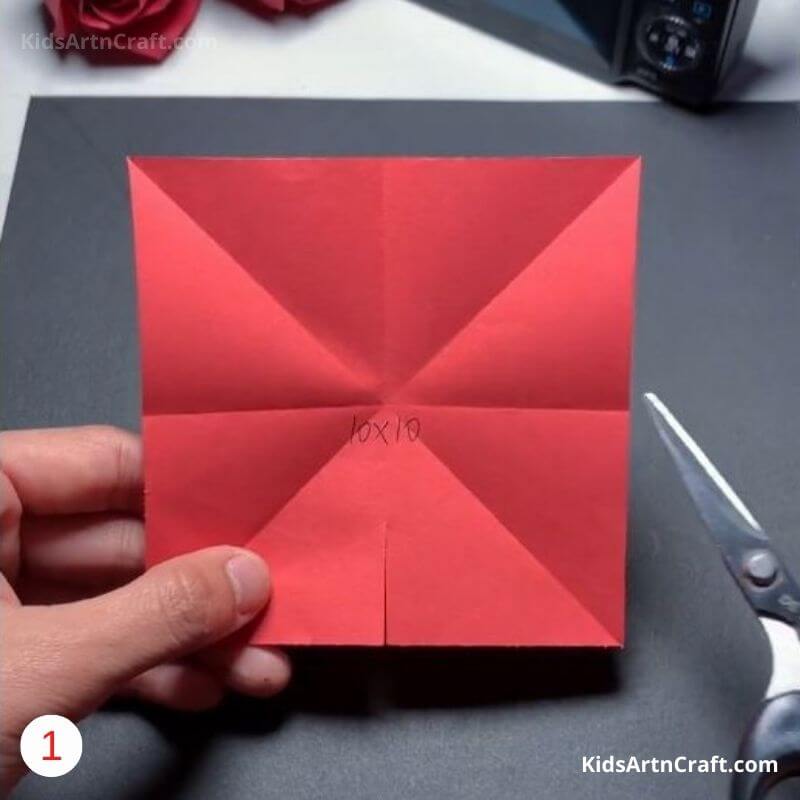
1. Take the craft paper and fold it twice to get four equal parts. Fold it further diagonally. Now open the paper back into its original form. Make a small cut on the bottom crease.
Creases:
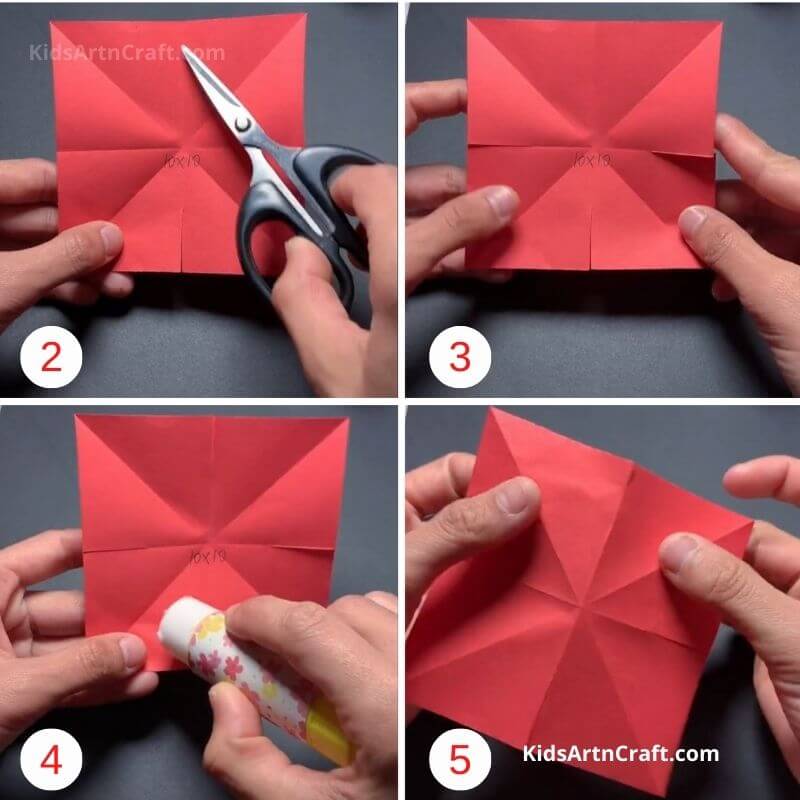
2. Make small cuts of the same dimension on the other two sides (other than the top side) using a pair of scissors.
3. The paper is now cut from three adjacent sides.
4. Now apply glue to the two opposite portions of the bottom-most slit.
5. Hold the sides using your fingers.
Folding of the sheet to a 3D form:
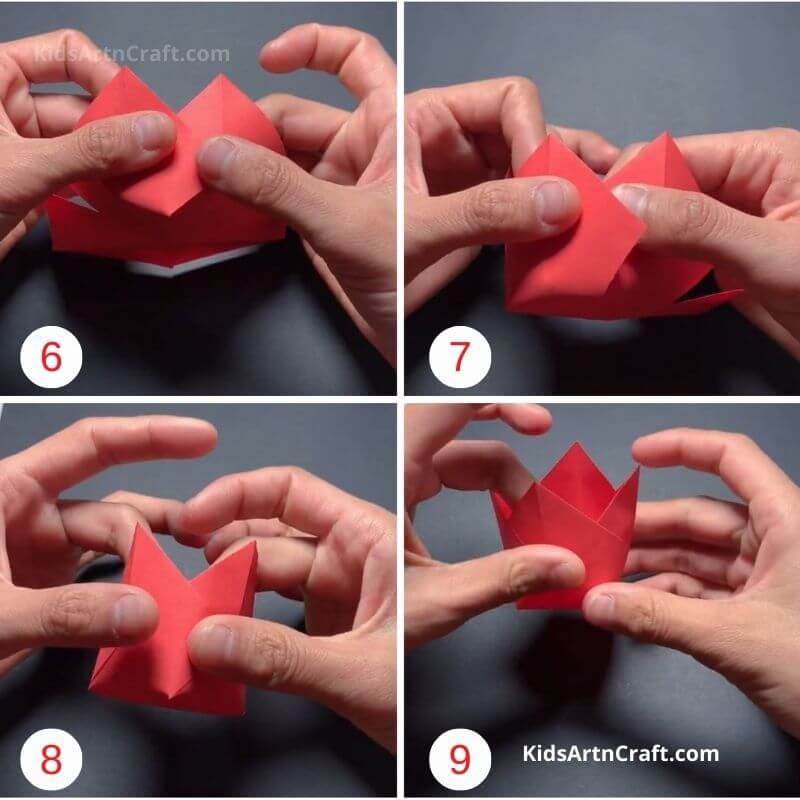
6. Folding the portions perpendicularly, overlap one of them over the other. Press them gently so that they stick to each other properly.
7. Repeat the same folds to all the other parts, taking two adjacent ones at a time.
8. Stick them carefully. Make sure you maintain the symmetry while overlapping.
9. Press the petals from the inner portion as well.
Making of the leaves:
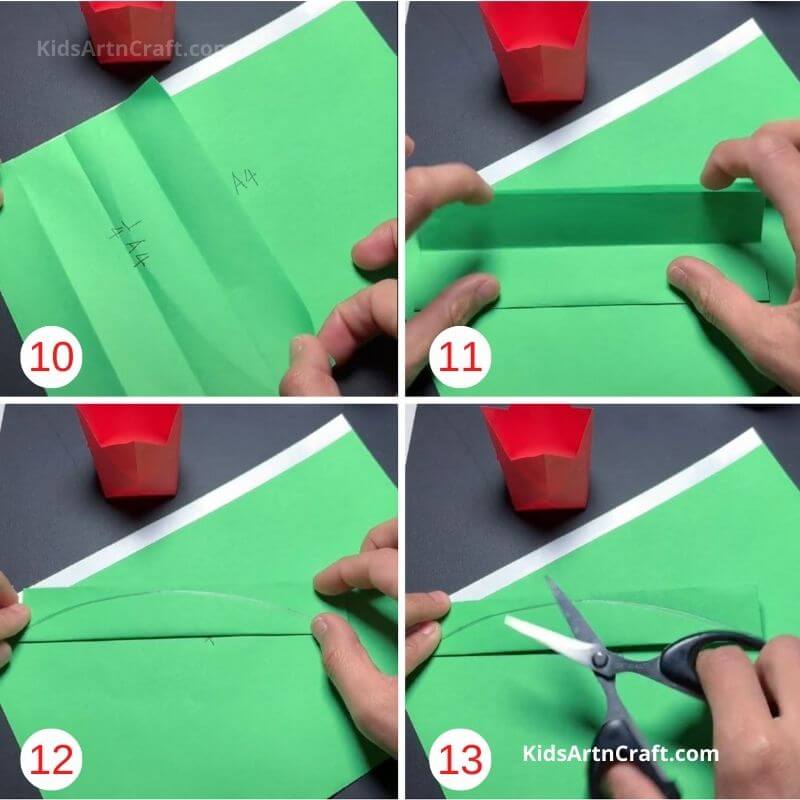
10. Now, take the green-colored A4-sized sheet. We will be using only one-fourth of the sheet. Now fold the part twice along the horizontal axis.
11. The piece will be divided into 4 equal parts. Now fold it again.
12. Draw the shape of half of a leaf throughout the whole length. Make it longer to make it look realistic, i.e., that of an actual tulip.
13. Cut the shape evenly using a pair of scissors.
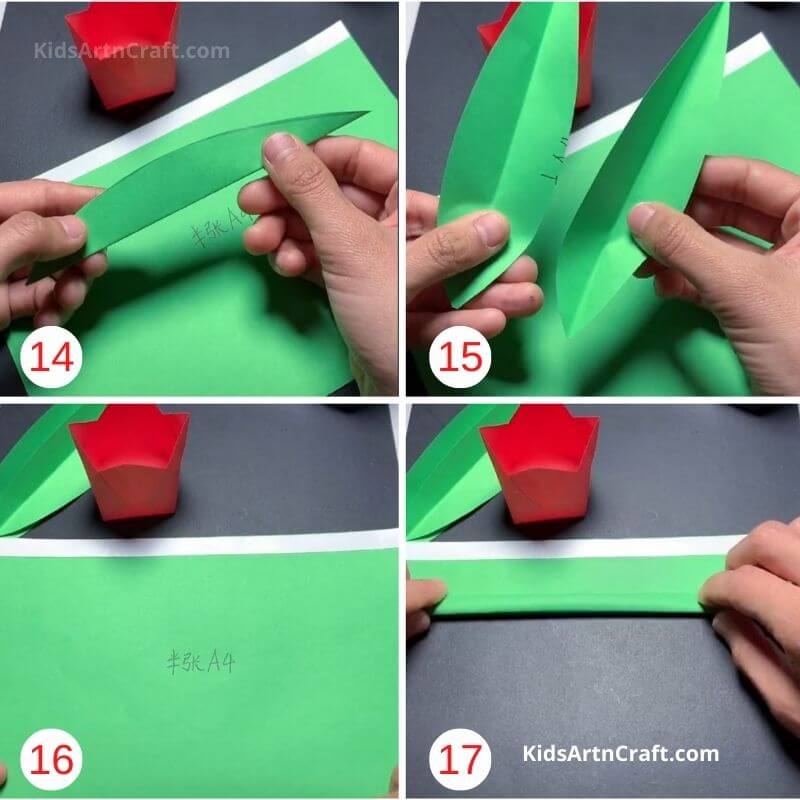
14. Remove the excess portion of the green paper after you get the cut-out.
15. Open it. You’ll see two leaves of the same size have been cut.
16. Now we will be using the left three-fourths of the green A4-sized sheet we just used.
17. Fold the piece horizontally upwards, such that it attains a circular surface.
Making of the stem:
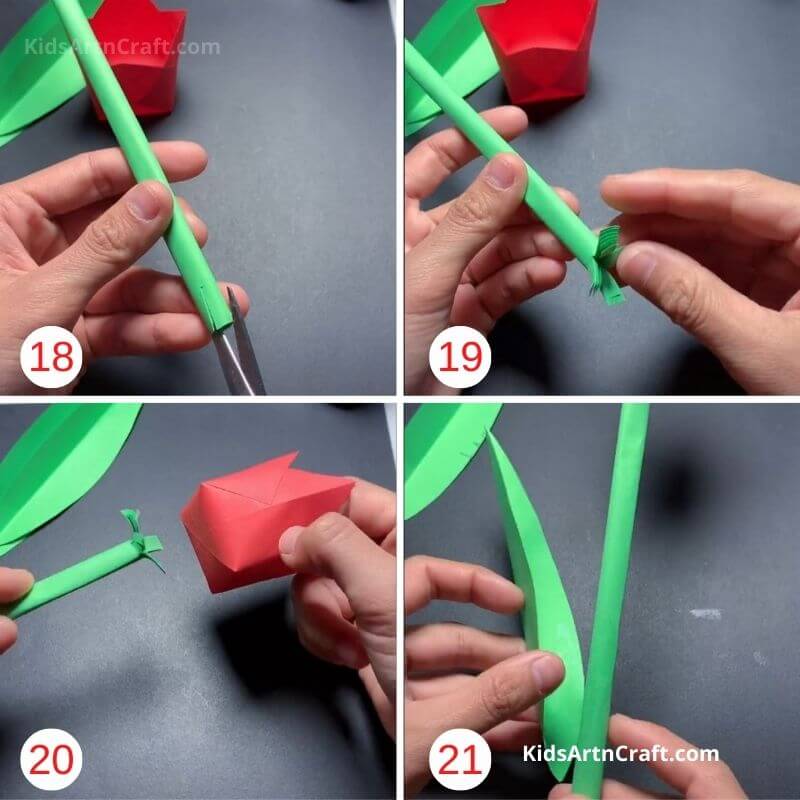
18. Make small cuts with the help of scissors. Cover all the inner layers formed due to the folding.
19. Press each of them outwards in all four directions so much that the surface becomes almost flat for ease in sticking.
20. Paste the stick on the bottom of the tulip.
21. Now bring in the leaves of the flower.
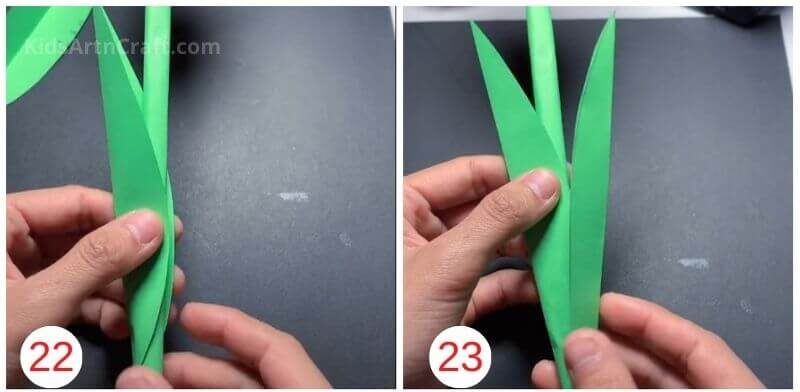
22-23. Fold the leaves inwards around the stick.

Your Tulip is Ready!
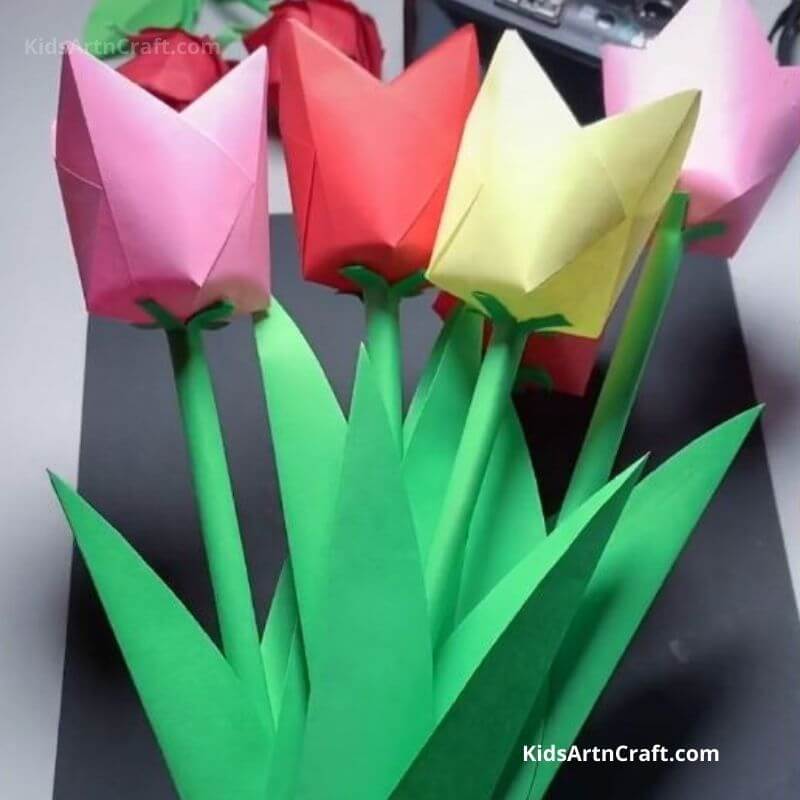
Your paper tulips are absolutely ready! Flaunt these crafty masterpieces of yours in the best way possible. Add advantage to it by making more tulips of different colors and making a handmade bouquet of beautiful paper tulips. Decorate them according to the place of their usage and keep adding beauty to them in your own way.
Specialty About Tulips:
- The flower consists of three petals and three sepals.
- Since the sepals look the same as their petals. They appear to be 6 petals altogether.
- The variety of tulips touches heights. There are about 3000 different varieties of tulips alone in the wide-ranging kingdom of flowering plants.
- As early as the seventeenth century, tulips were available in the market at a very high price, so much so that it almost equaled the wage of a working-class man.
- The Netherlands is home to the largest number of tulip plantations in the world. Crediting the amount, this country is also the largest exporter of tulip bulbs.
- Tulips gain their names originate from the word ‘dulband’, meaning a turban.
Some More Paper Flower Craft Tutorial
Making Tulip Flowers with Paper

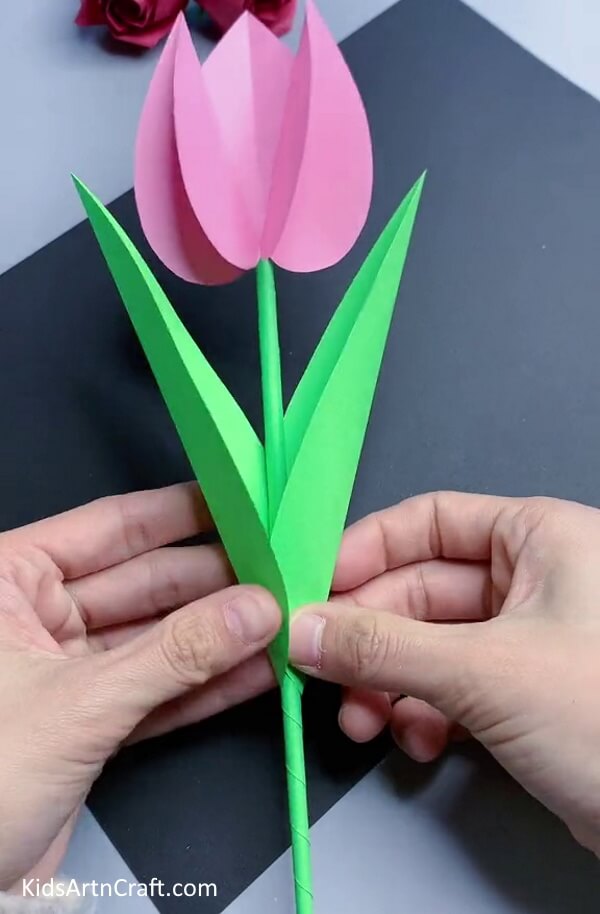
Image Source/Tutorial: Kids Art & Craft
Making tulip flowers with paper is an easy and fun craft for kids. It requires minimal supplies and can be used for decorations or as a gift. With a few simple steps, you can create beautiful paper tulips that will last for years.
Easy Paper Tulip Craft Step-by-Step Tutorial

Learn how to make a beautiful paper tulip with this easy step-by-step tutorial. This DIY paper flower craft is perfect for kids, beginners, and spring decorations. Follow simple folding and cutting techniques to create colorful tulip flowers using paper for greeting cards, gifts, classroom activities, or home decor.
FAQs
Q1. What materials do I need to make a paper tulip?
Answer: To make a paper tulip, you will need a few basic materials: a sheet of construction paper, scissors, glue, a pencil, and a ruler.
Q2. How can I cut the construction paper for the petals?
Answer: To cut the construction paper for the petals, use a ruler to draw two curved lines from the bottom corner to the top corner of the paper. Then use scissors to cut the paper along the lines.
Q3. How do I make the stem and leaves?
Answer: To make the stem and leaves, cut a strip of construction paper that is about 1 inch wide and 9 inches long. Then fold the strip in half lengthwise and glue the edges together. Once dry, glue the stem to the tulip base. Then cut a few leaf shapes out of construction paper and glue them to the stem.
Q4. What color of construction paper should I use?
Answer: You can use any color you like! However, red, yellow, and pink are traditional colors for paper tulips.
Q5. How do I make the base of the paper tulip?
Answer: To make the base of the paper tulip, use a pencil to draw a circle on a sheet of construction paper. Then cut the circle out using scissors.
Q6. How do I assemble the paper tulip?
Answer: To assemble the paper tulip, start by gluing the petals together around the base. Then glue the stem and leaves onto the base of the tulip.
Q7. Can I make multiple paper tulips?
Answer: Yes, you can make as many paper tulips as you would like!
Making paper tulips is a simple and enjoyable craft activity for kids of all ages. With just a few basic materials, children can create colorful handmade flowers while improving creativity and fine motor skills. These DIY tulip flowers are perfect for spring decorations, classroom projects, greeting cards, and thoughtful handmade gifts. Try using different paper colors and designs to create an entire bouquet of beautiful tulips at home or in school.
Make learning fun with easy DIY crafts, colorful activities, and unique school project ideas for kids! Join our Telegram community and follow us on YouTube & Facebook. today.
Reviewed by Yash Sharma
Read More:
- How to Make an Origami Elephant
- How to Make An Origami Dog
- How to Make An Origami Cat
- DIY Origami Paper Butterfly Craft – Step by Step Image Tutorial
- How To Make An Origami Rose With Kids