DIY and Crafts
How To Make A Paper Owl

There must be very few people whose favorite bird is the owl. Owls are a very rare kind of bird. If you see you can’t always see them. This nightbird is very fascinating to many kids. Kids love making owls as they kind of represent their laziness. Jokes apart! Nowadays, children are very creative and sensitive when showing their talents. They can be very interested in making an owl. So, let’s get a hold of your stationery and give life to an owl.
How To Make A Paper Owl
Materials Required:
- A paper of 20*20 c.m.
- Two-button eyes. ( making birds-eye) P.s:- You can also draw it.
- A glue.
- Pastel or watercolor.
- A black marker.
Procedure:
- Take a 20*20 c.m. paper, fold it left to right by matching the edges side by side, then fold it similarly in an upside-down manner. The folds should make the same four boxes in the paper.
- You have to turn the 20*20 c.m. page and place it like a diamond shape, fold the edge of the left side to the right side by making a triangle. You should do the same with it upside down. The folds should form like four little diamond shapes on the page.
- Put your finger in the middle of the page, and make a diamond shape by folding the sides. Notice the straight line of the middle of this little diamond shape, and the edges of the page should make a triangle side-wise by turning it.
- Notice the straight line of the little diamond shape, then fold it in sideways from down it will make a narrow triangle. Then fold the upside of it into a triangle shape, and then turn this part and fold it similarly.
- Lose all the folds, put your hand on the middle portion of it, look at it upside down, make two narrow triangles, but don’t lose the upper triangle area. Then, turn it.
- Look at the turned paper; it should look like a diamond shape, and a narrow triangle should be peeking over it. Fold the diamond shape sideways, following the narrow triangle over it. Leave a triangle shape in the middle of it, then fold it.
- Lose the folds, put your hand in the middle of the page, leaving the narrow triangle on the top. Then, fold it sideways into a triangle shape. Then take the bottom part of it, leaving the middle line upside down, and fold both parts in an arrow-like form.
- Lose the folds, then make a space with your hand on both sides of the page, then fold the edges by making a small triangle, making it look like an arrow you made before. Open the triangle folds over it, and it will look like a star.
- The star shape pagesare middle, which looks like a pyramid. Unfold it and then fold it into a square shape. Turn the star shape and fold two upside-down arms of it, just make a space in the middle,e and fold like a little triangle on its upper edge to the center. Fold the one arm with the little triangle made in the center, er and the other arm by turning it in the same way.
- Fold the bottom triangle above by making a very small triangle in the center and enter it in the middle of the other two folds. Do the same by turning the page.
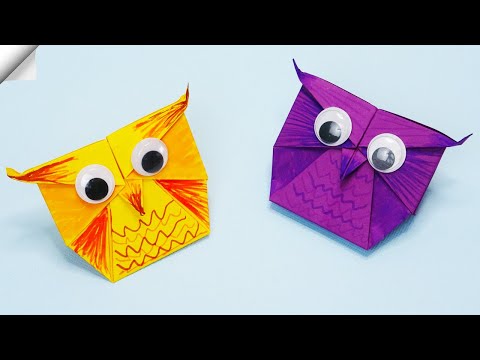
- Draw the owl’s belly and highlight the piece with black markers and colors.
- Attach both sides of the piece with glue.
- Draw or attach the button eyes of your owl with glue and make it fly, finally.
Your owl is ready for a flight! This process does not need many materials; it is very easy to do. You only have to understand the folds and turns of it. It will make children more concentrated, and they will have fun for sure! So,o hurry up, get your stuff, and enjoy your own cute owl.
FAQs on How To Make A Paper Owl
Q1. What materials do I need to make a paper owl?
Answer: You will need paper, scissors, glue, and something to color with (marker, crayon, or paint).
Q2. How do I start making a paper owl?
Answer: Start by cutting out two identical owl shapes from the paper.
Q3. How do I make the ears and the eyes of the paper owl?
Answer: Cut two small triangles for the ears, and two circles for the eyes.
Q4. What do I need to do to put the owl together?
Answer: Glue the two owl shapes together, then glue the ears and eyes on.
Q5. How do I add color to the paper owl?
Answer: Use markers, crayons, or paint to add color to the owl.
Q6. How can I make the wings of the paper owl?
Answer: Cut out two large ovals and glue them onto the sides of the owl.
Q7. How do I make the beak?
Answer: Cut out a triangle and glue it onto the head of the owl.
Q8. How do I make the feet?
Answer: Cut out two small rectangles and glue them onto the bottom of the owl.
Q9. What can I use to decorate the paper owl?
Answer: Use glitter, sequins, or other craft materials to decorate the owl.
Q10. How can I make the paper owl look more realistic?
Answer: Add feathers to the wings and draw lines or dots on the face to make it look more realistic.
Discover endless kids’ craft ideas, DIY fun, and educational activities designed to inspire creativity. Follow us on YouTube & Facebook and join our Telegram community today.
Reviewed By Rachit Gupta
Read More:
- How to Make An Antistress Transformer Paper Toy
- How to Make a Paper Cat
- How To Make A Paper Owl
- How to Make A Paper Origami Toy – Spinner
- How to Make a Cute Chicken Family for Easter