Painting
Summer-Spring Tree Landscape Painting Tutorial

Explore a summer spring tree landscape painting step-by-step tutorial to learn painting. This activity is for you to learn a new technique.
Beautiful Summer-Spring Tree Landscaper Painting


Read More: Bubble Wrap Painted Pineapple Craft Step-by-Step Tutorial
Material Required
- A circular canvas
- White and black tape
- Acrylic colors
- Paint brushes
- A sponge
- A scale
Instructions
Step 1: Starting With Blue Color


Firstly, start with blue acrylic color and paint the entire canvas.
Step 2: Blending With Light Blue

Now, blend the blue color with light blue acrylic color.
Step 3: Using Black Tape

It is time to divide the area of the canvas into two. Paste the tape vertically dividing the canvas in two equal parts.
Step 4: Using White Tape

On the left side, paste two white tape strips horizontally. Look at the given picture for the reference.
Step 5: Sea Green Color

By using a paintbrush and sea green acrylic color, paint the area between two horizontal white tape strips. After drying, remove the white tapes.
Step 6: Dark and Light Green Color

Now, start painting from just below the sea green color. Further, by using the light green color, start painting from below the dark green color.
Step 7: Let It Dry

Let all the colors dry. Make sure you are painting in one direction.
Step 8: Grass and Flowers

Now, by using an ear bud and orange acrylic color, make some flowers on the light green region. Also, paint some grass on the right side corner of the left side of the canvas.
Step 9: The Right Side

Start working on the right side of the canvas. By using the green acrylic color, color the field on the right side.
Step 10: Yellow Flowers

By using yellow color, paint some yellow flowers.
Step 11: Lemon Yellow Color

Add details to the yellow flowers. Use lemon yellow acrylic color and paintbrush for it.
Step 12: On The Left Side

Now, on the left side, use dark green acrylic color to paint bushes. Also, by using purple acrylic color, paint some flowers on the light green region.
Step 13: Removing the Tape

Remove the tape and start painting a tree on the left side.
Step 14: The Tree

First, paint the trunk using brown acrylic color. Further, paint leaves using green acrylic color.
Step 15: Leaves On The Tree

Now, paint the leaves of the tree by using different shades of green.
Step 16: On Right Side

Use a sponge on the right side of the canvas. Use it to add texture and paint cherry blossoms of the tree.
Step 17: Pink Color

Use pink acrylic color for cherry blossom.
Step 18: The Trunk

Now, by using the brown acrylic color, paint the trunk of the cherry blossom tree.
Step 19: Light Pink Color

Use light pink acrylic color and an ear bud to add details to the cherry blossom.
Step 20: Adding Details

Add details throughout the cherry blossom tree.
Step 21: Another Layer
Enchanting Summer-Spring Tree Landscaper Art
Add another layer of details, use the same color and the ear bud.
Step 22: Fence
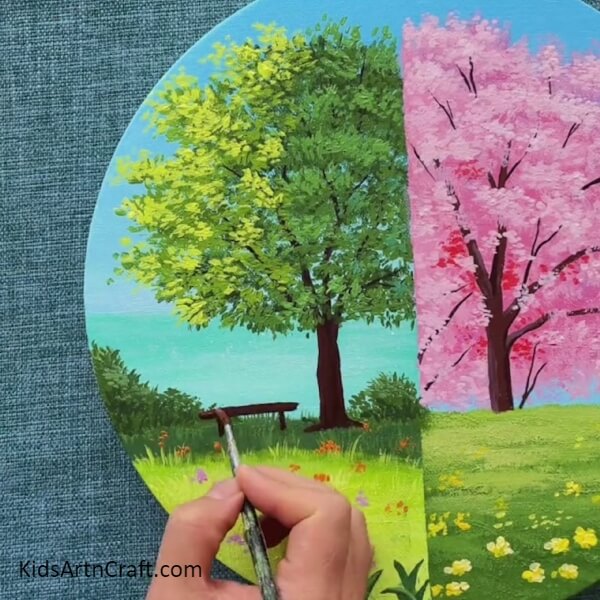
Paint a fence on the left side of the canvas by using brown acrylic color.
Step 23: Using A Scale

By using a scale and a paintbrush, sprinkle some white paint on the painting. Just tap the paintbrush dipped in white paint in the scale.
Step 24: Painting A Man

Paint a man on the right side of canvas.
Step 25: Painting A Woman

Also, paint a woman on the same side, that is, the right side of canvas.
Summer-Spring Tree Landscape Painting Tutorial!

With this you have come to the end of summer spring tree landscape painting. This was a good learning experience for kids as they learnt about painting two different sceneries on the same canvas. This craft idea would teach students about a new technique of painting, they will end up polishing their skills. This must be fascinating for kids of 10-15 years of age. This painting looks adorable. Kids have learnt about a new mechanism from this tutorial. They can use it as room decor.
Hope you liked this summer spring tree landscape painting step-by-step tutorial. Do not forget to share your comments and inform us about your experience. Make sure to revisit our website!
Thanks for visiting our website.
Follow us on YouTube for art and craft tutorials and much more.
More Articles from Kids Art & Craft
- Easy Painting Video Tutorial for Beginners
- Easy Hand Drawing And Painting Video Tutorial for Kids
- Acrylic Painting Make Easy Video Tutorial for Kids
- Easy Crayons Drawing At Home Video Tutorial for Beginners
- Summer Watermelon Drink Artwork For Kids