Popsicle Stick Crafts
Beautiful Swing Popsicle Stick Craft Tutorial For Kids


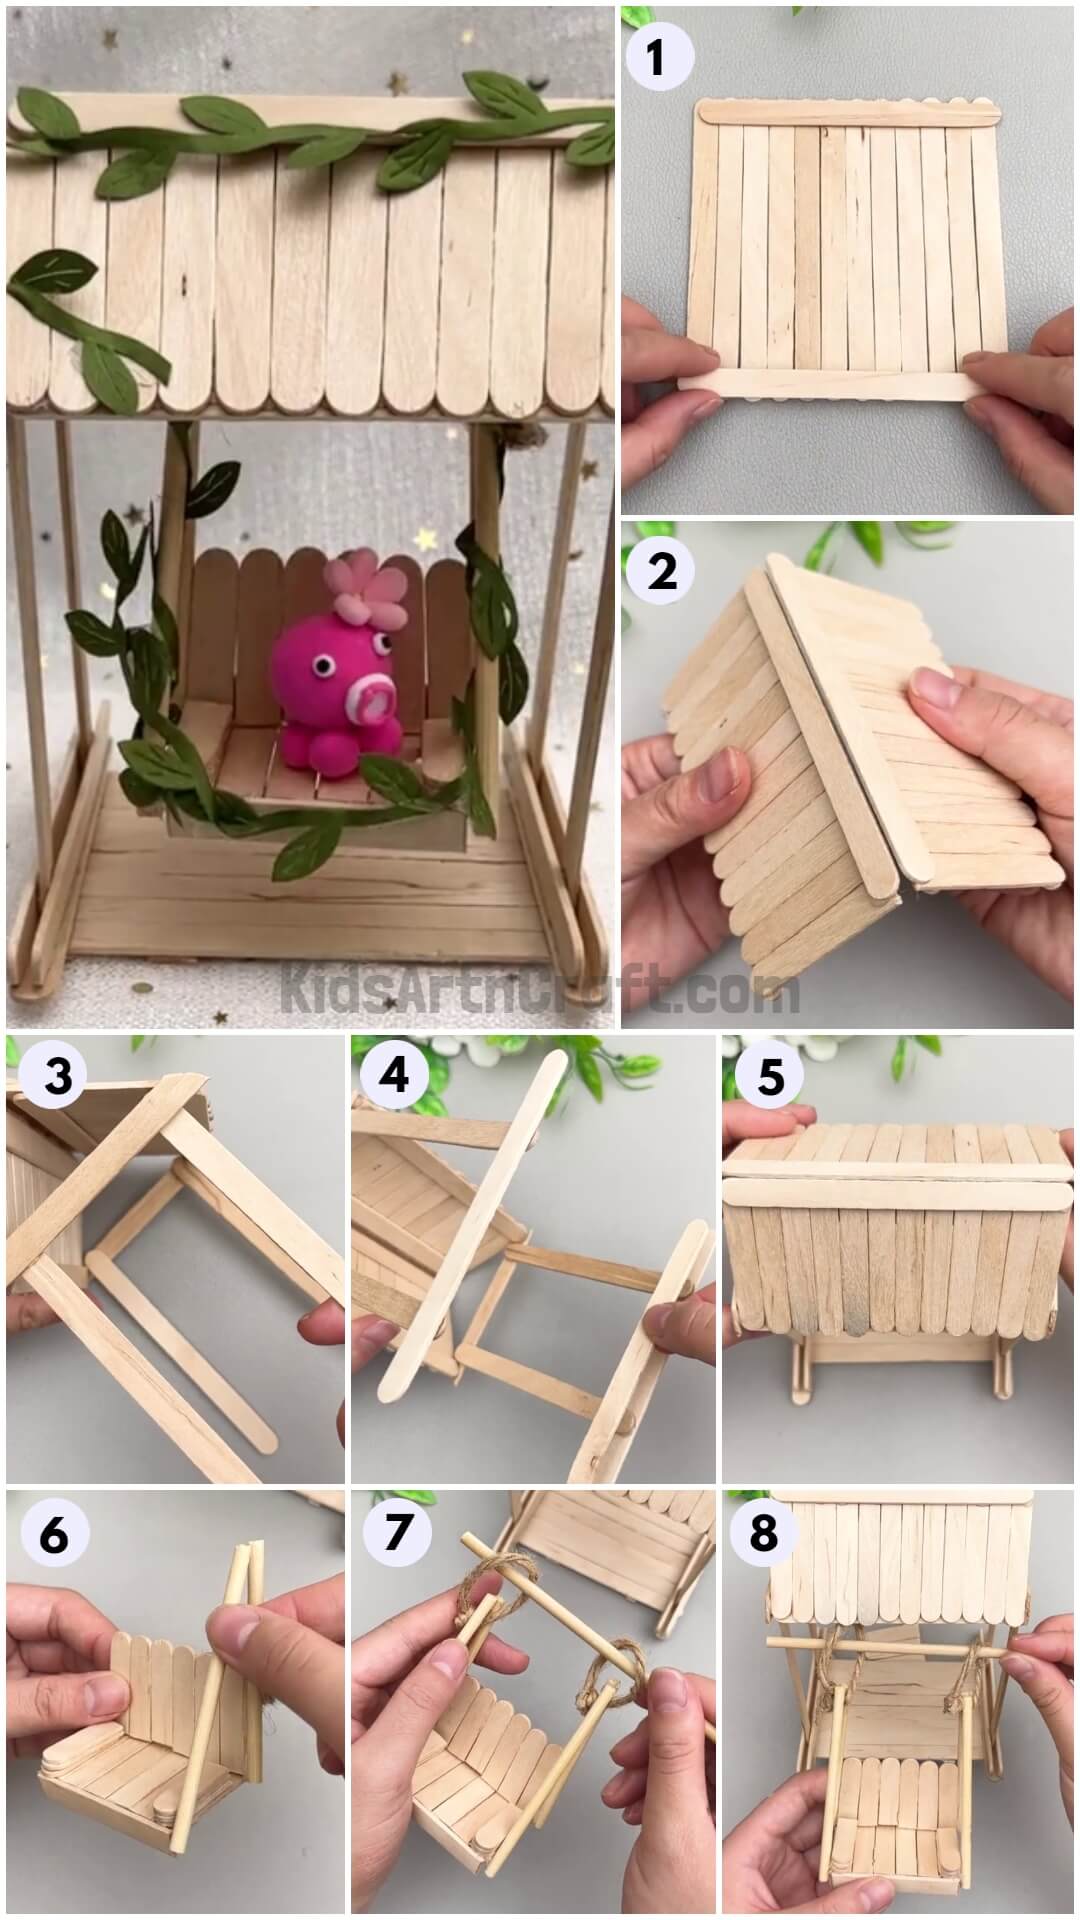
If you want a pretty swing for your garden, then this is an alternative for you! This tutorial will guide you on making a mini swing!
Do not miss out on this craftwork! Dive into your imagination by creating a pretty swing of your dreams! This step-by-step tutorial will serve you as a guide on each and every step of making this popsicle stick swing, from arranging to pasting. This article has got you covered on everything! This easy craft will be a piece to showcase in your home or even used as a gift for your loved ones! It will thrive everywhere! This craft is a perfect option for all the craft lovers out there, for sure! Let’s get up to their level by making a stunning popsicle stick swing!
Easy Beautiful Swing Popsicle Stick Craft For Kids
Read More: Cool Airplane Popsicle Stick Craft Step-by-step Tutorial For Kids
Materials Required
- Popsicle Sticks
- Wooden Sticks
- Craft Cutter
- Hot Glue Gun
- Scissors
- Green Paper Sheet
- A Pencil
- Jute Rope
Procedure
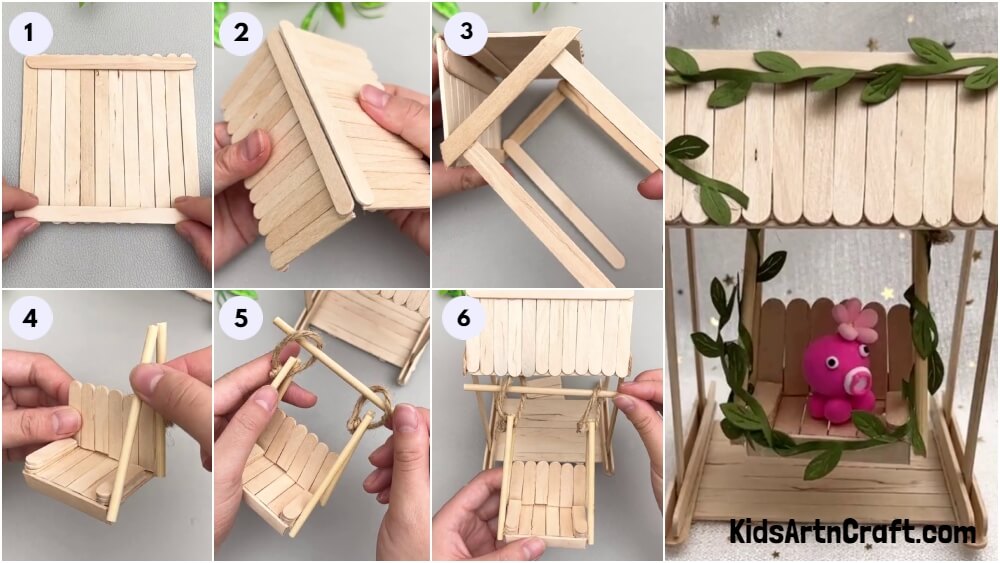
Step 1: Placing 12 Popsicle Sticks Together
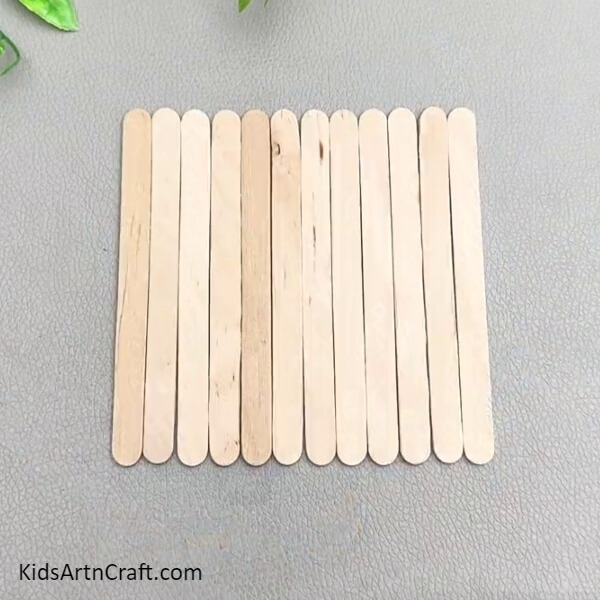
To begin this craft, take 12 popsicle sticks and place them together vertically as shown in the image.
Step 2: Pasting 2 Popsicle Sticks Over The Ends
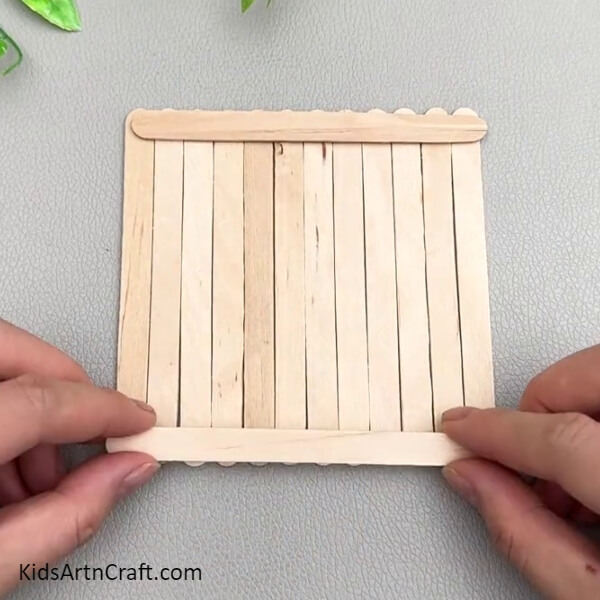
Using hot glue, paste 2 popsicle sticks horizontally on the top and bottom ends of the 12.
Step 3: Cutting the Stick Structure Into 2 Halves
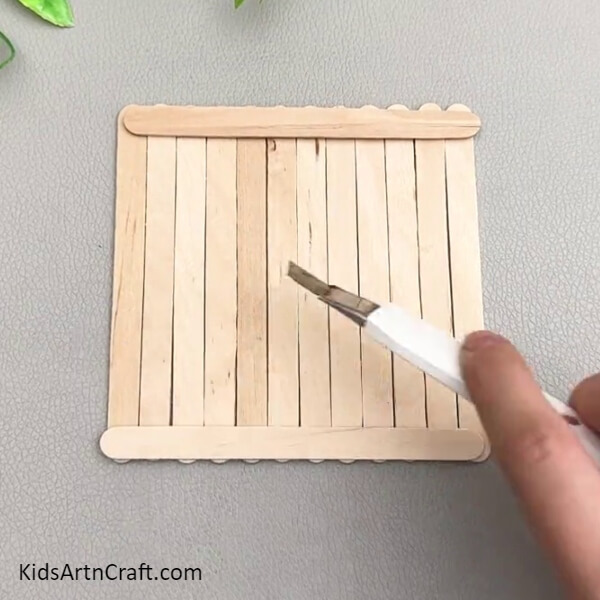
Using a craft cutter, cut the popsicle stick figure in half horizontally.
Step 4: Applying Hot Glue to the Back
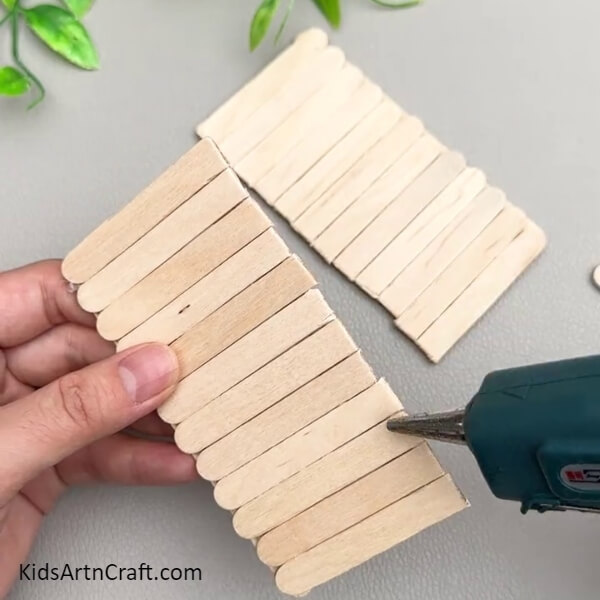
Turn the halves to the back side and, using a hot glue gun, apply hot glue on the cut side of the figures.
Step 5: Pasting A Popsicle Stick Over the Glue
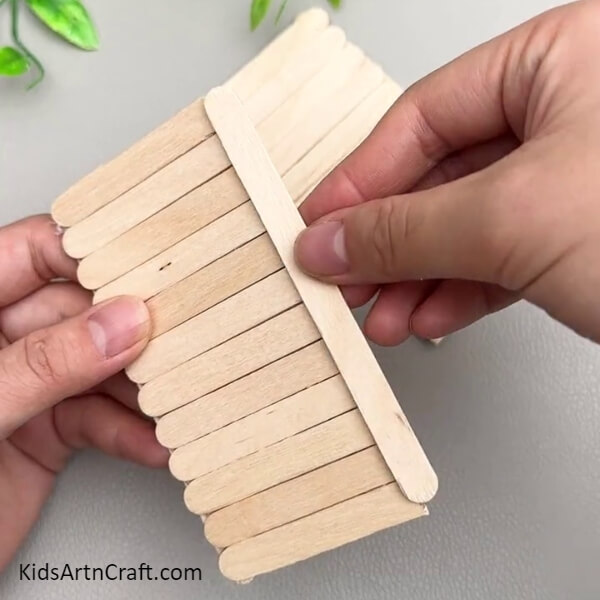
Paste a popsicle stick on the applied hot glue. These will be the slabs of the roof.
Step 6: Sticking The Slabs Together
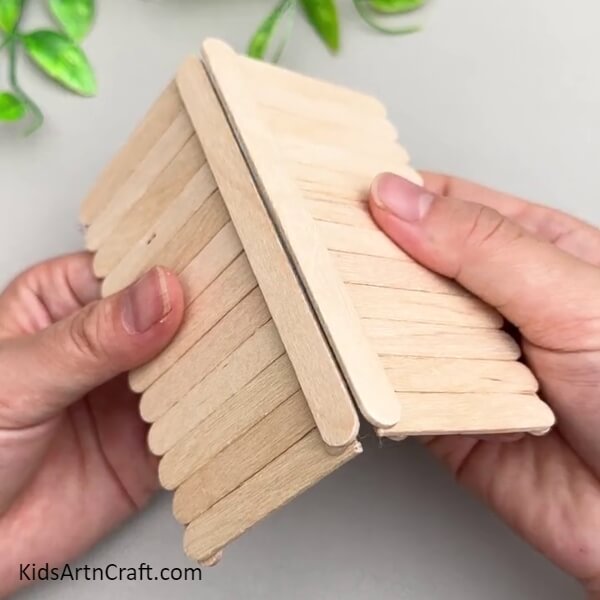
Using hot glue, paste the slabs together slantingly to form the roof.
Step 7: Making Triangles
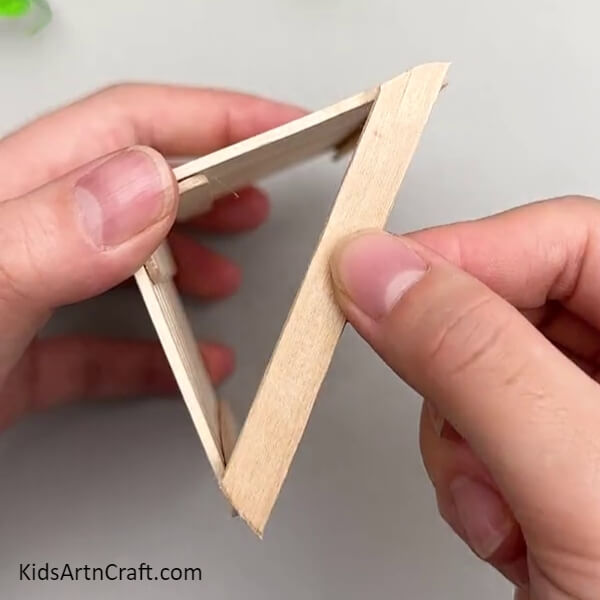
Cut out a piece of a popsicle stick to paste on the sides of the roof and form triangles on each side using hot glue.
Step 8: Making The Pillars
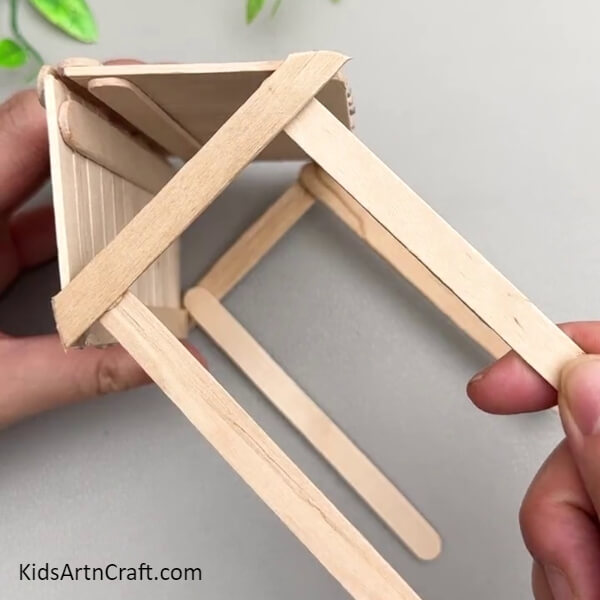
Paste 4 popsicle sticks on each corner of the roof triangle to make the pillars using hot glue.
Step 9: Making The Stand From Pillars
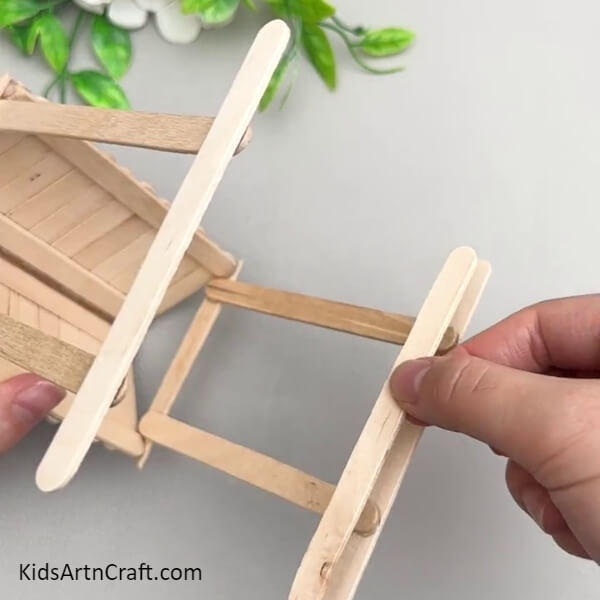
To make the stand for the pillars, pop sticks on the ends of the 2 pillars that share the same triangle on both sides, using hot glue as shown in the image.
Step 10: Completing Making The Stand
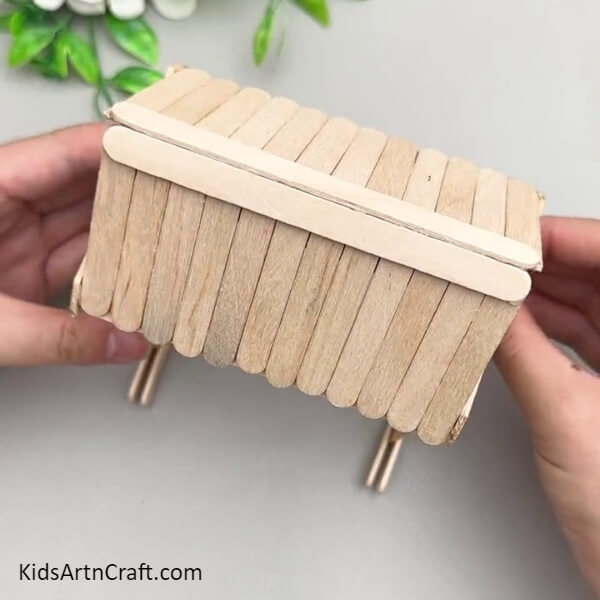
Following the same, make the stand of the other pillars sharing the same triangle, and keep your roof standing.
Step 11: Making The Base
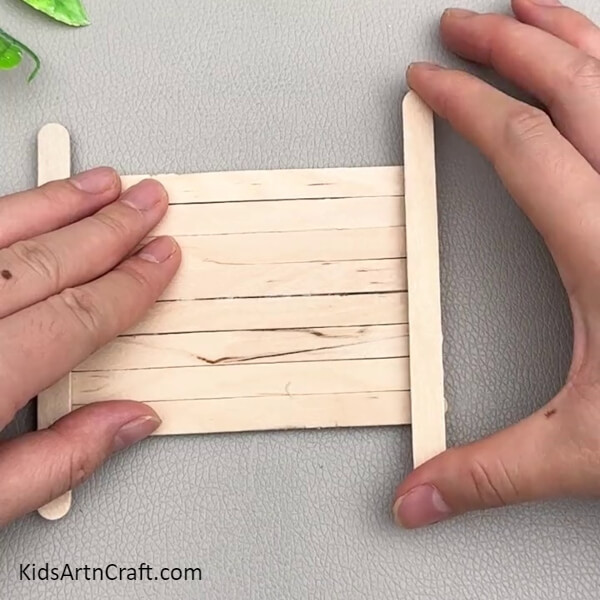
Place 2 popsicle sticks horizontally together and paste 2 popsicle sticks on the ends of them vertically using hot glue. This will be the base.
Step 12: Pasting The Roof Over The Base
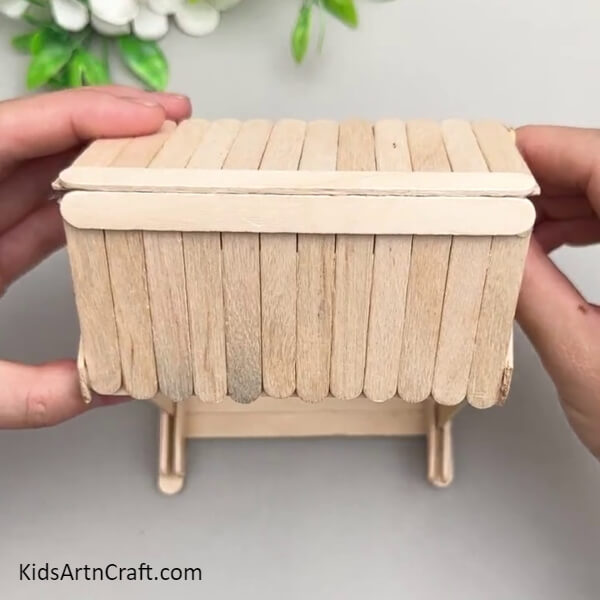
Using hot glue, paste the standing roof over the base’s vertical sticks.
Step 13: Making The Parts Of The Swing Seat
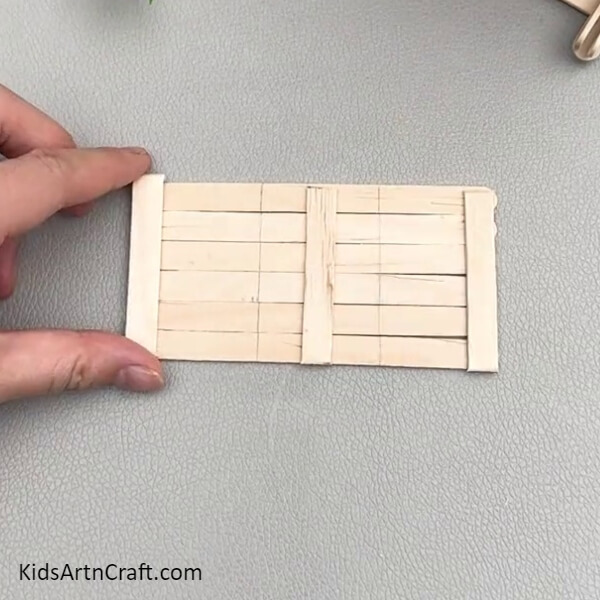
Place 6 popsicle sticks together horizontally and cut out 3 popsicle stick pieces of the size of the breadth of a 6-popsicle-stick rectangle,e and paste 2 of them on the ends and one in the middle vertically using hot glue. Now, using a pencil, mark 2 vertical lines over the figure to divide the rectangle into 3 equal parts.
Step 14: Making A Seat
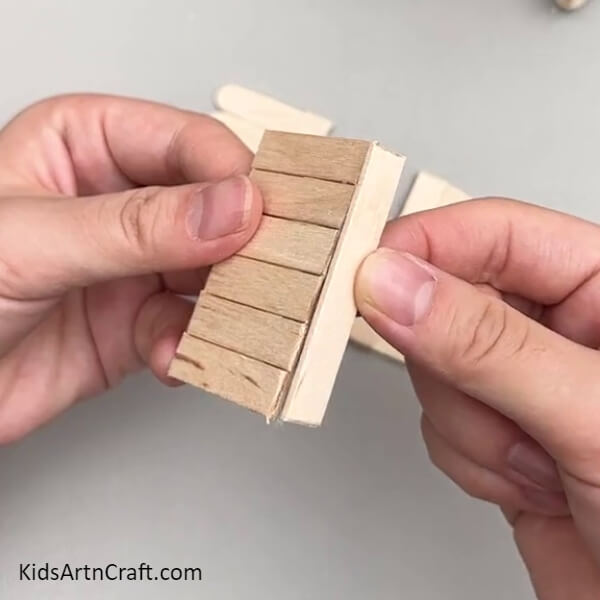
Using a craft cutter, cut out the pieces of your swing seat along the drawn lines. Now, take the middle piece and stick a piece of a popsicle stick over the longer side of it perpendicularly on the boundary, as shown in the image, using hot glue. This will be the seat.
Step 15: Attaching The Backrest To The Seat
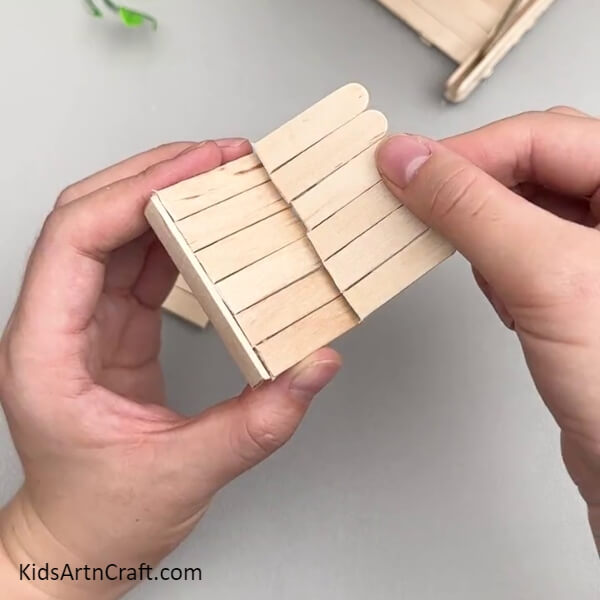
Take the other cut part of the rectangle and paste it over the seat opposite the perpendicular stick,d a little tilted, keeping the curved edge upward, using hot glue to make the backrest of the seat.
Step 16: Making The Handles
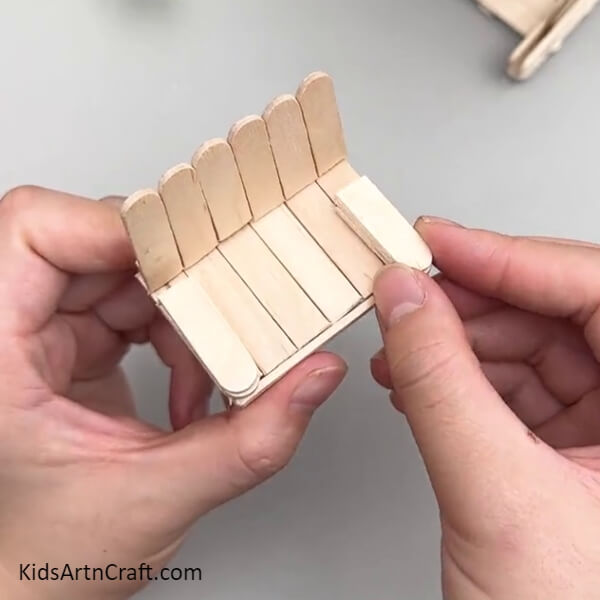
Cut out 6 curved pieces of popsicle sticks of the same size and paste them on the seat sides, with 3-3 pairs of them to make the handles of the swing seat.
Step 17: Pasting A Wooden Stick Piece On The Seat
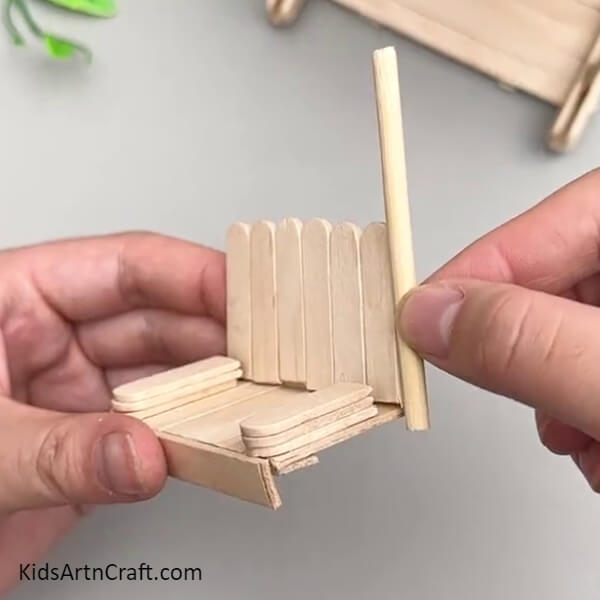
Cut out a wooden stick using a craft cutter and paste it along the backrest side of the boundary using hot glue as shown in the image.
Step 18: Inserting A Rope Loop
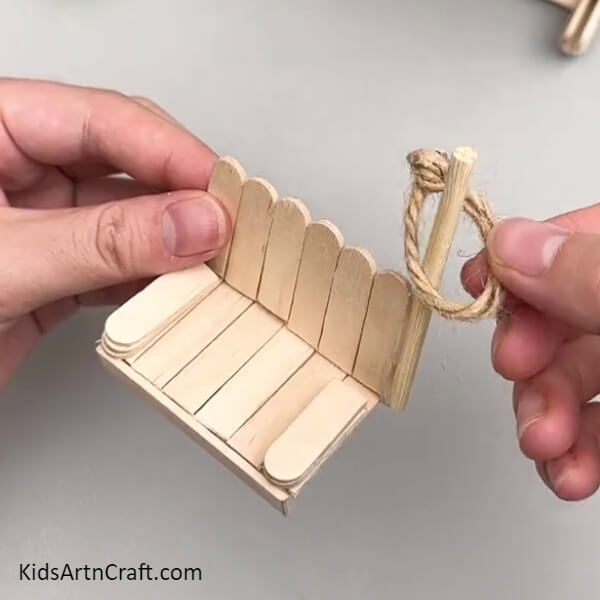
Make a loop of jute rope and insert it into the wooden stick.
Step 19: Pasting Another Wooden Stick
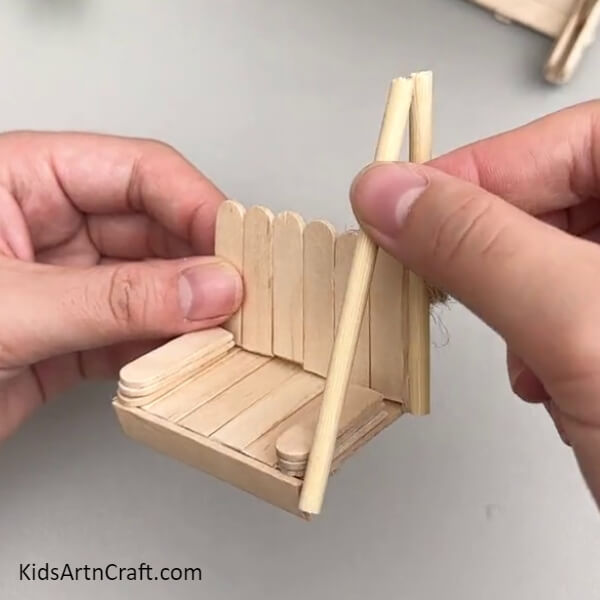
Paste another wooden stick from the corner of the seat to the top of the already pasted wooden stick using hot glue to make a triangle of them.
Step 20: Making Another Wooden Stick Triangle And Inserting a Stick In The Loops
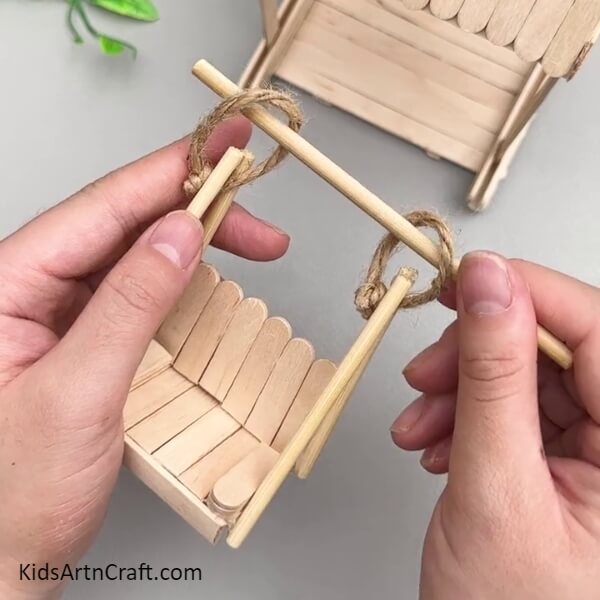
Following the same previous steps, make another wooden stick triangle of the same size as the one you already made on the side of the seat. Now, take the loops up and insert a wooden stick through both loops. This completes your swing seat.
Step 21: Sticking The Swing Seat In The Roof Base
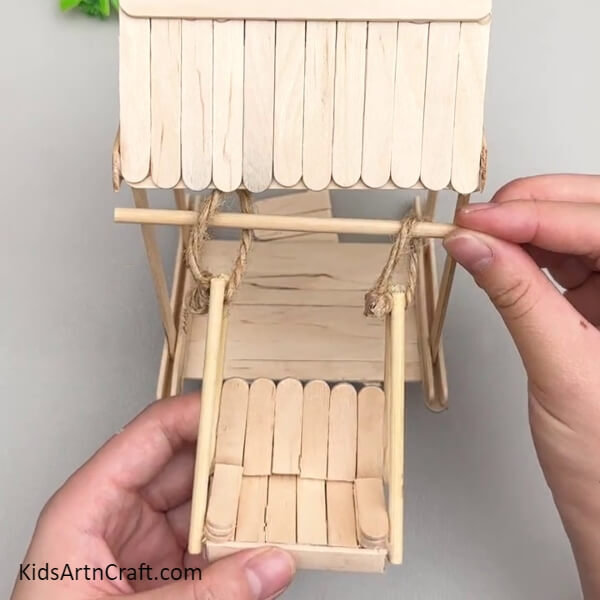
On the side triangles of the roof, stick the wooden stick inserted in the loops using hot glue to complete your swing.
This Is The Final Look Of Your Wooden Swing Craft!
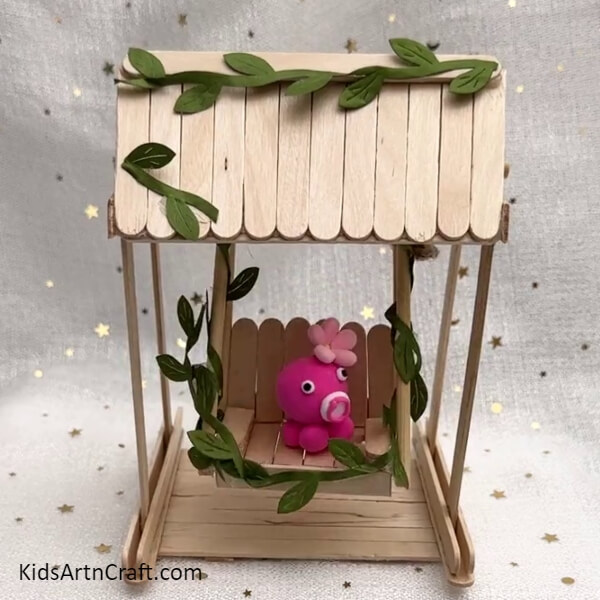
Cut out some leaves attached with a long strip of green paper and paste them onto the wooden swing sticks and some on the roof, as shown in the image.
Beautiful Swing Popsicle Stick Craft Tutorial for Kids | Easy DIY Craft
Learn how to make a beautiful swing using popsicle sticks with this easy DIY craft tutorial for kids. Perfect handmade craft activity for students, parents, and teachers to boost creativity and art skills. Simple ice cream stick craft idea for school projects, home decoration, classroom activities, and fun kids learning projects.
Congratulations! Look at the amazing swing that you’ve created! Your prettiest swing is ready in no time!
What Makes This Popsicle Stick Swing Craft Special?
This popsicle stick swing is a creative DIY project that turns simple craft materials into a beautiful miniature decoration. Children enjoy assembling the swing piece by piece while learning how different parts fit together. The finished craft can be displayed on a study table, bookshelf, or classroom shelf, making it a rewarding activity for young creators.
Skills Kids Develop While Making This Craft
- Improves Fine Motor Skills- Handling popsicle sticks, applying glue, and assembling small pieces strengthen hand muscles and improve coordination.
- Encourages Creative Thinking– Children can paint, decorate, and customize the swing using their favorite colors and craft materials.
- Builds Patience- Making the swing step by step teaches children to work carefully and complete projects with focus.
- Boosts Problem-Solving Skills– Assembling different parts helps children think critically and find simple solutions during the crafting process.
Ways to Personalize Your Mini Swing
Once the swing is complete, children can make it even more attractive by adding artificial flowers, tiny paper butterflies, miniature cushions, beads, ribbons, or colorful paint. They can also create a small garden scene around the swing using paper grass, pebbles, or pom-poms to make a unique display.
Helpful Safety Reminders
- Use child-safe scissors whenever possible.
- An adult should handle the hot glue gun and craft cutter.
- Work on a flat, clean surface for better stability.
- Allow the glue to dry completely before moving the swing.
FAQs
Q1. What age group is this craft suitable for?
Answer: This project is best suited for children aged 8 years and above with adult supervision when using hot glue or sharp tools.
Q2. Can I paint the popsicle sticks?
Answer: Yes. Acrylic paint, poster colors, or markers can be used to decorate the swing before or after assembly.
Q3. Where can I display this miniature swing?
Answer: It looks great on study tables, bookshelves, classroom displays, fairy gardens, or as part of a handmade home décor project.
Q4. Can recycled popsicle sticks be used?
Answer: Yes. Clean and dry recycled popsicle sticks are an eco-friendly option for making this craft.
Create this charming popsicle stick swing to enjoy a fun crafting experience while developing creativity and practical skills. Explore more unique DIY craft tutorials and miniature projects on Kids Art & Craft. Encourage kids to create, learn, and explore through fun hands-on activities. Join us on Telegram, YouTube, & Facebook.
Reviewed By Rachit Gupta
More Articles from Kids’ Art & Craft
- Unique Popsicle Stick Flower Vase Craft Tutorial For Beginners
- Creative Popsicle Sticks Archery Toy Craft Making Idea For Beginners
- Popsicle Sticks Chair Craft-Making Tutorial
- DIY Hatching Baby Dinosaur Craft Using a Popsicle Stick
- Learn To Make a Popsicle Stick Dragonfly Craft