Home Decor
Easy Wall Decoration Ideas


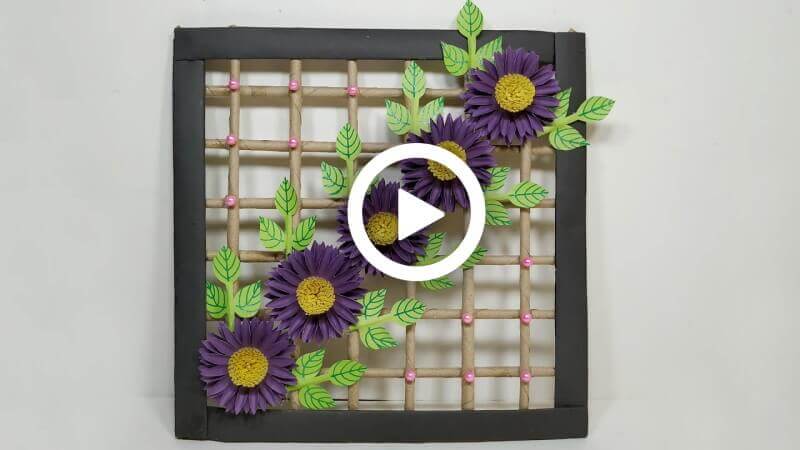
Hi guys!! Today we’re going to make something very creative. You might be guessing what it might be! No more suspense then. Today you’re going to learn to make DIY wall decor. This decor will be made of paper, so it’s going to be so easy and fun! So, without any words, let’s make it!
Easy wall decoration crafts are not only fun creative activities but also valuable learning experiences for children. Simple DIY wall decor projects help kids improve fine motor skills, hand-eye coordination, focus, creativity, and problem-solving abilities. Activities like cutting, folding, painting, gluing, and arranging decorative elements strengthen finger muscles and encourage imaginative thinking. Paper crafts and hanging decorations are widely used in children’s learning because they are affordable, engaging, and beginner-friendly.
Wall decoration ideas also encourage self-expression and confidence. Children enjoy creating personalized room decor using colorful paper, recycled materials, tissue flowers, paper chains, wall hangings, and handmade art pieces. DIY wall crafts can help children explore shapes, patterns, colors, textures, and basic design concepts while developing patience and concentration.
How to Make a Wall Decoration with Papers
Materials:
- Ten sheets of green colour paper, 5.6 cm*3.6 cm.
- Ten sheets of green colour paper, 5 cm* 3.5 cm.
- Twenty sheets of purple-coloured paper, 5.5 cm* 5.5 cm.
- Ten sheets of yellow paper, 29 cm* 1.5 cm.
- Four sheets of black colour paper, 23*10 cm.
- Sixteen yellow colour papers, 23*9 cm.
- Green glitter/ colour pen.
- Craft glue
- Scissors
- Small round stones.
- A Scale.
Procedure:
- Take a colour paper of 23 cm* 9 cm.m, grab a stick and roll the paper all over it.
- Pertain glue at the end of the paper to properly secure it.
- Pull out the stick from the paper, and a paper stick will be formed.
- Follow these steps and make fifteen more paper sticks of the same colour.
- Take a black paper of 23 cm* 10 cm and a scale, roll the paper around the scale side-wise.
- Press glue on the end side of the paper to secure it.
- Pull out the scale from the paper, and a paper stick will be formed.
- Push the stick with your hand to flatten it.
- Follow these steps and make three more paper sticks of the same colour.
- Take a colour paper of 5.5 cm* 5.5 cm, fold it from the corner like a triangle.
- Again, fold the same to make a small triangle.
- Again, fold the same to make a smaller triangle.
- Grab a pencil and draw the joined flower petals on it from the edge of the triangle.
- Cut out the petal with scissors.
- Open the piece, and a flower will be formed.
- Take a stick and fold all the petals of the flower in half to give it more volume.
- Repeat these steps and make four more of these flowers, and stick all four flowers together with craft glue.
- Take another colour 29c.m*1.5c.m page, fold it in half from up and down.
- Repeat the fold two more times.
- Make straight fuzzy lines on the bottom of the piece with scissors.
- Open the piece.
- Make one more of this strip.
- Take one of these strips, apply glue on one side of it, and roll the strip roundly.
- After the rolling is done, apply glue to its end.
- Apply glue outside of this piece, and roll the other strip around it.
- It will be in the middle of the flower.
- Push the round piece down with your hand to give it more shape.
- Take the flower you made previously and attach this round piece in the middle of it with glue.
- A flower will be formed!
- Follow these steps and make four more flowers like it.
- Take a green paper of 5 cm* 3.5 cm, fold it in half.
- Grab the pencil and draw half of two leaves with a branch on it with the pencil.
- Cut out the drawing parts.
- Open it. A leaf will be formed!
- Place the leaf on a page and grab a glitter pen or colour pen of deep green colour and draw the leaf’s outline on it.
- Take a green paper of 5.6 cm* 3.6 cm, roll it, and make a small stick with it.
- Pertain glue at the end of the stick.
- Attach the stick to the back of the leaf you made previously. It will give a more 3D look to the leaf.
- Follow these steps and make nine more of this leaf.
- Grab the paper sticks you made previously, take four of them, apply glue to the edges of them, and attach them by making a square.
- Take six more sticks and apply glue to the edges of them and stick them into the square straightly, leaving gaps between each of them.
- Take the other six sticks, apply glue to the edges of them, and stick them over the previous sticks by making a vertical line and leaving gaps between each of them.
- After the window square box is ready, take the four black sticks you made previously.
- Apply glue to them and attach them to the four sides of the square with glue.
- Take the flowers, attach them corner-wise over the square windows with glue.
- Take the leaves and attach them in pairs to the two sides of each flower.
- Take small stones and attach them to the four corners of each square with glue to make the piece more beautiful.
- Your beautiful paper wall decorator will be ready!
Step-by-Step Tutorial for Beautiful Room Decor
Learn easy DIY wall decoration ideas in this step-by-step tutorial. This simple craft video shows how to create beautiful handmade wall decor for your room using basic materials. Perfect for beginners, kids, and craft lovers who want creative, budget-friendly home decoration ideas to make stylish wall art at home.
Read More:
- Classroom Decor Paper Craft Ideas for Kids – Handmade Wall Decoration
- Wall Hanging Decoration Ideas With Popsicle Sticks
- Wings Wall Art Ideas For Home Decorations
- DIY Wall Décor Ideas – Kids Room Decoration
- Wine Cork Wall Decor Ideas