DIY and Crafts
How to Make A Paper Butterfly

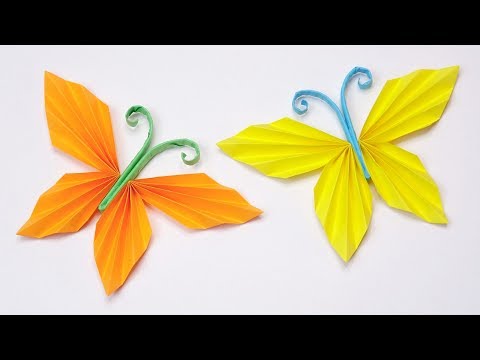
Crafts are something that gives wings to your creative self that you might not have. Its importance is never limited to anything. Today, you are going to learn origami art, which will give more flow to those creative wings. You are going to make some beautiful origami butterflies today! Isn’t it amazing! Who doesn’t love butterflies, right? Their colorful wings make us go in wonder how any creature can be so beautiful! Today, you will be making these beautiful creatures in paper form. Kids will love the process. So, why are you waiting? Let’s learn it!
How to Make A Paper Butterfly
Materials Required:
- A 20*20 cm color square paper.
- A 9*21 cm. color rectangular shape paper.
- A Binder clip.
- A bamboo stick
- A glue stick.
Procedure:
- Take a 9*21 cm. color rectangular shape paper and a bamboo stick, place the bamboo stick over the bottom corner of the page, and roll the page all over it, and attach the end of it with a glue stick.
- Put the bamboo stick from the page smoothly, then fold it and cut the edges of it straight and smoothly. And fold it properly.
- Take the bamboo stick and roll both sides of it. It will make two butterfly strings.
- Stick glue in the middle of it, attach them, and clip it with a binder clip.
- Take a 20*20 cm color square paper, fold it sidewise by making a rectangular shape. Look at the middle fold line and cut the page with a scissor by following the middle fold line.
- Take one piece of the page, fold it sideways by making a rectangular shape. Unfold it.
- Place it like a rectangular shape, then fold the right side by making a half-triangle on both sides of it. It will make a whole triangle on the left side.
- Do the same on the left side, but the triangles will be a little bigger than the right ones.
- Fold it from the middle, then unfold. There is a fold line in the middle, follow it and fold from the bottom up by rolling the page over and under straightly.
- Do the same with the other cut piece page. It will be the wings of the butterfly.
- Fold the pieces from the middle and remember that the upper part of the wing will be bigger than the lower.
- Stick glue in the middle of them.
- Take the string of the butterfly and remove the binder clip. Make sure that it folds properly.
- Stick glue on both sides of the string and attach the wings to it properly with the glue.
- Your butterfly will be done.
Your beautiful butterfly is ready to fly! As you can see, this process is so easy that anybody could make them. Kids can easily make them by following this procedure. Use your creativity and make as many of them as you can. Use your skills to add more shine and beauty to the butterflies. Kids can use them to decorate their projects, cards, notebooks, and can also use them as a present. The receiver will love them and will be impressed by their creativity. You can also use them to decorate your room, house, office, and stuff. So, let’s take hold of your materials and make these precious butterflies.
FAQ’s on How to Make A Paper Butterfly
Q1. What materials do I need to make a paper butterfly?
Answer: To make a paper butterfly, you will need paper, scissors, glue, and decorative materials such as markers, glitter, and/or sequins.
Q2. How should I fold the paper for a paper butterfly?
Answer: First, fold the paper in half and then in half again. Next, fold the paper into a triangular shape. Finally, fold the triangle in half. The paper should now look like a diamond.
Q3. How do I cut the paper for a paper butterfly?
Answer: Cut along the edges of the diamond shape, leaving the middle of the paper untouched. The cut should create two symmetrical wings.
Q4. How do I attach the wings to the paper butterfly?
Answer: Glue the two wings together at the center. Make sure to add enough glue so the wings stay in place.
Q5. What other steps are there to making a paper butterfly?
Answer: Once the wings are attached, you can start decorating. You can choose to use markers, glitter, sequins, or any other decorative material you prefer.
Q6. How can I make the paper butterfly look more realistic?
Answer: To make the paper butterfly look more realistic, you can add details such as antennae and eyes. You can also paint patterns onto the wings.
Q7. How should I store my paper butterfly?
Answer: To store your paper butterfly, you should place it in an airtight container or bag. This will help preserve its shape and colors.
Q8. How long does it take to make a paper butterfly?
Answer: Depending on your skill level, it can take anywhere from 10 minutes to an hour to make a paper butterfly.
Q9. What other paper crafts can I make besides a paper butterfly?
Answer: There are many paper crafts you can make, such as paper flowers, paper airplanes, and origami animals.
Q10. Where can I find inspiration for paper crafts?
Answer: You can find inspiration for paper crafts from websites, magazines, books, and YouTube videos.
Paper butterfly crafts are easy, affordable, and enjoyable activities for kids that combine creativity with learning. Whether you are a parent, teacher, or craft lover, this colorful DIY activity is a wonderful way to keep children engaged while helping them develop artistic and motor skills. Try different colors, shapes, and decorations to create your own unique butterfly designs and turn simple paper into beautiful handmade art.
Read More:
- How to Make An Antistress Transformer Paper Toy
- How to Make a Paper Cat
- How To Make A Paper Owl
- How to Make A Paper Rabbit
- How to Make a Cute Chicken Family for Easter