


Christmas
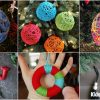
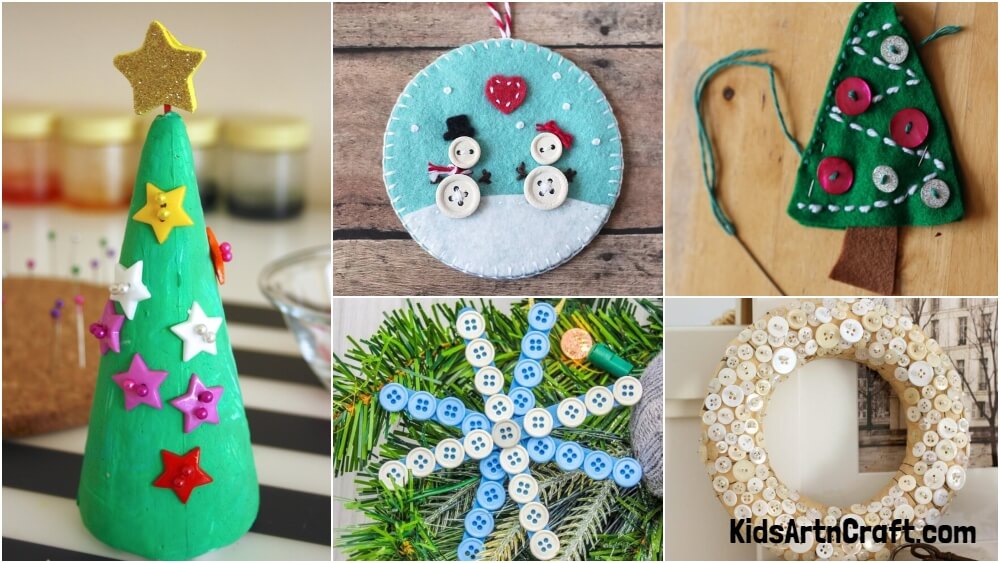
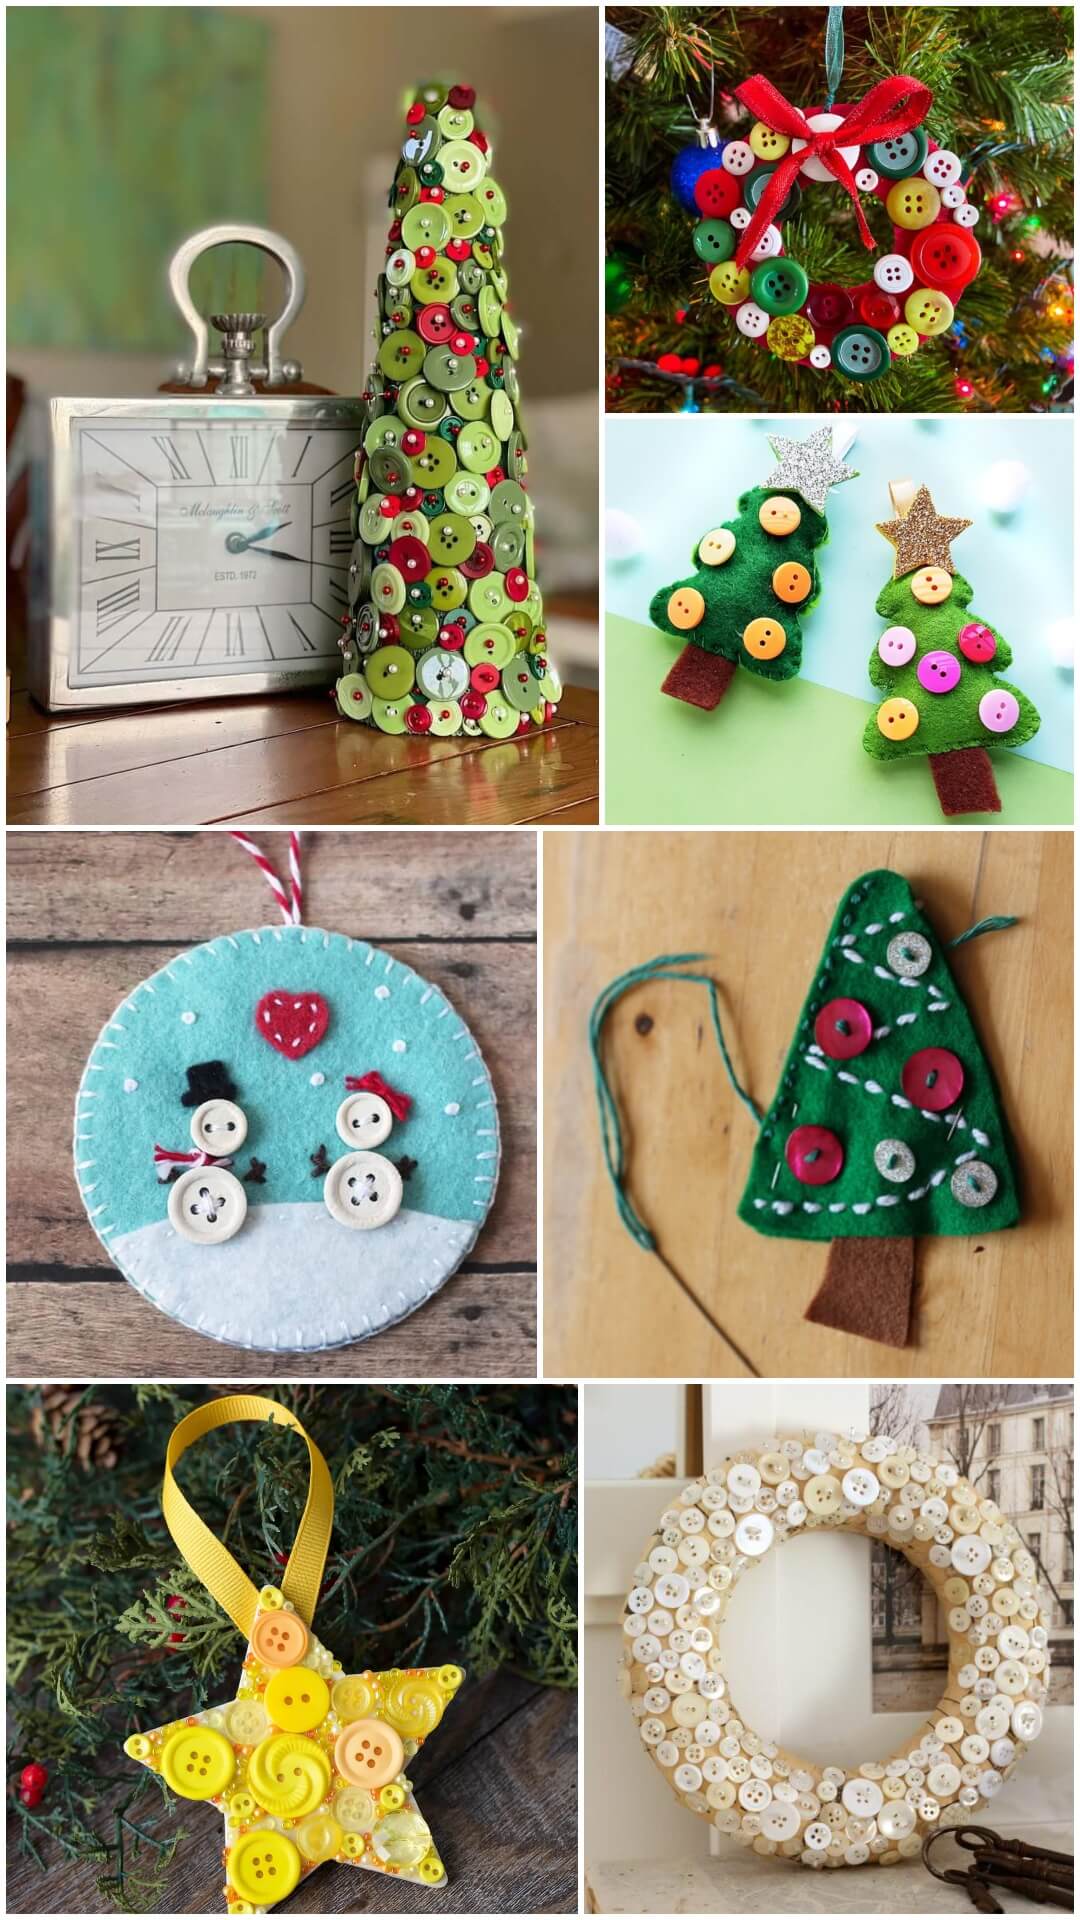
Christmas Decoration Craft With Buttons

Create festive Christmas decoration crafts with buttons! Make wreaths, ornaments, and tree décor with easy DIY ideas for a colorful and creative holiday season.
This Christmas decoration craft is so easy and fun to make! You only need some buttons, hot glue, and a little imagination. You can make all sorts of different designs with buttons – trees, snowflakes, stars, and more. Let your creativity run wild and make something truly unique. This is a great project for kids or adults, and it’s sure to bring a smile to everyone’s face.
Click Here for Christmas Crafts
DIY Christmas Decoration Craft With Buttons
Read More: Creative Wreath Ideas For Class Decor
Making a Paper Christmas Tree for Learners
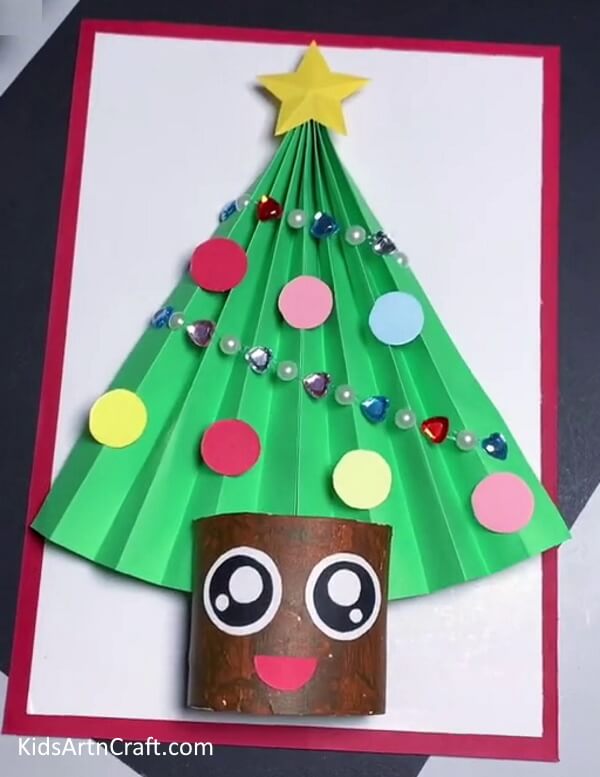
Image Source/Tutorial: Kids Art & Craft
Materials Required:
- Cardboard Tube
- Color Paper
- Beads
- Glue
- Scissor
- Sketch Color
- Cardboard Sheet
- Hot Glue
Procedure:
- Take a piece of green paper and fold it equal to inches from both sides. Repeat the process until the entire paper is over.
- Then hold the paper.
- Please fold the paper in half so it looks like a Christmas tree
- Then take half a cardboard roll and cut the back surface of it with the scissors.
- Then place the tree on the top of the cardboard roll.
- After this, take a brown sketch pen and paint the cardboard.
- Lastly, add some beads or other decorative items.
- Now paste the star on top of the tree and the eye on a cardboard roll.
- After this, take a cardboard sheet and make the red boundary from the sketch color.
- Lastly, paste three on a cardboard sheet with hot glue.
Result:
Your paper tree craft is ready. This craft is helpful for learners to understand the craft easily. Also, it is budget-friendly for you all. It takes 15 min only.
Busted Button Decoration Craft Tutorial For Christmas Tree
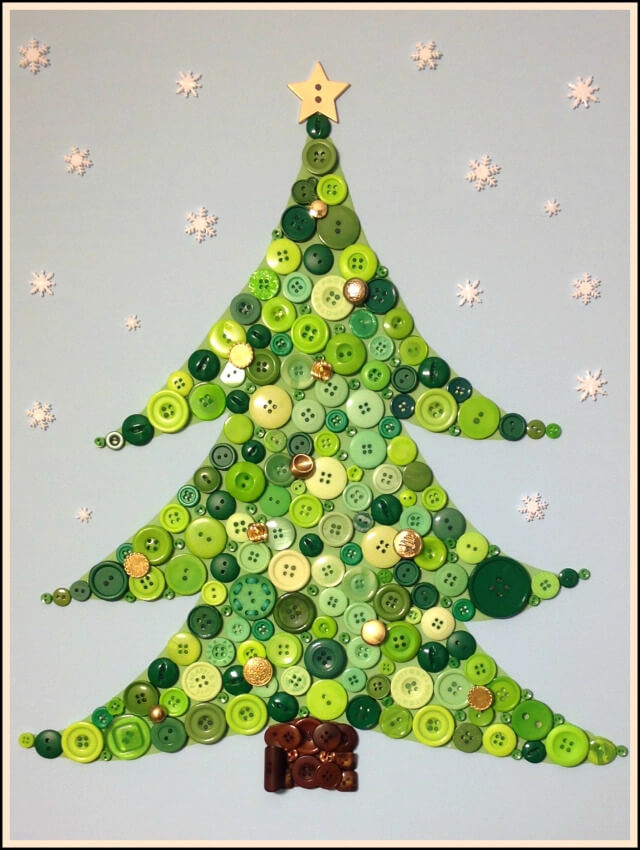
Image Source/Tutorial: Busted Button
Materials Required:
- Acrylic Paint
- Beads
- Different Shades Of Green Color Button
- Brown Buttons
- Snowflakes
- Piece Of Paper
- Hot Glue Gun
- Thin Cardboard
Take a piece of blank paper and paint it with grey acrylic paint. Let the sheet dry for 15 min. Then take a thin cardboard and create a Christmas tree. Then paint the tree with green and brown colors respectively. Now take a hot glue gun and paste the button on the tree. Dry the whole sheet overnight. Your buster button decorative craft for Christmas is ready in just 2 hr. It is inexpensive and easy to make the craft. Also, this craft is budget-friendly for you all.
Mini Christmas Tree Decorate With Button For Christmas
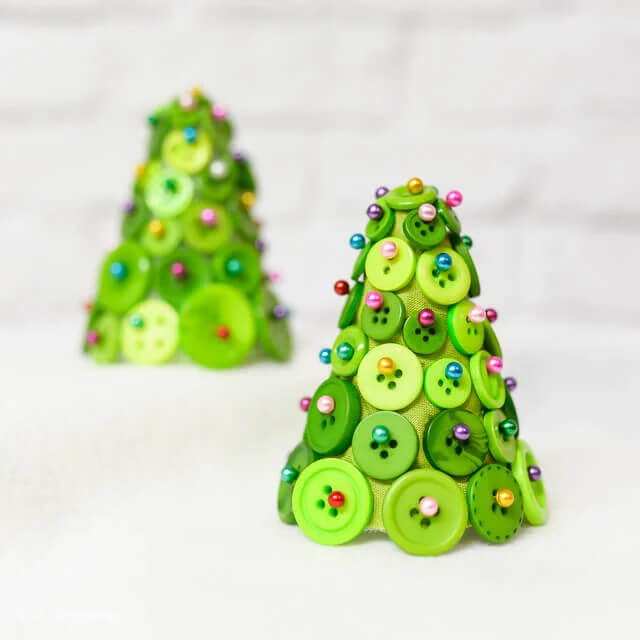
Materials Required:
- Peering Straight Pins
- Green Buttons
- Form Cone
- Scrape Of Green Fabric
Now take a fabric and cover the fabric with the green form. Now start adding buttons from the bottom and attach them with a straight pin. Your craft is ready in just 5 min. This is a mini Christmas tree with green buttons.
Button Wreath Ornament Decoration Craft For Preschoolers
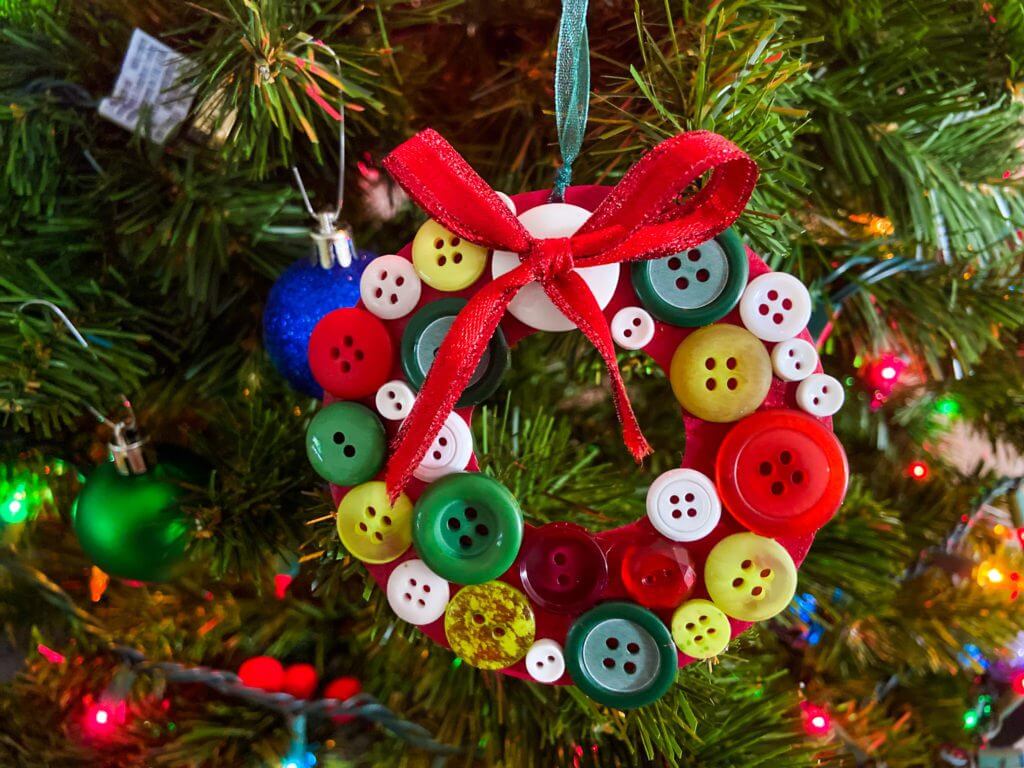
Image Source/Tutorial: Raising Veggie Lovers
Materials Required:
- Cardstock
- Button
- Glue
- Ribbon
- Scissor
- Marker
Procedure:
- Take a red piece of cardstock and cut it into the shape and cut it with scissors.
- Tie the blue ribbon to the cardstock.
- After tying the ribbon, take glue and spread all the surfaces of the cardstock.
- Stick a button on it, and let it dry for 10 min.
- After this, make a bow from a red ribbon and tie the top of the cardstock.
Result:
You can see the button ornament decoration is ready in just 15 min. It is easy to make and also budget-friendly for you all.
Simple Star Ornament Craft For Christmas
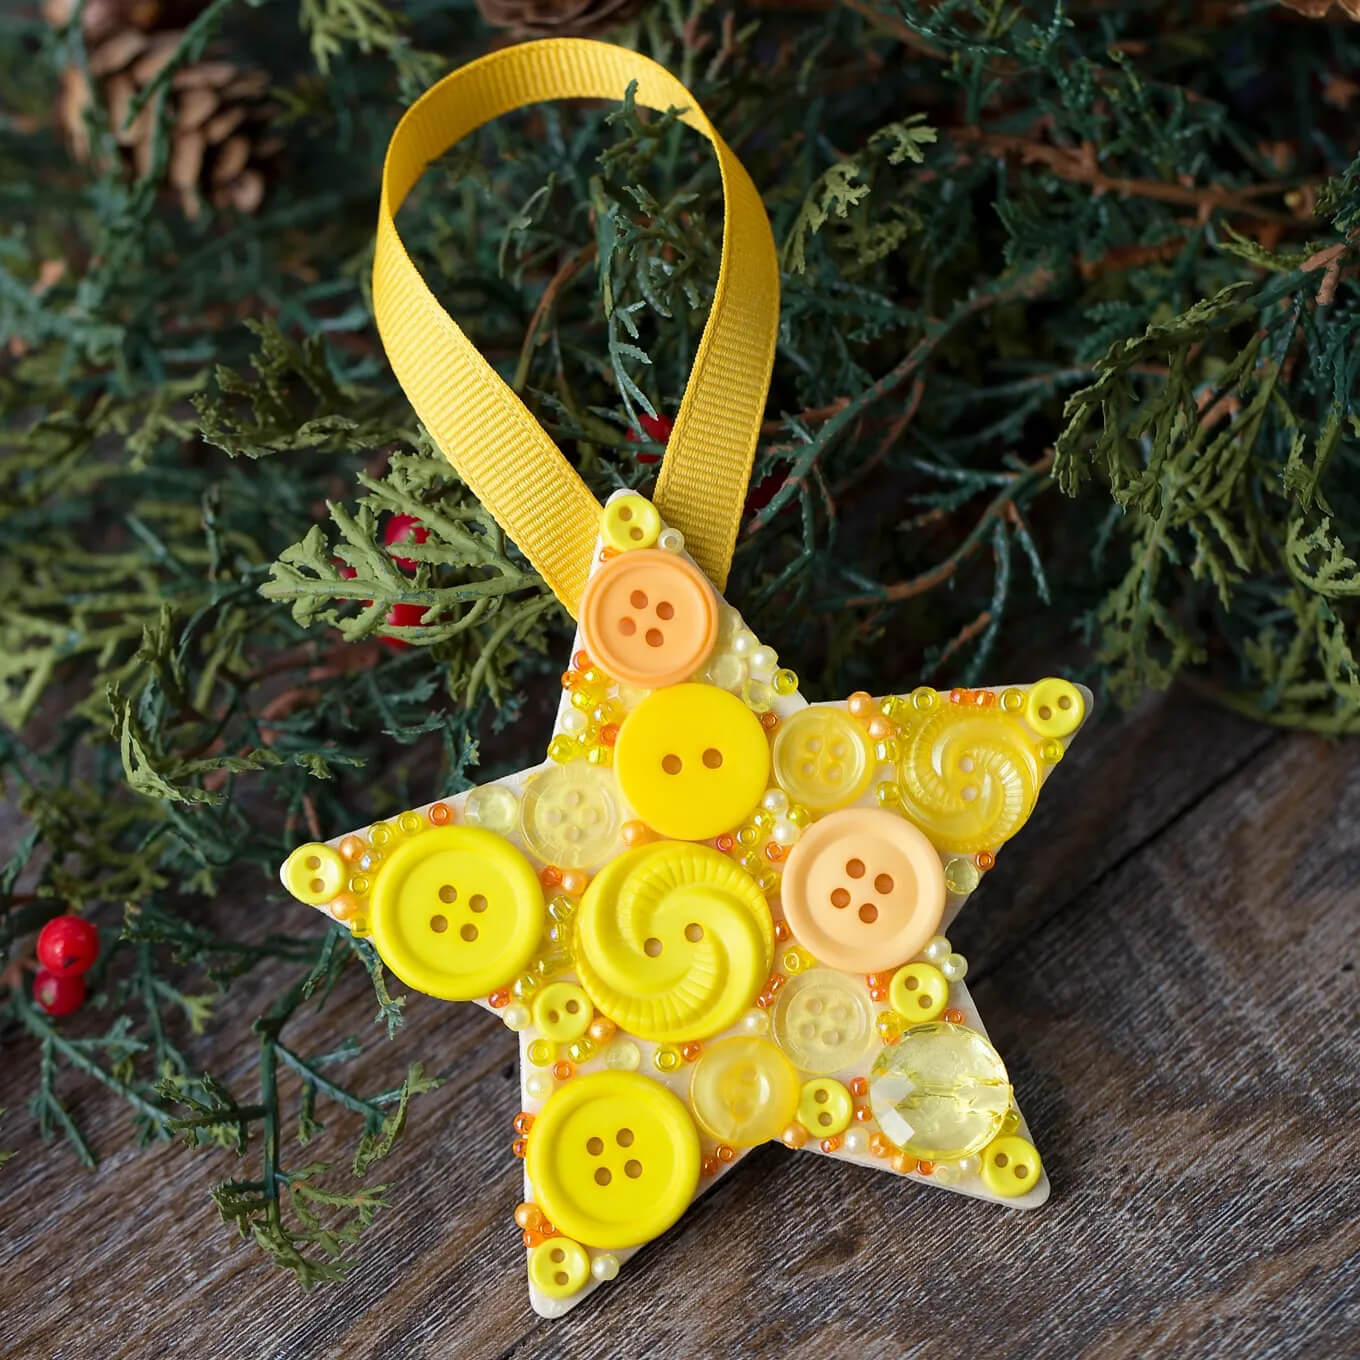
Image Source/Tutorial: Fire Flies And Mudpies
Materials Required:
- Start Cut Out
- Yellow Button
- Yellow Beads
- Paintbrush
- Mod Podge
- Ribbon
- Hot Glue Gun
Procedure:
- First, take a wooden star cut out and apply Mod Podge on it.
- Then take the Button and beads and press long in the cut-out.
- Now let the star dry for 10 min.
- Lastly, apply a hot glue gun and ribbon at the back.
Result:
They are simple and fabulous that you can make for your Christmas tree decoration in just 20 minutes. It is a budget-friendly and intersecting activity. This can be done by 10-year-old children.
Christmas Tree Ornament Craft With Cinnamon & Pom Poms
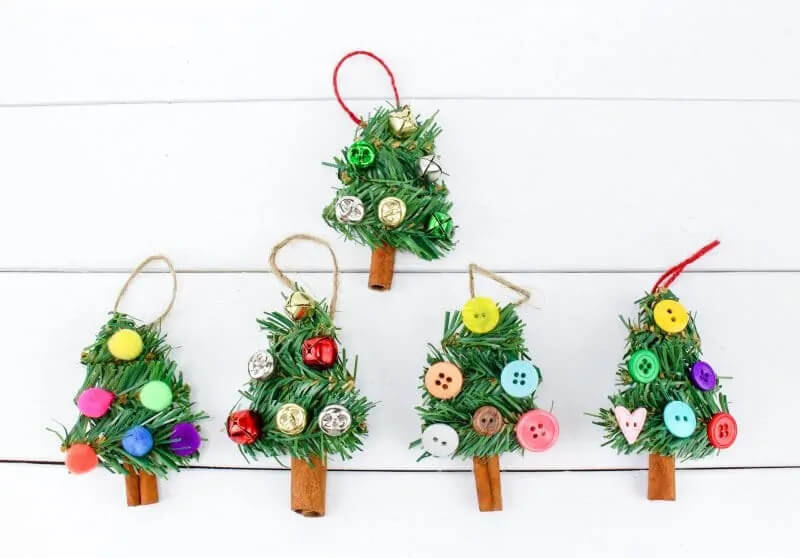
Image Source/Tutorial: Crayons & Cravings
Materials Required:
- 5 Cinnamon Sticks
- Plastic Garland
- Jute
- Buttons
- Bells
- Pom-Pom
- Hot Glue Gun
- Scissor
Procedure:
- Take a piece of garland and cut it with scissors to take a Christmas tree.
- Then take a jute, bend it, and apply hot glue to attach to the cinnamon sticks.
- After this, decorate the tree by using pom-poms, bells, and colorful buttons of different sizes.
Result:
By using the home available material, you can make this Christmas tree in just 10 minutes. It is easy to make at home. Hope you like the idea of making this beautiful and easy Christmas tree.
Easy Snowflake Button Decoration Craft Using Popsicle Sticks
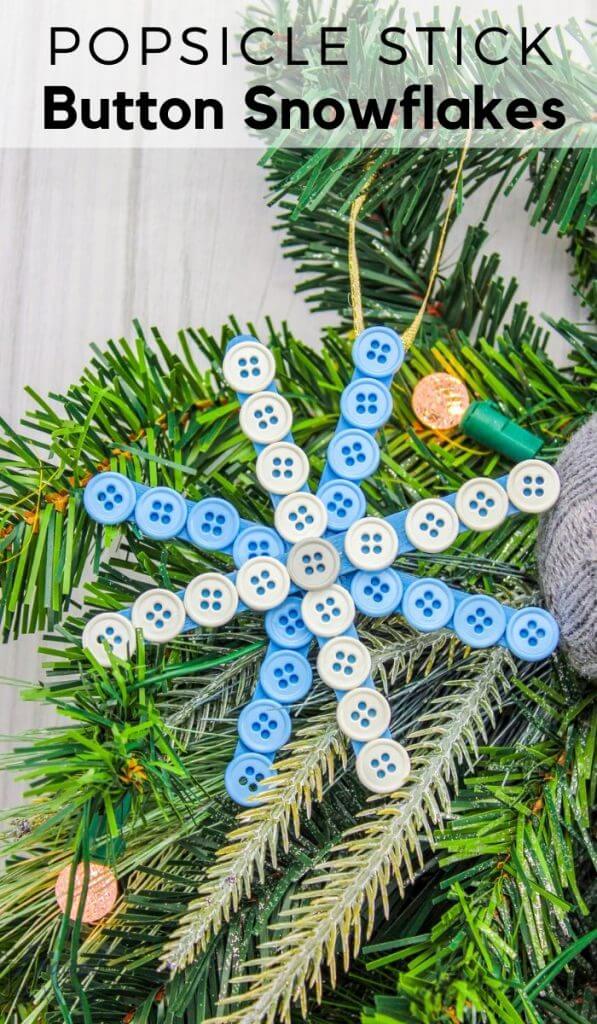
Materials Required:
- Popsicle Sticks
- Painting Color
- Blue And White Buttons
- Glue
- String
- Paintbrush
Procedure:
- Firstly, take an 8 popsicle stick and glue them together to make a star shape.
- Now take a blue painting color and color the sticks with a painting brush.
- Let the color dry for 5 min.
- Lastly, apply a hot glue gun to the stick to attach the button to it.
- After this, attach the string to the one stick.
Result:
Your snowflakes button decoration is ready in just 10 min. Also, it is budget-friendly. You can ask your child to make this snowflake button decoration on their own.
Simple & DIY Button Art & Craft In Snowman Shape
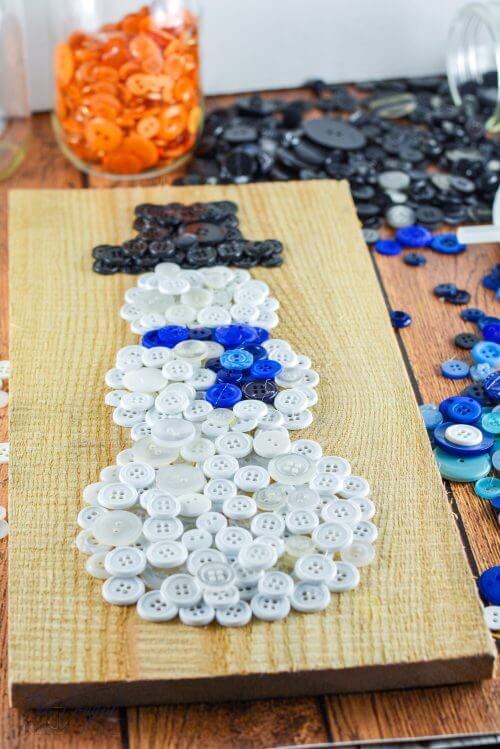
Image Source/Tutorial: The Frugal Navy Wife
Materials Required:
- Wooden Plate Board
- Different Colors And Sizes Of Buttons
- Hot Glue Gun
Procedure:
- Place the outline of the snowman shape on the wooden plate board with a white button.
- Add the hat on the top with black color buttons.
- Take a hot glue gun and place the button accordingly.
- Fill the body and hat with white and black buttons respectively.
- Add an orange button for noise and a blue button for the band.
Result:
Your snowman craft by using a button is ready in just 10 min.
DIY Christmas Tree Ornament Craft Activity Using Button
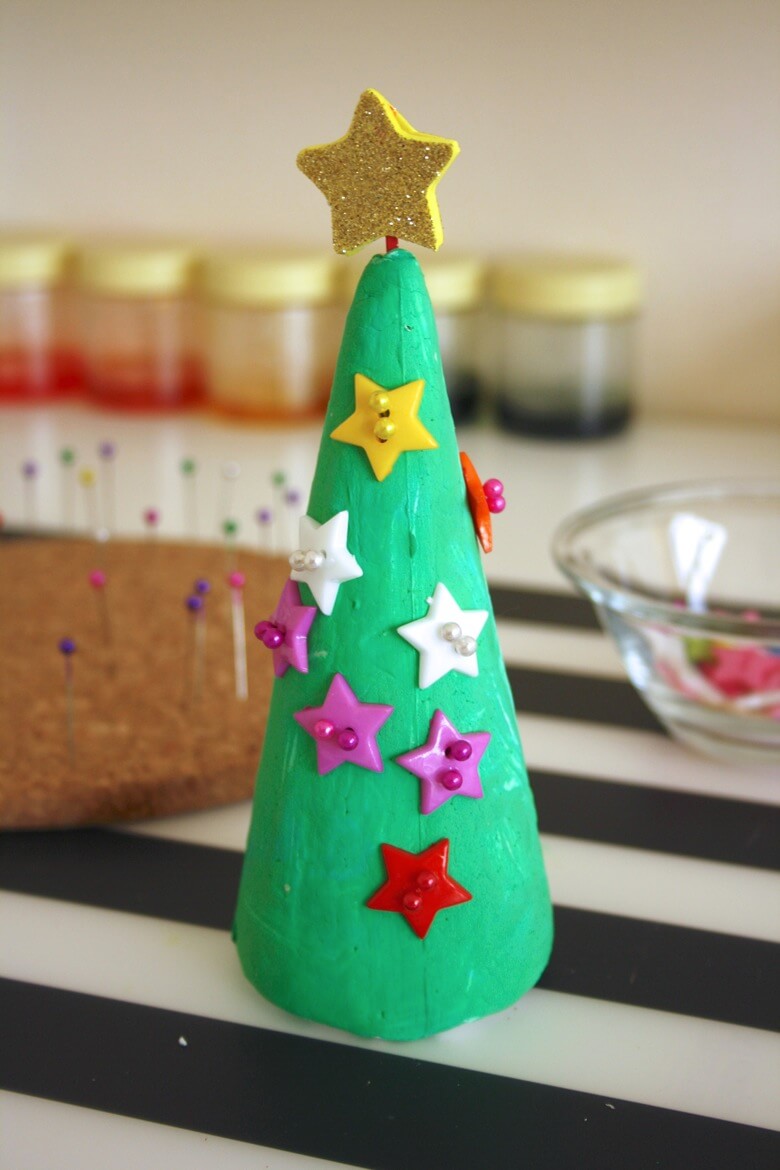
Image Source/Tutorial: Mama Papa Bubba
Materials Required:
- Styrofoam Cone
- Green Acrylic Paint
- Painting Brush
- Ball Shape Topping Pins
- Star Shape Button
- One Glittery Star
Take the styrofoam cone and paint it with a green color. After this, let the paint dry for 5 min. Start decorating the Christmas tree by using star buttons of different colors. In the start button, insert the ball pin inside the star hole. At the top of the tree attach a golden glittery star. Your Christmas tree button craft is ready in just 5-7 min. This can be done by 10-year-old children.
Handmade Christmas Decoration Craft For Home
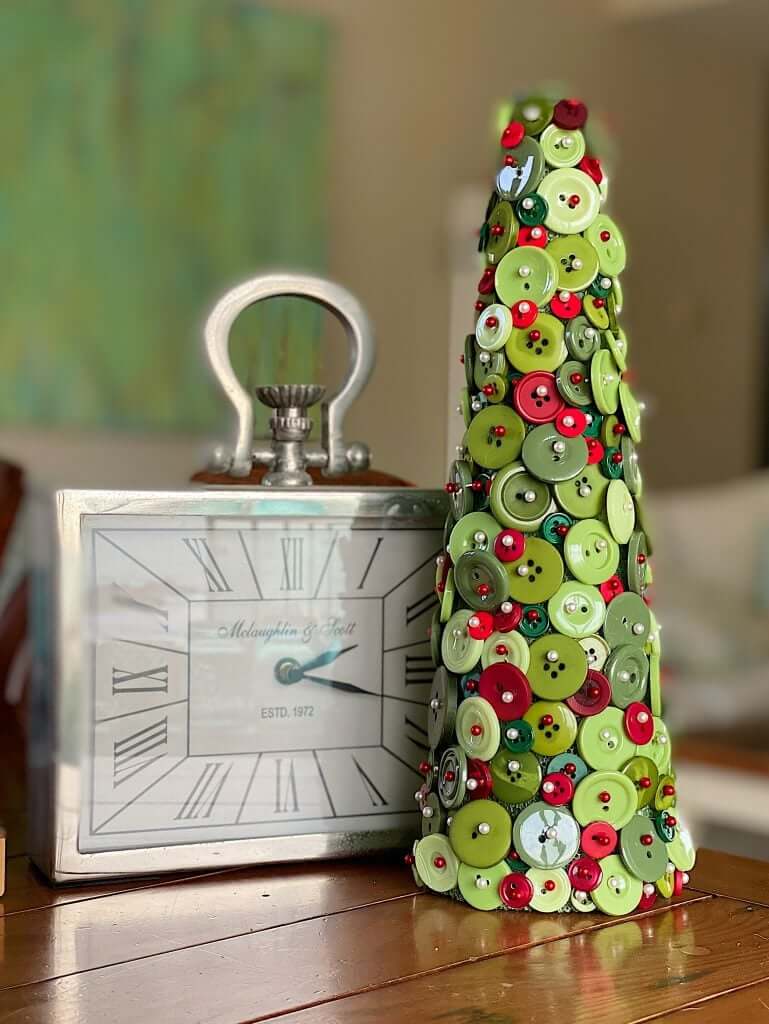
Image Source/Tutorial: My 100-Year-Old Home
Materials Required:
- Colorful Buttons Of Different Shapes And Sizes.
- Ball Shape Topping Pin
- Foam Cone
- Mod Podge
- Hot Glue Gun
Take a form cone and do od pode on it. Now, after this dry for 2 min, do the green color paint in the form of a cone. Now attach the buttons and ball pins by using the hot glue gun. Your Christmas tree craft is ready in just 10 min. You can also try this at your home. This can be made by using budget-friendly materials and is easy to make at home.
Giant & Mini Christmas Tree Craft Idea For School
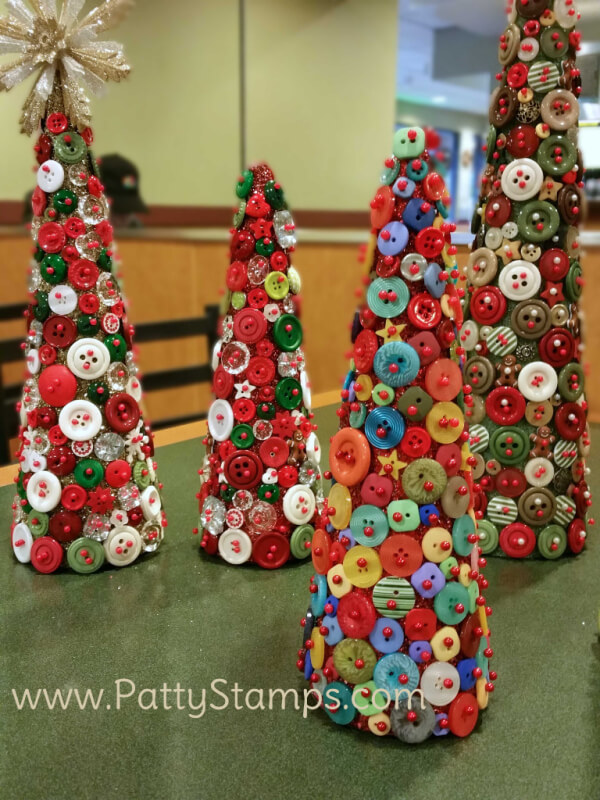
Image Source/Tutorial: Patty Stamps
Materials Required:
- Styrofoam Cone
- Buttons Of Different Shapes And Sizes
- Ball Shape Topping Pins
- Other Ornaments
- Glitters
- Glue
Take the styrofoam cone and spread glue on it, and then apply glitter on the top of it. Let the cone dry. Start gluing the button, ball topping pin, and other ornaments from the bottom. Fill all the space with tiny buttons. Your mini Christmas tree craft is ready in just 10-15 minutes at your home.
Cute & Easy Button Cards Idea For Christmas
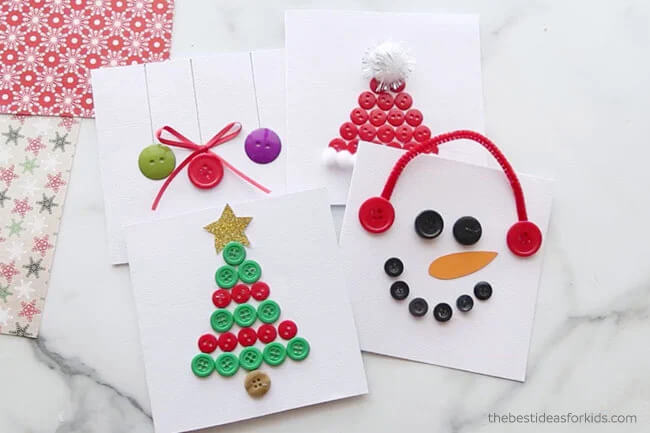
Image Source/Tutorial: The Best Ideas For Kids
Materials Required:
- White Cardstocks
- Round Buttons Of Different Colors And Sizes
- Glittery Star
- Thin Red Ribbon
- Pom-Pom
- Glue
Procedure:
- Take a piece of cardstock and trim it with scissors to make a 4 square shape.
- Start gluing the green and red buttons from the bottom respectively.
- Gluing the button until the Christmas shape.
- Now add a brown button at the bottom.
- Glue the golden glittery star at the top of it.
Result:
By using this budget-friendly item, you can make this craft at your home. Also, you can do some other creativity by using this material as you can see in the above image.
Felt & Colorful Button Decoration Craft For Christmas Tree
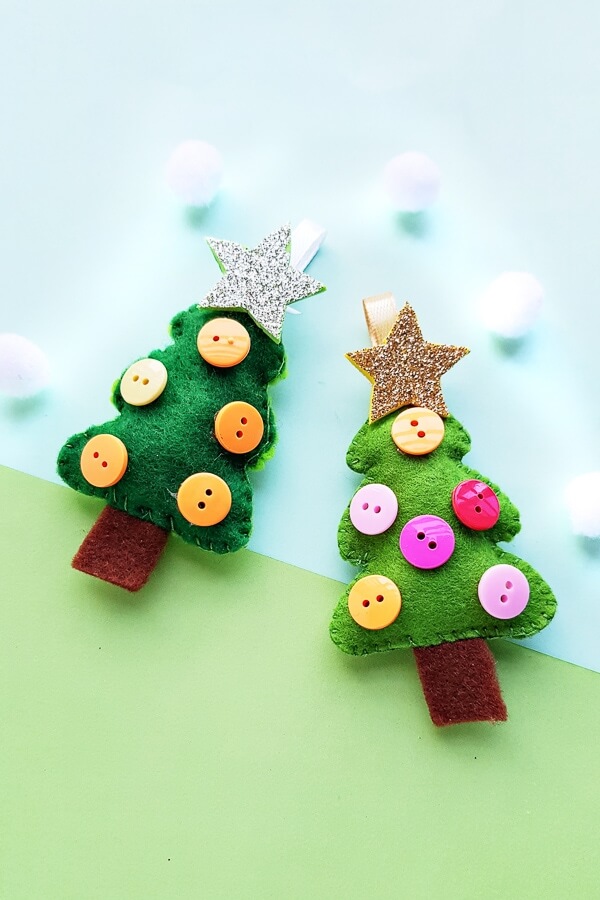
Image Source/Tutorial: Mommy Made That
Materials Required:
- Felt Fabric
- Ornament
- Satin Ribbon
- Colorful Buttons
- Needle
- Thread
- Pencil
- Scissor
- Christmas Tree Ornament Template
- Two Big Glittery Golden And Silver Stars
Procedure:
- Take a piece of green felt and cut it into a Christmas tree shape.
- Now take a needle and thread and start stitching.
- Then take a satin ribbon and stitch it on the top of the tree.
- Stuff the other ornaments inside the tree.
- Add the truck of the tree.
- Lastly, glue the button and glittery star on the tree.
Result:
You can see your tree craft is ready in just 10 min. Also, it is budget-friendly, you can try this craft at your home. Hope you like the creativity of the Christmas tree by using home-available materials. This can be done by the 7-10 year old children.
Beautiful Christmas Decoration Craft Activity For Kids
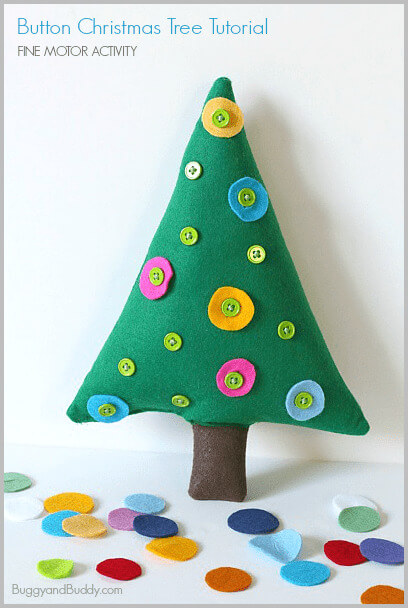
Image Source/Tutorial: Buggy And Buddy
Materials Required:
- Green And Brown Felt
- A Scrap Of Various Colors
- Pin
- Scissor
- Buttons
- Sewing Machine
- Needle
- Thread
- Embroidery Floss
- Stuffing
Procedure:
- Take a green felt and cut into the 2 feet into a Christmas tree shape.
- Take a green color button and sew it.
- Now take a brown felt and cut it into two pieces.
- Sew the truck into the bottom of the tree.
- Stuff the tree by using a waste cloth.
- Now take a colorful felt and cut it into a circle shape.
- Lastly, paste the felt by using a hot glue gun.
Result:
This beautiful Christmas craft activity is ready in just 15 min. You can also try this activity by showing some creativity.
Button & Felt Ornaments Craft For Christmas
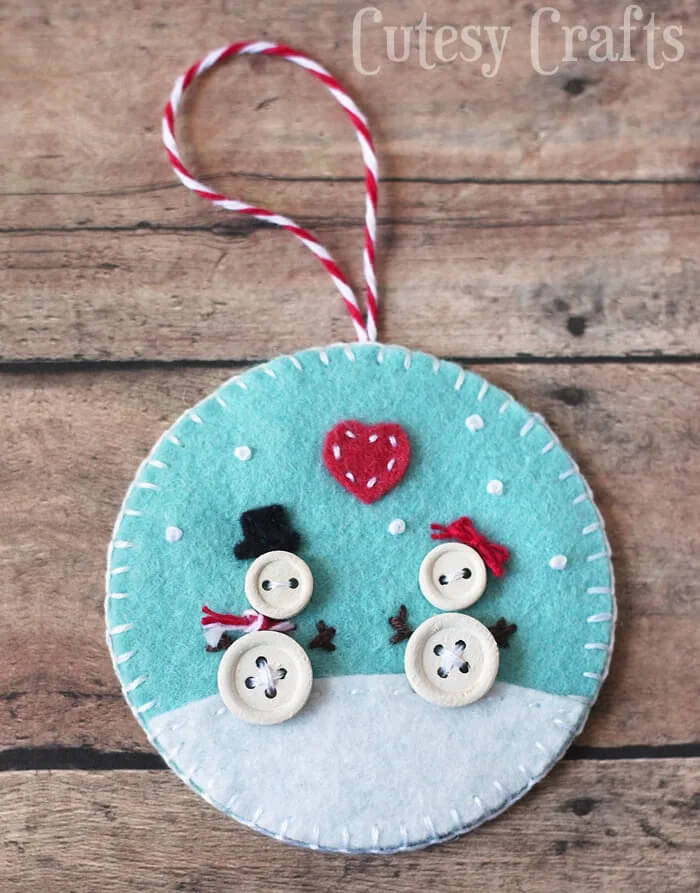
Image Source/Tutorial: Cutesy Craft
Materials Required:
- Christmas Ornament Template
- Felt
- Wooden Buttons
- White Paint
- Embroidery Floss
- Baker Twine
- Painting Brush
- Sew Machine
Firstly, take a wooden button and paint it white. Cut out the pieces of the heart pattern and tape them. After this, sew it from both sides and add embroidery floss. Then take a large embroidery needle and knot the end. Lastly, give a finishing touch to the craft. This can be done by children in the 10 and above years of age group.
DIY Tall Tree Pillow Decoration Craft Ideas
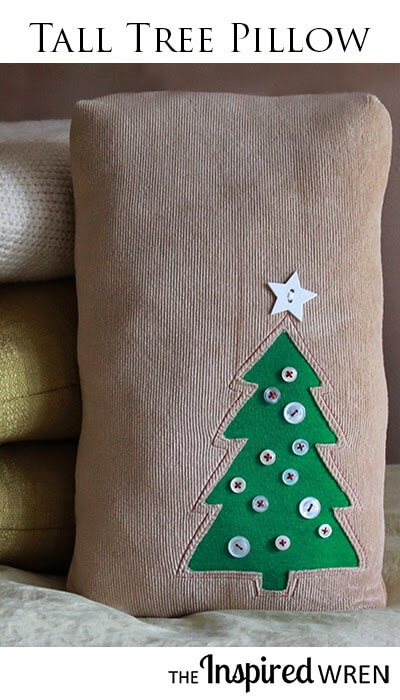
Image Source/Tutorial: The Inspired Wren
Materials Required:
- Knit Fabric
- White Buttons
- Matching Threads
- Ballpoint Needle
- Star Button
- Fiberfill
- Pillow
Procedure:
- Draw the line of the Christmas tree.
- Pin the fabric from right to left.
- Now use the matching thread for the front panel fabric.
- Sew the thread of the matching color where it is needed.
- Take a scissor and cut from the front panel.
- After this place, the button on the three and top put the star button. Sew all buttons accordingly.
- Pin the front and back panels together from the right side.
- After this turn, the pillow and do a hand stitch on it.
Result:
This amazing tall tree decoration is ready in just 15-20 min at home. You can also try and show your creativity. It is also budget-friendly for you all. This can be done by a 12 to 14-year-old age group of children.
Easy To Make Christmas Card For Preschoolers
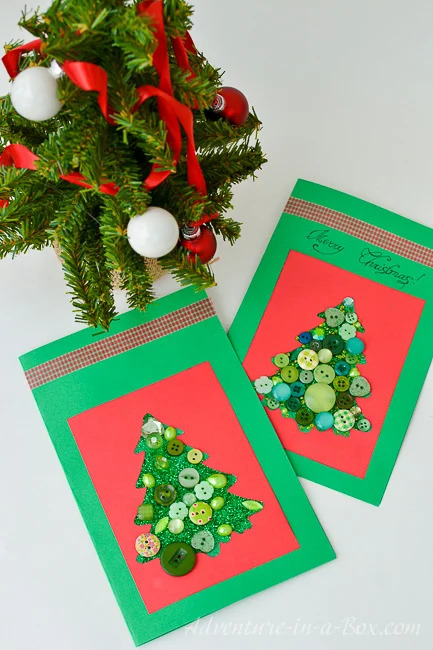
Image Source/Tutorial: Adventure In A Box
Materials Required:
- Red And Green Scrapbook Paper
- Green Buttons
- Packaging Tape
- Glue
- Beads
- Glitter
- Scissor
Procedure:
- Take a piece of red rectangular paper and trace the Christmas tree shape.
- Now cut the piece of the template.
- Then apply a tape on the back side of the red paper.
- Now attach beads and buttons randomly to the paper.
- Add some green glittery inside it. Then attach the red rectangular paper with green.
Result:
This easy-to-make Christmas tree craft is ready in just 10 min. This is budget-friendly for you all and the materials are easily available.
Homemade Snowman Gift Craft Made With Button
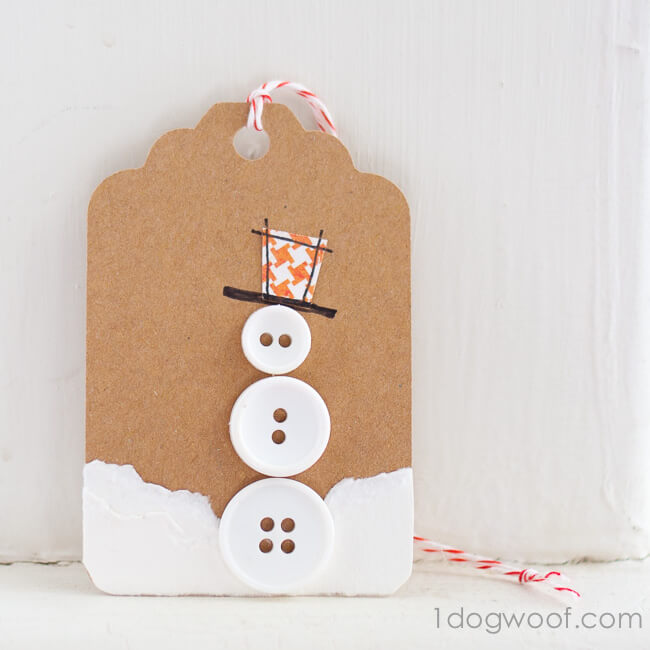
Image Source/Tutorial: One Dog Woof
Materials Required:
- 3 Buttons[ Small, Medium, Large]
- Off White Paper
- Black Pen
- Scrapbook Paper
- Craft Glue
To make this homemade snowman craft at home. Firstly, rip the colored paper to make the snow. Glue the button on it. Now take a piece of scrapbook paper and cut it out to make a snowman hat. Take a thread and insert it inside the hole. Your craft is complete in just 3-5 min. You can also try this craft on your own. This can be done by the 7-10 year old children.
DIY X-mass Tree & Ornaments Decoration Craft With Buttons
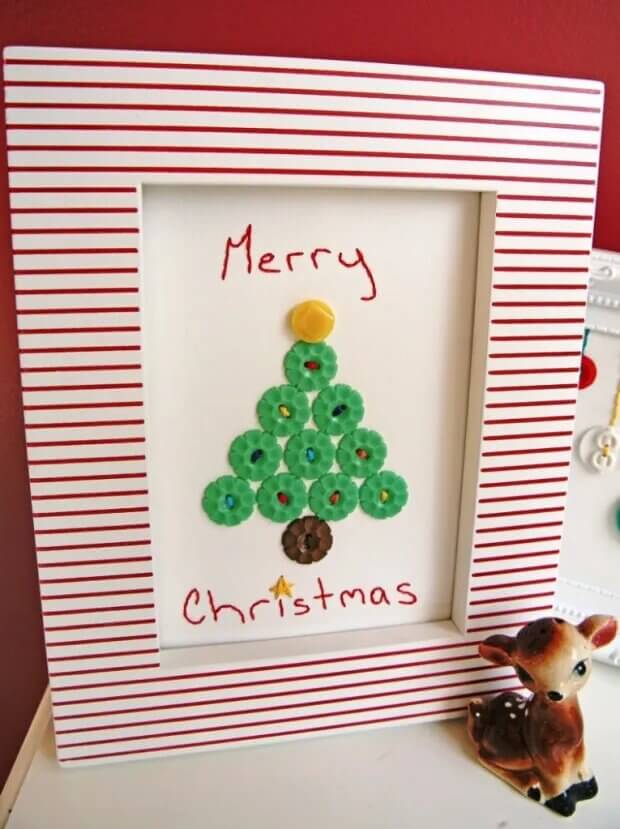
Image Source/Tutorial: My So-Called Crafty Life
Materials Required:
- Buttons
- White-Thickness Color Paper
- Needle
- Scissor
- Embroidery Floss
- Frame
Firstly, take a piece of white thick paper, lay it down, and make a Christmas tree by using buttons. Now you can also use some other ornaments for design like stars, other buttons, etc. Now sew the buttonhole by hand. Knot all the thread buttons from the back. After this, put the paper inside the frame. Your Christmas tree craft using some other ornaments is ready in just 10 min. You can also try this, also it is budget-friendly for you all. This can be made by 7-10 year old children.
Creative Button Wreath Decoration Craft At Home
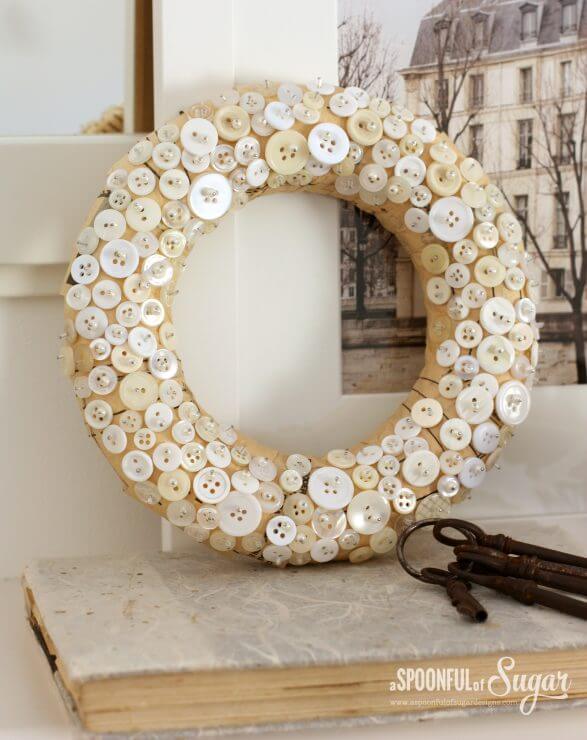
Image Source/Tutorial: A Spoonful of Sugar
Materials Required:
- Polystyrene
- Vintage Dressmaking Tissue
- Various Sizes Of Round Buttons
- Applique Pins
- Small Beads
Firstly, take a round foam and cover it with dress-making tissue. Secure the pin in it. Now pin the various sizes of buttons by using applique pins. This creative button wreath decoration craft is ready in just 10 minutes at home. You can also try this and do more creativity like this. This is also budget-friendly for you all.
Homemade Snowflake Ornament Craft Using Buttons
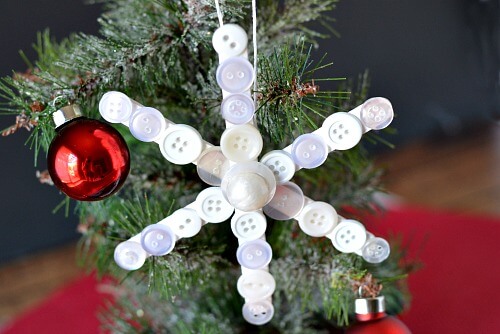
Image Source/Tutorial: A Cultivated Nest
Materials Required:
- Ice Cream Sticks
- Various Sizes And Colors Of Round Buttons
- Embroidery Thread
- Paintbrush
- Acrylic Paint
- Hot Glue Gun
Take an ice cream stick and make a star shape with it. Use the hot glue gun and attach it. Now use acrylic paint and paint the color on it. Let them dry for 5 min. Attach the button on the stick by using the hot glue gun. Cut the piece of the string and make a loop, then apply a hot glue gun to attach it. This popsicle of homemade snowflakes is ready in just 5-8 min. You can also ask your child to do it. Also, it is budget-friendly for you all.
Handmade Gift Tags Idea With Paper & Buttons
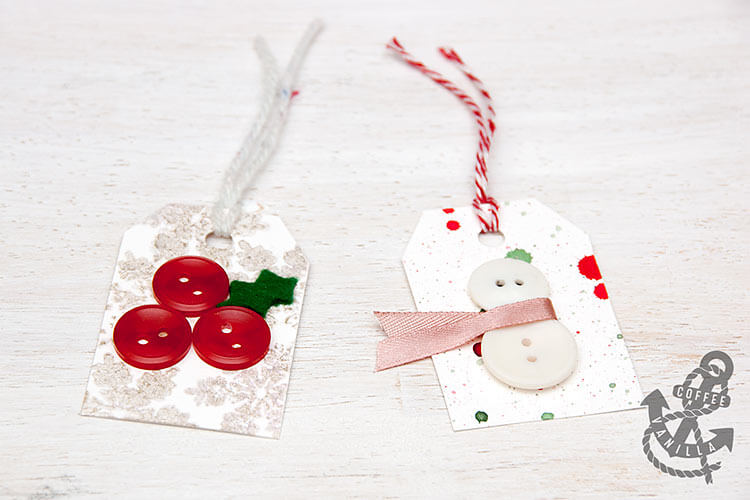
Image Source/Tutorial: Coffee & Vanilla
Materials Required:
- Buttons
- Scrap Paper
- Felt
- Ribbon
- Paper Embellishments
- Yarn
- Glitter
- Glue
Take a scrapbook paper, trim it and make a rectangular shape. Now take a punching machine and make a hole in it. Now glue the button on the card. Use golden glitter for one card. Lastly, take a yarn and insert it into the hole. Your amazing handmade gift tags are ready in just 15 min.
Very Simple Button Wreath Ornament Craft For Preschoolers
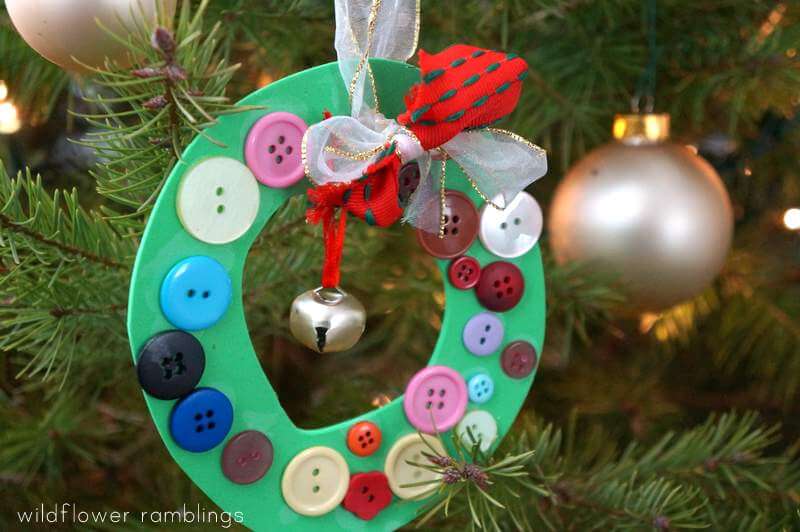
Image Source/Tutorial: Wildflower Ramblings
Materials Required:
- Green Foam Paper
- Buttons
- Ribbon
- Bell
- Glue
Take a piece of green foam paper and cut it into a circle shape. Now glue the button on the surface of the form. Let it dry for 5-10 min. Now hang the bell on it. Lastly, make a knot and tie over the foam. Your simple and easy button wreath ornament is ready in just 5 min. It is also budget-friendly for you all.
Simple Sewing Decoration Craft Project For Kids
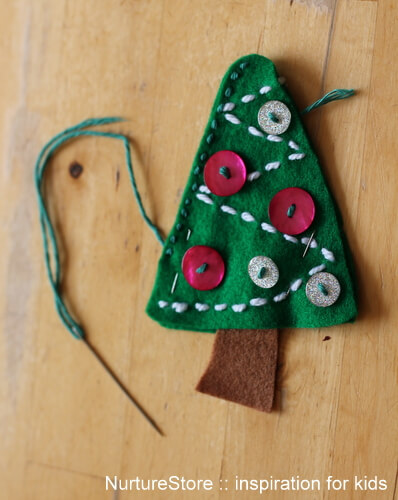
Image Source/Tutorial: Nurture Store
Materials Required:
- Green And Brown Felt
- Buttons
- Pencil
- Wool
- Scissor
- Needle
- Piece Of Paper
- Thread
Take a piece of paper and draw the shape of a Christmas tree. After this, cut this with scissors. Then cut the green felt into the tree’s shape and the brown felt into the shape of the trunk. Now sew white wool on the tree for decoration. After this, take a green thread and sew 2 green felt together. This simple decoration for a Christmas tree is ready in just 10 min. Also, it is budget-friendly for you all.
Easy & Simple Wreath Craft For Preschoolers
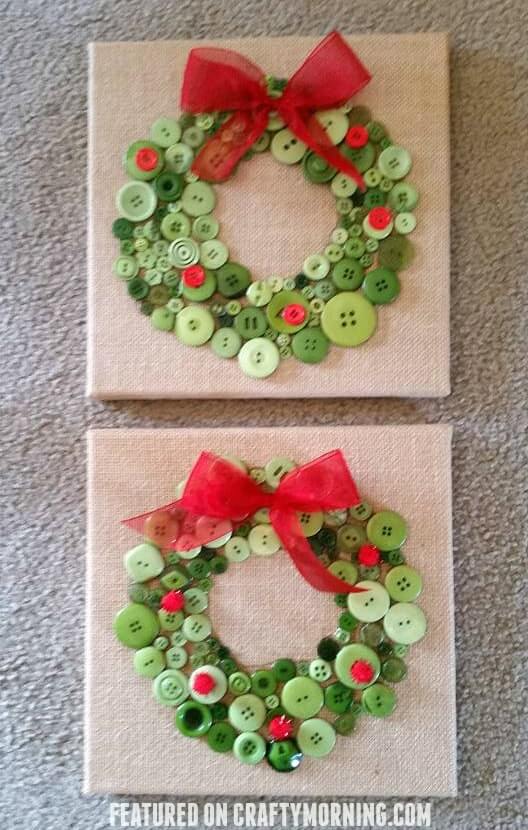
Image Source/Tutorial: Crafty Morning
Materials Required:
- Square Canvas
- Glue
- Various Shades And Sizes Of Green Buttons
- Red Pom-Pom
- Red Ribbon
Firstly, take a canvas and start tracing a circle with buttons. Make another circle inside it and glue it. Now put the 5 red pom-poms on the upper side. Lastly, attach the red ribbon on top of it. This easy and simple wreath craft is ready in just 10 minutes. Ask your child to make this raft at home in the evening time. Also, it is budget-friendly and materials are easily available at home.
Very Simple Button Craft For Toddlers
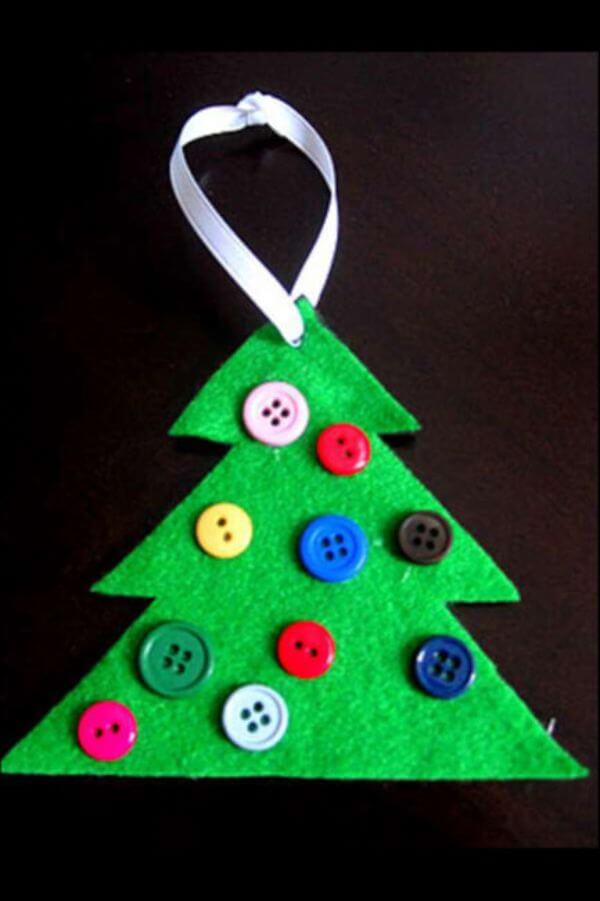
Image Source/Tutorial: Hands-on As We Grow
Materials Required:
- Green Felt
- Various Colors And Sizes Of Round Buttons
- Foam Sheet
- White Ribbon
- Hot Glue Gun
- Scissor
Draw the Christmas tree and cut it. Then trace into the green felt and cut 2 pieces. Now by using a hot glue gun, stick it together. After this, take a colorful button and glue it on the tree. Then make a small hole on top of the tree, insert the ribbon on it, and make a knot. This little Christmas tree is ready in just 5-7 min. This Christmas tree can be made by children of the 7 and above age group.
Simple Snowman Craft Activity For Christmas
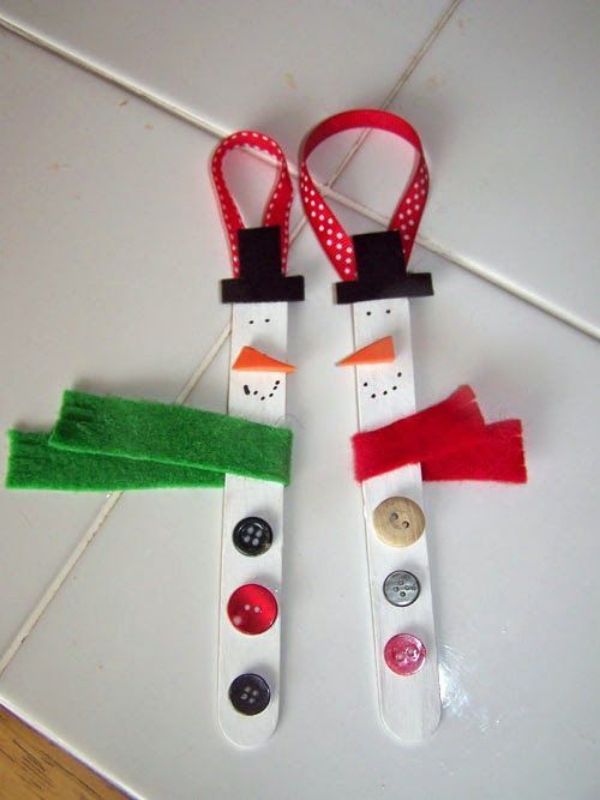
Image Source/Tutorial: A Day of Wonders
Materials Required:
- Various Round, Colored Buttons
- Scrapbook Paper
- Rubber Green And Red Floor Mat
- Marker
- Painting Color
- Painting Brush
Firstly, paint the craft stick with a white color. Then cut the square shape of the black craft foam. Now glue the hat at the top of the sticks and attach a dotted red ribbon. Then take an orange scrapbook paper, cut it into a triangular small shape, and glue it under the eye. Then take a marker to make a mouth. Now take a mat of green and red color and put it around and under the mouth. Lastly, glue the button on each ice cream stick. Your easy-to-make snowman craft is ready in just 10 minutes. You can also try this activity.
Easy To Make Snowman Craft Project For Classroom
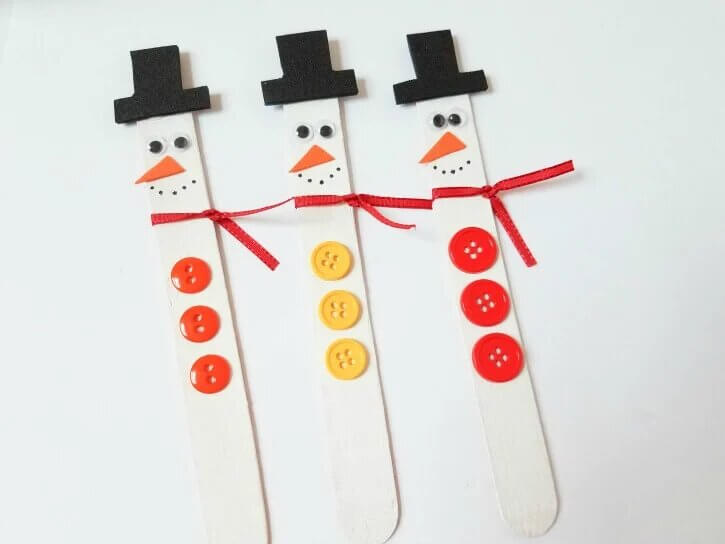
Image Source/Tutorial: Thrifty Jinxy
Materials Required:
- Ice Cream Sticks
- Googly Eye
- Ribbon
- Scrapbook Paper
- 3 Round Shapes Of Different Color Buttons
- Marker
- Painting Color
- Painting Brush
Firstly, paint the craft stick with a white color. Then cut the square shape of the black craft foam. Now glue the hat at the top of the sticks, then the googly eye. Then take an orange scrapbook paper, cut it into a triangular small shape, and glue it under the eye. Then take a marker to make a mouth. Now take a ribbon and put it around and under the mouth. Lastly, glue the button on each ice cream stick. Your easy-to-make snowman craft is ready in just 10 minutes. You can also try this activity.
Fine Motor Sewing Activity For Kindergartners
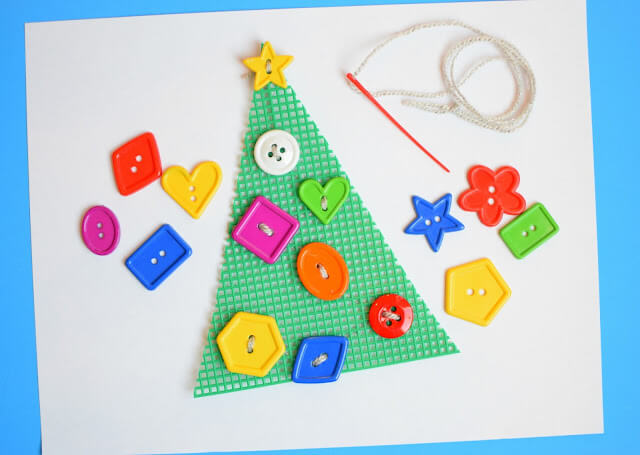
Image Source/Tutorial: Paper And Glue
Materials Required:
- Green Plastic Canvas
- Plastic Yarn
- Normal Yarn
- Scissors
- Various Shapes And Sizes Of Buttons
Take a canvas and cut it into a Christmas tree shape. Then thread a button with the canvas. Apply all the buttons and other decorative ornaments to the canvas. Your motor sewing canvas is ready in just 5 min. You can also ask your child to do this activity at home. It is also budget-friendly for you all.
Handmade Christmas Ornaments Decoration Craft Using Yarn
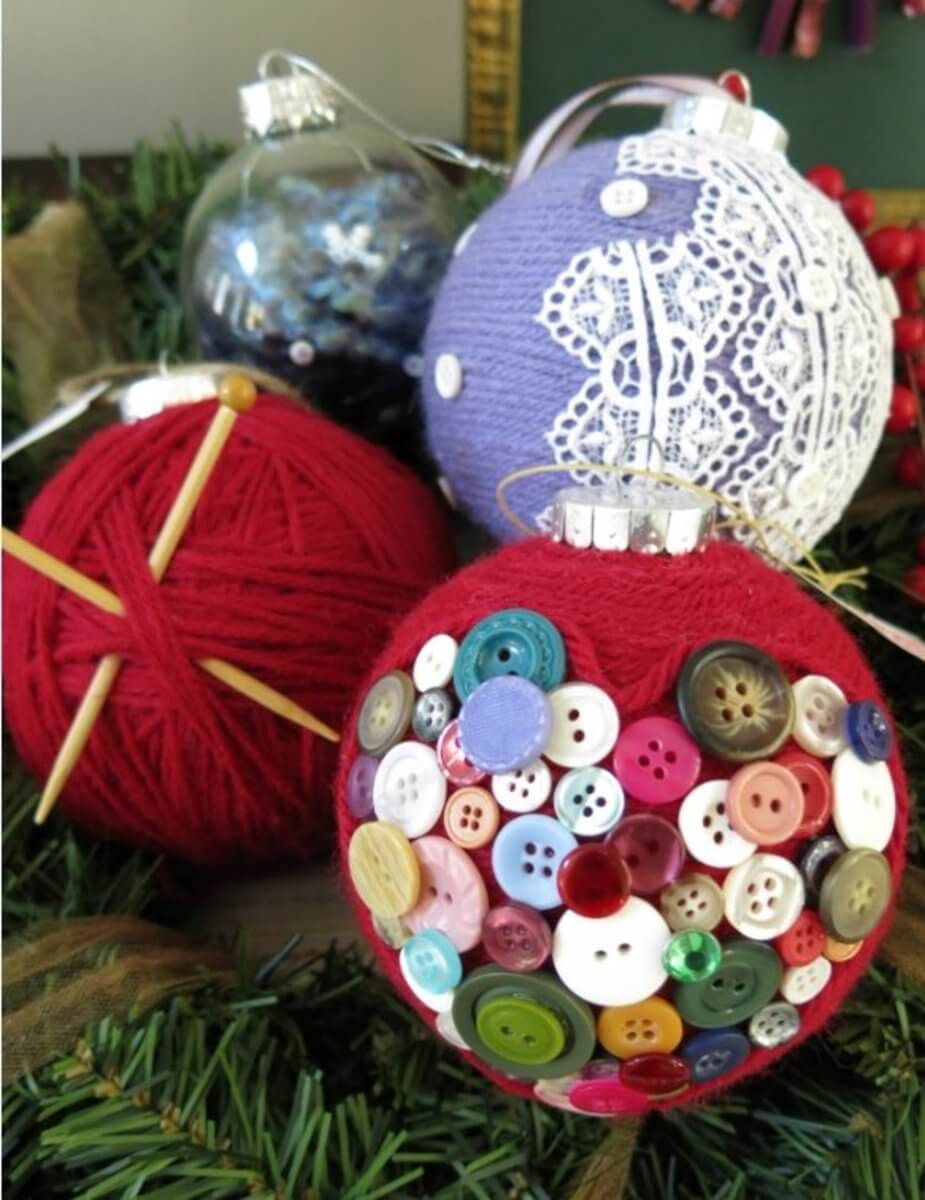
Image Source/Tutorial: Holidappy
Materials Required:
- Egg-Size Ball Of Yarn
- Colorful Buttons
- Beads
- Sequins
- Yarn
Take an egg-size ball and place some decoration items inside it. Now place the yarn around the ball. After this, take another ornament like beads or sequins and put it inside the ball. Lastly, apply a hot glue gun on the button and paste it outside it. Your handmade Christmas ornament decoration is ready in just 10 minutes. Hope you like this activity and the new ideas and creativity for the Christmas decoration craft. This can be made by those 10 and above.
FAQs
What kind of crafts can you do with buttons?
There are all sorts of fun crafts you can do with buttons! You can make jewelry, such as bracelets, necklaces, and earrings. You can also use buttons to decorate clothes, hair accessories, and other items. If you’re feeling creative, you can even make sculptures and other art projects out of buttons. The possibilities are endless!
What can you do with Christmas buttons?
There are all sorts of things you can do with Christmas buttons! You can use them to decorate a holiday wreath or garland, you can use them to make a festive button tree, or you can even use them to create a unique piece of holiday jewelry. Whatever you decide to do with them, Christmas buttons are sure to add a touch of holiday cheer to your home.
How do you make Christmas tree decorations with buttons?
To make Christmas tree decorations with buttons, you will need a hot glue gun, a styrofoam cone, and a variety of buttons in different colors and sizes. Begin by gluing the buttons around the styrofoam cone, starting at the bottom and working your way up. Continue until the entire cone is covered. You can make patterns with the buttons, or simply glue them on randomly. Let the glue dry completely before displaying your finished decoration.
What do you decorate with buttons?
There are all sorts of things you can decorate with buttons! You can put them on clothes, bags, shoes, and even jewelry. You can also use buttons to decorate other things like scrapbooks and picture frames. They add a bit of color and personality to whatever you decorate with them.
How do you make Christmas tree decorations with buttons?
One way to make Christmas tree decorations with buttons is to glue them onto a piece of construction paper or cardboard in the shape of a Christmas tree. Another way is to string them together with thread or yarn to make a garland.
How do you make a Christmas wreath button?
To make a Christmas wreath button, you will need: a hot glue gun, a styrofoam wreath form, a bag of small buttons, and a ribbon. First, hot glue the buttons around the wreath form. Once the entire wreath is covered, hot glue a ribbon to the back for hanging.
How do you crochet tree ornaments?
To crochet tree ornaments, you will need some basic supplies including yarn, a crochet hook, and a tapestry needle. You will also need some stuffing material and some decorative items such as beads or sequins.
To start, make a magic ring with your yarn and crochet 6 single crochet stitches into the ring. Join with a slip stitch, and then crochet 2 single crochet stitches into each stitch around (12 stitches total). Join with a slip stitch and stuff your ornament lightly.
Next, Crochet 2 single crochet stitches into each stitch around (24 stitches total). Join with a slip stitch and stuff your ornament more firmly.
Finally, Crochet 2 single crochet stitches into the first stitch, 1 single crochet stitch into the next stitch, and repeat around (36 stitches total). Join with a slip stitch, and finish off your ornament. You can now add any decorative items you like.
How do you make wire Christmas ornaments?
To make wire Christmas ornaments, you will need some thin wire, wire cutters, and pliers. You will also need some beads, sequins, and other small decorations. First, use the wire cutters to cut a length of wire. Then, start threading beads and other decorations onto the wire. Once you have enough decorations on the wire, use the pliers to twist the wire into a loop. You can then hang your ornament on a Christmas tree or elsewhere.
Follow us on YouTube for art and craft tutorials and much more.
More Articles from Kids Art & Craft
- Washi Paper Tape Decoration Craft For Christmas
- Newspaper Crafts for Christmas
- Candy Cane Craft Ideas For Kids
- Snowflake Crafts and Activities For Kids
- Christmas Santa Crafts Made With Everyday Supplies!