




Christmas
How to Make a Christmas Tree


Christmas is almost knocking on the door! People like to decorate their house with a Christmas tree, gifts, a Santa look-alike toy, and many more. You must have wanted to decorate your house with a beautiful tree. Today, you’re going to learn how to make a dazzling Christmas tree that will make your room brighter. Christmas trees are the symbol of Christmas and happiness. That’s why to celebrate a Christmas Eve party, one must have one of them. By doing this craft, you can save some money too. So, without any words, let’s get started!
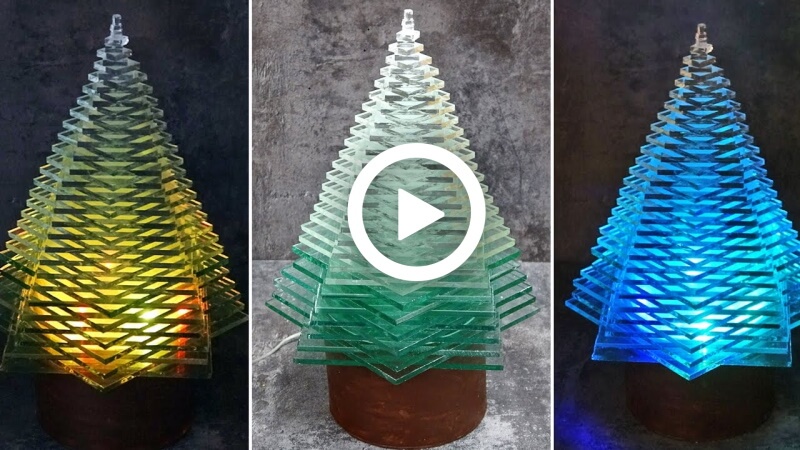
How to make a Glass Christmas tree
Materials:
- Glass 4 mm thick
- Glass cutter
- A black marker
- A ruler
- The bar for sharpening knives
- Nail polish remover
- Superglue
- A piece of plastic pipe( diameter of 110 mm)
- A cardboard
- Acrylic paint
- Garland 5 meters.
Procedure:
Reference video:
- Take a diamond glass cutter and a glass (4mm thick), use a marker, and make a point with a ruler to measure it. The two parts will not be the same; one will be bigger than the other. It will be rectangular (smaller) and square-shaped (bigger).
- Cut the glass with the glass cutter.
- Take the rectangle, cut out two squares of the same shape. Before cutting them, measure with a ruler, then cut.
- Use the glass cutter and cut the glasses into square shapes sized 13 c.m to 5 cm in 5mm intervals.
- Take a knife-sharpening bar, and shape the glasses with it.
- Take a nail polish remover and a cloth, put some remover into the clothes, and use it to polish the glasses.
- Take a liquid superglue, put the glasses shape-wise, and place them in a diamond shape one over another, and stick them properly with the glue. Do it carefully.
- After finishing, it will look like a Christmas tree.
- Measure it’s what you want.
- Take a piece of plastic pipe( diameter of 110 mm), use the marker to draw lines on the bottom of it, which part you will cut.
- Cut the part properly with a cutter.
- Take the cut part, clean and shape it with sandpaper.
- Take the cardboard, place the pipe on it, use a marker, make two circles with it on the cardboard, and cut them out.
- Use Slime nail polish remover and clean the pipe.
- Place the two cardboard circles on the bottom and top of the pipe and stick them with super glue.
- Cut the unnecessary parts of that pipe with the cutter.
- Make a hole in it with a drill, put electric lights, and stick the electric board on it properly.
- Take a brown Acrylic paint and paint the pipe part.
- Put the glass tree on it and then turn on the lights.
- Your beautiful Christmas tree will be ready!
Step-by-Step How to Make a Christmas Tree Tutorial – Easy DIY Paper Christmas Tree Craft
Learn how to make a Christmas tree with this step-by-step tutorial! This video shows an easy DIY paper Christmas tree craft using simple materials. Perfect for kids, beginners, and holiday school projects. Create beautiful Christmas decorations at home and enjoy fun festive craft ideas while boosting creativity and fine motor skills.
Wow, it’s so beautiful, just look at how beautiful the lights look in it! This will shine in your home. You can easily make it with the materials that are all available in the market. Santa will love it! Without buying anything, you can use your creativity to decorate your house. Your relatives, guests, and kids will love them. So, hurry up, grab the materials, and make a dazzling Christmas tree.
Get inspired with fun craft ideas, kids’ DIY activities, and creative learning projects. Join our Telegram group today and follow us on YouTube & Facebook
for more exciting content!
Reviewed By Rachit Gupta
Read More:
- Enjoy Christmas with Santa Claus Craft Ideas for Kids
- Easy DIY Christmas Craft Ideas for Kids
- Christmas Footprint Crafts for Kids – Reindeer, Snowmen, Christmas Bell & More
- Easy Christmas Tree Craft Ideas For Kids
- How to Make a DIY Christmas Gift Card with a Pop-Up Tree