Kids Activities
How to Make a Paper Rudolph Reindeer Card

Christmas is almost knocking on the door! Christmas is the most favourite holiday of many of you. It is dedicated to numerous regions all over the earth. People like to illuminate their house with Christmas trees, gifts and Randolph Reindeer toys and many more.
You must have wanted to decorate your house with some beautiful stuff and wish your friends and family beautiful cards. Today’s craft is related to this, as you’re going to learn to make a paper Randolph Reindeer card, which will bring smiles to your guests’ faces. So, without any words, let’s get started!
How to Make a Paper Rudolph Reindeer Card
Materials required:
- A brown paper colour strip of 8*20cm.
- A yellow paper colour strip of 8*20cm.
- A small white square of paper.
- A red piece of paper.
- A small square yellow coloured paper.
- A black marker.
- A pencil.
- A glue stick.
- Scissors.
Procedure:
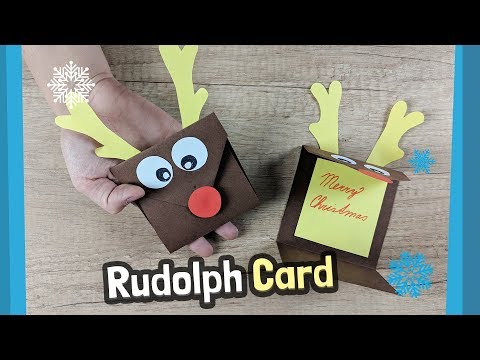
- Take a brown paper colour strip of 8*20cm, place it straight with the long length sides.
- Fold the top of the paper’s edges by making half small triangles.
- Fold the bottom part of the paper by making a square by the fold line on the side of the paper, leaving it in the middle.
- Grab a glue stick and attach the top half triangle folds with it.
- Fold this side by leaving a square space in the middle with the glued portion.
- This part should be over the previously folded part and will be bigger than it.
- A small white square of paper, fold it in half sideways, then cut a circle on it.
- It will create two circles if you separate the pieces.
- Grab a black marker and draw cute eyeballs on the circles.
- These will be the reindeer’s eyes.
- Attach the eyes to the top of the converse triangle part.
- Take a red piece of paper and cut out a small circle from it with scissors.
- Attach the circle to the tip of the converse triangle as the reindeer’s nose.
- Take a yellow paper colour strip of 8*20cm, place it straight with the long length sides.
- Fold it in half from top to bottom.
- Grab a pencil and draw a reindeer’s horn on it.
- Cut the drawn reindeer horn with scissors.
- It will create two horns if you separate the pieces.
- Attach the horns of the two sides of the top back side of the card with the glue stick.
- Open the card.
- Take a small square of yellow-coloured paper and attach it to the middle of the card base.
- Write any Christmas message on this portion.
- Close the card like before.
- Your cute Randolph Reindeer card will be ready!
P.S- You can use different coloured paper as per your help.
Wow, it’s so beautiful, just look at how adorable the reindeer look! This will make your receiver’s day. Make them easily with the materials that are all accessible in the market. Why buy anything if you can use your skill to make a beautiful Christmas card? Your relatives and guests will adore them. So, hurry up, grab the materials and make an adorable Randolph Reindeer.
Educational Benefits of This Christmas Craft
Paper craft activities are not only fun but also educational for kids. Making a Rudolph Reindeer Card helps children develop:
- Fine motor skills through cutting and folding paper
- Hand-eye coordination while decorating the card
- Creativity and imagination during design customization
- Focus and patience by following step-by-step instructions
- Communication skills when writing Christmas wishes inside the card
Craft-based learning activities are excellent for early childhood development and interactive classroom learning.
Tips to Make Your Rudolph Card More Creative
You can make your reindeer greeting card more attractive using simple decorative materials:
- Add googly eyes for a fun 3D effect
- Use glitter paper for shiny antlers
- Stick a red pom-pom for Rudolph’s nose
- Write a personalized Christmas message inside
- Decorate with snowflakes, stars, or candy cane stickers
Kids can also experiment with different paper textures and colors to create unique Christmas greeting cards.
Best Occasions to Use Handmade Reindeer Cards
These DIY Rudolph cards are perfect for many holiday occasions:
- Christmas classroom activities
- Winter art competitions
- DIY greeting card projects
- Handmade Christmas gifts
- Holiday party crafts
- Preschool Christmas activities
- Family craft sessions at home
Handmade cards add a personal touch and make holiday celebrations more memorable.
Safety Tips for Kids During Crafting
Adult supervision is recommended when children use scissors, glue guns, or small decorative items. Choose child-safe scissors and non-toxic glue for younger kids. Organizing craft supplies before starting the activity can also make crafting easier and safer.
Why Kids Love Making Rudolph Reindeer Cards
Creating a Paper Rudolph Reindeer Card is a fun Christmas craft activity that helps kids express creativity while celebrating the holiday season. The bright red nose, cute antlers, and festive design make this craft exciting for preschoolers and school-age children. Handmade Christmas cards also encourage emotional bonding because children can gift them to parents, teachers, grandparents, or friends.
This easy Christmas craft is perfect for winter classroom activities, holiday art sessions, homeschooling projects, and family crafting time. Children improve their cutting, folding, coloring, and gluing skills while enjoying a screen-free creative activity.
FAQs on How to Make a Paper Rudolph Reindeer Card
Q1. What materials do I need to make a paper Rudolph reindeer card?
Answer: You will need cardstock, scissors, a pencil, a black marker, a red marker, and some glue.
Q2. How long does it take to make a paper Rudolph reindeer card?
Answer: It should take less than an hour.
Q3. How do I start making the card?
Answer: Start by drawing the shape of the reindeer on a piece of cardstock. Then cut it out with scissors.
Q4. How do I make the antlers?
Answer: Draw two antlers on a piece of cardstock and cut them out. Then attach the antlers to the reindeer with glue.
Q5. How do I make Rudolph’s nose?
Answer: Draw a red nose on a piece of cardstock and cut it out. Glue it to the reindeer’s face.
Q6. How do I make the eyes of the reindeer?
Answer: Draw two black eyes on a piece of cardstock and cut them out. Then glue them to the reindeer’s face.
Q7. How do I make the reindeer’s mouth?
Answer: Draw a black line on a piece of cardstock and cut it out. Then glue it to the reindeer’s face.
Q8. What other decorations can I add to the reindeer card?
Answer: You could add a Santa hat, some holly, or a Christmas tree.
Q9. How do I write the message on the card?
Answer: Write the message on a piece of cardstock and cut it out. Then glue it to the card.
Q10. How do I finish the card?
Answer: Fold the card along the edges to make a card shape. Then glue the reindeer to the front of the card.
Making a Paper Rudolph Reindeer Card is a simple and enjoyable Christmas craft activity for kids. It combines creativity, learning, and festive fun in one engaging project. Whether used for classroom activities or holiday decorations, this adorable DIY Christmas card helps children create meaningful, handmade memories during the holiday season.
Creative fun begins here! Explore amazing crafts, educational activities, and easy DIY projects for kids by joining our Telegram and following us on YouTube & Facebook.
Reviewed By Rachit Gupta
Read More:
- Interesting and Easy Paper Card Ideas for Kids
- Cardboard Christmas Crafts for Home Decoration
- DIY Creative Cardboard Crafts That Kids Will Love
- Bell Card – From my Christmas Crafting Book
- Cardboard Christmas Crafts for Home Decoration