Kids Activities
How to Make a Paper Rudolph Reindeer Card

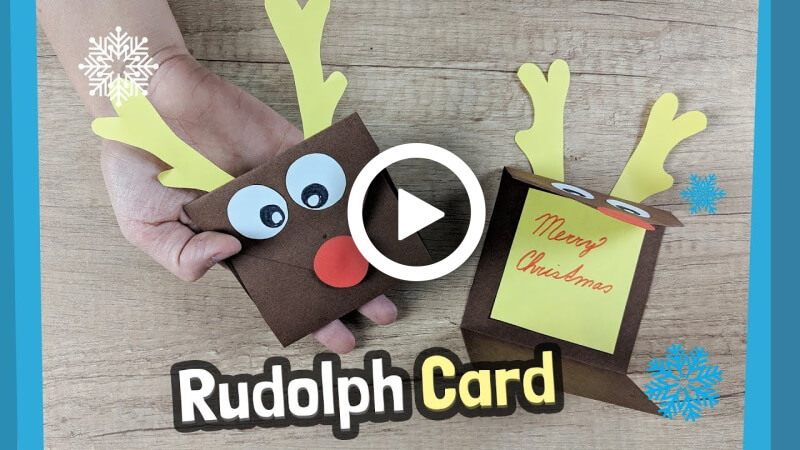
Christmas is almost knocking on the door! Christmas is the vastly favourite holiday of many of you. It is dedicated to numerous regions all over the earth. People like to illuminate their house with Christmas trees, gifts and Randolph Reindeer toys and many more.
You must have wanted to decorate your house with some beautiful stuff and wish your friends and family beautiful cards. Today’s craft is related to this as you’re going to learn to make a paper Randolph Reindeer card, which will bring smiles to your guest’s faces. So, without any words, Let’s get started!
How to Make a Paper Rudolph Reindeer Card
Materials required:
- A brown paper colour strip of 8*20cm.
- A yellow paper colour strip of 8*20cm.
- A small white square paper.
- A red piece of paper.
- A small square yellow colour paper.
- A black marker.
- A pencil.
- A glue stick.
- Scissors.
Procedure:
- Take a brown paper colour strip of 8*20cm, place it straightly by having the long length sides.
- Fold the top of the paper’s edges sides by making half small triangles.
- Fold the bottom part of the paper by making a square by the fold line on the side of the paper by leaving it in the middle.
- Grab a glue stick and attach the top half triangle folds with it.
- Fold this side by leaving a square space in the middle with the glued portion.
- This part should be over the previous bottom folded part and will be bigger than it.
- A small white square paper, fold it in half sideways then cut a circle on it.
- It will create two circles if you separate the pieces.
- Grab a black marker and draw cute eyeballs on the circles.
- These will be the reindeer’s eyes.
- Attach the eyes on the top of the converse triangle part.
- Take a red piece of paper and cut out a small circle from it with scissors.
- Attach the circle on the tip of the converse triangle as the reindeer’s nose.
- Take a yellow paper colour strip of 8*20cm, place it straightly by having the long length sides.
- Fold it in half from top to bottom.
- Grab a pencil and draw a reindeer’s horn on it.
- Cut the drawn reindeer horn with scissors.
- It will create two horns if you separate the pieces.
- Attach the horns of the two sides of the top back-side of the card with the glue stick.
- Open the card.
- Take a small square of yellow colour paper and attach it to the middle of the card base.
- Write any Christmas message on this portion.
- Close the card like before.
- Your cute Randolph Reindeer card will be ready!
P.S- You can use different colour paper as per your help.
Wow, it’s so beautiful just look at how adorable the reindeer look! This will make your receivers day. Make them easily with the materials that are all accessible in the market. Why buy anything if you can use your skill to make a beautiful Christmas card? Your relatives, guests, will adore them. So, hurry up, grab the materials and make an adorable Randolph Reindeer.
FAQ’s on How to Make a Paper Rudolph Reindeer Card
1. What materials do I need to make a paper Rudolph reindeer card?
You will need cardstock, scissors, a pencil, a black marker, a red marker, and some glue.
2. How long does it take to make a paper Rudolph reindeer card?
It should take less than an hour.
3. How do I start making the card?
Start by drawing the shape of the reindeer on a piece of cardstock. Then cut it out with scissors.
4. How do I make the antlers?
Draw two antlers on a piece of cardstock and cut it out. Then attach the antlers to the reindeer with glue.
5. How do I make Rudolph’s nose?
Draw a red nose on a piece of cardstock and cut it out. Glue it to the reindeer’s face.
6. How do I make the eyes of the reindeer?
Draw two black eyes on a piece of cardstock and cut them out. Then glue them to the reindeer’s face.
7. How do I make the reindeer’s mouth?
Draw a black line on a piece of cardstock and cut it out. Then glue it to the reindeer’s face.
8. What other decorations can I add to the reindeer card?
You could add a Santa hat, some holly, or a Christmas tree.
9. How do I write the message on the card?
Write the message on a piece of cardstock and cut it out. Then glue it to the card.
10. How do I finish the card?
Fold the card along the edges to make a card shape. Then glue the reindeer to the front of the card.
Read More:
- Interesting and Easy Paper Card Ideas for Kids
- Cardboard Christmas Crafts for Home Decoration
- DIY Creative Cardboard Crafts That Kids Will Love
- Bell Card – From my Christmas Crafting Book
- Cardboard Christmas Crafts for Home Decoration


