


Kids Activities
How to make an Origami Magic Rose Cube


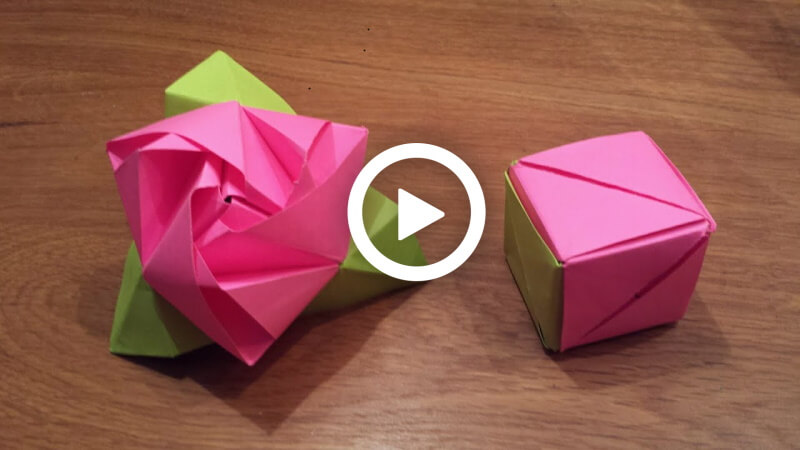
Do you know what the most beautiful flower is? It’s a Rose! Everyone adores this flower for its beautiful structure and fragrance. I mean, who doesn’t like roses, right? From anybody’s birthday to any happy moment, people give roses to each other to show their respect, love and happiness. The roses are the symbol of love, happiness and prosperity. Today, you are going to learn to make an origami rose, but it’s not a normal rose; it will be a magical rose, which can also turn into a box. How amazing, right? So, why are you waiting? Let’s get started!
How to Make a Magic Paper Rose
Materials:
- Six 10*10 cm square coloured paper ( three will be pink and the other three green)
Procedure:
- Take a 10*10 cm pink colour square paper, fold the paper from top to bottom by making a fold line in the middle. Unfold it.
- Follow the fold line, then fold the bottom part into the middle fold line. Unfold it.
- Do the same process in the upper part.
- Take the paper, and there should be four straight fold lines.
- Fold the paper from the right part to form a triangle shape, leave a straight fold line on the left side and some space at the bottom. unfold it
- Fold the exact opposite corner of it in the same way.
- Turn the page and press it in the middle, and fold it from the left side straight and carefully.
- Follow this process and do the same with the upper part of the page, and there should be two sides on the left and right. The middle folded parts should be under it.
- Turn over the page and fold the sharp edges of both left and right sides. That should look like little triangles.
- Fold the left edge from the side to the bottom, and the right side up. It should look like a little square together.
- Lift both sides a little.
- Follow the same process with the other two pink pages.
- Take a 10*10 cm green colour square paper, fold the paper from top to bottom by making a fold line in the middle. Unfold it.
- Follow the fold line, then fold the bottom part into the middle fold line. Unfold it.
- Do the same process in the upper part.
- Take the paper, and there should be four straight fold lines.
- Fold the paper from the right part to form a triangle shape, leave a straight fold line on the left side and some space in the bottom part. unfold it
- Fold the exact opposite corner of it in the same way.
- Turn the page and press it in the middle, and fold it from the left side straight and carefully.
- Fold the right bottom sharp edge of it like a small triangle shape. Unfold it.
- Put that part over its left side and fold it.
- Fold the upper part of the page into the middle of the bottom fold. There should be one side after it.
- Turn over the page, fold the sharp edge of the side into a small triangle shape.
- Fold the left edge from the side to the bottom, and the right side up. It should look like a little square together.
- Lift both sides a little.
- Follow the same process with the other two green pages.
- Take the green papers, put one sharp edge of a paper to the middle part of the other and put the other page’s edge on the bottom of that page. And put the first-page edge to the side of the last page.
- Follow this process and take the pink pages to do the same.
- After that, put both the pink and green parts together. Altogether, it will look like a box.
- Unfold the bottom sides and upper parts a little. It should look like a rose with leaves.
- After unfolding, you will discover the magic!
Can you feel that magic! It’s amazing! As you can see, it requires so few materials; all you need to do is follow these steps properly. Kids will love it. So, grab your stationery and let’s make a magical rose!
FAQs on How to Make an Origami Magic Rose Cube
Q1. What is an Origami Magic Rose Cube?
Answer: An Origami Magic Rose Cube is a complex origami figure that is constructed from six identical sheets of paper. It has a cube-like shape and is made up of eight interlocking units, each resembling a rose.
Q2. How do I make an Origami Magic Rose Cube?
Answer: To make an Origami Magic Rose Cube, you will need six identical square sheets of paper, a pair of scissors, and a ruler. Start by folding each sheet of paper into a square base. Then, fold each unit and assemble them to form the cube.
Q3. What type of paper should I use?
Answer: You can use any type of paper, such as origami paper, cardstock, or regular printer paper. However, it is best to use paper that is not too thick or too thin.
Q4. What is the best way to store my Origami Magic Rose Cube?
Answer: The best way to store your Origami Magic Rose Cube is to keep it in a flat container or box. This will keep the cube from being crushed or deformed.
Q5. How long does it take to make an Origami Magic Rose Cube?
Answer: The time it takes to make an Origami Magic Rose Cube will depend on the skill level of the person making it. Generally, it can take anywhere from 30 minutes to 2 hours.
Q6. Are there any special techniques used to make an Origami Magic Rose Cube?
Answer: Yes. There are a few special techniques used to make an Origami Magic Rose Cube. These include: folding the paper into a square base, folding the corners of the square base inwards, folding the edges of the square base up and inwards, and interlocking the units.
Q7. What is the best way to learn how to make an Origami Magic Rose Cube?
Answer: The best way to learn how to make an Origami Magic Rose Cube is to watch tutorials online. There are many tutorials available that can help you learn the steps and techniques needed to make the cube.
Q8. Can I make an Origami Magic Rose Cube with one sheet of paper?
Answer: No, you cannot make an Origami Magic Rose Cube with just one sheet of paper. You need at least six square sheets of paper to make the cube.
Q9. Are there any other types of origami cubes I can make?
Answer: Yes. There are many other types of origami cubes you can make, such as the Rubik’s Cube, the Alexander Star, and the Starburst Cube.
Making an Origami Magic Rose Cube is a fun and rewarding activity for kids, parents, and teachers. This creative paper craft improves concentration, boosts creativity, and helps children learn important developmental skills while enjoying hands-on learning. Whether used as a school project, decoration, or gift, this magical origami craft is a wonderful way to inspire artistic thinking in children.
Bring creativity to life with fun craft ideas, DIY projects, and learning activities for kids. Join our Telegram family and follow us onYouTube & Facebook.
Read More:
- Christmas Tree Crafts for Kids – Papers, Popsicles, Paintings & Pasta!
- How to Create A Paper Toy- Spinning Top
- How to Make an Origami Lotus Flower
- How to Make a Halloween Pumpkin
- How To Make a Paper Chick – DIY Chick – Paper Craft