


Paper Crafts
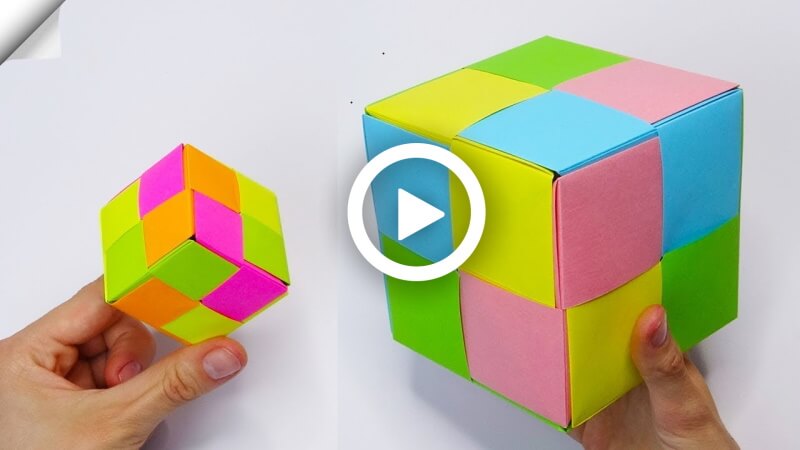
How to Make A Colorful Paper Cube

Let’s make a mathematical craft today! You must be wondering what it should be! Today you’re going to make a paper cube. This process will be filled with fun and educational information. Let us know first what the cube actually is! You must hear it in the geometry part of maths. Some of you also might know the proper definition! But we don’t go to that hard study part as we are here to have fun! Right! But you must know about it simply, as then you can really understand it! The Cube is a three-dimensional figure which has 6 square faces, 8 vertices, and 12 edges. There are many cube shapes you can see in your daily life, like dice, sugar cubes, casserole, solid square tables, milk crates, etc.
Now it is understandable, right? So, today we are making this fun, and Kids will love it. Without wasting any time, let’s get it!
How to Make A Colorful Paper Cube
Materials:
- Eight 20*20 c.m. color papers. ( There must be two pages of the same color for each)
Procedure:
- Take a 20*20 c.m paper, fold it from the bottom up in a rectangular shape, and unfold it.
- Fold it sideways, left to right, in a rectangular shape, and unfold it. There must be four identical square fold lines made.
- Follow the fold line in the middle and fold the page from the left side by making a straight line-like shape into the fold line. The same will be done to the right side as well, and then unfold it. There must be twelve identical rectangular fold lines made.
- Fold the left’s top corner and the right’s bottom corner like a half triangle into the side fold lines of each side, and fold the sides with these triangles straightly.
- Place it like a rectangular shape on the desk, where the folded triangles must be at the top and bottom.
- Unfold the bottom straight fold, not the triangle fold, then fold the top of the page like a triangle shape at the left side into the bottom part’s fold line. Then unfold it.
- Fold the downside’s right portion similarly, then place the upper fold part over it.
- Put the other side part under the bottom fold part. Fold it in the middle. It will look like a rotated flat rectangular plane.
- Follow these steps and make another seven rotated rectangular planes with the other color pages.
- Take four of those shapes, but the one edge into the other page and make it a square, but every part should have a different color.
- Follow these edges one into another, and at last, it will make a beautiful cube.
Your cube is ready for a throw! As you can see, this process requires only color pages, which are always available in our house. Without throwing or wasting those pages, you and your kid can make this educational and playful thing easily, which also helps your kid. The size of this cube is never limited. You can make as many as you can and many of them. These cubes are usually bought from the shop, but other than that, you can make this process and make them yourself, which can save you money as well. You can use them for studying, playing, and decorating rooms. So, grab your stationery and make this colorful cube!
Educational Benefits of Making a Paper Cube
Making a colorful paper cube is not only a fun craft activity but also a great educational project for kids. This simple paper craft helps children understand basic geometry concepts like faces, edges, and vertices practically and creatively. Kids improve their hand-eye coordination, paper-folding skills, concentration, and creativity while making the cube. Parents and teachers can also use this activity during math lessons, craft sessions, or STEM learning activities to make learning more interactive and enjoyable.
Benefits for Kids:
- Improves fine motor skills
- Enhances creativity and imagination
- Helps children learn 3D geometric shapes
- Encourages problem-solving abilities
- Boosts focus and patience
- Fun educational craft for home and school projects
Tips to Make Your Paper Cube More Attractive
You can customize your colorful paper cube in many creative ways. Try using patterned origami paper, glitter sheets, neon colors, or cartoon-themed paper for a unique look. Kids can also decorate the cube using stickers, sketches, stars, or small drawings to make it more fun and personalized.
Creative Decoration Ideas:
- Use rainbow-colored papers
- Add alphabet or number stickers
- Create themed cubes, like animal cubes or emoji cubes
- Make giant cubes using chart paper
- Use cubes for room decoration or classroom displays
Safety Tips for Kids During Paper Craft Activities
Adult supervision is recommended when children are using scissors or glue during paper craft activities. Use child-safe scissors and non-toxic glue for a safe crafting experience. Keep the workspace clean and organized to avoid losing small craft materials.
Why Paper Crafts Are Important for Child Development
Paper crafts are one of the best screen-free activities for children. Crafting activities help kids express their creativity while also improving essential developmental skills. Activities like making paper cubes teach children how to follow instructions step-by-step and complete a project independently. These crafts are also excellent for reducing stress and increasing confidence in young learners.
FAQs on How to Make A Colorful Paper Cube
Q1. What materials do I need to make a paper cube?
Answer: You will need six pieces of paper, a ruler, scissors, and a glue stick.
Q2. How do I measure the paper to make a cube?
Answer: Each piece of paper should be cut into a square that measures 6 inches by 6 inches.
Q3. How do I make the cube?
Answer: First, fold each of the squares in half diagonally. Then, lay the pieces out in a cross shape, with the points of the folded pieces touching. Glue the edges together to form the cube.
Q4. How do I make sure the cube is colorful?
Answer: You can use colored paper, or use markers, crayons, or paints to make the cube colorful.
Q5. How do I make a paper cube with more sides?
Answer: You can make a cube with more sides by using more pieces of paper. The pieces should be cut into 6-inch squares and folded in the same way as before.
Q6. How do I make a paper cube with fewer sides?
Answer: You can make a cube with fewer sides by using fewer pieces of paper. The pieces should be cut into 4-inch squares and folded in the same way as before.
Q7. How do I make the paper cube sturdy?
Answer: You can make the cube more sturdy by using a thicker paper or by using a glue that dries hard.
Q8. What other shapes can I make with paper cubes?
Answer: You can make other 3D shapes, such as pyramids, cubes with more sides, or even spheres.
Q9. How do I make a paper cube for a school project?
Answer: You can make a paper cube for a school project by using colored paper, markers, and glue. Follow the instructions above for measuring and folding the paper.
Q10. Is it possible to make a paper cube without glue?
Answer: Yes, it is possible to make a paper cube without glue. You can use tape or staples to hold the pieces together.
Making a colorful paper cube is a simple and enjoyable craft activity for kids, students, parents, and teachers. It combines creativity with learning and helps children practically understand geometric concepts. Whether you use it for school projects, room decoration, math activities, or fun DIY playtime, this colorful paper cube craft is a wonderful educational activity for all ages. Try different colors and designs to create your own unique paper cubes at home.
Looking for fun crafts and creative DIY projects for kids? You’re in the right place! Join our Telegram group and follow us on n YouTube & Facebook for daily inspiration.
Read More:
- How to Make A Paper Rabbit
- How to Make A Moving Paper Toy- An Elephant
- How to Make a Cute Turtle – Paper Craft for Kids
- How to Make a Paper Swinging Horse
- How to Make a Paper Jumping Rabbit – Easy Craft for Kids


