Paper Crafts
How to Make a Paper Swinging Horse


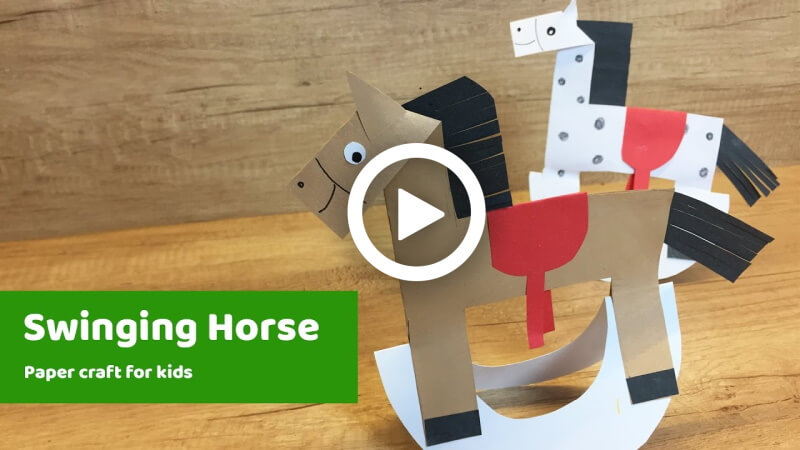
Hello readers! You must be bored with your daily life and activities and want to do something new. Here we come to bring you that. As you might know, the craft is a very good medicine to remove stress and tension. So, it will be a great experience for you. Today, you’re going to learn to make a paper horse. Interesting right! But the most interesting thing about the craft will be its swinging legs.
The horse is a kind of animal we are all fascinated by. These animals can be beautiful and interesting at the same time. The quality of sleep by standing and fast running speed always amazes us. They are also domesticated as pets for many. Not only the adults but also the kids find them interesting. So, without wasting any time, let’s get started with the process!
How to Make a Paper Swinging Horse
Materials:
- A big white circle of paper.
- A big, brown, rectangular piece of paper
- A black coloured paper.
- A red piece of paper.
- A black marker pen.
- A glue stick.
- Scissors.
Procedure:
- Take a big, circular white paper, fold it in half from the sides.
- Grab a pencil and draw a half circle over a folded side.
- Cut out the half-circle with scissors.
- Take a big, brown, coloured rectangle of paper, fold it in half from the side.
- Grab a pencil and draw a box at the bottom of the paper, and a big rectangle shape by having lines on only two sides.
- It should look like a horse’s body.
- Cut out the drawing lines with scissors.
- Fold the tip of the horse’s neck by making a convex triangle.
- By following these fold lines, open the pieces and fold the inside folds outside.
- It will be the horse’s face.
- Take a small rectangle of black square paper, cut one side by making parallel lines with scissors.
- Attach this straightly under the face-neck portion of the horse with the glue stick.
- Take a piece of the same brown colour paper as the horse’s body and cut out two very small triangles of the same size.
- Attach them to the top of both sides of the horse with the glue stick
- These will be the horse’s ears
- Attach the other sides of the neck to the black paper similarly with the glue stick.
- Take a black colour paper, cut out four very small rectangle shapes with scissors.
- Attach them to the underside of the legs of the two sides of the horse with the glue stick.
- If any part is out of shape, cut it by cutting with scissors.
- Open the piece, follow the middle fold line, and cut its leg portion within the fold line.
- Fold it like before.
- Take a small black rectangle piece, cut the tip of it with scissors by making parallel lines.
- Attach it like the horsetail between the sides of the horse’s body with the glue stick.
- If any part is missing from the horse, shape it by cutting with scissors.
- Take the cut circle shape you made previously, attach the horse’s legs on its front and back with the glue stick.
- Take a red square piece of paper, cut it roundly as a horse sits, and attach two small strips on both sides of the middle tip with the glue stick.
- Attach this seat to both sides with the glue stick.
- Highlight the horse’s face by making eyes and other parts with a black marker.
- Your swinging horse will be ready!
P.S- You can use different coloured paper as per your help.
Look how amazing it looks! This swinging horse will bring back your childhood memories! For kids, it will create a new memory. Play with them in your home and gift them. Encourage your kids to make it. Hurry up, grab your stationery, and let’s make a cute paper swinging horse.
FAQ’s on How to Make a Paper Swinging Horse
Q1. What materials do I need to make a paper swinging horse?
Answer: You will need colored paper, scissors, glue, and a wooden dowel or stick.
Q2. How do I create the body of the horse?
Answer: First, cut out two large circles from the colored paper. Then, cut out a smaller circle for the head, 2 triangles for the ears, and a long rectangle for the neck. Glue all of these pieces together to form the body of the horse.
Q3. How do I make the legs of the horse?
Answer: Cut out 4 long rectangles from the colored paper. Glue two of them together to form a loop, then glue the other two together to form a second loop. These will be the legs of the horse.
Q4. How do I assemble the horse?
Answer: Attach the legs to the body of the horse. Then, attach the wooden dowel or stick to the back of the body.
Q5. How do I make the tail and mane?
Answer: Cut out thin strips of colored paper and glue them to the back of the horse to create the tail. For the mane, cut out thin strips of paper and glue them around the neck of the horse.
Q6. How do I hang the horse?
Answer: Use a string or thin rope to attach the wooden dowel or stick to the ceiling or a tree branch.
Q7. Can I use other materials to make the horse?
Answer: Yes, you can use different materials such as fabric, felt, or even cardboard to construct the body of the horse.
Q8. Can I make the horse in different colors?
Answer: Yes, you can use different colors of paper to create your horse.
Q9. How do I make the horse move?
Answer: Gently push on the dowel or stick to make the horse swing back and forth.
Q10. Is it safe to hang the horse?
Answer: Yes, it is safe to hang the horse as long as the materials used are strong and secure.
This easy paper swinging horse craft is a perfect DIY activity for kids who love creative art projects and moving paper toys. It is simple to make, budget-friendly, educational, and entertaining for children of different age groups. Whether at home or in the classroom, this fun horse craft activity keeps kids engaged while improving their creativity and crafting skills.
Turning simple ideas into fun learning adventures for kids! Follow us on Telegram, YouTube & Facebook for more.
Reviewed by Yash Sharma
Read More:
- How to Make a Flying Paper Butterfly
- How to Make A Paper Butterfly
- How to make a Paper Butterfly – DIY Folding Butterfly – Paper Craft
- How to Make a Paper Dinosaur – Step-by-Step Instructions
- How to Make a Paper Dog