


DIY and Crafts
How to Make a Flying Paper Butterfly

Hello readers! Today you’re going to make an amazing paper butterfly, right? Their colourful wings make us wonder how any creature can be so beautiful! Let me tell you something about butterflies: they are a kind of insect that everybody adores. They have different types of wings, which are really interesting!
Butterflies represent youth and beauty. That’s why it’s perfect to be done by a kid. But not the beauty outside inside also, as the butterflies first were a caterpillar, which is ugly to everyone, but then it broke that cover and transformed itself into this beautiful living being. Today, you will be making this beautiful creature in paper form. Kids will love the process. So, why are you waiting? Let’s learn it!
How to Make a Flying Paper Butterfly
Materials:
- A big yellow coloured paper.
- A purple-colored paper.
- A red-coloured paper.
- Blue-coloured paper.
- A black coloured paper.
- Two of the same size long sticks.
- Two bamboo sticks.
- Yarn roll.
- Glue stick.
- Scissors.
Procedure:
- Take a black piece of paper, and cut out a small square from the paper with scissors. To get an idea about the correct size, see the reference video once.
- Fold a side of the square a little by making a straight fold line.
- Take a long strip of yarn and put it inside the fold of the black square paper.
- Roll the paper by the folding part and with the yarn inside it.
- Pertain glue at the end of the roll with a glue stick to secure it.
- Push the black page with your hand to flatten it. It will be the body of the butterfly.
- The yarn’s size will be dependent on how much area you wish to have to fly your paper butterfly.
- Take a big yellow coloured paper, cut out four big circles of the same size. To get an idea about the correct size, see the reference video once.
- Cut out four circles of the same size, smaller than the previous ones, from the same paper.
- Apply glue to the black-sized piece.
- Attach the big circles, one over the other, on the sides of the black piece.
- Attach the small circles, one over the other, under the big circles you attached previously.
- Turn over and do the same on this part as well, with the other big and small circles.
- These will be seen as the wings of the butterfly.
- Take a red coloured paper, cut four small circles of the same size from it. To get an idea about the correct size, see the reference video once.
- Take a blue colour paper, cut out four circles of the same size, smaller than the previous ones. To get an idea about the correct size, see the reference video once.
- Apply glue to the big and small circles of the butterfly’s wings you made previously.
- Attach the red circles to the middle of the big circles of the wings, both upside down and down.
- Attach the blue circles to the middle of the small circles of the wings, both upside down and down.
- Take a purple coloured paper, cut out four big circles of the same size with scissors.
- Take the rest of the big yellow coloured paper you used previously.
- Cut out four small circles of the same colour from it with scissors.
- Apply glue to the purple circles, and attach the small yellow circles in the middle of them.
- They will make four flowers.
- Take two flowers together and cut the tips of them by making straight parallel lines from the tip to the middle circle.
- Don’t cut the bottom part. Just half of the flowers.
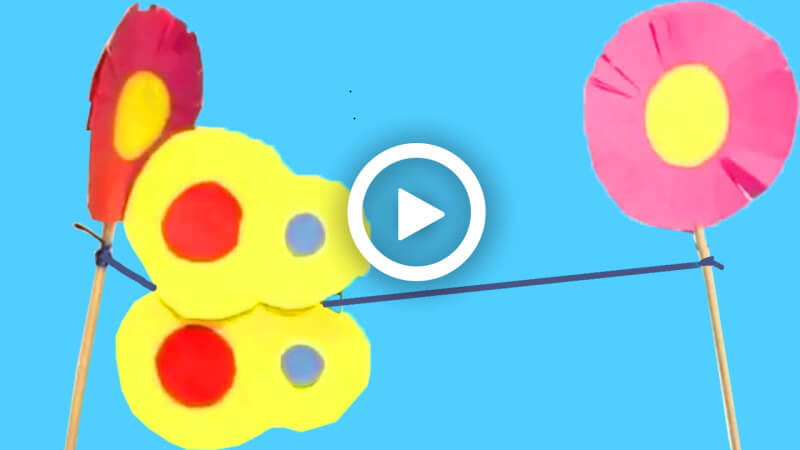
- Grab a stick and put it between the middle of the two flowers.
- Apply glue to it and attach the flowers with the stick. That will create a complete flower.
- Do the same with the other two flowers as well.
- It will create two flowers with a stick.
- Tie both sides of the yarn inside the butterfly you made previously with the two flowers.
- Move the butterfly with your flower sticks and yarn!
- Your flying paper butterfly will be ready!
P.S- You can use different coloured paper as per your help.
Make a Flying Paper Butterfly Step-by-Step Tutorial
Learn how to make a flying paper butterfly with this easy step-by-step tutorial. This fun DIY paper craft shows how to create a butterfly that flaps and glides like a real one. Perfect for kids, school craft activities, and creative home projects using simple paper and basic materials.
Educational Benefits of Flying Paper Butterfly Crafts
Flying paper butterfly crafts are not only fun DIY activities but also excellent learning experiences for children. Craft activities like folding, cutting, coloring, and assembling help improve fine motor skills, hand-eye coordination, creativity, and concentration. Making moving butterfly crafts also encourages children to explore basic concepts of motion, balance, and design in a playful and engaging way.
This easy butterfly craft is perfect for preschoolers, kindergarten kids, and elementary students. Parents and teachers can use this activity during spring lessons, insect-themed classroom projects, nature study units, summer camps, or weekend craft sessions at home. Children also enjoy decorating their butterflies with different colors, glitter, stickers, and patterns, helping boost imagination and self-expression.
Tips To Make Your Flying Paper Butterfly Craft Look More Creative
Here are some easy ways to make your paper butterfly craft more attractive and colorful:
- Use bright colored craft papers or patterned scrapbook sheets.
- Add glitter glue, sequins, or stickers on the butterfly wings.
- Draw unique wing patterns using markers or sketch pens.
- Attach a thread to hang the butterflies as room decorations.
- Use pipe cleaners or paper strips to create curly butterfly antennas.
- Make butterflies in different sizes for a beautiful wall display.
These creative ideas make the craft activity more exciting for kids and encourage artistic experimentation.
Why Butterfly Crafts Are Popular Among Kids
Butterflies are one of the most loved insects among children because of their colorful wings and beautiful flying movements. Butterfly crafts are widely used in preschool activities, classroom decorations, spring themes, garden projects, and DIY art sessions. Simple butterfly paper crafts help children learn about insects, symmetry, colors, and nature while enjoying hands-on creative play.
Safety Tips For Kids During Craft Activities
Parents and teachers should supervise younger children while using scissors, glue, or small decorative items. Using child-safe scissors and non-toxic craft supplies helps ensure a safe and enjoyable crafting experience for everyone.
Frequently Asked Questions (FAQs)
Q1. What age group is this flying paper butterfly craft suitable for?
Answer: This craft is ideal for preschoolers, kindergarten kids, and elementary school children. Younger kids may need adult supervision while using scissors.
Q2. What materials are needed to make a flying paper butterfly?
Answer: You typically need colored paper, scissors, glue, markers, and decorative materials like stickers or glitter.
Q3. Can this butterfly craft be used for school projects?
Answer: Yes, flying paper butterflies are great for school craft activities, science projects, spring decorations, and classroom displays.
Q4. How can I make the butterfly fly better?
Answer: Using lightweight paper and balanced wing folds helps the butterfly move and flutter more smoothly.
Q5. Can I use recycled paper for this craft?
Answer: Absolutely! Old magazines, newspapers, wrapping paper, or leftover craft paper can be reused creatively for eco-friendly butterfly crafts.
Your beautiful butterfly is ready to fly! As you can see, this process is so simple that anybody could make them. Kids can easily make them by following this procedure. Use your creativity and make as many of them as you can. Use your skills to add more shine and beauty to the butterflies. Use them as gifts, the receiver will love them and will be impressed by their creativity. We all know butterflies roam around flowers, so the paper flowers perfectly suit the butterflies, and it looks great! You can also use them to decorate your room, house, office, and stuff. So, let’s take hold of your materials and make these precious butterflies.
Keep the creativity going! Follow us on YouTube & Facebook and join our Telegram group for the latest craft ideas, DIY activities, and educational projects for kids.
Reviewed by Yash Sharma
Read More:
- How to Make A Paper Butterfly
- Easy Way to Make a Paper Heart
- How to Make A DIY Paper Lion
- How to Make an Origami Elephant
- How to Make An Antistress Transformer Paper Toy


