DIY and Crafts
How to Make Paper Cat

Hello to all our animal lovers! By the first line, you must be guessing why start with this? Here we offer something that makes you all very happy. We are going to learn to make a paper cat. Who doesn’t love cats! right! As you all know, most children love animals, especially cats and dogs. They find them very cute and fascinating and play with them. So, they will find it very fun and interesting to make one of them. So, without wasting any time, grab your stationery, and let’s make a new member of your family.
How to Make a Paper Cat
Materials:
- A 20*20 c.m color paper.
- Coloring markers. ( for highlighting your cat)
- A Black marker.
- Pastel or watercolor.
- A Scale with round holes. P.S- It will require it to draw the eyes and eyeballs of the cat but you can also do it with your hand.
Procedure:
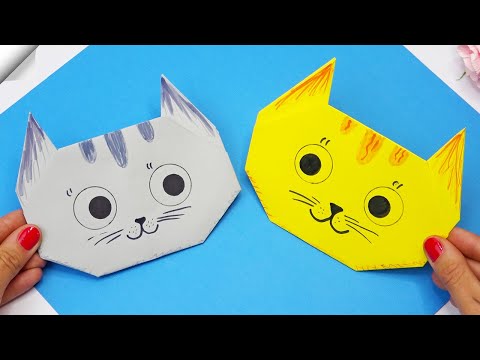
- Take a 20*20 c.m color paper, place it like a diamond shape on your desk. Fold it upside-down like a triangle shape. It should look like a triangle or a pyramid.
- Fold the triangle-shaped paper sideways like a triangle shape, making a fold line in the middle of it.
- Unfold the side triangle, and notice the middle fold line. Then, fold the two sides of the line by making a little arrow shape fold sideways. Remember, these two folds might be placed from the bottom, starting from one point.
- Fold the middle of the piece, which looks like a triangle upside down, making a small triangle conversely. Do the same with the side arrow-like triangles and with the bottom edge of the piece.
- Turn it over, then take a scale ( with round holes) or use your hand, draw two eyes and eyeballs with the black marker. As for help, you can also use other color materials like pastel or watercolor to give it more life.
- Take your coloring markers to highlight your cat’s eyes, mouth, smile, and mustache.
- Give a final touch with the black markers, and give more life to your cute pet.
- Your cute pet is ready to play! As you can see, this requires very few materials and is so easy to make.
- Children can make many of them by themselves. You can use them to decorate your room, diary, school projects, and many more. You can make your parents and friends happy with them.
- If they like cats, then it will be a bonus. You can use them in many other creative and attractive ways as well, like decorating your cat’s house.
- You can make one that can represent your pet cat! right! So go fast, take hold of your materials, and give wings to your creativity. Your little friend is on its way, meow! meow!
Benefits of Making a Paper Cat Craft for Kids
Paper cat crafts are a wonderful way to encourage creativity and hands-on learning in children. This easy DIY activity helps kids improve their fine motor skills, hand-eye coordination, focus, and imagination while having fun with colorful paper and simple craft supplies. Cat-themed paper crafts are especially popular among preschoolers and kindergarten students because they combine animal learning with creative play.
Parents and teachers can use this paper cat activity during classroom art sessions, weekend craft time, homeschooling projects, or rainy-day indoor activities. It is an affordable craft idea that uses easily available materials like colored paper, scissors, glue, and markers.
Materials Required for Paper Cat Craft
Before starting this easy paper cat activity, gather the following materials:
- Colored craft paper or cardstock
- Safety scissors for kids
- Glue stick or craft glue
- Black marker or sketch pen
- Googly eyes (optional)
- Pencil and ruler
- Decorative items like stickers or glitter
Using thicker paper, like cardstock, makes the paper cat more durable and easier to display.
Educational Value of Animal Paper Crafts
Animal paper crafts help children learn about pets, wildlife, shapes, and colors in an interactive way. Cat crafts are also useful for storytelling activities, nursery themes, and animal-learning lessons in preschool classrooms.
Origami and folding crafts additionally support early STEM learning because children understand symmetry, sequencing, geometry, and spatial awareness while folding paper into shapes.
Creative Ideas to Decorate Your Paper Cat
Kids can personalize their paper cat craft using different creative techniques:
- Draw stripes for a tiger-style cat
- Add cotton for a fluffy fur texture
- Use glitter paper for shiny ears
- Create rainbow-colored cats
- Make Halloween black cats
- Add yarn whiskers or paper tails
- Stick the cat on greeting cards or school charts
These decoration ideas make the craft more engaging and encourage children to experiment with colors and patterns.
Safety Tips for Kids During Craft Activities
Adult supervision is recommended while using scissors, glue, or small decorative items. For preschool kids, use child-safe scissors and non-toxic glue. Keep the crafting area clean and organized to avoid losing small craft materials.
FAQs on How to Make a Paper Cat
Q1. What supplies do I need to make a paper cat?
Answer: You will need paper, scissors, a glue stick, a pen or marker, and some colorful materials such as ribbons, fabric scraps, or buttons.
Q2. How do I make a paper cat?
Answer: First, draw a cat’s body shape onto the paper. Cut out the shape and fold it in half lengthwise. Glue the two sides together and let it dry. Then, draw and cut out the cat’s legs, ears, and tail, and glue them to the body. Finally, decorate the paper cat with the colorful materials.
Q3. What kind of paper should I use?
Answer: You can use any kind of paper you like, but cardstock is best for making a sturdy paper cat.
Q4. Can I make a paper cat without scissors?
Answer: Yes, you can make a paper cat without scissors by tracing the cat’s body onto a piece of cardstock and then cutting it out with an X-acto knife or craft knife.
Q5. What other materials can I use to make a paper cat?
Answer: You can use other materials such as felt, fabric, or even beads for the cat’s legs, ears, and tail. You can also use craft foam or pipe cleaners for the cat’s whiskers.
Q6. How do I make the cat’s face?
Answer: You can draw the cat’s face using a pen or marker, or cut out eyes and a nose from cardstock or felt.
Q7. How do I make the cat’s tail?
Answer: You can make the cat’s tail by cutting out a tail shape from paper or felt and then gluing it to the cat’s body.
Q8. Can I make a paper cat that stands up?
Answer: Yes, you can make a paper cat that stands up by using a thicker paper, such as cardstock, and adding a wire or pipe cleaner to the bottom of the cat’s body.
Q9. What other animals can I make with paper?
Answer: You can make a variety of animals with paper, such as dogs, birds, mice, and even fish.
Q10. What is the best way to store a paper cat?
The best way to store a paper cat is to put it in a box or bag so that it won’t get damaged. You can also hang it on a wall or display it on a shelf.
Making a paper cat craft is a fun and educational activity for kids that combines creativity, learning, and hands-on play. Whether used at home, in school, or during holiday activities, this simple paper craft keeps children engaged while helping them develop important artistic and motor skills. Try different colors, expressions, and decorations to create your own unique paper cat designs.
Creative crafts, fun DIYs, and smart learning projects for kids — all in one amazing place! Join our Telegram community and follow us on YouTube & Facebook today.
Reviewed By Rachit Gupta
Read More:
- How to Make A Paper Butterfly
- How to Make A DIY Paper Lion
- How to Make a Paper Giraffe
- How to Make An Antistress Transformer Paper Toy
- How to Make a Paper Cat