Clay Crafts
How to Make Miniature Clay Orange Tree for Kids

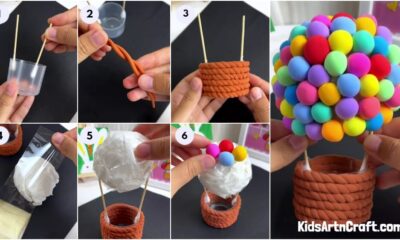
Round & roll, play with clay dough! This tutorial has brought oranges on a tree branch clay craft! A fun learning experience for your kid!
In today’s menu, we have sweet and juicy oranges, plucked for you right from the tree! Kiddos love to play with clay and this craft will be just right for them to create something healthy that will encourage them to eat oranges whenever you serve them! Teach the benefits of eating oranges to your little while this craft making! This step-by-step tutorial will help them to make this oranges on tree branch clay craft like a pro! After its completion, they will definitely love to eat oranges!
Miniature Orange Tree Art Idea Using Clay

Materials Required
- White Circular Paper Sheet
- Brown Sketch Pen
- Colored Clay (Orange And Green)
Procedure
Step 1: Drawing Tree Branches

Begin this artwork craft by taking a white circular paper sheet as the base and a brown sketch pen. Using the sketch pen, draw a tree branch coming from the left side of the base.
Step 2: Making Further Smaller Branches

Complete the branch drawing by making further smaller branches to the main branch over the base.
Step 3: Making An Orange Clay Ball

Now, take an orange-colored clay dough into a ball, and place it below the branch drawing.
Step 4: Flattening The Clay Ball

Press the clay ball to flatten it into a circle. This will be your orange hanging below the branch.
Step 5: Making More Oranges

Following the same, make more oranges over the base randomly from the clay hanging below the branches to cover the whole base.
Step 6: Making A Leaf On The Tree

Make clay green-colored clay ball and place it over the branch. Now, using your finger, press and drag the clay ball to give it an oval shape. This will be the leaf on the tree branch.
Step 7: Making More Leaves

Following the same previous step, make more leaves on the tree branch randomly as you can see in the image.
Step 8: Making The Stems Over The Oranges

Using green-colored clay, make some small clay rolls and place them on top of the oranges to make a cross on each orange and press to flatten them.
This Is The Final Look Of Your Clay Oranges Over Branches Craft!

Tada! You have finally made your clay oranges on tree branch craft!
Umm! They look so fresh and juicy! It makes me wanna pluck them out and eat them! Do you feel that too? I know you do! You can now use this craft as a school project on your favorite fruit! Also, kiddos will be keen to learn about oranges and their benefit while this craft-making! You can add more details to your craft by using clay shaping tools and making the dots on the oranges, carving the leaf veins, or anything you can think of! Your imagination and creativity are the limit! Make it as unique as you are and stun everyone!
Hope you liked the article and the easy craft idea! If not made yet do give it a try as it is full of motor skills! Also, share your crafting journey with us in the comments section below!