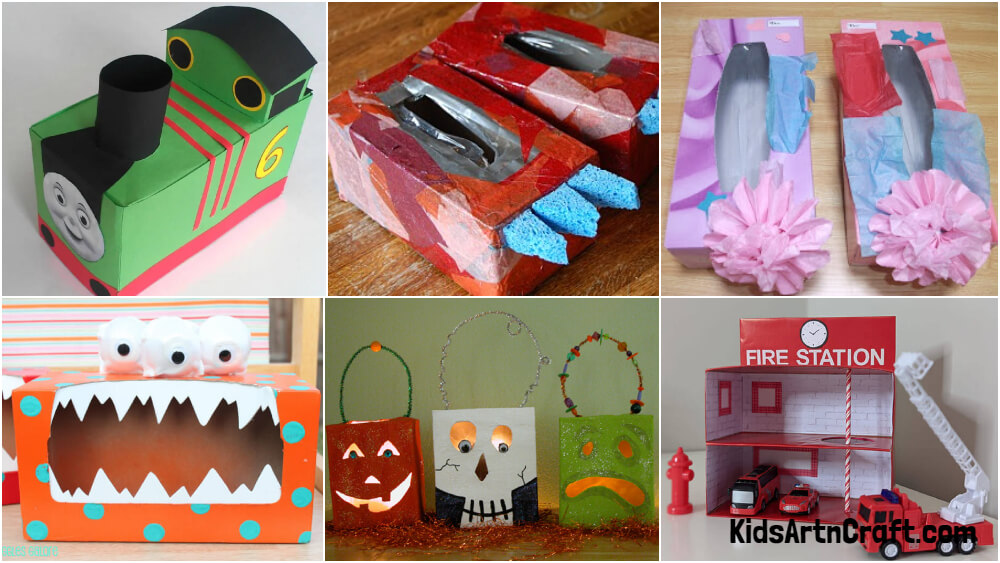


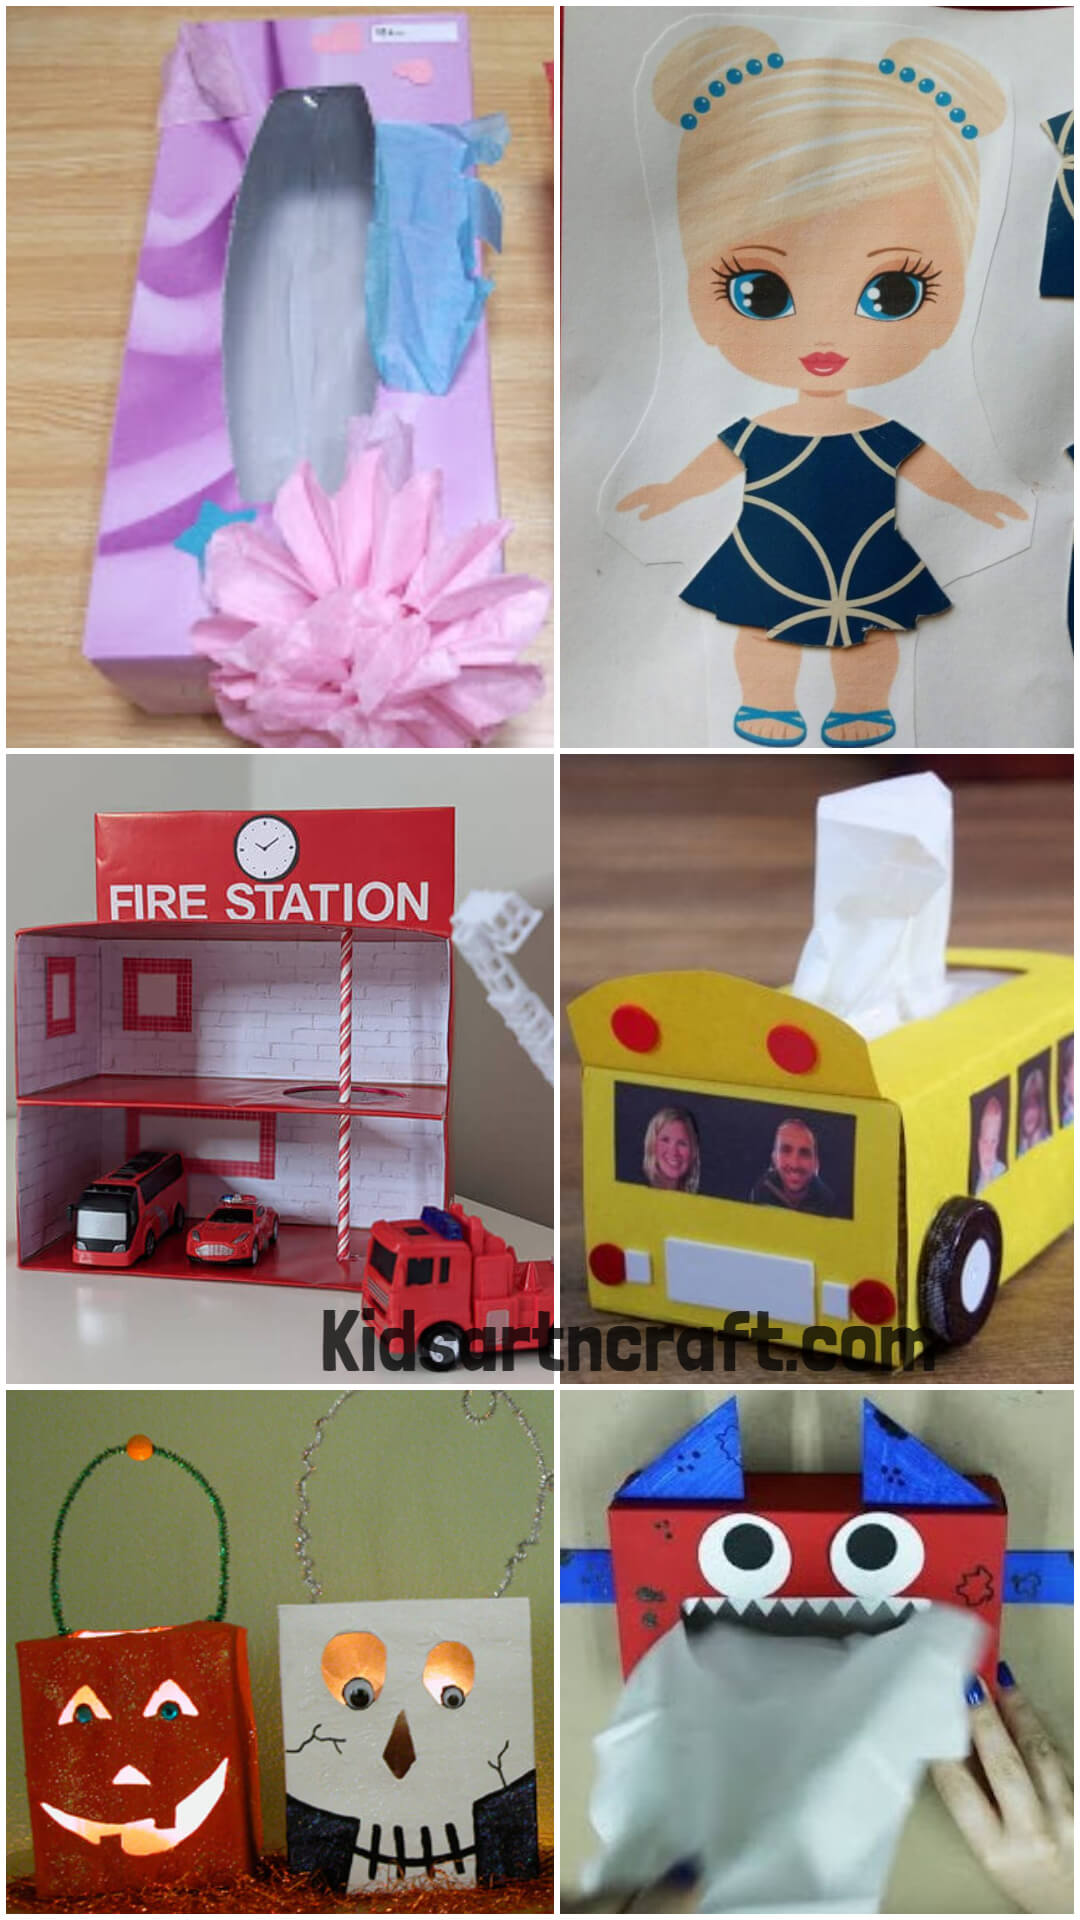
DIY and Crafts
Tissue Box Art Ideas for Kids

Discover creative tissue box art ideas to help you upcycle and decorate with ease. With these easy-to-follow tips and tricks, you’ll be able to make functional, beautiful pieces to add to your home.
Welcome to the wonderful world of tissue box art! DIY tissue box art is a fun and creative way to spruce up your home. Whether you are looking for a unique gift idea or just want to add a bit of flair to a room, these tissue box art ideas are sure to inspire you. From using upcycled materials to creating interesting shapes and patterns, these projects are sure to be a hit! So grab a box of tissues and get creative!
DIY Tissue Box Art Ideas
Read More: DIY Plastic Bottle Planter Ideas
DIY Fire Station Art & Craft Ideas Using Tissue Box
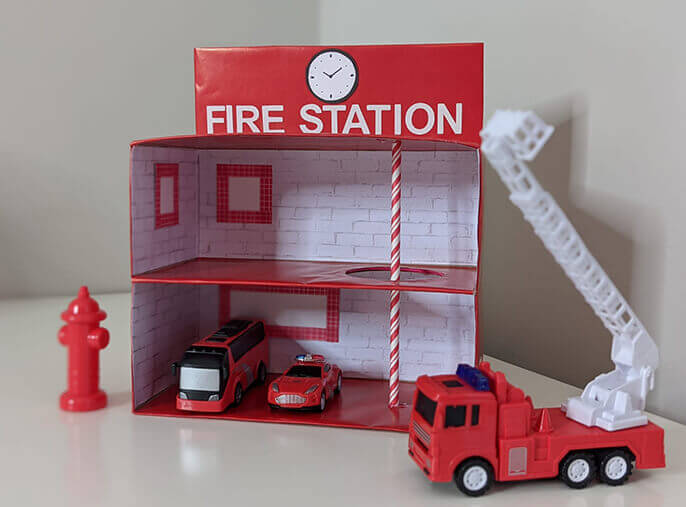
Image Source/ Tutorial: Kleenex
Firefighters are real heroes as they protect your life from fire, and they also protect your loved ones and your home, becoming like them will be a great honor to the nation, kids can take inspiration from firefighters and build for themselves a fire station using tissue box craft. Place your supplies together to create this fire station; we need two tissue paper boxes, red construction paper, scissors, a utility knife, transparent tape, glue, a marker, washi tape, one black and white paper, white brick decorative paper, white adhesive letters, and paper straw. We will start by taking two clean tissue paper boxes, removing their long panel on one side while keeping the other side, Take a utility knife and cut a circle in both boxes with equal length. Now, tape the boxes together and start using red paper to cover both sides, the back, and the top. For the interior, we will use white brick paper, and for the window, we will use white paper and cover it with washi tape. Place your paper straw from top to bottom, om going through the circle. For our top board, we will use the cutout panel from earlier, cover it with red paper, and use adhesive letters to write “Fire stat.ion” Finally, make a clock using black and white paper and write on it with a marker. Your craft is ready; kids can create this with their parents and learn how they can use craft materials.
Fun Tissue Box Train Craft Tutorial For Kids
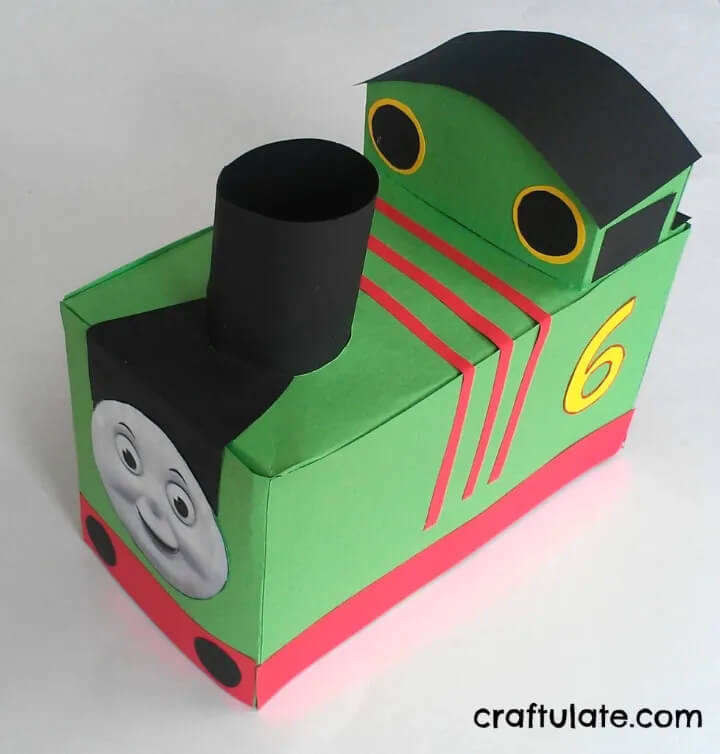
Image Source/ Tutorial: Craftulate
Every kid loves trains, and who wouldn’t, they look great, they run very fast, and seeing them running in tracks makes us feel, so why don’t we make our train with tissue paper boxes? For this, you need two tissue paper boxes, green and black cardstock paper, glue, a craft knife, scissors, construction paper, and design materials. We will start by gluing two tissue boxes together, and we will cover them with green cardstock paper. To make the cover, we will again use green paper and black paper to make its funnel and glue them together, through this, we will take out our tissues. For decorating it even more, use cardstock paper to make the train’s cabin and construction paper to give it more design, like paper strips and train numbers. For the face, you can take Thomas’s face if you want the wheels, which I think will make it look good, stick cardboard pieces and green card paper. With that, your craft is ready; kids can create this with their parents and place it on the table for a good display.
Beautiful Tissue Box Lantern Decoration Art Idea For Home
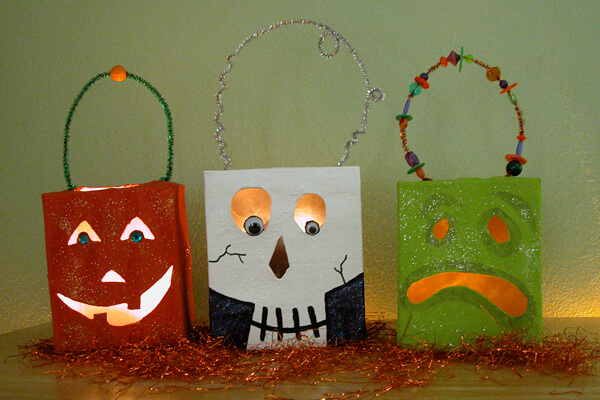
Halloween is great for showcasing our talent, and we believe that the tissue box will work very well. For this, you need tissue boxes, a marker, newspaper, flour, water, craft paint, a paintbrush, scissors, a craft knife, a hole punch, and pipe cleaners. We will start with covering the working area with a newspaper. Then, we will take our tissue boxes and make sure that they have holes on the top. Use a marker to make drawings on the boxes and use a craft knife to make facial features. Then, cut small strips of newspaper and make a paste using flour and water in a small bowl. Dip your small strips in the paste and then wrap the openings and their edges with the dipped strips and leave them to dry overnight. After it has dried, get your paint and color it, then leave it to dry. After it has dried, take a hole punch and make two holes, place your pipe cleaners through these holes by twisting their ends. Finally, you can place a flashlight inside to make it glow. Your tissue box craft is complete. Kids can do this craft activity with their parents and learn how they can use tissue boxes and other craft items to make Halloween crafts.
Creative Little Paper Doll Craft Idea Using Recycled Tissue Box
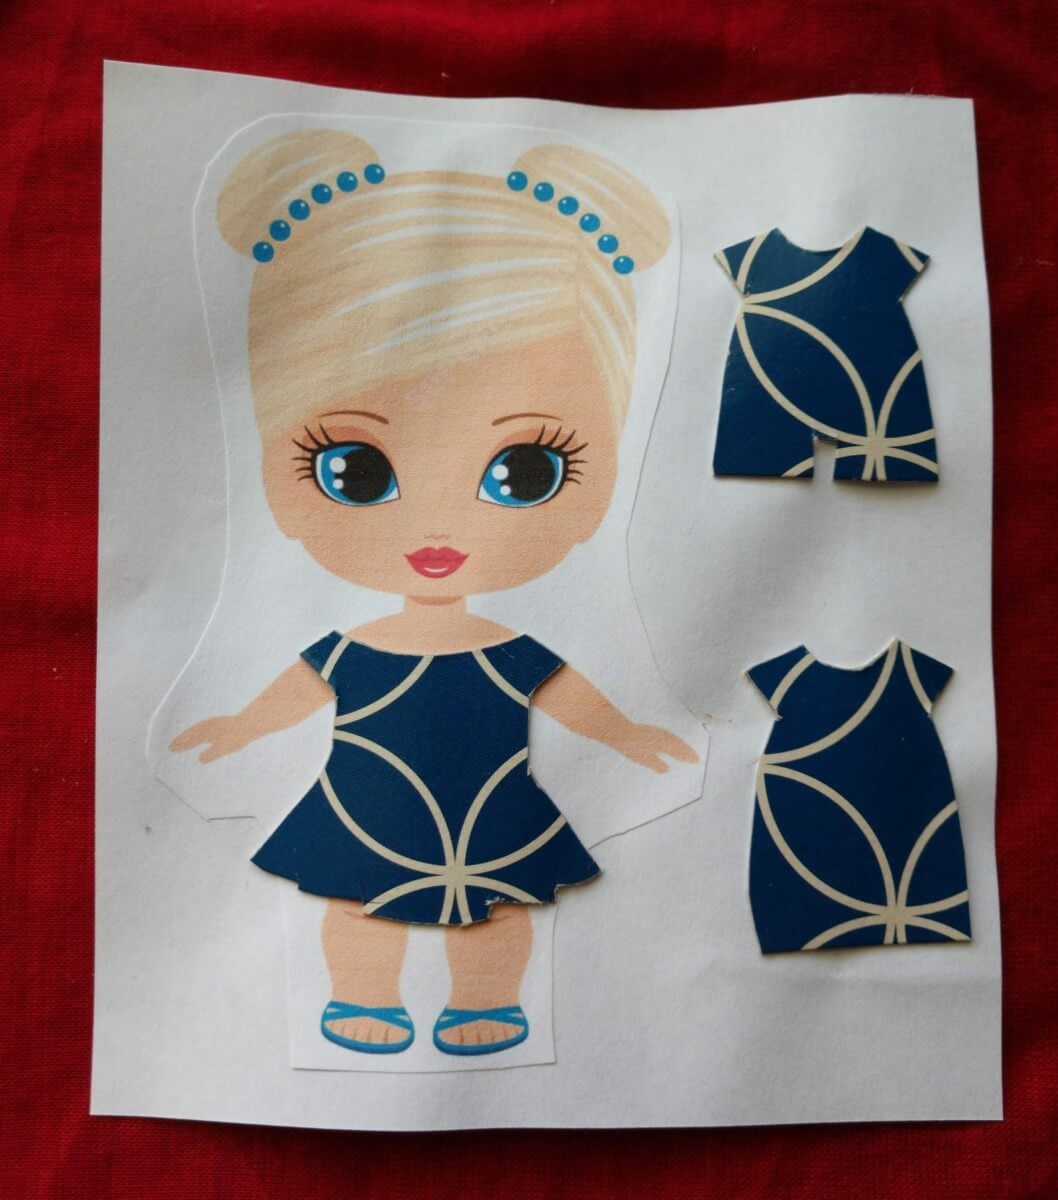
Image Source/ Tutorial: Felt Magnet
You can recycle material to great use, in this case, we used a recycled tissue box to create this little paper doll. For this, cut the pieces of tissue paper box and find an image of a little doll, trace its image on white paper, and after that, cut the pieces of tissue box into dresses and then stick the dress on the little doll. With that, your craft will be complete; kids can do this, and parents and parents can learn how they can use recycled materials to make crafts.
Easy to Make Monster Tissue Box Art Idea For Kids
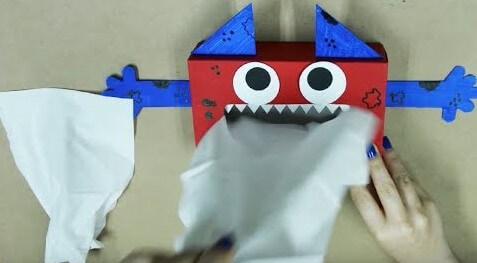
Image Source/ Tutorial: EZPZ Ideas
Kids love different ideas, and we think that the monster tissue box is one of them. This craft activity is simple,e and you don’t need many expensive supplies to create this. You need a tissue box, paint, a paintbrush, scissors, a marker, white cardstock paper, and glue. We will take our empty tissue box, paint it red, and leave it to dry. On the white cardstock paper, use a marker to draw its ears, eyes, hands, and teeth. Cut all the drawings from paper, pasting its teeth inside and eyes above, then paint its hands and ears with blue color and paste them. Finally, you can use the marker to create more designs on the box, its hands, and ears. Your craft is complete, place your tissues inside, but protect your hands from its jaws! Kids can create this craft with their parents and learn how they can create different things from a tissue paper box.
Read More: Goose Paper Plate Crafts for Kids
Recycled Tissue Box Tattle Monster Art & Craft Idea
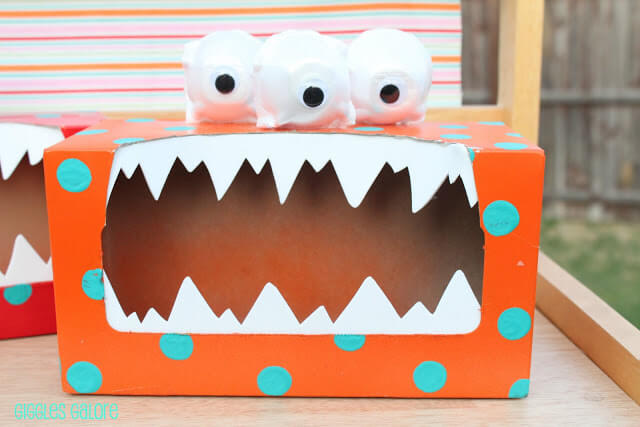
Image Source/ Tutorial: Giggles Galore
Monster tissue boxes are creative, and they have many styles that will be liked by kids. So grab your materials to create this monster, you need a tissue box, paint, a paintbrush, egg cartons, googly eyes, craft foam paper, a hot glue gun, and scissors. We will start by taking a clean tissue bo,x painting it orange, and leaving it to dry. In the meantime, draw the monster’s teeth on craft foam paper, cut an egg holder from an egg carton, and paint it white. After the holder has dried, stick googly eyes on it. After the tissue box has dried, make small dots of blue paint using the back of a paintbrush. Finally, paste the things with pasting teeth inside the box and eyes above the box. With this, our craft is complete. Kids can create this craft with their parents and learn how they can use different craft materials to make tissue box monsters.
Adorable & Fun Tissue Box Dinosaur Feet Art Project For Kids
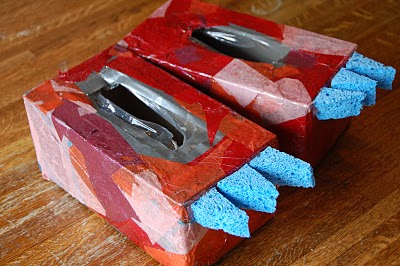
Who doesn’t wanna be creative? Imagine making dinosaur legs on the tissue paper box. It’s highly creative, and kids can play with this all day long. To make this, you need empty tissue boxes, duct tape, paint, a sponge, and a hot glue gun. We will start by placing duct tape around the tissue box to make it strong and give little space for opening. After that, paint the tissue box with the desired color and leave it to dry. In the meantime, cut the sponges into three and in a triangle shape, after it has dried, stick the sponges on the box using a hot glue gun. Your craft is complete; kids can wear it all day and enjoy playing as dinosaurs. Through this activity, kids will learn how we can use different materials in tissue box crafts.
Unique & Cute Tissue Box Shoe Art & Craft Idea For Preschoolers
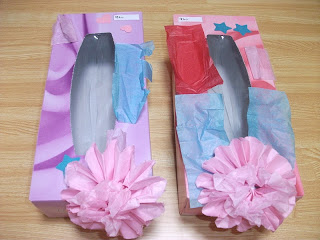
Image Source/ Tutorial: Easy Preschool Craft
Our preschool kids love to wear fancy and colorful shoes and roam wearing them. We can present our kids with different alternatives, how about shoes with a tissue paper box, it sounds different, isn’t it? Well, grab your things to make your tissue paper box, all you need is a tissue paper box, craft tissue paper, tissue paper flower, and glue. We will start by making tissue paper flowers and sticking them on the tissue paper box. After that, paste craft tissue paper around the paper bo,x, and you can also paste different decoration materials like yarn and stars to make it more decorative. Now your tissue box shoe is ready, and kids can wear it and roam around.
Reuse Tissue Box Woolen Cover Art Ideas For Home Decor
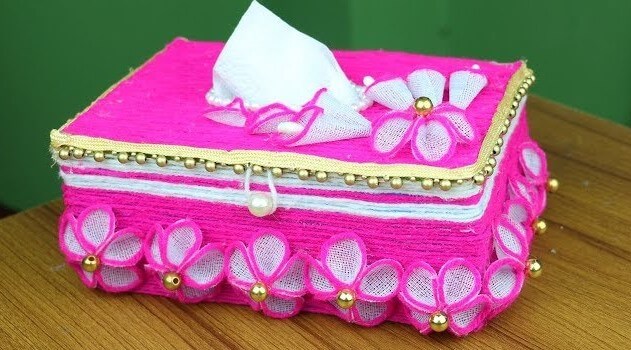
Image Source/ Tutorial: NR Art & Drawing
Creating a tissue box using woolen threads and other decorative items can bring out its creativity and attract anyone who sees it. For this, you need a cardboard box, woolen threads, a Glue stick, a hot glue gun, pearls, decorative beads, cotton swabs, net paper, and yellow color paper. We will start by cutting the outer panel of a cardboard box, and then we will make a small hole for tissue. After that, we will take yellow color paper and paste it inside the box and behind the cover. After that, we will use a hot glue gun and glue stick to stick white and pink woolen threads all around the box. Then, we will take net paper and pink thread to make small petals of flowers. Join these petals to make flowers and stick them around the box and above it. To decorate it more, stick a decorative beads layer on the opening layer. Finally, place a small thread and a pearl for opening and closing the box. Your tissue box is ready; you can gift it to someone and place tissues inside it, and it will work greatly for home decoration.
Awesome School Box Art & Craft Idea Using Construction Paper & Kleenex Box
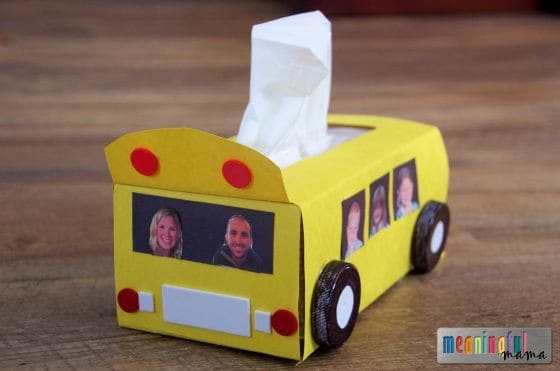
Image Source/ Tutorial: Meaningful Mama
Everybody loves it when school opens again after summer vacations, and through our school journey, our school bus is important, so why not make a school bus using a tissue paper box? For this, we need a tissue paper box, construction paper, white plastic lids, red foam circles, glue sticks, double stick tape, a hot glue gun, a Sharpie, and scissors. First, we will take the yellow construction paper and measure its sides to the tissue paper box, then cut accordingly and then use a glue stick to stick it around the tissue box. With that cover, use yellow paper to make the front of the bus with its flap. Now, use red foam circles and white construction paper to make lights and other lights on the bus. For the tires, use white plastic lids and Sharpie and then stick them using a hot glue gun. Finally, use black construction paper to make bus windows on the sides and the main driver window. Paste the photos of your family members making it the family school bus. With that, your craft is complete. Kids can make this craft with their parents and learn how they can use construction paper and other craft materials to make a school bus using tissue paper boxes.
FAQs Related to Tissue Box Art Ideas
1. What does a tissue box symbolize?
A tissue box is often seen as a symbol of comfort, care, and support. It is often associated with the idea of being able to provide comfort to someone in need, whether that be through emotional or physical support. The tissue box is often seen as a reminder of the importance of caring for others in times of need and of lending a helping hand.
2. What can I do with tissue paper art?
Tissue paper art is a fun and creative way to express yourself. With tissue paper, you can make a variety of art projects such as collages, mosaics, and even 3-dimensional sculptures. You can also use tissue paper to create wall art, greeting cards, or even decorations for special occasions. Tissue paper art is a great way to get creative and have fun!
3. Can you use acrylic paint on tissue paper?
Yes, you can use acrylic paint on tissue paper. However, it is important to note that acrylic paint can be quite heavy and may cause the tissue paper to tear more easily. To ensure that your artwork lasts, it is best to use a few layers of tissue paper and use a light touch when applying the paint. You may also want to use a paintbrush with soft bristles to help reduce the chances of tearing the tissue paper.
4. What kind of paint can you use on tissue paper?
You can use acrylic paint on tissue paper. Acrylic paint is water-based and won’t damage the tissue paper. It is also easy to work with and can be applied using a variety of techniques, including brush painting and sponging. Make sure to use a light touch and thin layers of paint to prevent the tissue paper from tearing.
5. Do you need to seal acrylic paint on paper?
Yes, it is recommended that you seal acrylic paint on paper to ensure that it will last as long as possible. Sealing the paint will keep it from fading or cracking over time. You can use a spray sealant, a brush-on sealant, or even a gel medium to seal the paint.
6. Should I wet my paper before painting?
It depends on the type of paint you are using. If you are using watercolor paints, then it is recommended to wet the paper before painting to create a more blended look. However, if you are using acrylic paints, then wetting the paper beforehand is not recommended, as the paint will not adhere properly and may cause the paper to buckle.
7. Can hairspray seal acrylic paint?
No, hairspray cannot be used to seal acrylic paint. Acrylic paint needs to be sealed with a clear acrylic-based sealer for protection and to ensure the paint does not chip or fade over time. Hairspray is not an effective sealant for acrylic paint and can even cause the paint to crack or blister when applied. For best results, use a clear acrylic-based sealer to protect and preserve your acrylic paint.
Creating art from a tissue box is a unique way to recycle and express your creativity. With a few simple tools and materials, you can turn an ordinary tissue box into something truly unique.
Follow us on YouTube for art and craft tutorials and much more.
More Articles from Kids Art & Craft
- Simple & Cute Button Bookmark Craft Tutorial
- Pine Cone Decoration Crafts For Christmas
- Black Cat Crafts Using Paper Cup
- Easy Candy Cane Crafts for Kids
- Easy Crafts With Button & Popsicle Sticks


