


DIY and Crafts
Simple Button Art & Craft Ideas for Kids

Discover simple button art and craft ideas for kids! Create fun, colorful projects like animals, flowers, and patterns using easy DIY techniques and creativity.
Whether you are making a card, scrapbook, or just a piece of artwork, buttons can add an extra touch of color and texture. This article will explain how to use buttons to craft beautiful and unique designs on paper. With a few basic supplies and some imagination, you can create amazing projects with buttons. So, let’s start and explore the wonderful world of button crafts on paper!
Easy Button Art & Craft Ideas for Kids
 Read More: DIY Button Bracelet Craft Ideas
Easy Ladybug Button Art & Craft Project For Kids
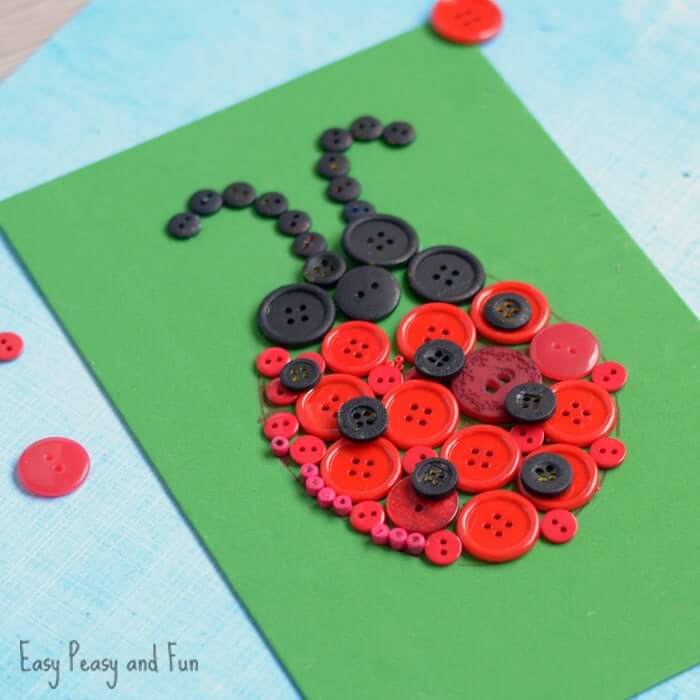
Image Source/Tutorial: Easy Peasy And Fun
Ladybugs are interesting insects, and we are amazed by their looks and their flying, kids love seeing them and knowing about them. For this, kids can create their ladybugs with button craft; it is very easy, and they only need simple supplies to create this. All you need is the red and black buttons, green foam paper, glue dots, and a pencil. Start with taking green foam paper and pencil, and form the shape of your ladybug. After that, use glue dots to stick your red buttons to form the body. After forming a body with red buttons, use glue to stick black buttons and form a ladybug’s antennae. With that, your ladybug craft will be complete. Through this activity, kids will learn how they can do more craft activities with buttons.
Cute Button Flower Card With Cotton Balls On Paper

Image Source/Tutorial: Farm Wife Crafts
Everybody loves flowers as they look good and they have a great fragrance, so why not gift a flower card using button craft and cotton balls? For this, you need blue and green paper, buttons of various colors, glue, scissors, and cotton balls. Begin with taking blue paper and making flowers with buttons, for this, stick a big button in the middle and small buttons around it in a circle. For the stem of flowers, cut small strips of green paper and stick them below the flowers, and for the small leaves on the site,m stick buttons for that. Now, make the sky by sticking cotton balls as clouds, and for sunlight; we will stick big yellow buttons and, near it, use small yellow buttons. With this, our craft will be complete. Young kids can create this with low-cost supplies, and it is also a time-friendly activity where they will learn how they can use buttons and cotton balls for craft activities.
Easy & Quick Button Fish Craft Activity Using Paper
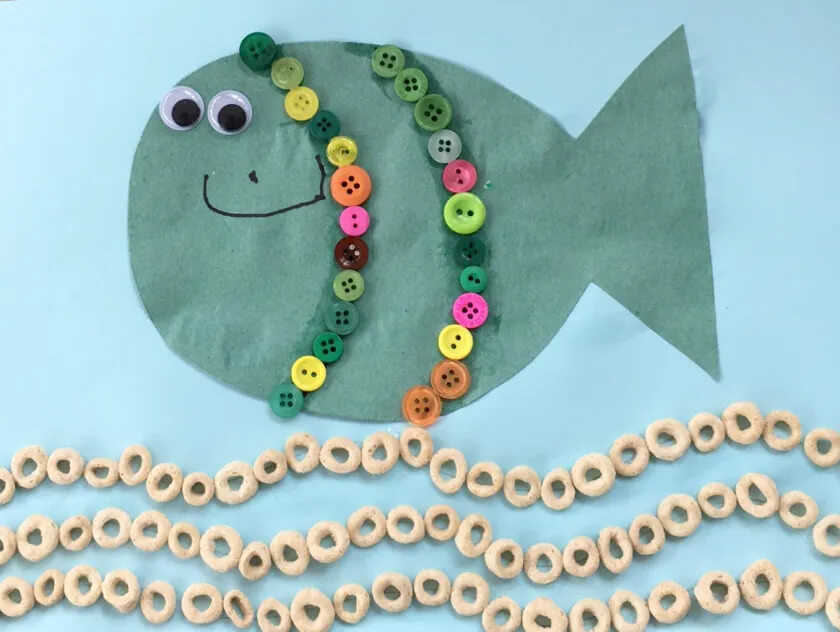
Kids love watching fish and how cute they look swimming in the water. They can create their fish craft by using buttons and colored paper. All they need is colored papers, buttons, scissors, a black marker, googly eyes, glue, and Cheerios. We will start with colored paper, and using scissors, we will cut it to make the shape of a fish. We will paste our fish on blue colored paper, then paste googly eyes, and make its facial features and gills with black marker. After that, we will paste our buttons on the gills and make our seabed we will paste Cheerios. With that, our craft activity is complete; kids can create this craft with their parents and learn how they make different crafts using colored paper and buttons.
Handmade Button Card Idea Using Paper & Yarn
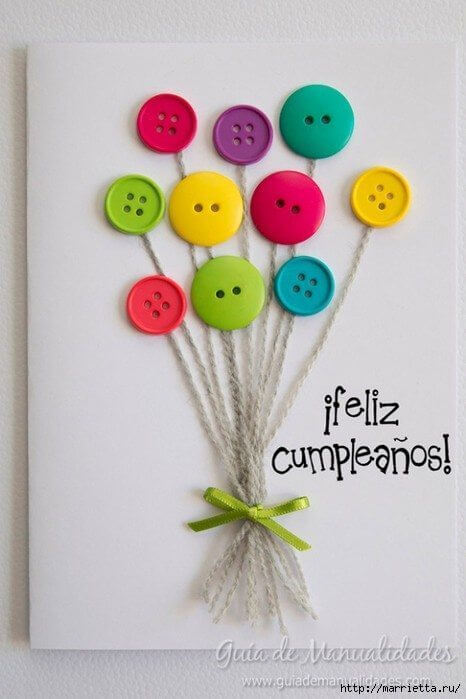
Image Source/Tutorial: K4Craft
Gifting cards are a good way of showing our creativity, and button craft can work on that, like making balloons using buttons and yarn. For this, you need buttons, yarn, ribbon, and glue. Start with cutting yarn threads in small sizes, place them on paper, and stick them on paper, to join them and to make a good look, use ribbon to join the threads. Finally, stick buttons on the top points of threads. Your gift card is ready. Kids can use this craft to make birthday cards for their friends and show their creativity.
Easy To Make Button Rainbow Craft On Paper
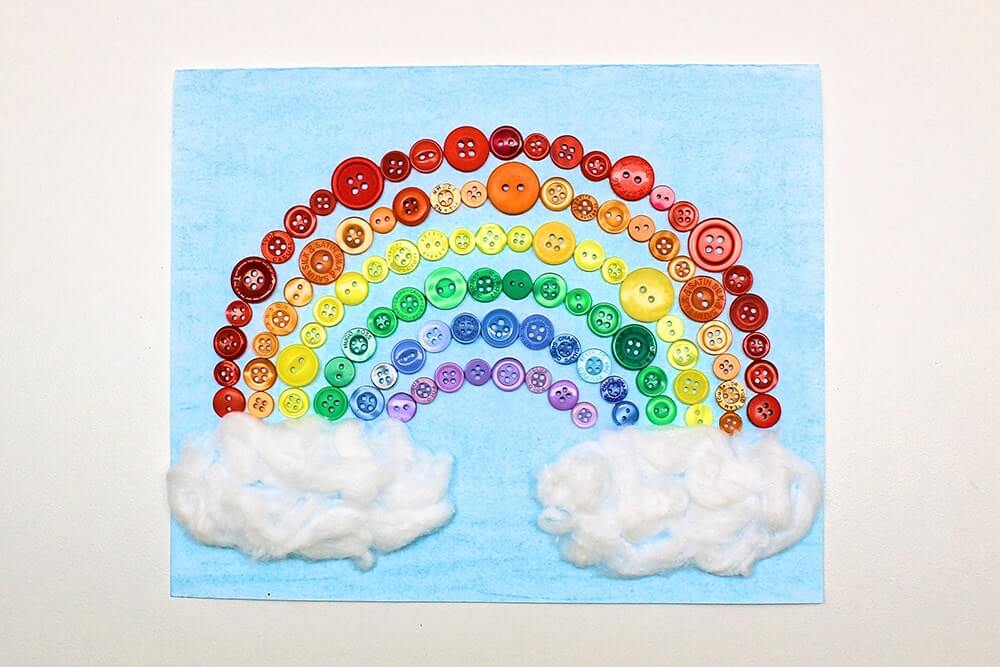
Image Source/Tutorial: The Craft At Home Family
Every kid loves watching rainbows they are beautiful in shape and color, and their appearance makes us feel, but we don’t see rainbows every day, so why not rainbow for ourselves using button craft? Gather your supplies for our beautiful rainbow; you need buttons in rainbow colors, glue, cotton balls, white cardstock paper, liquid watercolors, and a pencil. We will begin by taking cardstock paper and drawing seven lines of rainbow using a pencil. Then, we will color the paper with blue liquid watercolor and leave it to dry. After it has dried, use glue to stick our buttons in color order. Finally, we will make clouds by taking two cotton balls, spreading them, and sticking them using glue. After all the gluing, leave it to d,ry, and your colorful rainbow will be ready. Kids can create this and learn how they can use liquid watercolors and buttons to do craft activities.
Read More: Simple & Cute Button Bookmark Craft Tutorial
Beautiful Button Christmas Tree Paper Craft For Kindergartners
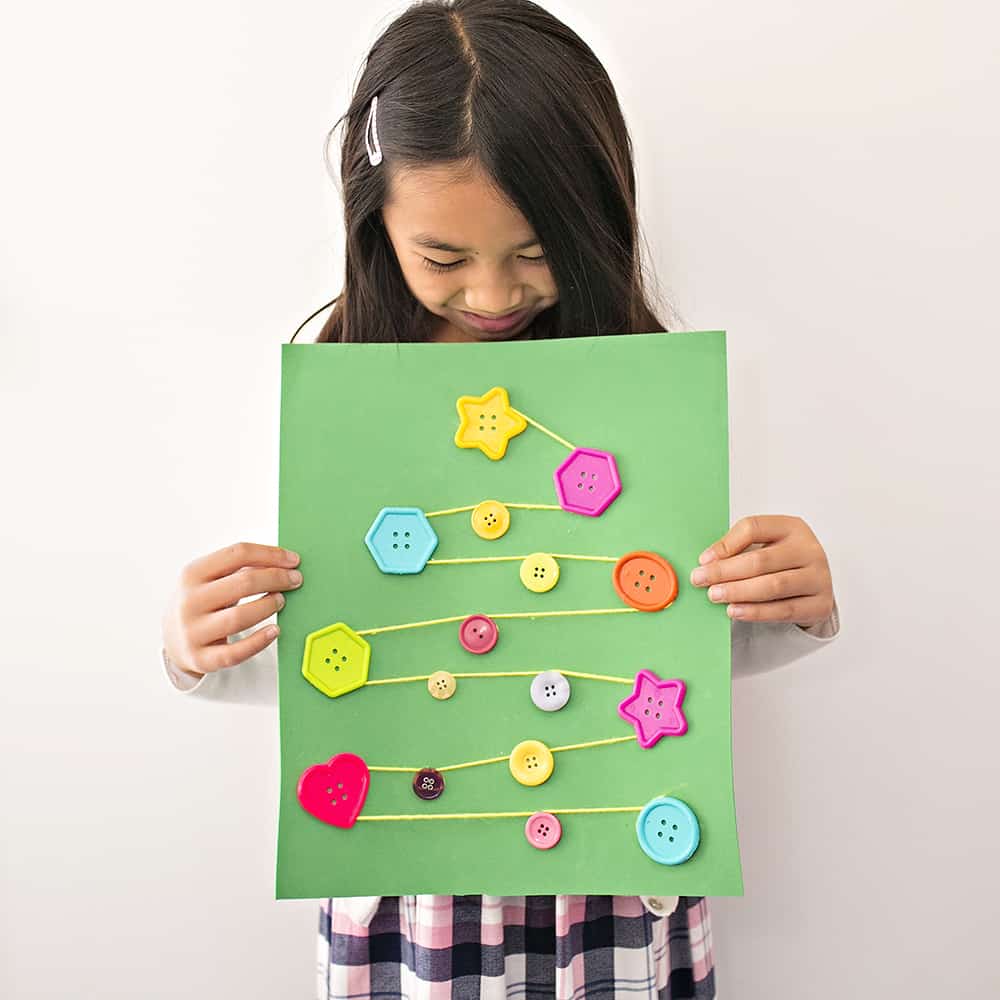
Image Source/Tutorial: Hello Wonderful
On Christmas, we use different craft activities to design our home, including Christmas trees. But for this year, why don’t you try button craft activities with kids to make your Christmas tree and place them with decorations? This activity is very simple and uses low-cost supplies to make. For this, you need buttons, tape, green craft foam paper, embroidery thread, a hot glue gun, and a needle. We will take craft foam paper and, with tape, place our buttons where we need them. After placing our buttons in the right position, remove the tape, and now here it goes differently. Young kids just stick their threads near buttons to make the shape of the tree, and if you are older, then you can stitch with the needle through buttons and place your thread. Parents should accompany their kids through this activity. After that, your craft is complete, through this activity, kids will learn how they can do craft activities with thread and buttons, and this will also improve their motor skills.
St. Patrick’s Day Decoration Craft Idea With Paper & Buttons
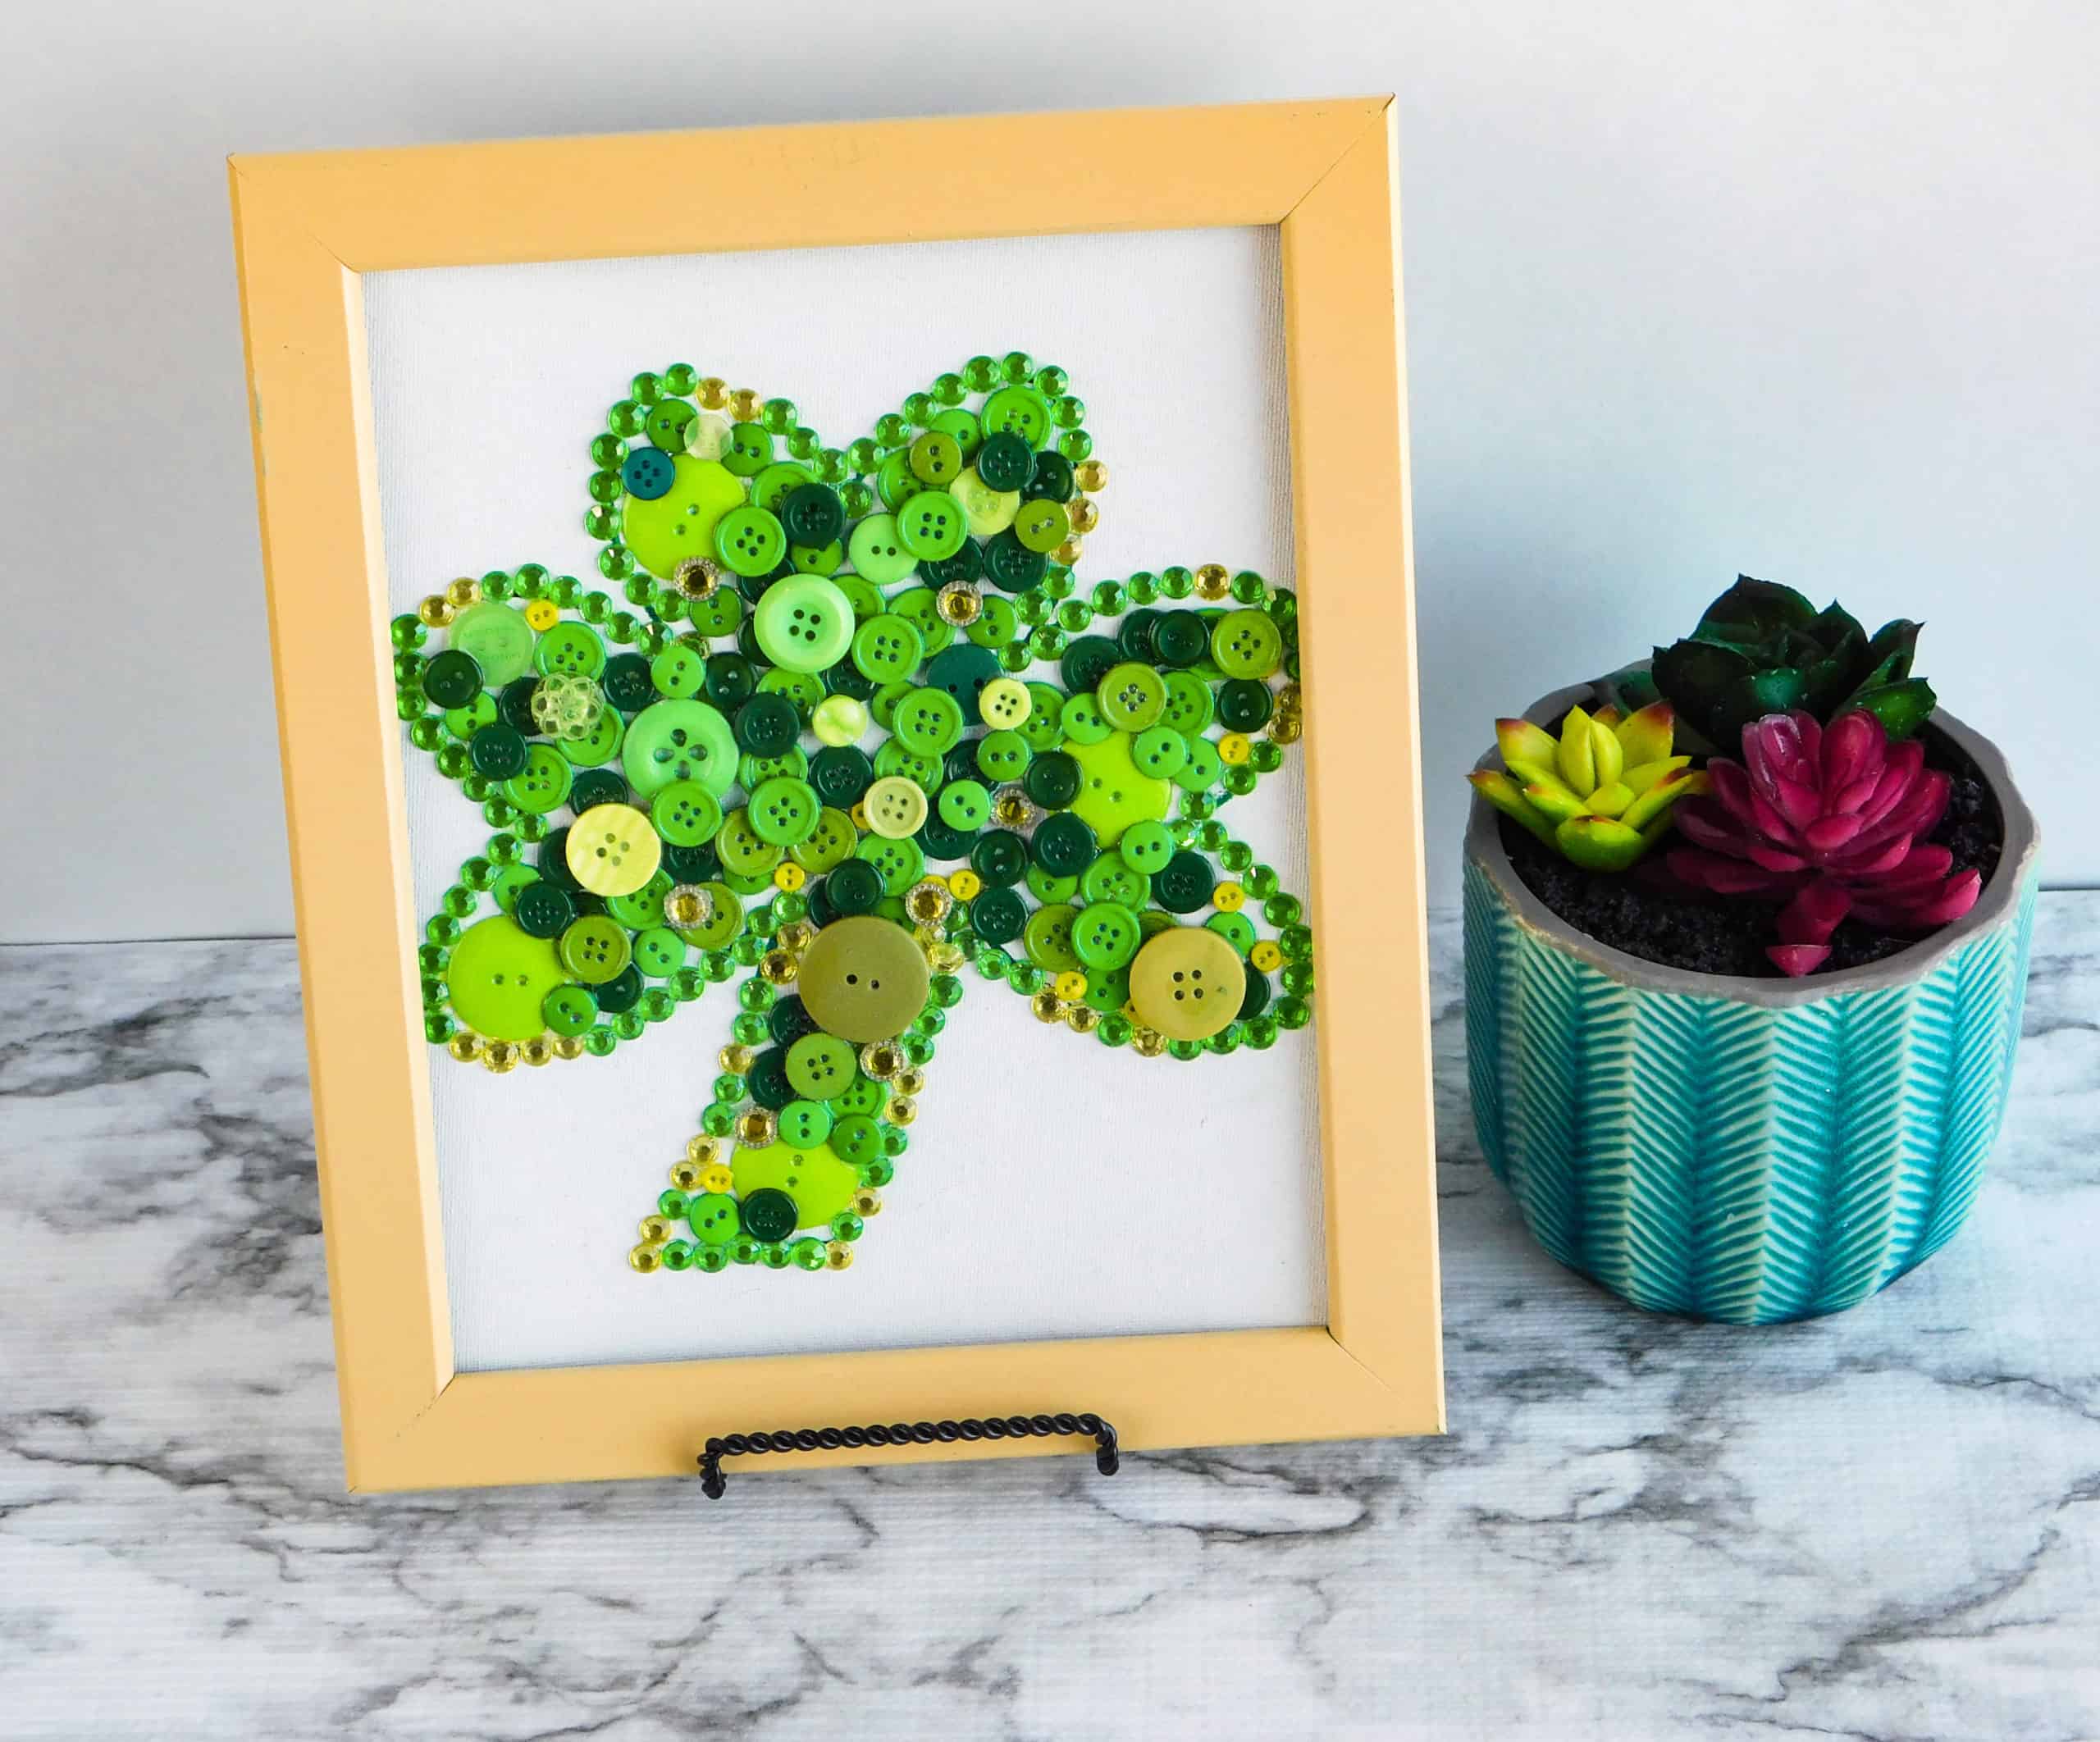
In honor of Saint Patrick’s Day, kids can use craft activities to celebrate the day, and button craft activity is one of them. This craft is very simple and with low-cost supplies. For this, you need green buttons of various shapes, cardstock paper, a medium-sized canvas, a pencil, and craft glue. Start with taking cardstock paper and using a pencil to draw the clover. After you have drawn it, use craft glue to first cover the boundaries, then stick buttons all over the clover, and then leave it to dry. After it has dried, place your canvas on the craft, and with that, your craft is complete. You can place this as a display to showcase your craft and honor Saint Patrick.
Easy Button Canvas Wall Art Project For Home Decor
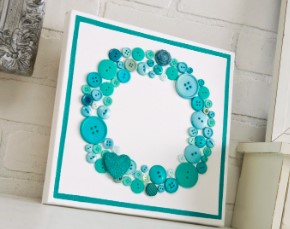
Image Source/Tutorial: Modpodge Rocks Blog
Wreaths look good, and they are easy to make, especially if you are making them with a button craft activity. Gather your supplies to make this. You need a paintbrush, a ruler, a pencil, a craft knife, a medium-sized canvas, white acrylic paint, Mod Podge, buttons, craft glue, and stencil tape. We will take our canvas and paint it with white acrylic color and then leave it to dry. After it has dried, we then draw a border on canvas using a pencil and ruler. Then, place your stencil border inside the border, and then use paint to color your border and remove the stencil tape. Next, seal your canvas, place the Mod Podge around the canvas, and leave it to dry. Then, place your buttons in the wreath shape and let them dry. After it has dried up and your craft is ready, place it for a display for home decor.
Very Simple Counting Buttons Flower Craft Project Using Construction Paper
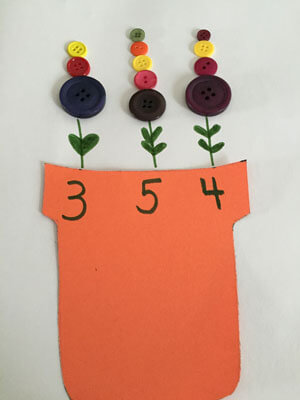
Image Source/Tutorial: All Kids Network
We can use different craft activities to teach our young children about numbers, and button craft is one of them. This activity requires simple supplies, and it is a time-friendly activity. All you need is buttons, a green sketch pen, a white paper. And an orange color paper. Cut the orange paper into the shape of a flower pot and use a green sketch pen to write numbers like 3, 4, and 5. Then, use a sketch pen to draw a small plant with the same number of leaves as the below-written number. Now, ask your kids to place the number of buttons over the plant by seeing the written number below, through this activity, kids will learn about number counting and button craft activity.
Scarecrow Craft Made With Paper & Button
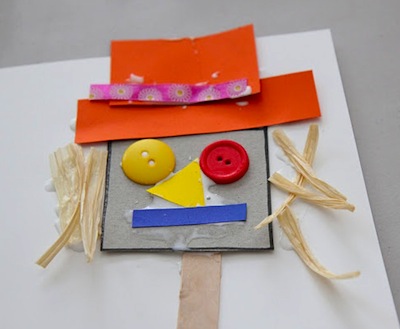
Image Source/Tutorial: The Crafty Crow
Scarecrows are scary, but eventually, kids start to love them, and with this craft, we can create our scarecrow, you need a cereal box cardboard piece, scissors, cardstock, ribbon, Elmer’s glue, buttons, raffia, a popsicle stick. We will start by taking the cardboard piece and pasting cardstock paper on it, and as the support to hand it, paste the popsicle stick at its back. Then, we will take orange cardstock paper and paste it above,e and to make it a good look, paste the ribbon on the orange paper. For the face, paste buttons as eyes and cut nose and mouth from yellow and blue cardstock paper. Finally, use raffia to make the scarecrow’s hair. Your craft is read; kids can play with the scarecrow, and through this, they can also learn how they can use cardstock paper and buttons for craft activities.
Read More: Button Crafts For Senior Students
Adorable Ladybug Button Card Idea Using Paper
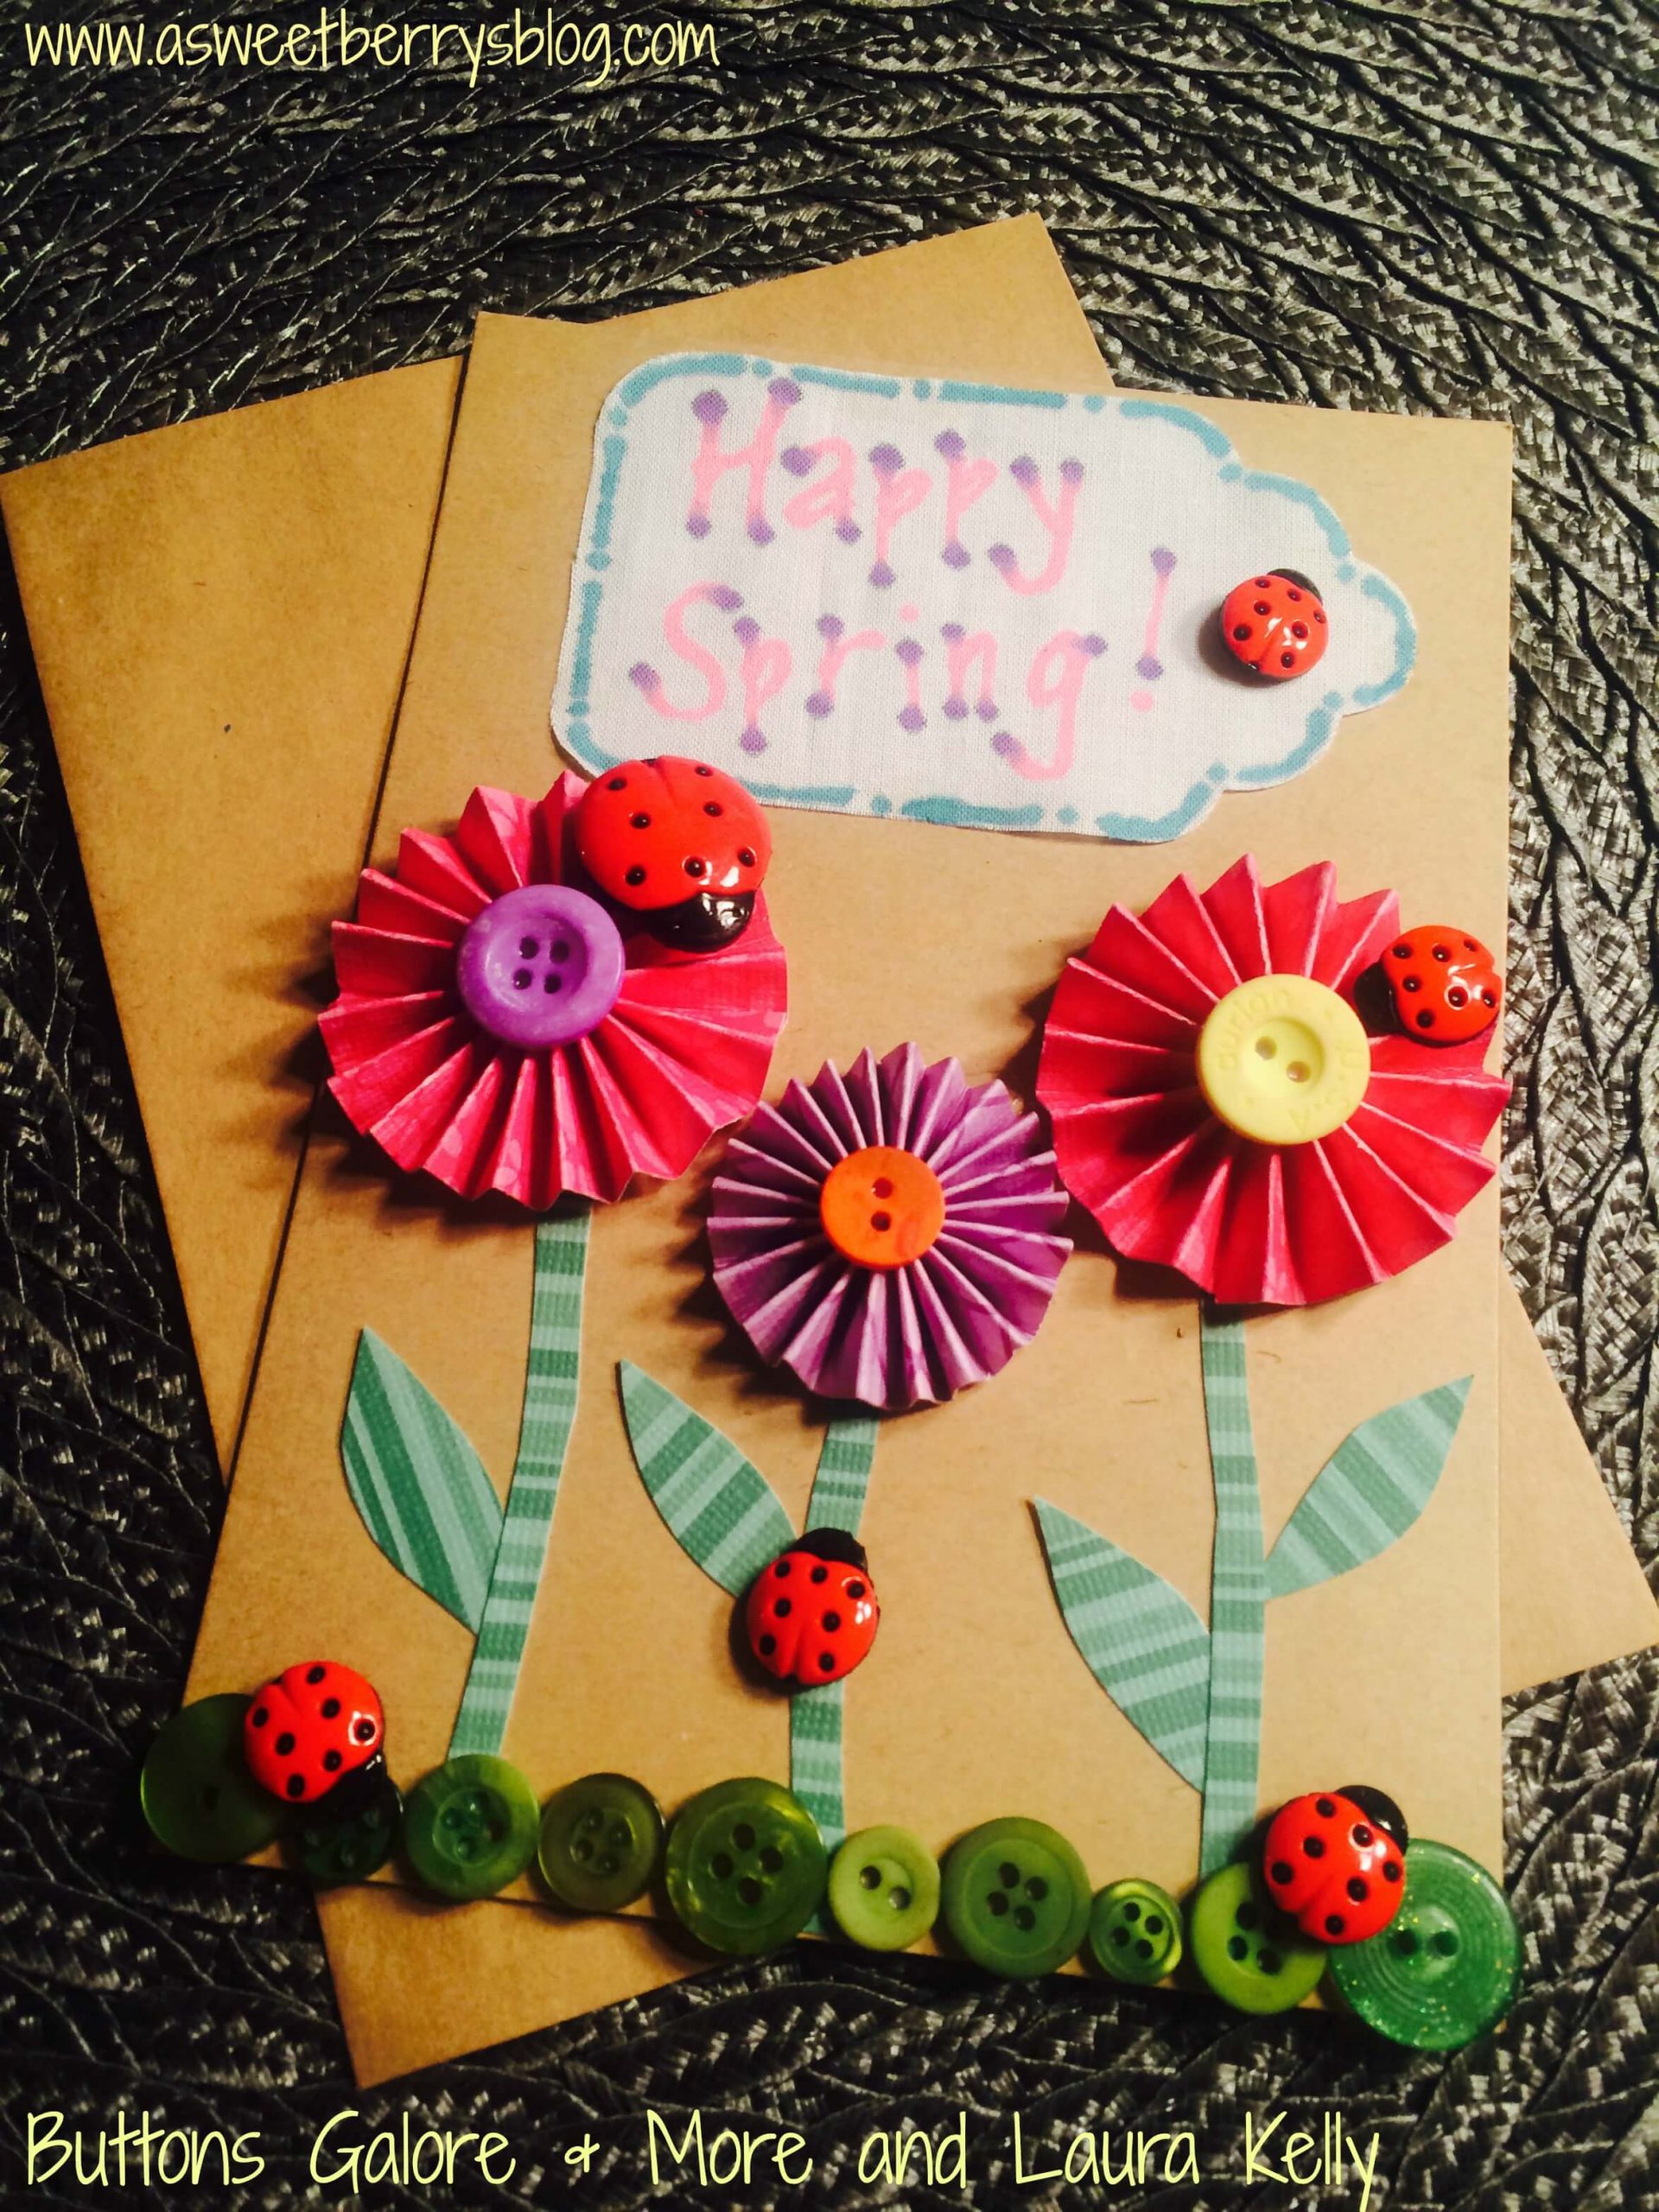
Image Source/Tutorial: Buttons Galore And More
Kids love making and gifting them to others as making them is a lot of fun, and it helps in showing our creativity, so why don’t we make a card celebrating the arrival of spring and gifting it to others using paper and button craft activities? Gather your supplies to form this card; you need buttons, ladybug buttons, cardstock papers, an envelope, a card, colored markers, a hot glue gun, glue, glaze paper, and scissors. We will start by creating our flower using glaze paper and cardstock paper, taking small strips of paper and folding them in a zigzag way, and then joining their ends with a hot glue gun. With this method, create three flowers and paste them on the card. For their stems and leaves, take green cardstock paper, shape them using scissors, and paste them with glue. Take a small piece of cardstock paper, design it with markers, and write “Happy spring” on it, paste that square on top of the card. Finally, stick your buttons below the flower stem and ladybug buttons all over the card. Your spring card is ready; you can gift this card to your loved ones and show your love and creativity through this card.
Simple Penguin Number Counting Craft Activity Using Paper & Buttons
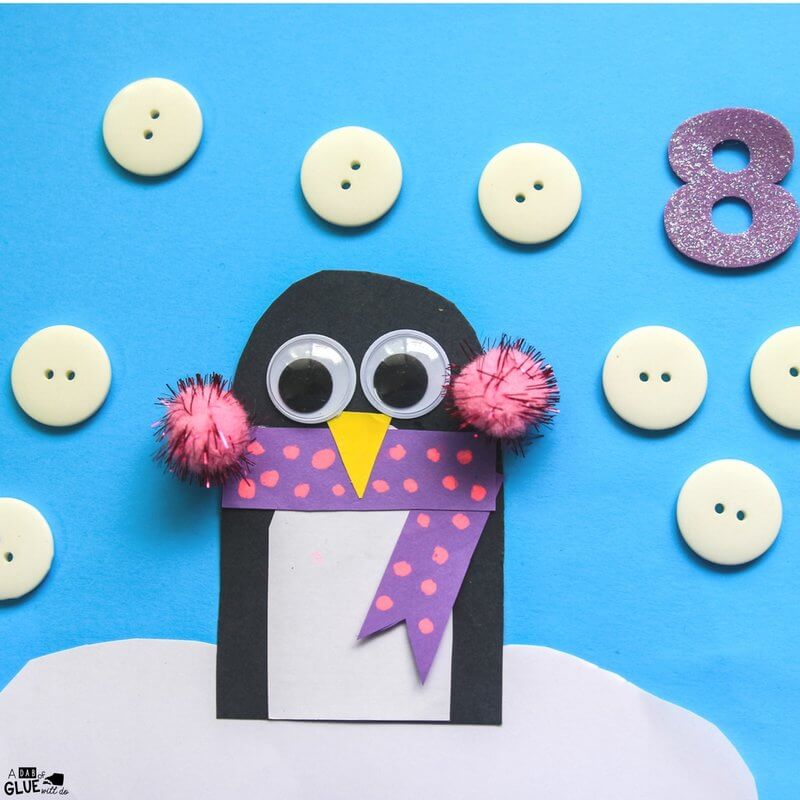
Image Source/Tutorial: Adab Of Glue Will Do
Craft activities can also work in teaching our young kids about numbers, and if we make cute animals like penguins in our craft activity, then it will encourage them more, so gather your supplies as we make our penguins and create our button craft activities. For this, you need construction papers, googly eyes, glue, buttons, chalk markers, pompoms, and foam numbers. We will start by taking blue construction as the main sheet and using black and white construction paper; we will make our penguin. Make its face by sticking googly eyes, yellow paper for the nose, and for the scarf, we will take purple paper and chalk markers, paste it, and on its sides place our pompoms. For the ice land, use white paper and place our penguin there. Now place eight buttons around the penguin and place foam numbers near it, ask your kid to count the number of buttons and place the foam number near it. This activity is great as it helps kids learn craft activities and also helps in number counting.
Handmade Groovy Button Craft Idea Using Paper Plate
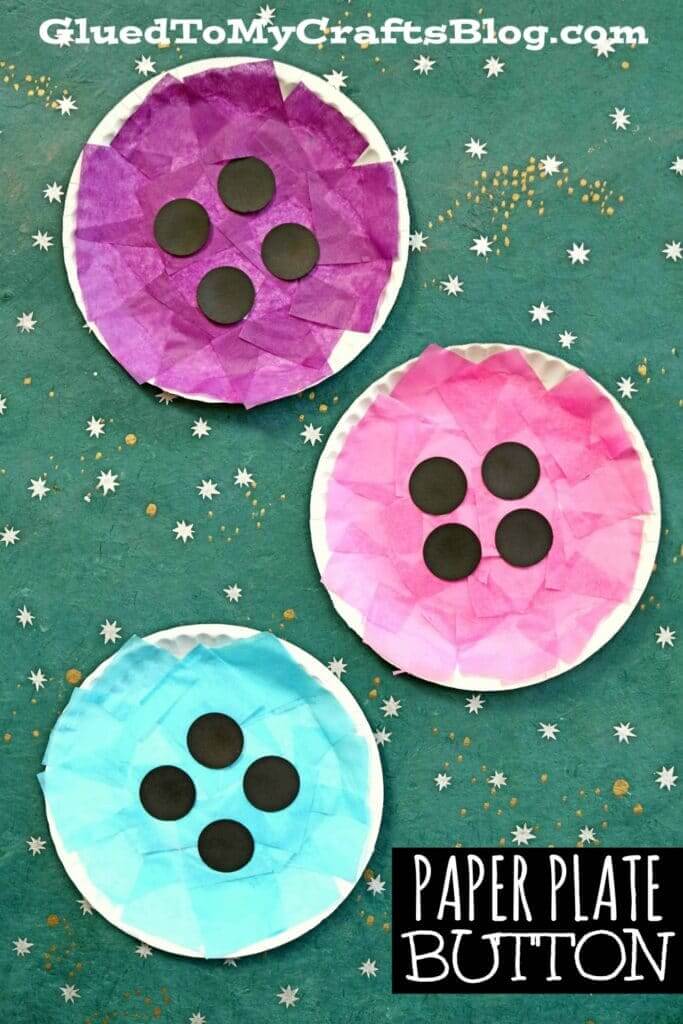
Image Source/Tutorial: Glued To My Crafts Blog
Kids love the story of Pete, the cat who loses all the buttons on his shirt but keeps on going and singing. Inspired by this story, we can create our groovy buttons by using paper plates and buttons. We need paper plates, scissors, tissue paper, black cardstock paper, craft punch, and glue. Start with cutting the tissue paper into small squares and then pasting them on the paper plate. After they are placed perfectly, use a craft punch to make small circles of black cardstock paper as buttons. Finally, paste these buttons on the tissue paper plate, and your craft will be complete. Through this craft, kids will be able to enjoy their stories well, and it will also encourage them in craft activities.
DIY Mother’s Day Button Card Craft with Handprint On Paper
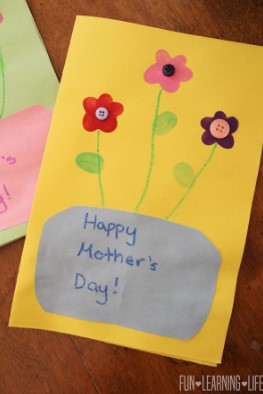
Image Source/Tutorial: Fun Learning Life
Mothers play an important role in our lives as they are the ones who always make us happy and protect us from bad things, so why don’t we make them happy by making a Mother’s Day card by showing our creativity? This activity requires simple supplies as you don’t need expensive things to create this card, all you need is a card, crayons, buttons, construction paper, a blue sketch pen, glue, and scissors. We will start by taking the card and then using green crayons to make stems of flowers after that, use your desired colors to make flowers. After making the flowers, take three buttons and paste them in the middle of the flowers. Now, cut a square piece of blue construction paper, use a blue sketch pen, and write “Happy Mother’s Day” with big writing. Paste the construction paper below, and with that, your craft is complete. Gift your mother this beautiful card and showcase your creativity and craft skills.
Awesome Paper Flower Button Craft With Step By Step Instruction
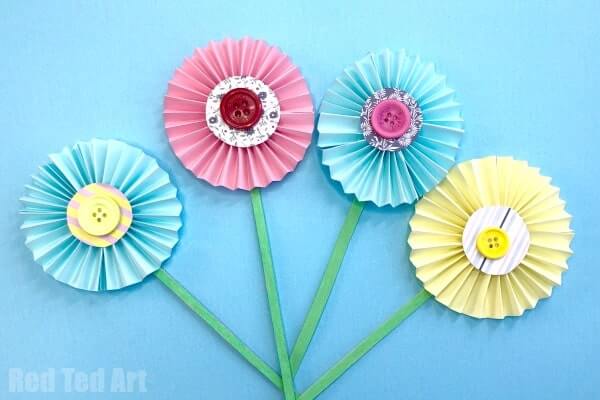
Image Source/Tutorial: Red Ted Art
Paper and button craft activities work greatly together as they bring something great, and kids also love these simple activities flower making is the most simple and brilliant activity that works better in it. So gather up your supplies for this flower-making, you need a square piece of paper, paper scraps, buttons, a glue stick, scissors, and coffee stirrers. We will start by taking the piece of paper and cutting it into four different pieces, then start folding them in zigzag form and then unfold them, repeating the process until you get clear creases. Then, fold them in a circle and join their ends with glue. Then, we will take a piece of paper, paste buttons on it, and then stick them in the middle of the flowers. Finally, to hold the flowers, we will take coffee stirrers, paint them green, and stick them behind the flowers. Your craft is complete; kids can create this with their parents and learn how they can use paper and buttons to create flower crafts.
FAQs Related To “Button Crafts On Paper”
1. What craft can you make with buttons?
Buttons can be used to make a variety of crafts, from simple projects such as button magnets to more intricate pieces such as button art. Buttons can be used to make jewelry such as necklaces, earrings, and bracelets. Buttons can also be used to create colorful frames for photographs or artwork. Button garland can be used for decoration and can be used to add a pop of color to any room. Buttons can also be used to make decorative items such as coasters and placemats. With a little creativity, buttons can be used to make countless craft projects.
2. How do you make a button out of paper?
Making a button out of paper is a really simple and fun craft project. All you need is a piece of paper, a pair of scissors, and some glue. First, cut out a circle from your paper. Next, cut out a smaller circle from the inside of the larger circle. Then, cut out four strips of paper that are the same size and wrap them around the larger circle. Lastly, glue the strips together, apply glue to the back of the smaller circle, and press it back onto the larger circle. Now you have a beautiful paper button!
3. How do you attach a button to the paper?
Attaching a button to paper is a relatively easy task. First, find the area on the paper where you want the button to be placed. Then, use a needle and thread to sew the button securely to the paper. Start by threading the needle with a length of thread that is twice the size of the button’s circumference. Now, insert the needle through the paper and the buttonhole in the button. Pull the thread through until there is an equal length on both sides of the button. Then, tie a knot in the thread securely and repeat this process as many times as necessary to make sure the button is securely attached to the paper. Once the thread is tied in a knot, cut off any excess thread, and the button is attached!
4. How do you make button art?
Making button art is a creative and fun way to make something unique and colorful. You will need a surface to work on, such as a canvas or a piece of cardboard, as well as a variety of different colored buttons of varying sizes. You can create a pattern or image with the buttons or simply arrange them in a pleasing composition. You can use a hot glue gun to attach the buttons to the surface, or you can use fabric glue if you plan on displaying the artwork in an area where the buttons may be knocked off. Once you have arranged the buttons, you can use a clear sealant to protect the artwork and ensure that the buttons stay in place.
5. What do you decorate with buttons?
Buttons are a great way to add a little extra flair to any project. Buttons can be used to decorate clothing, bags, hats, scrapbooks, and other accessories. You can also embellish a variety of different projects with buttons, such as cards, jewelry, pillows, and more. Buttons are a fun and easy way to add texture and color to your creations. Buttons come in all shapes, sizes, and colors, so you can find the perfect buttons to fit your needs. With a little creativity and imagination, you can use buttons to create an array of beautiful and unique decorations.
6. How do you make button flowers craft?
Button Flowers Craft is a quick and easy project that can be done with just a few supplies. To make button flowers, you will need buttons of various sizes, a hot glue gun, scissors, and a piece of felt or cardstock. Begin by arranging the buttons in a flower pattern on the felt or card stock. Next, use the hot glue gun to glue the buttons together. Once the glue is dry, use scissors to cut the felt or cardstock around the flower. Finally, use the scissors to cut small slits in the center of the flower and fold each button petal to give the flower more dimension. This craft is great for kids, and it can be used to make home decor or gifts.
7. How do you Stroke a button?
Stitching a button is a fairly simple process. Start by threading the needle, knotting the end of the thread, and pushing the needle up through the fabric where you want the button to be. Push the needle back down through the buttonhole and bring it back up through the fabric, looping the thread around the shank of the button a few times. Pull the thread tight and push the needle back down through the fabric. Repeat this process a few times until the button is securely attached. Finally, tie the thread off securely by looping the thread around the shank of the button a few times and knotting the thread at the back of the fabric.
8. How do I make a picture a button?
Creating a picture button is a simple process that can be done in just a few steps. First, design the image that you want to use for the button and save it as a .jpg or .png file. Next, open the HTML page that you want to add the button to and add a link tag and an image tag with the source attribute set to the location of the image that you created. Then, add an onclick attribute to the link tag and set the value to the JavaScript code that you want to execute when the button is clicked. Finally, save the HTML page and preview it in a web browser to see the image-based button in action. Button crafts on paper are a great way to get creative and have fun with traditional paper craft techniques. Experiment with different button shapes, sizes, and colors to create something truly unique and eye-catching.
Follow us on YouTube for art and craft tutorials and much more.
More Articles from Kids Art & Craft
- DIY Beautiful Button Bird Crafts
- Flower Bouquet Button Crafts Using Tissue Paper
- Recycled Button Elephant Crafts
- Winter Crafts For Kids With Paper
- Glow Day Classroom Transformation Ideas


