


Christmas
Cute Christmas Tree Craft Ideas You Can Try With Your Kids

Are you in the mood to make some Christmas tree craft ideas with your kids? These quick and easy Christmas craft ideas for kids can be made using items that you probably already have around the house!
Christmas means fun, gifts, and, of course, Christmas tree craft ideas. Decorating the Christmas trees is so much fun. Kids usually love decorating the tree with bells and drawings that they have made. This Christmas, why not make something crafty with the kids to decorate the Christmas tree? It would be more like a crafty Christmas tree.
Christmas tree crafts are more than just fun holiday activities—they play an important role in child development. Crafting helps children improve fine motor skills, creativity, focus, and problem-solving abilities while also encouraging family bonding during the festive season.
In this collection of cute Christmas tree craft ideas, we’ve curated easy, budget-friendly, and kid-approved projects that are perfect for preschoolers, toddlers, and school-aged children. Whether you’re using paper, recycled materials, or simple household supplies, these ideas are designed to be engaging, safe, and mess-friendly.
Christmas Tree Craft Ideas: Try with Your Kids for a School Project
Here I am going to tell you some amazing craft ideas that you can do with your child and later use them as a Christmas tree decoration. It would definitely boost them and make them happy, which would result in making the kids more creative rather than technology-oriented.
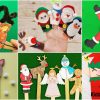
1. Christmas candy ornaments Christmas tree craft ideas
We all love those cute peppermint candies, and especially the colour of the candy, those sweet red and white stripes. Why not make a peppermint candy ornament to decorate the Christmas tree? It is super easy and looks really cute. All we need is a thick plain paper or card stock, plastic wrap, red coloured markers, and red yarn. Draw some circles on the white cardstock. Now, with the red marker, make that spiral peppermint candy design on the cardstock. Make many such candies and then keep them aside.
Now tear some plastic wrap and take a candy ornament. Tear it according to the size of the candy ornament, a bit larger so that it can be tied up. Wrap the plastic in the candy ornament, basically crush the plastic a bit so that it gives a realistic feel. Now, twist the ends of the plastic and tie them with yarn. Your candy ornament is ready. To tie it to the Christmas tree, make a loop at any end of the candy.
2. Woollen caps for decorations, Christmas tree craft ideas
Christmas means snow and cold. To make it warmer, let’s make some cute little woollen caps to decorate the Christmas tree. All we need is a cardboard paper roll, some multi coloured yarn, and that’s it. Cut out a circle from the paper roll. Now, take a piece of yarn and make a loop as it is shown in the video below, on the circle. Make many such loops with different colours of yarn and continue till the whole circle is covered with yarn.
Now turn all the excess yarn from the circle, inside out, so that it gives a rough image of a woollen cap. Tie the excess part with a piece of yarn and make a loop for tying it to the Christmas tree. Cut off the excess yarn a bit to give it a round shape, and your warm little Christmas caps are ready.
3. Snowflakes for decorations
Snowflakes are so beautiful to look at. Each snowflake is unique and beautiful in its own way. How can we imagine a Christmas tree without some snowflakes? You can make these and hang them in the tree or somewhere near the tree to create the effect. All we need is a simple square piece of paper. You can simply take a piece of paper and make a triangle, and then cut off the remaining part. We will get two triangles from a single sheet of paper.
Take one triangle and then fold it according to the steps shown in the video. An alternative would be to fold the paper into triangle folds and then finally get a cone shape. Make a unique design for the snowflake and then cut out the design carefully, making sure not to cut the whole paper. Unfold the paper and see the wonderful snowflake.
4. Decoration from plastic bottles
We have so many waste plastic bottles at home. Instead of throwing them away and polluting nature, why not use them to decorate our house this Christmas? Take a plastic bottle and with the help of a tape, mark a gap of around one inch and then cut it out. Don’t throw away the bottle, we have to use it later. To make the sides of the circle, we have cut out from the bottle. Just take the circle and make it even by using a warm iron.
Keep it aside for a while. With the remaining bottle, cut out stars of different sizes. Paint the stars and keep them aside. Now, make some holes in the circle for attaching the stars. Make the holes at an equivalent distance. Attach the stars with thread and needle. Don’t forget to paint the circle. Now just add a string and hang it above the Christmas tree as a wall hanger. You can make many such decorations from plastic bottles.
5. Christmas bells
Christmas is incomplete without Christmas bells. We get so many varieties of Christmas bells in the market. Why not try to make one with the kids? All we need is two plastic bottles, a bangle, beads, laces, glitter, glitter foam sheet, glue, and some aluminium foil. Cut out the top cone part of two plastic bottles. To make the edge even, press it against a warm iron. Take a bangle and apply hot glue to stick it to the top of the plastic cone. Now, take a long piece of golden lace and start wrapping the bangle with it.
After you have completed this part, apply glue to the body of the cone and simultaneously sprinkle the glitter on it. The whole body of the cone should be covered with glitter. Keep it aside to dry. While the cone is drying, let’s make the bells. To make the bells, tear out some aluminium foil and crush it to make it appear like a ball. Now, with a strong golden string, pass the whole aluminium ball securely through the inside of the cone and tie it on the bangle. Make around four such balls and repeat the process. Make some flowers from the glitter foam sheet and stick them on top of the cone, near the bangle. Our Christmas bells are ready.
6. Sock dolls
Why not recycle the old socks and make dolls out of them? You can use these dolls as decor in your kid’s bedroom, or better keep them under the Christmas tree to protect the gifts. Take an old sock and cut it into three parts. One should be the lower part, the second one would be the ankle part, and the third would be the top part with elastic. Fold the lower part and cut it from the bottom for about an inch to make it appear like two legs.
Sew them and then fill them with cotton balls or stuffing, and then sew them properly. Now, take the other bottom part of a sock and fill it with the stuffing, and sew it. Now attach both the parts with the thread and needle to make it appear like a body. Take the top part and sew the side with no elastic, and then use it as a cap for the doll. Add the googly eyes for that cuteness effect. You can even make the hands. Follow the video to see how to make this perfect, cute sock doll.
7. Mini Christmas tree from matchsticks
Mini Christmas trees are really cute and look amazing near the pine tree during Christmas. Encourage your child to make this Christmas tree. All we need is a lot of matchsticks, paper, glue, and some glitter. First of all, dip the tip of the matchstick in the glue and then in the glitter. This would make the edge look glittery and festive. Allow the matchsticks to dry. Meanwhile, take a paper and make a cone out of it. Secure the end with glue.
Now, apply glue on the surface of the cone and start sticking the matchsticks. It would look really good if you do it in layers, so that it will give that realistic look. Cover the cone with the matchsticks. Allow it to dry. After it has dried, make a star out of the remaining sticks and stick it on the top of the tree. You can even add some glitter at some points to decorate it. You can use this mini Christmas tree as a décor by keeping it aside from the bigger Christmas tree.
8. DIY Christmas tree
This is another method to make a mini Christmas tree craft idea, but with paper. All we need is a piece of hard paper, green paper, and glue. Make a cone from the hard paper. Fold the green paper in half and cut it out. Take one piece and fold it in half into a rectangular shape, and cut it. Do the same with the other pieces, too.
Take all the pieces and cut them into shreds, making sure not to cut the whole piece of paper. Separate each piece and roll the shredded part so that it gives the look of leaves. Now start sticking this to the hard paper cone in a layered manner. Make sure not to apply glue to the shredded part. After completing decorating it with some small stickers, your Christmas tree is ready.
Benefits of Christmas Tree Crafts for Kids
- Enhances fine motor skills through cutting, folding, and glueing
- Boosts creativity and imagination
- Improves focus and patience
- Encourages self-expression
- Promotes family bonding and teamwork
Common Materials Used in Christmas Tree Crafts
- Colored paper or cardstock
- Glue and scissors
- Crayons, markers, or paints
- Popsicle sticks
- Pom-poms and glitter
- Recycled materials (toilet paper rolls, cardboard, newspapers)
- Cotton balls, buttons, or beads
Tips for Making Christmas Crafts with Kids
- Choose age-appropriate crafts to avoid frustration
- Pre-cut materials for younger children
- Use non-toxic, child-safe supplies
- Cover your workspace to avoid a mess
- Encourage creativity instead of perfection
Explore More Christmas Craft Ideas
- Easy Paper Plate Christmas Crafts for Kids
- DIY Christmas Ornaments for Preschoolers
- Handmade Christmas Gift Ideas for Kids
- Recycled Christmas Craft Ideas
Who Are These Christmas Tree Crafts For?
- Preschoolers (ages 3–5) – simple cutting, sticking, and colouring
- Kindergarten & primary kids – slightly advanced DIY projects
- Parents & homeschoolers – fun holiday learning activities
- Teachers & classrooms – group craft sessions and decorations
Most of these crafts use everyday materials like paper, glue, crayons, cardboard, and recycled items—making them affordable and accessible.
FAQs
Q1. What are the easiest Christmas tree crafts for kids?
Answer: Paper Christmas trees, handprint trees, and toilet paper roll trees are among the easiest and most popular options for young children.
Q2. What materials can I use for DIY Christmas tree crafts?
Answer: You can use paper, cardboard, pom-poms, buttons, cotton balls, and even recycled items like newspapers and paper rolls.
Q3. Are Christmas crafts good for child development?
Answer: Yes! Crafting improves fine motor skills, creativity, focus, and problem-solving abilities in children.
Q4. How do I make Christmas crafts less messy?
Answer: Use washable supplies, cover surfaces, and prepare materials in advance to keep things organised.
Q5. Can these crafts be used as decorations?
Answer: Absolutely! Many Christmas tree crafts can be used as ornaments, wall decor, greeting cards, or classroom decorations.
These were some cute Christmas tree craft and decoration ideas which you can try with your kids. Hang these cute ornaments on the Christmas tree or keep them under the tree so that it will encourage your child to do more crafts. Do try them this Christmas. Stay updated with our newest content—join our Telegram group today! Don’t forget to follow us on YouTube & Facebook for creative art and craft tutorials, fun ideas, and much more.
Reviewed By Rachit Gupta
Read More:
- DIY Christmas Yarn Ornaments
- Gorgeous DIY Christmas Candles
- Easy Santa Claus Craft Ideas For Kids
- Disney Frozen Crafts For Kids
- Easy Snowman Craft For Kindergartners