Independence Day
Independence Day Celebration Ideas for Kids


Christmas crafts are more than just fun activities—they play an important role in a child’s development. Research and parenting resources highlight that hands-on DIY crafts help improve fine motor skills, creativity, problem-solving, and focus in children.
These cute Christmas tree craft ideas are specially curated for kids of different age groups—from toddlers to school-going children—using simple, safe, and easily available materials. Whether you’re a parent, teacher, or caregiver, these ideas will help you create meaningful holiday memories while encouraging learning through play.
India, the world’s largest democracy, is all set to celebrate its 74th Independence Day. Check out Independence Day Celebration Ideas for Kids crafts and activities.
Independence Day is approaching, and it is time to celebrate the victory of India over the dark forces. We are going to celebrate the 72nd Independence Day this year.
Independence Day Celebration Ideas for Kids
We have come this far since the day we achieved Independence, and we are working harder to reach greater heights. The beautiful tricolour Indian flag combines all the cultures and unifies the diversity of our country. Each colour has its own significance. The vibrant saffron colour signifies the courage and strength of India, white represents peace, and green represents. Today, we are going to make some arts and crafts that capture the beautiful colours of our national flag.
1. RAKHI on Independence Day Celebration ideas theme
All Indians are children of Mother India. Every person reaches the other as a brother. On the occasion of Independence Day, celebrate the brotherhood by tying rakhis.
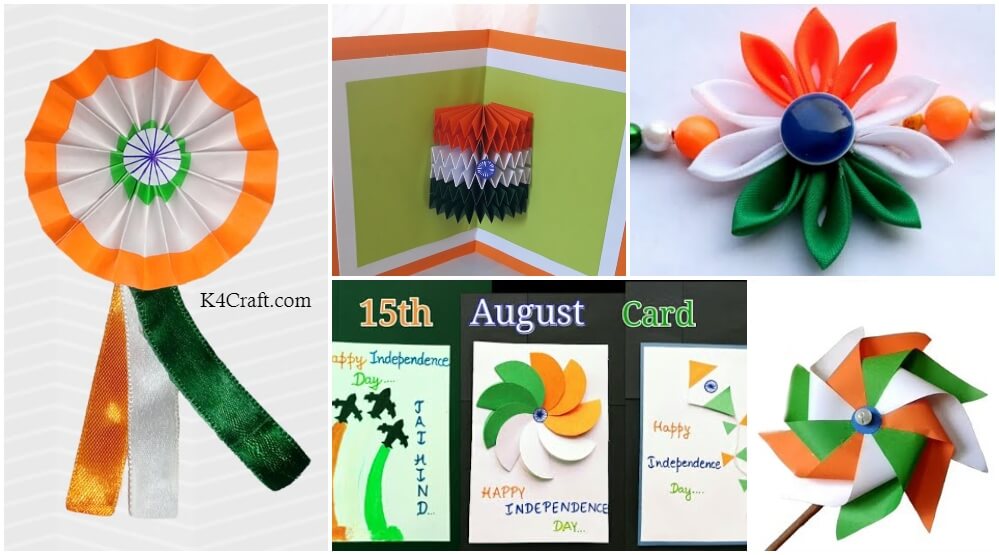
Make your own tricolour rakhi on Independence Day Celebration ideas as below:
The first one we are going to make is using ribbons. Take 4×4 cm saffron, white, and green-coloured ribbon pieces. Take a saffron coloured ribbon piece and fold it diagonally in half. Repeat the process three times. After the third fold, using a lighter seal the bottom. Be careful when handling the fire. Trim the excess base so that the petal stands.
Repeat the process with 2 other saffrons, 3 green pieces, and four white pieces of ribbon. Using super glue, stick the three saffron petals and 3 green ribbon petals. Stick 2 whites together. Cut two small circles out of paper. Apply the hot glue on the paper and stick the petals as a flower with 2 whites in between green and saffron petals that resemble our national flag. At the centre is a blue button. Take a plain thread used for rakhi and stick the flower onto it in the middle. Make knots on either side and pass beads through the threads to decorate. Check out the video below:
For the next Rakhi, take embroidery threads of three colours of the flag. Cut a cardboard of 3.5cm length and wrap a thread of one colour around it 20 to 30 times. After rolling around, remove from the cardboard carefully, cut at one edge, and tie a knot exactly at the centre. Bend the thread in half and tie a piece of thread at the top to make a tassel. Make 2 of each colour in a similar way. Pass a needle having a thread through a white, 2 oranges, again white, and finally 2 green tassels. Make a knot at the end and pull all tassels together to form a circle. Take a circular piece of paper, stick a blue stone, and decorate with a beaded chain along the circle. Stick it exactly in the centre. Tie it to a plain rakhi and embellish it with beads.
2. BADGES on Independence Day Celebration idea theme
Make badges of the Indian flag in an artistic way and wear them in events that are organised on Independence Day. You can make it with paper or ribbon, as per your choice. Let us first make the ribbon badge. Cut 10cm satin ribbon out of saffron, white, and green colours. Cut 10-20 of these. Stick the ends of the ribbon using glue to make a loop. Cut an 8cm circle out of canvas paper and stick the green loops along the outer rim with the loop popping outwards. Stick the white loops on the inner layer. Similarly, stick the saffron ribbons also. Cut a circle that covers the centre part and draw strokes with blue colour to resemble the Asoka Chakra. Stick it at the centre and add an attachment to the batch with 3 ribbons whose ends are cut into 2 pointed arrows. To pin the badge, stick the safety pin with the opening side facing you. Check out the video below:
Let us make the badge with paper now. Take orange, white, and green coloured papers and fold in accordion style or paper fan style. Stick the folded paper end to end using glue according to the flag colours. Stick the centre part of the fan so that it looks like it’s pinned. Attack the ends to make a circle. Cut an Asoka chakra and stick it at the centre. As previously stated, the attachments and pins.
3. PAPER WINDMILL
Take square paper of orange, white, and green colours. Cut the squares into 4 triangles equally along the diagonal lines. Take 3 triangles of each colour. Arrange the three colours of the flag at an angle adjacent to each other and make a circle by sticking them at the bottom. Now fold the left corner to the centre and stick all the flags that converge to the middle. Cut small. blue colour rings and stick on either side. Pass a huge pearl through a thin wire and pass the other end through the centre of the wheel. Bend the wire into a 90-degree angle and wind it to the edge of a wooden stick that acts as a handle. Check out the video below:
4. PAPER CARDS
Let us make 3D pop cards on this Independence Day. Begin by making the Indian flag as a pop-up. We need 21×15cm orange, 19×13cm white, and 17×11cm green colour papers. Stick the white onto the orange paper in the centre such that a uniform gap is present around. Take a 6×21cm strip of orange, white, and green colours. Make accordion folds of about a half-inch and cut them in half along the horizontal axis. Repeat the process with all the strips, and we get a total of 6 accordion folds with 2 of each colour. Stick each end of the folded paper on each side. Arrange them in the order of 2 oranges, 2 whites, and 2 greens. Cut a small circle out of white paper and draw strokes with blue colour. Stick it exactly in the centre of the white colour.
Write quotations and your wishes on the front cover and decorate. Check out the video below:
Our next card has a 3D tri-coloured flower. Cut 3 circles out of three coloured papers with a 3cm diameter each. Fold the circles in half. Initially, stick the first orange petal to the front cover and stick the other 2 oranges at the centre with a slight angle deviation. Similarly, stick the other petals and complete the flower. Stick a small Asoka chakra at the centre.
The next greeting card has the Indian flag flying high like a kite. For this, cut a white paper in the shape of a kite and stick the tricolour paper in order of the flag. Stick an Asoka Chakra at the centre. Stick the kite-like flag on the front cover and stick a white thread as a string. Embellish the kite and string with colourful small triangles of orange and green on either side of the string. Write the message or wishes beside the kite in a beautiful style.
We can make cards of our own style representing India in any form. The three main pillars of India’s security are the army, navy, and air force. Therefore, we can even make a card representing the Indian forces.
Check out the video below for more details:
Celebrate this Independence Day, strengthening the bond of brotherhood. Be proud that we are a part of an amazing country where people belong to a religion known as INDIAN. The youth of the country is the future of the country. Let us strive hard and make India a developed country, free from social evils.
Common Materials for Christmas Tree Crafts
- Colored paper & cardstock
- Glue, scissors, and tape
- Markers, crayons, or paints
- Yarn, ribbons, and beads
- Recycled items (toilet paper rolls, cardboard, plastic wrap)
- Decorative items (glitter, sequins, pom-poms)
How to Make Easy Christmas Tree Crafts
- Choose your base – paper, cardboard, or recycled materials
- Create the tree shape – cut, fold, or roll into cones
- Decorate creatively – use paints, stickers, glitter, or natural elements
- Add finishing touches – stars, ribbons, or hanging loops
- Display your craft – hang on a tree, a wall, or use as gifts
Benefits of Christmas Crafts for Kids
- Enhances fine motor skills and hand-eye coordination
- Boosts creativity and imagination
- Encourages family bonding and teamwork
- Reduces screen time with meaningful activities
- Builds confidence through hands-on learning
Safety Tips for Kids’ Crafting
- Always supervise young children while using scissors
- Use non-toxic glue and paints
- Avoid small choking hazards for toddlers
- Keep the workspace clean and organised
Expert Crafting Tips
- Let kids explore freely—don’t aim for perfection
- Encourage the use of recycled materials for eco-friendly crafts
- Combine crafts with storytelling for better engagement
- Turn crafts into DIY gifts or decorations
Relatable Crafts
- Christmas Tree Craft Ideas for Kids
- Easy Christmas Crafts for Kids
- DIY Christmas Tree Decorations
- Holiday Crafts for Preschoolers
- Simple Christmas Art Activities
Related Christmas Craft Ideas
- Paper Christmas Tree Tutorials
- DIY Ornament Crafts for Kids
- Recycled Christmas Decoration Ideas
FAQs
Q1. What are the easiest Christmas tree crafts for kids?
Answer: Paper trees, handprint trees, and cardboard crafts are among the easiest and require minimal materials.
Q2. How can I make Christmas crafts eco-friendly?
Answer: Use recycled items like paper rolls, old magazines, and cardboard to create sustainable decorations.
Q3. What age group are these crafts suitable for?
Answer: These crafts are ideal for toddlers, preschoolers, and school-age children, with adult supervision where needed.
Q4. Can these crafts be used as decorations?
Answer: Yes! Most of these crafts can be used as Christmas tree ornaments, wall decor, or handmade gifts.
These cute Christmas tree craft ideas are a perfect way to combine fun, creativity, and learning during the holiday season. With simple materials and easy steps, kids can create beautiful decorations while developing essential skills. So gather your craft supplies, spend quality time together, and make this Christmas extra special with handmade creations! Stay updated with our newest content—join our Telegram group today! Don’t forget to follow us on YouTube & Facebook for creative art and craft tutorials, fun ideas, and much more.
Reviewed By Rachit Gupta
Read More:
- Independence Day Activities for Kids
- Indian Republic Day Crafts & Activities For Kids
- Easy Popsicle Sticks Flag Crafts Tutorial
- Birthday Celebration Ideas at Home
- Earth Day Art & Craft Ideas for Kids