



DIY and Crafts
Stone, Rock DIY Crafts to Beautify Your Life


Stone, Rock DIY Crafts to Beautify Your Life is one of my favourite DIY projects. They are cheap, easy to source, and can be used in so many ways. Rock Craft Ideas are an ideal Spring and Summer activity. Sharing some Stone, Rock DIY to Beautify Your Life below, that are sure to get you inspired to start creating.
DIY Stone, Rock, and Pebble Crafts
Do you have the habit of collecting different kinds of stones whenever you visit places? Do different kinds of stones amaze you? We can use the stones to make many DIYs for our day-to-day lives.
1. POT HOLDER
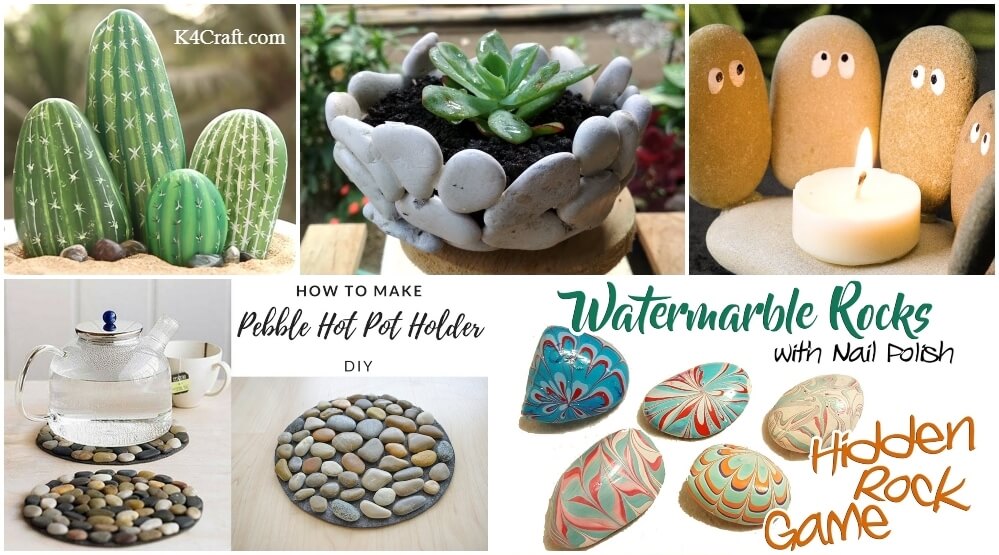
Take a piece of felt cut in a circular shape. Gather flat stones from your collection. Stick the stones to the felt using a hot glue gun. Place all the stones so the felt is completely covered. Sticking flat stones on the felt creates a flat surface that supports any item to stand. We can place hot tea pots while serving tea. Check out the Rock DIY to Beautify Your Life video below:
2. RINGS
We can make beautiful rings using pebbles. Select some small pebbles and paint them using spray paint. Make patterns on pebbles using paper tape. For example, take a pebble and cover half of it with the tape and spray gold paint. Spray black painton then other half. Stick the pebble onto a ready-made ring holder using a hot glue gun. Similarly, we can make many patterns on rings. Spray black paint on a pebble. Tie a rubber band on the pebble and spray gold colour or a contrasting colour. Stick it to the ring holder. Check out the Rock DIY to Beautify Your Life video below:
3. WATER MARBLE
It is a fun trick you can do when you are bored. Fill a tumbler with normal water and add a nail polish drop to it. Take another 2 colours that are contrasting and add them one over the other. The nail polish starts spreading in the form of rings. Go on adding in a sequence till we get huge circles. Using a toothpick, create a pattern like a flower. Initially, paint the rock with white colour. After it dries out, dip the rock into water where there is a good pattern. Using the cuticle of an ear bud, remove the polish from the remaining part of the water. Dry the rock, and we can use it as paper weights. Check out the Rock DIY to Beautify Your Life video below:
4. STONE CACTUS
Take some flat pebbles that resemble a cactus. Paint the pebbles with a dark shade of green. After the paint dries, paint spots of light green on it. Using a whitener pen, highlight the light spots. On another dark green stone, paint thin lines of light green and draw stars along the lines using white colour. Make more 2 of these cacti of different patterns and arrange them in a pot of mud like a cactus. Check out the Rock DIY to Beautify Your Life video below:
5. ROCK PENDANT DIY
Make jewellery of your own and customize different designs. We need a thin wire, a rock, pliers, a hook pair, and a chain. Make a loop using a piece of wire and place the rock in the loop. Tightly secure the rock by wrapping the wire around it a couple of times. Make sure to make a small loop on the top at the end. Pass the chain through the loop and fix the hook to the chain using pliers. With the help of pliers, fix each part of the hook set on either side of the chain to the jump rings. Make chains out of your favourite stone and carry them with you on special occasions. Check out the Rock DIY to Beautify Your Life video below:
6. ROCK MAT
Take an old plastic mat and start sticking the rocks to the mat. Stick the rocks to the mat using glue. Make sure you stick the rocks uniformly, and they cover the mat completely. There, it is our rock mat is ready. Place it at your doorstep and dry your legs before you enter your room.
7. PHOTO STAND ROCK DIY
A rock with a flat base can be used as support for a photo holder. Take a thin wire and wrap it around the rock twice. With the same wire, make a small circular loop at the other end such that there is a gap between two turns. The gap is enough to hold the photo in place. Check out the Rock DIY to Beautify Your Life video below:
8. ROCK VASE // PEBBLE BOWL
Take an empty tall plastic can. Paint it with white colour. Apply the hot glue gun uniformly and stick small rocks, and cover the tin completely. Place flowers in it and keep it on your side table.
Cover the inner part of the bowl with a plastic wrap. Arrange the flat pebbles along the inner surface of the bowl on the wrap. Cover the inner surface completely. Take super glue and stick the contact points of all the stones. Let it dry for some time. Later, slowly remove the pebble bowl from the bowl and use it. It can be used as a soap holder because when soaps are placed, the excess water is drained from the holes in between.
9. CANDLE PLATE ROCK DIY
Take some flat pebbles and heat them in the oven for a few minutes till it gets hot. Now try to draw concentric rings with different colours on the rock using crayons. The crayons melt as you draw on the hot surface. When we draw concentric circles, the colours blend in and create a beautiful design. Let it dry and place candles on it later. Check out the video for Rock DIY to Beautify Your Life below:
Aren’t these Rock DIY to Beautify Your Life great? Try these yourselves and have fun while doing. Just with basic things, we can make amazing decorations and art. Make sure you do not forget to collect more stones when you go out next time.
Materials You Need for Stone & Rock DIY Crafts
- Smooth stones or pebbles (washed and dried)
- Acrylic paints (long-lasting and vibrant)
- Paintbrushes (fine and medium sizes)
- Waterproof sealant or varnish
- Pencil or chalk for sketching designs
- Glue (for 3D crafts)
- Decorative items (googly eyes, glitter, beads)
Step-by-Step Guide to Making Rock Crafts at Home
Step 1: Clean the Rocks
Wash the stones thoroughly to remove dirt and dust. Let them dry completely.
Step 2: Sketch Your Design
Use a pencil or chalk to lightly draw your design before painting.
Step 3: Paint the Base Layer
Apply a base coat and allow it to dry. This helps colours appear more vibrant.
Step 4: Add Details
Use fine brushes to add patterns, faces, or designs.
Step 5: Seal the Artwork
Apply a waterproof sealant to protect your design, especially for outdoor use.
Benefits of Stone Craft Activities for Kids
- Enhances creativity and imagination
- Improves hand-eye coordination
- Boosts concentration and patience
- Encourages eco-friendly crafting habits
- Promotes family bonding and teamwork
Safety Tips for Kids While Doing Rock Crafts
- Always supervise young children
- Use non-toxic, child-safe paints
- Avoid sharp or rough-edged stones
- Wash your hands after painting
- Work in a well-ventilated area
Related Craft Ideas You May Love
- Rock Painting Ideas for Beginners
- Garden Decoration Crafts using Recycled Materials
- Easy DIY Crafts for Kids at Home
- Nature-Based Craft Activities for Preschoolers
- Stone Craft Ideas for Kids
- Rock DIY Crafts
- Painted Rock Ideas
- Easy Stone Crafts at Home
- Rock Painting Ideas for Beginners
Why Stone & Rock DIY Crafts Are Perfect for Kids (Expert Guide)
Stone and rock DIY crafts are not just fun activities—they play a crucial role in developing creativity, fine motor skills, and patience in children. Crafting with natural materials like stones also encourages kids to connect with nature while exploring their artistic side.
According to art educators, hands-on crafts such as rock painting help improve focus, colour recognition, and problem-solving skills. These activities are especially beneficial for preschoolers and school-age children, as they combine learning with play in a meaningful way. Another major advantage of stone crafts is accessibility. Rocks are easy to find, eco-friendly, and budget-friendly, making them an ideal material for parents, teachers, and DIY enthusiasts.
FAQs
Q1. What are the best stones for rock crafts?
Answer: Smooth, flat stones are ideal for easy painting and better design results.
Q2. Which paint is best for stone crafts?
Answer: Acrylic paint works best because it is vibrant, durable, and water-resistant.
Q3. Are rock crafts safe for kids?
Answer: Yes, as long as non-toxic materials are used and adult supervision is provided.
Q4. How do you make rock paintings last longer?
Answer: Seal the painted rocks with a waterproof varnish to protect them from damage.
Q5. Where can I find stones for DIY crafts?
Answer: You can collect stones from gardens, beaches, or purchase them from craft stores.
Stone and rock DIY crafts are a perfect blend of creativity, learning, and fun. With minimal materials and endless design possibilities, these crafts are ideal for kids, beginners, and even adults looking for relaxing activities. Start with simple designs and gradually experiment with more creative ideas. Whether for home decor, gifts, or educational purposes, rock crafts are a timeless and rewarding DIY activity. Stay updated with our newest content—join our Telegram group today! Don’t forget to follow us on YouTube & Facebook for creative art and craft tutorials, fun ideas, and much more.
Reviewed By Jatin
Read More:
- Easy Flower Painted Rock Ideas For Kids
- Cute Monster Painted Rock Crafts
- Honeybee Painted Rock Ideas
- Handmade Rainbow Painted Rock Ideas
- Beautiful Owl Rock Painting Ideas