


Kids Activities
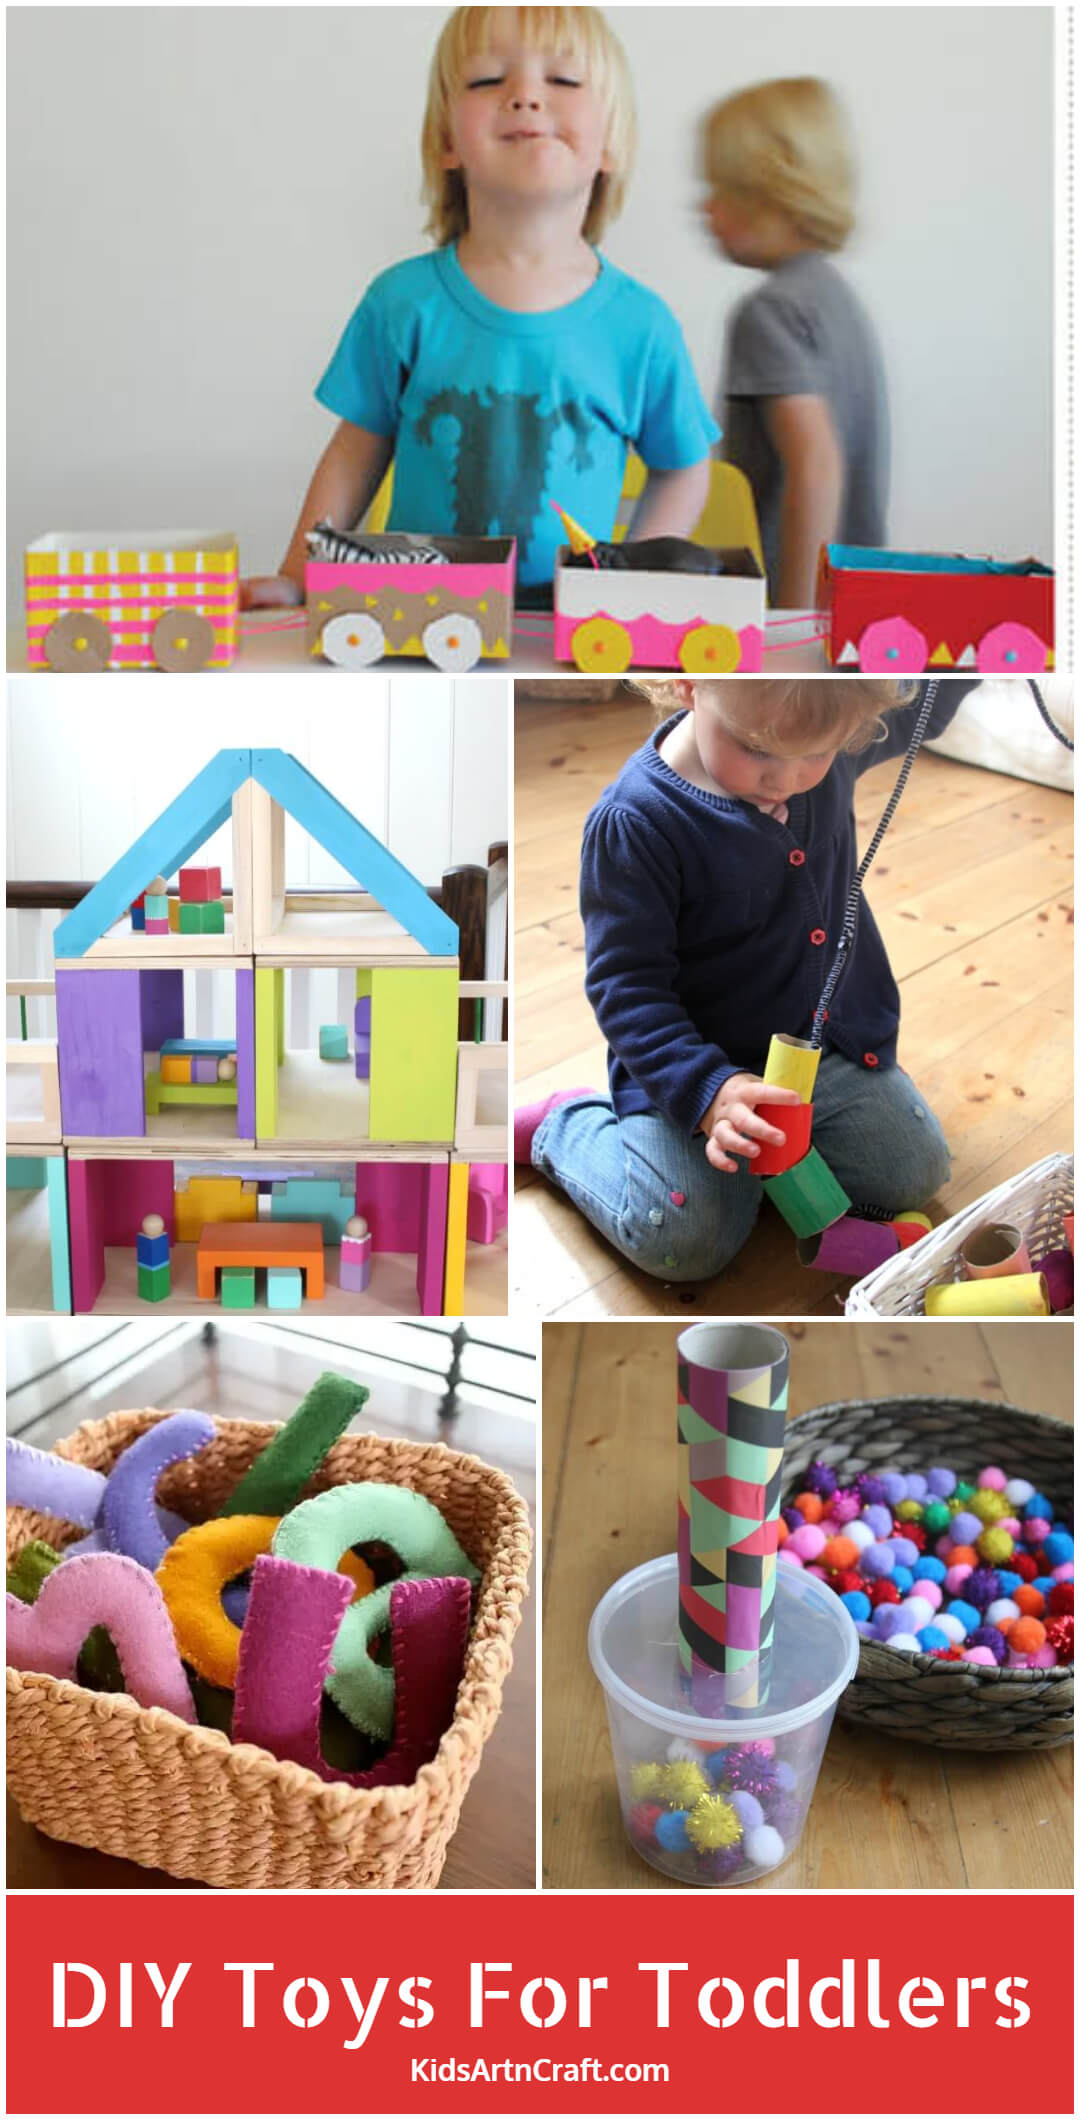
DIY Fine Motor Toys For Toddlers

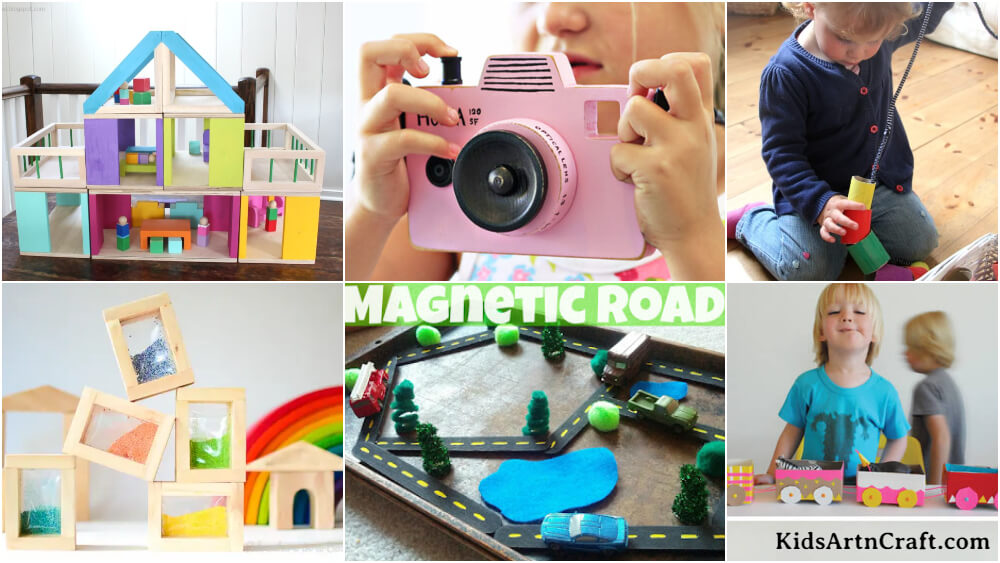
Create fun and engaging DIY fine motor toys for toddlers! Boost their skills with simple, hands-on activities using everyday materials for learning and play.
If you’re searching for DIY toys for toddlers for kids to do at home, you’re in the right place! Keep your learning spirit alive with our curated list of DIY toys for toddlers like easy fine motor skill rolling toys, tin can drums, a princess castle from a shoebox, DIY easy-to-make fun stacking rings, water beads, and rainbow sand blocks. These ideas are suitable for toddlers, preschoolers, and kindergarteners.
Best DIY Fine Motor Toys For 2-3-Year-Old Kids
Read More: 15 Beautiful Flower Crafts for Kids
DIY Easy Toys For Babies & Toddlers
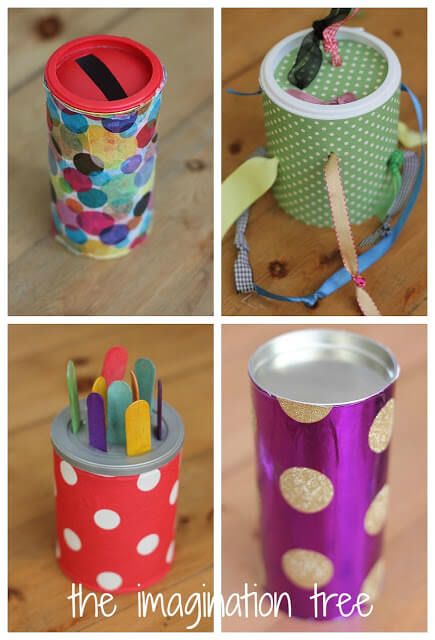
Image Source/Tutorial: The Imagination Tree
Materials required:
- Empty Canister
- Gift Wrapping
- Wrapping Paper
- Ribbon
- Ice Cream Sticks
- Knife
- Painting Color And Brushes
Take the 4 empty canisters and wrap them with colored wrapping paper and gift wrapping paper. Then take a knife and make a hole on top of one canister and put a colorful ice cream stick on it. Make another hole in another canister box, and make a hole on the top and sides of it. Insert the ribbon inside the empty canister. Now it’s your turn, how do you decorate the canister? Show your creativity, make a toy for a child, and ask your child to make this type of toy.
Simple Monster Munch Fine Motor Game For Kids
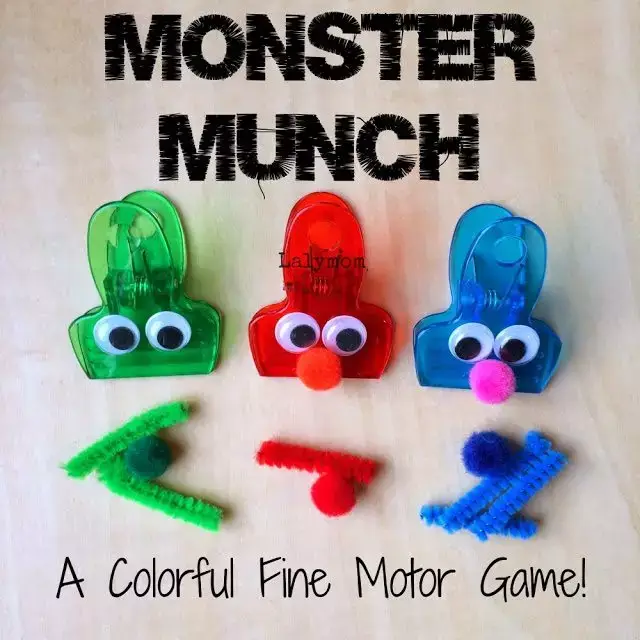
Image Source/Tutorial: Lalymom Fun Fit Family
Materials required:
- Pin
- Matching Pom-Pom
- Fuzzy Sticks
- Hot Glue
- Googly Eye
Take a 3 color pin and glue the same pom-pom for a nose. Now take a Googly eye and glue it on all the pins. Now attach the fuzzy sticks to the pin on the side of it. This is an inexpensive and easy-to-do activity that is ready in just 5 min.
How To Make DIY Fine Motor Toys For 2-year-old Baby
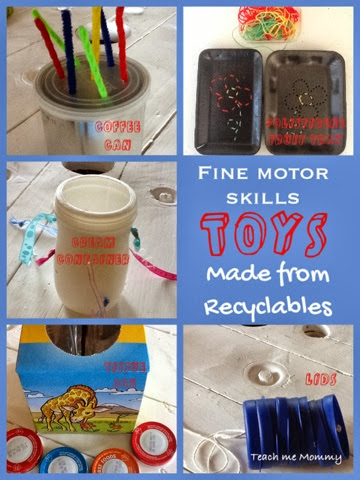
Materials required:
- Pipe Cleaner
- Empty Coffee Container
- Lid
To make this fine motor toy for babies. As you can see in the first image, take the coffee container, make a hole on top of the container, put the colorful pipe cleaner inside, and play with it. We can make it using recycled materials and made in just 5 minutes. For doing more such activity, you can see the above image and try this activity on your own. All this activity you can do in 5 min by using recycling material.
Easy To Make Cardboard Fine Motor Dashboard
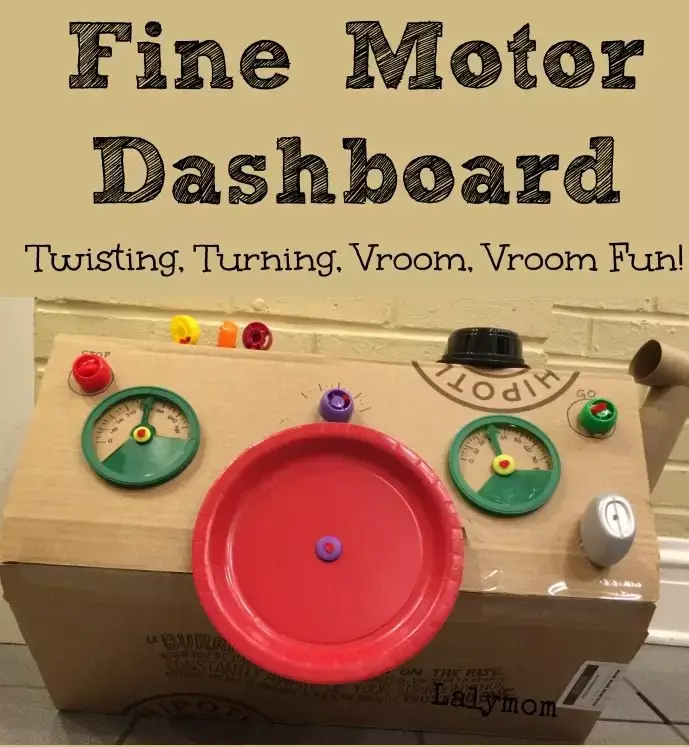
Image Source/Tutorial: Lalymom Fun Fit Family
Materials required:
- Plastic Lid
- Paper Plate
- Pouch Cap
- Cardboard Box
- Hot Glue Gun
- Toilet Paper
- Scissor
- Empty Bottle
To create this fine motor dashboard, take a large cardboard. Now by using a recycling material like a paper plate pouch cap, paste, this is done on the cardboard by using a hot glue gun. Then take a toilet paper insert a paper punch inside it, and cut the circle. Now remove the wrap, make a hole in the cardboard and fit the neck of the bottle. Your fine motor dashboard is ready in just 25-30 min. This is twisting, turning, and vroom fun. You can also ask your child to do this on their own.
Simple Pincer & Fine Motor Birds Game Use With Egg carton
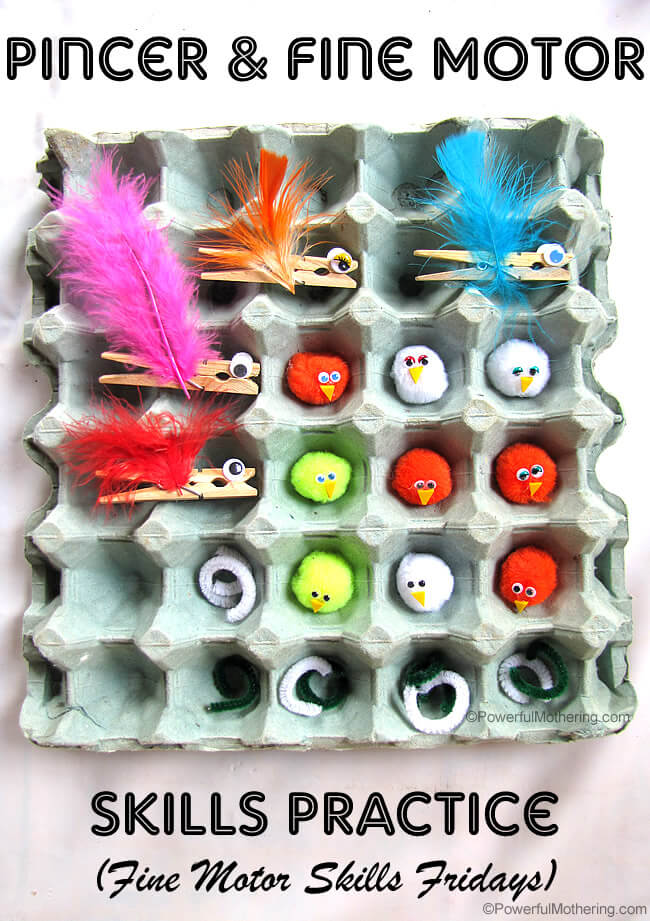
Image Source/Tutorial: Powerful Mothering
Materials required:
- Egg Tray
- Permanent Marker
- Clothespins
- Easter Chicken
- Paper
- Glue
For this activity, take an egg tray and put easter chickens in the tray with different colors. Take a blank paper, make a googly eye and attach it to the clothespin. Now take a fur and stick it to the clothespin. Then put all these items in the egg tray and enjoy your activity. We use this item by using budget-friendly materials.
DIY Fine Motor Word Wheels For Kids
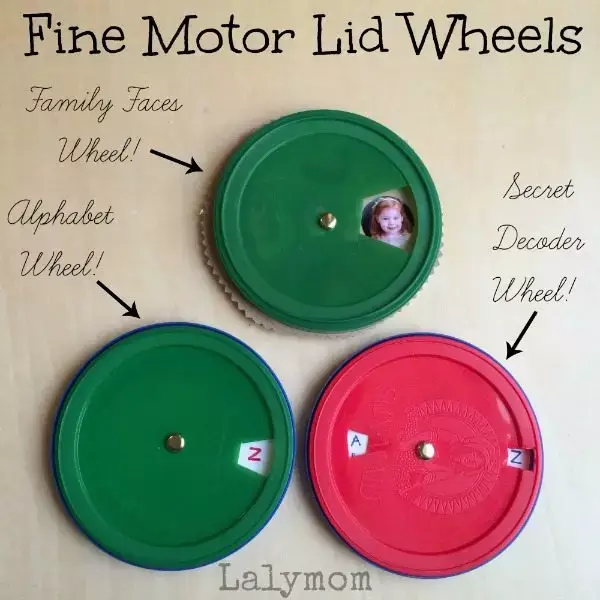
Image Source/Tutorial: Lalymom Fun Fit Family
Materials required:
- Plastic Lid
- Cardstock Or Cardboard
- Box Cutter
- Photo
- Scissor
- Tape
Take the lid, lay it down, and cut the square hole where you put the image or alphabet. Now take the cardboard and assemble the photos and letters on it. Then make a hole in the center of the cardboard and lid. Attach the cardboard inside the lid by using a hot glue gun. Once the glue is dry and resembles it. Your motor word wheel is ready in just 15 min. This is an inexpensive and simple activity that you can also try at your home.
Cardboard Space Shuttle Homemade Toys For 2-Year-Old Kids
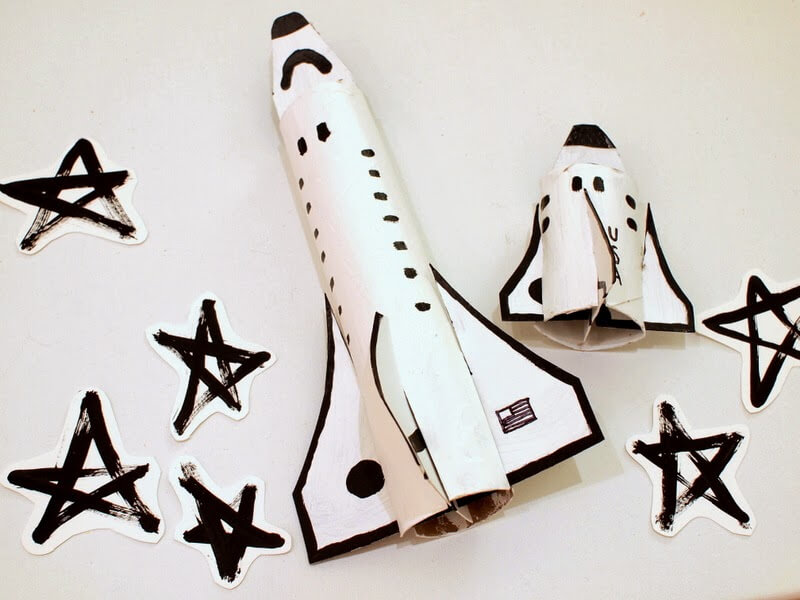
Materials required:
- Cardboard Paper Towel Roll
- Templet
- Cereal Box
- Scissor
- Pen
- Painting Color
- Paintbrush
- Glue
- Permanent Marker
- Mod Podge
- Scrap Paper
- Sponge Brush
- Tray For Colors
Firstly, print the template, then cut the body and wings from the cardboard. After this cut 3 slices in a paper towel. Then slide the rubber piece. Once all the things are done systematically. Then coated Mod Podge for paint. After this, make a start by using the place paper and use black paint. Your cardboard spacecraft is ready in just 20 min. It is easy to do a homemade craft
DIY Toys for 1-Year-Old Kid Recycled Little Cars
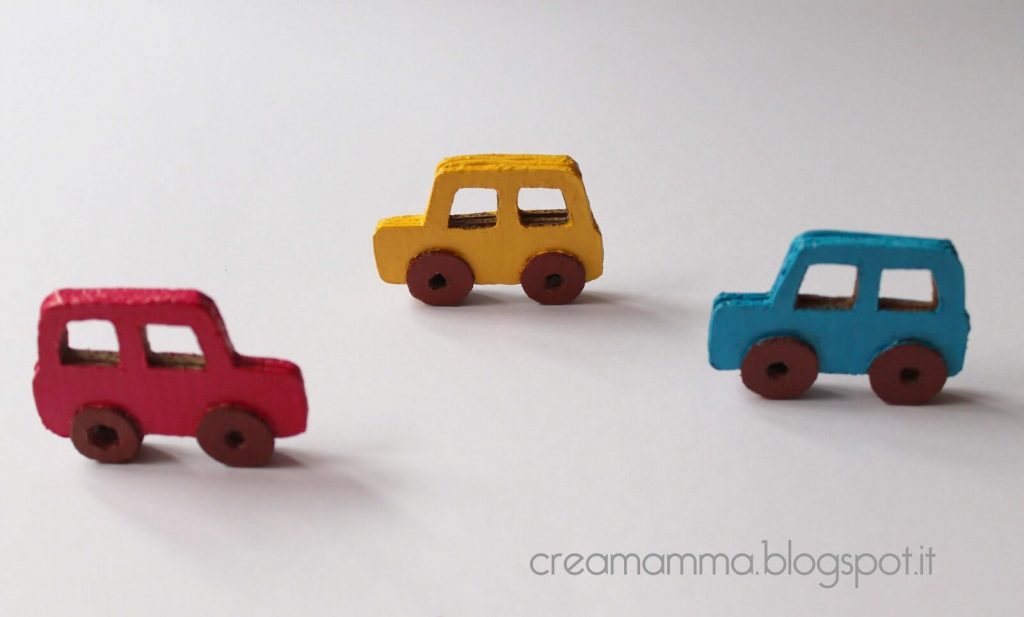
Image Source/Tutorial: Crea Mamma
To make this toy a recycled car. Materials that are required are: cardboard, scissors, acrylic paint, and glue. Cut the 6 pieces of cardboard into the shape of the car. Attach the two pieces by applying glue and dry them for half an hour. Using the same method of making a car and applying glue to it, make the wheel of the car. Use the acrylic paint red, yellow, and blue, and paint it on all three cars. Dry then for 15 min and 1 year, the baby this playing car is ready in just 45 min. This is also budget-friendly, or you can use materials that are available at your home.
Creative 3D Arctic Fox Craft For Toddlers
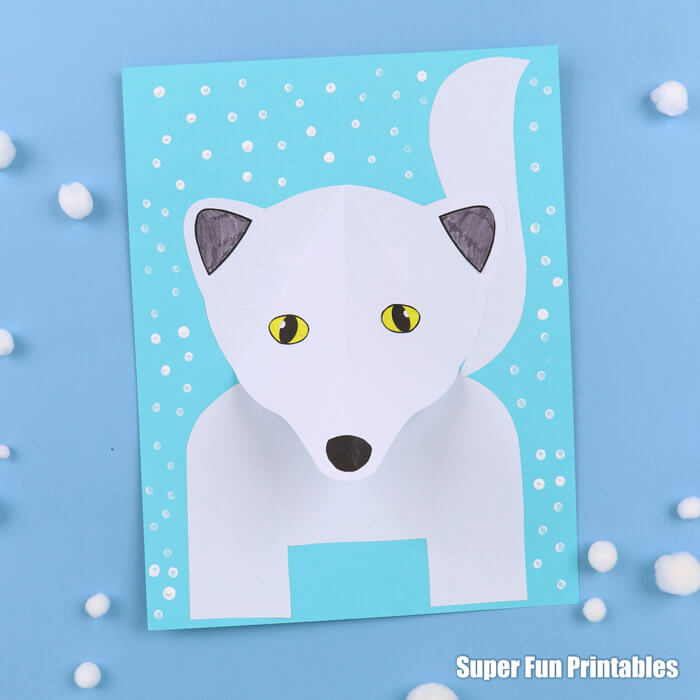
Image Source/Tutorial: The Craft Train
Materials required:
- Arctic Fox Template
- Cardstock
- Glue Sticks
- Scissor
- White Paint
- Cotton Bud
Print the template on the blank paper. Now fold the feature from the head shape and cut it from the black dot. Now fold the second dot line angle. Color the eye and the ear yellow and black respectively. Then cut the facial features. Now glue the torso shape and then the tail to the top right. Then take a cotton bud and make a white dot around the arctic fox so it looks like a snowfall all around.
How To Make DIY Toys At Home Animal Circus Train For Kids
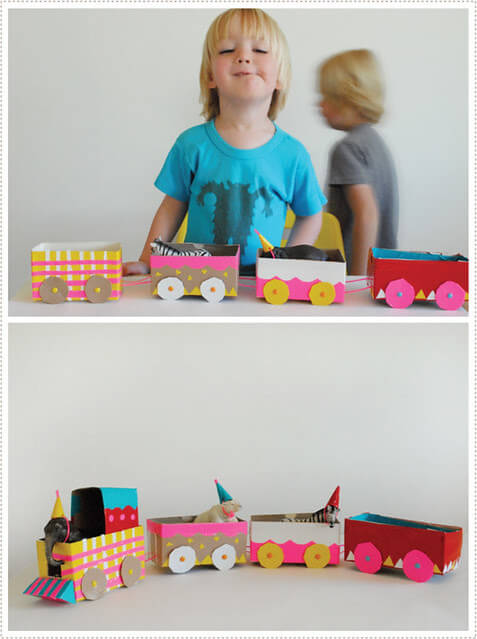
Image Source/Tutorial: Mer Mag
Materials required:
- Tea Box
- Duct Tape
- Acrylic Paint
- Toys
Take the tree box and paint the box with different colors and designs. Now use the duct tape and place it on the box. Then take a cardboard box and cut it with scissors to cover the top part of the engine. Then put the animal’s toy inside the box. Your simple and easy activity is ready in just 15 min. It is also a budget-friendly option for you all. Hope you like the creative idea for making a home animal circus train for kids to play.
Race Cars DIY Toys For Kids
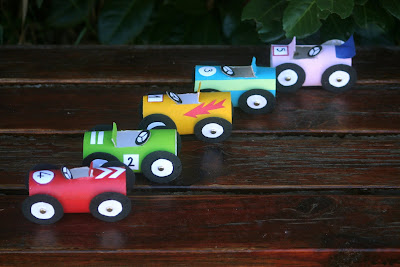
Image Source/Tutorial: Kiflies Levendula
Materials required:
- Toilet Paper Tube
- Acrylic Color
- Cardboard
To make this racing car for playing. Take a small toilet paper tube and color it with different colors. Now take a cardboard and cut a circle shape of equal size for the wheel. Your car is ready in just 5-10 min. This is very helpful to you. Kids also love to play with this handmade car and it is budget-friendly for you all.
Easy To Make Tin Can Drums For Kids
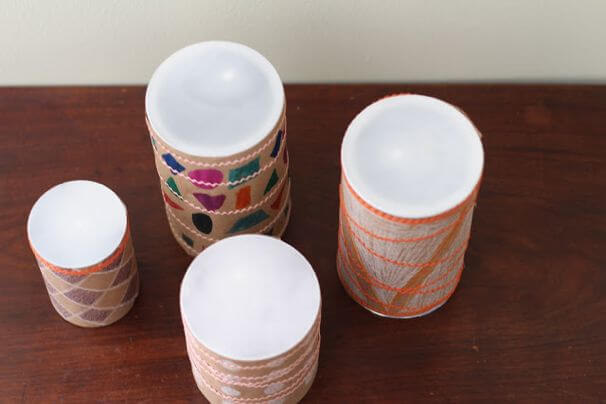
Image Source/Tutorial: (Cool) Progeny
Materials required:
- Balloon
- Tin Can
- Scissor
- Felt
- Orange Strip
To make this tin can drum. Firstly, take a white balloon and cut it from the top part. Now stretch the balloon and spread it tightly to the tin can. Now take a felt and cover it with a decorated style of felt using a strip on it. Your drum is ready to play with kids. It is very budget-friendly to you all. We can make this tin can drum in just 10 minutes.
Simple Animal Cardboard Dropbox For Kids
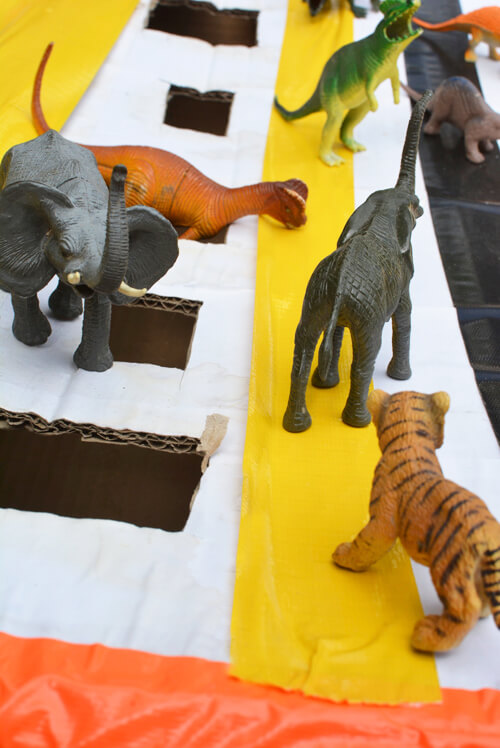
Image Source/Tutorial: Meri Cherry
Materials required:
- Cardboardbox
- Duct Tape
- Scissor Or Knife
- Toy Animals
To make a simple and easy cardboard box for animals. Take a cardboard box and cover the box with duct tape. Then take scissors or a knife to cut the box sides of the boxes into rectangular and square shapes, and also cut at the top of the cardboard. Now gather or collect the bunch of animals and drop the animals inside the cardboard box. Your cardboard dropbox is ready to play. It is budget-friendly for you all. You can play this game with your siblings or friends.
DIY Toys For 10-Year-Old Cardboard Sewing Machine
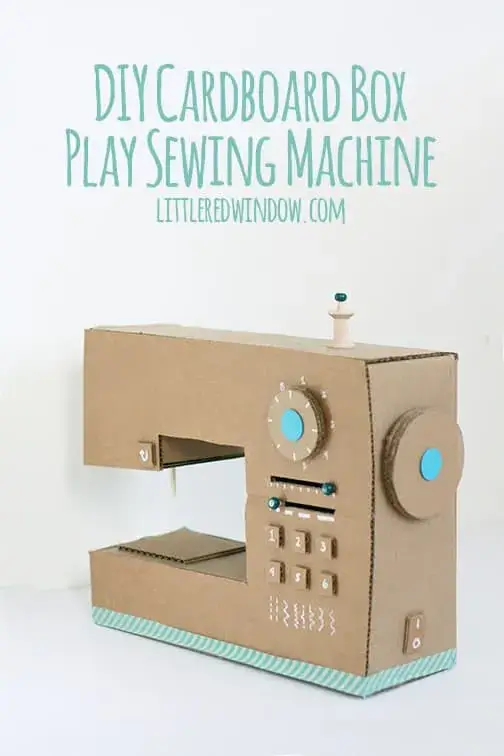
Image Source/Tutorial: Little Red Window
Materials required:
- Cardboard Box
- Hot Glue Gun
- Knife
- Scissor
- Ruler
- Paint Pen
- Wooden Dowel
- Regular Brads
To make this sewing cardboard. Make a mark on cardboard and cut it with a knife or scissors. Fold the side flag and secure it with the hot glue gun. For making a sewing machine, cut the strip of cardboard and use it to glue it inside the box. For a needle, you can use a half of a wooden dowel of a sewing machine. Lastly, add a pointer and flywheel outside the sewing machine. Your machine is ready in just 15-20 min. It is also budget-friendly to you all.
Easy To Make Princess Castles From Shoebox
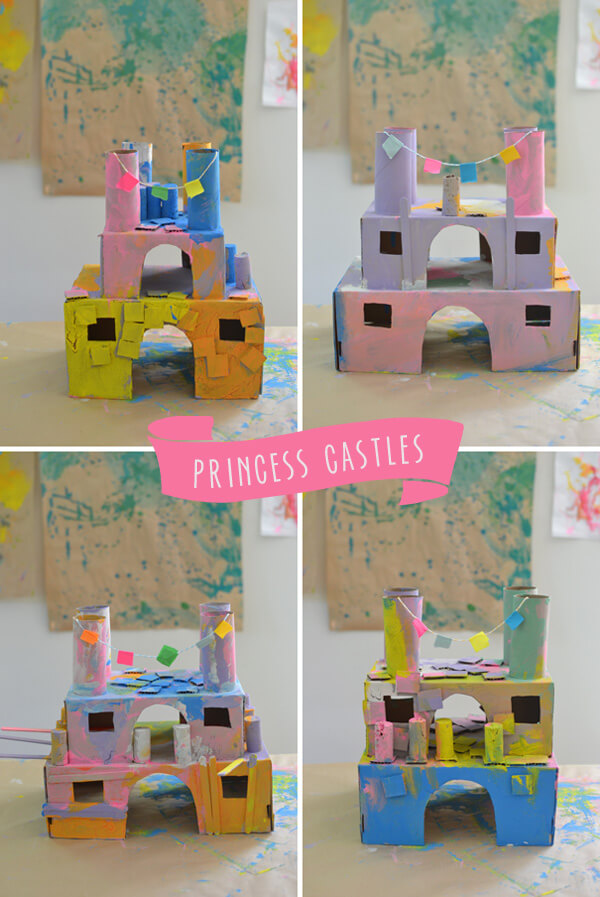
Image Source/Tutorial: Art Bar
Materials required:
- Shoe Boxes Of Different Sizes
- Scissor
- Knife
- Glue
- Recycling Material
- Pop Sticks
- Tempra Paint
- Painting Brush
- String
- Color Tape
- Toilet Paper Roll
- Thread
Take the same shape and sizes of pieces of cardboard and tape them. Glue the small box to a large shoe box and dry for 5-6 hours. On top glue the 4 toilet paper rolls. Once the glue dries, then color the castle. Color the flag, glue it with thread, and put it on the top of it. The princess castle is ready. This is an inexpensive but intersecting activity that girls can do.
DIY Cute Freeze water beads in balloons For Babies
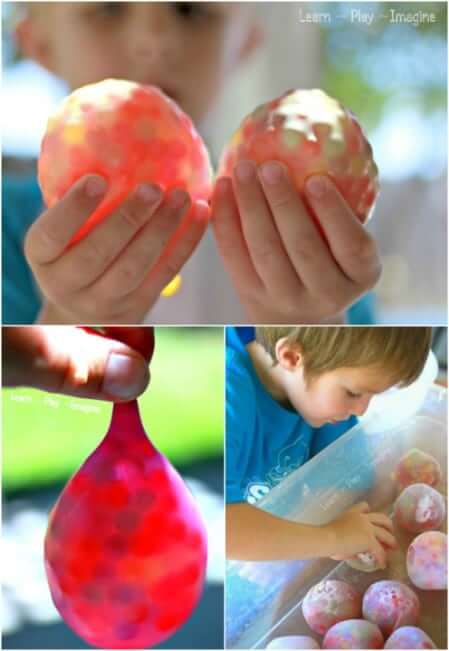
Image Source/Tutorial: Learn to play and imagine
Materials required:
- Water Balloon
- Pumper
- Water Beads
- Funnel
- Scissor
Attach the water balloon to the funnel and put water beads inside it. Then fill the balloon with water and tie a knot on the balloon. Once the water beads expanded inside the balloon. Then put the water balloon in a big freezer to get the water frozen. Then once the water balloon gets frozen, take a scissors and cut the balloon. Your cute water beads balloon is ready to play. It takes half an hour to do such an easy and simple activity.
Easy To Make Water Beads For Boys
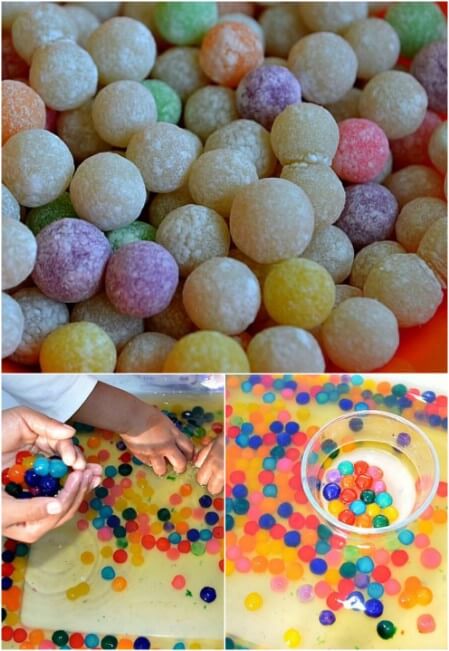
Image Source/Tutorial: Kids Play Box
Materials required
- Boba Beads
- Water
- Food Color
- Container
- Tray
Take boba beads, put them into the container and boil them until they come to the surface. Pour the beads into the strainer and wash with some cold water. To color it your own, add some 2-3 drops of different food colors in the beads and set them for 15-20 min. Again rinse the cold water in it until the beads get clean. Then put all the beads into the tray and let them dry for half an hour. After half an hour, these water or boba beads get ready and you can play with them. Boys enjoy this bead activity and play with it.
DIY Sensory Toys For Toddlers Play With Ice Cubes
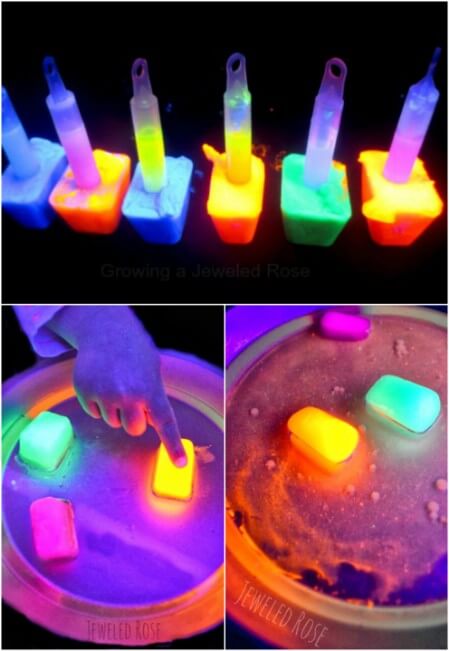
Image Source/Tutorial: Play Learn Grow
Materials required:
- Baby Or Vegetable Oil
- Ice Cube Tray
- Water
- Fluorescent Paint
- Glow In The Dark
- Glow In The Dark
To make a glowing or colored ice cube. We use glow-in-the-dark and fluorescent paint to give a variety of colors. Then add some amount of glowing paint in the ice cube tray. fill the hot water and mix the water well. Then put the ice cube tray in the freezer for 6-7 hr. Then fill the oil in the pan and place the ice in it. Your ice cube game is ready to play in a dark room, so it looks colorful. Hope you like this new idea and the creativity of the ice cube.
DIY Easy To Play with scented ice and water For Kids

Image Source/Tutorial: Learn Play Imagine
Materials required:
- Kool-Aid
- Ice Cube Tray
- Water
- Bowl
Take an ice cube tray and put Kool-Aid water in it. I use red, white, and blue kool. Now fill the bowl with some water and put ice cubes in the water for a minute. The scooping, pouring, and transferring of the ice cube until it gets melted. This activity is done using a home-available material, they’re easily available. Kids enjoy this activity while doing it.
Easy To Create “Princess Snot.” For Children
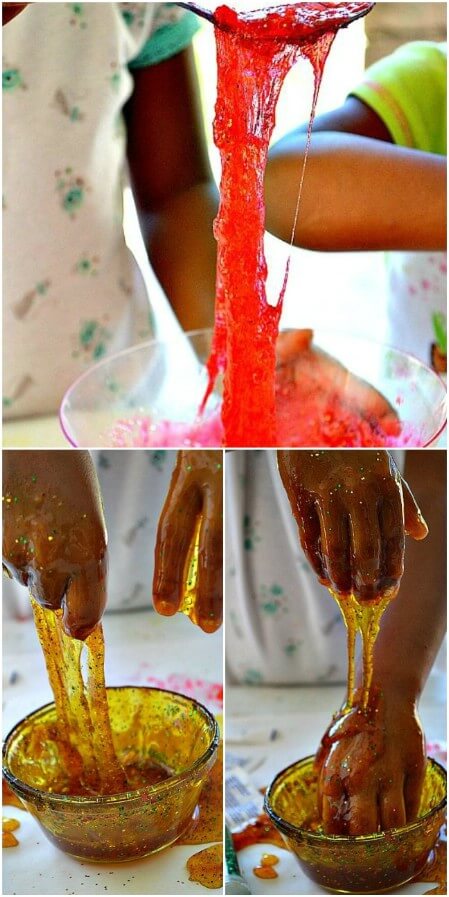
Image Source/Tutorial: Kids Play Box
Materials required:
- Boiling Water
- Corn Syrup
- Fall Scents
- Food Color
- Glitter
Take an unflavoured gelatin into the colored water and let them set in the fridge for 5-10 min until they do not get sticky. Once it gets soft, then we add some corn syrup. It gets a perfect score. Increase the gelatin so it gets a perfect consistency and looks good. Lately, we can add some glitter for shine. This is an easy-to-do activity and can be done in 10 min. Hope you like the idea of creating this beautiful princess snot for your princess.
Easy To Play What in the Balloons
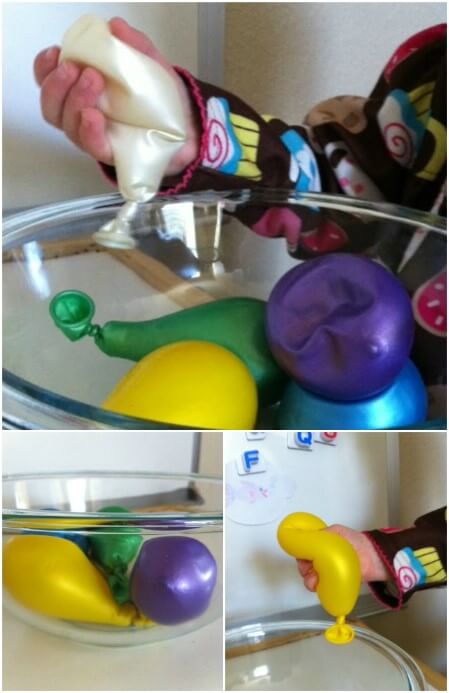
Image Source/Tutorial: Tot Treasures North Bay
Materials required:
- One Big Bowl
- Colorful Balloons
- Water
- Coffee Bean
- Floor
- Baby Powder
- Rice
- Hair Gel, Etc
This is one of the easiest activities. Take a bowl and put some water in it. Then take a balloon and put different material in each balloon, as described above, or you can put any material of your choice too. Then put the balloon in the water. After this, ask your child to take a balloon and feel what is in the balloon. This is the easiest but intersecting activity that you can do and ask your child to do. Also, it is a budget-friendly activity.
DIY Playing With the Bean Bags For Kids
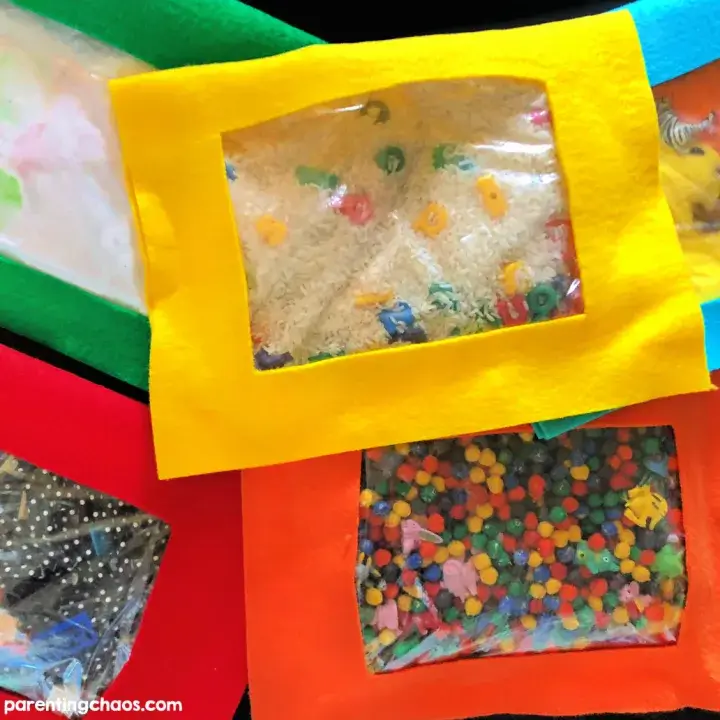
Image Source/Tutorial: Parenting Chaos
Materials required:
- Colorful Felt
- Pieces Of Cardboard
- White Pencil
- Highlighter
- Velcro
- Ziplock Bag
- Hot Glue
- Sensory Filler
- Toys
- Scissor
Now to make this bean bag, take the colorful felt and fold it to make a square, after this take a piece of cardboard and make a frame. Attach the felt to the cardboard. Now use a scissor to make a hole from the middle of the square. Now use the white hot glue in the square frame boundary and dry for a minute. Then take velcro and peel around the edges of the square. Lastly, add the bag with sensory filler and toys in the bean bag. Your colorful and beautiful bean bag is ready in just 15 min. Hope you like the creativity and idea.
Easy To Make Rainbow Sand Blocks For Preschoolers
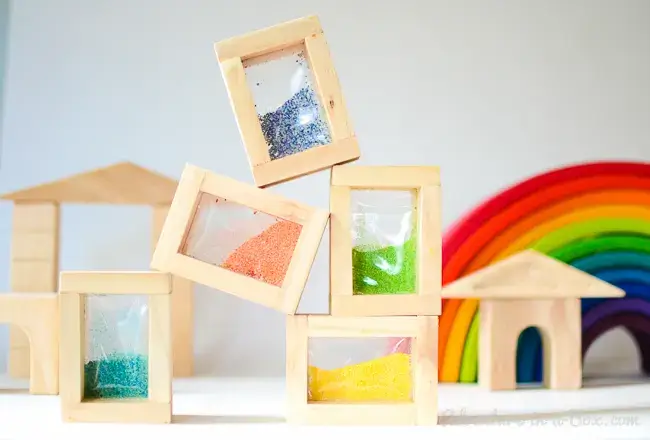
Image Source/Tutorial: Adventure In A Box
Materials required:
- Cream Of Wheat
- Wood Glue
- Food Coloring
- Reasonable Bag
- Puncture
- Wooden Blocks
Take 8 wooden blocks and one plastic bag. Then glue the three boxes from the open-ended. Let them dry for a minute and dye a cream of wheat on them. Add the color and a ream of wheat into the plastic bag and shake it out. Now glue the plastic bag and the zip lock bag, which needs to set from the open-ended, and let them dry for a while. Now fill the half bag with cream of wheat and seal it. Make them and give a uniform finish or touch to them. Your rainbow and sand block is ready in just 15 min.
DIY How To Make Floam Slime Recipe For Children
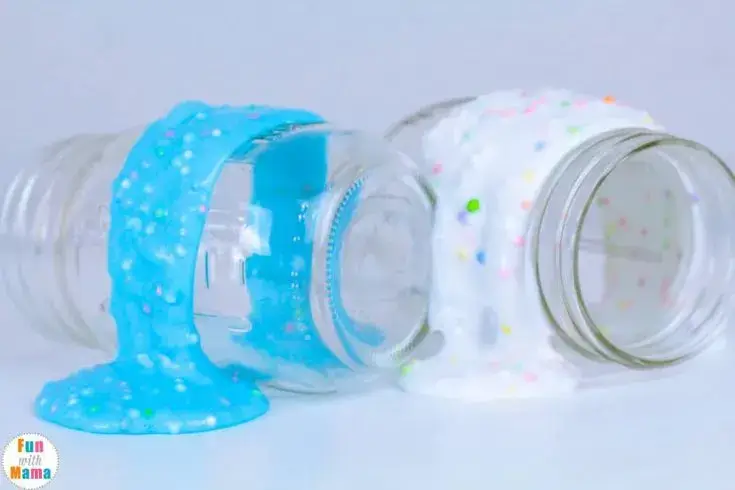
Image Source/Tutorial: Fun With Mama
Materials required:
- Blue Food Color
- Glue
- White Glue
- Confetti Styrofoam Balls
- Glass Jar Medium-Sized
- 2 Bowls
- Spoon
To make this foam recipe for children. Take two glass bowls and add three tablespoons of confetti styrofoam balls, white glue, and blue food coloring with glue in two bowls. Then add Magic Slim to the mixture. Then keep adding the slim until it gets sticky. Lastly, your slime is ready, you can put your slime in the top of the glass jar and show your kid. Hope you like the idea and creativity of slime. It took 15 min maximum.
DIY Sensory Cardboard Car Toys For Kids
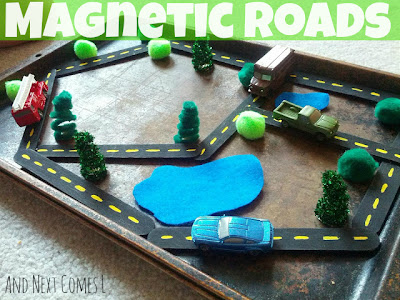
Image Source/Tutorial: And Next Comes L
Materials required:
- 10 Roadways
- Light And Dark Green Pom-Pom
- Felt Water Features
- Trees
- Four-Wheel Vehicles
- Acrylic Paint
- Hot Glue Gun
- Cardboard
Take a roadway strip, paint the black acrylic paint, and let the paint dry for 10 min. Then make a yellow line in the road and add hot hot from the back. Then also add a hot glue gun to a smaller magnet and a pom-pom. Felt the water features and the pipe cleaner tree. Now put all these items in the cardboard and your sensory cardboard car is ready. Kids enjoy this car activity. It takes 30 minutes to complete this wonderful cardboard car.
DIY Sensory Tunnel For Kids Step-By-Step
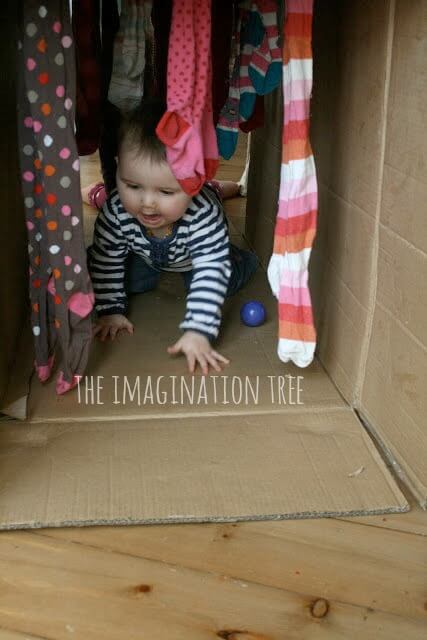
Image Source/Tutorial: The Imagination Tree
Materials required:
- Baby Ball
- Long Fridge Cardboard
- Various Sizes Of Shocks
- Scissor
To start this activity, take a cardboard box and make holes in the top of the cardboard. After this, take various sizes of shocks and attach them to the hole so that they sew. Now roll the baby ball in the cardboard and ask your baby child to take the baby. It looks like a sensory tunnel for small babies and kids. Kids enjoy this activity. Hope you like the idea for making this tunnel for kids and playing with them. It took 10 min to make this baby tunnel.
How To Make A Wooden Camera for Kids
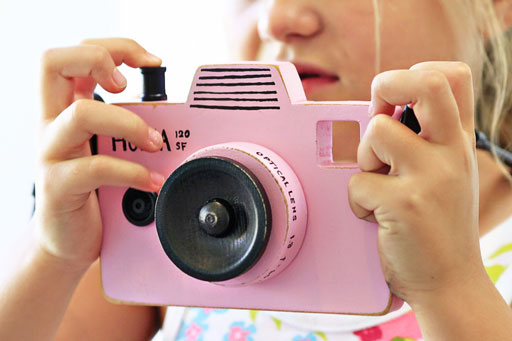
Image Source/Tutorial: Lil Blue Boo.
Materials required:
- Scrap Pieces Of Wood
- Pencil
- Camera
- Nail File
- Driller
- Painting Color
- Black-Acid Paint
- Leather Belt
- Marker
- Cutter
Take a scrap piece of wood and a pencil and mark the shape of the camera with a hole. After this, take a woodcutter’s mark, cut the wooden scrap piece, and drill the hole in it where needed. Then paint it with a pink color and add some black acid paint where it is needed. Let them dry for 5 min and write something with a marker on it. Then take a thin leather belt cut into equal size and attach it to the camera. Your wooden camera for kids is ready. You can also ask your child to make this camera at home. Also, it is budget-friendly, no extra material is required
Easy To Develop a Wooden Dollhouse For Kids
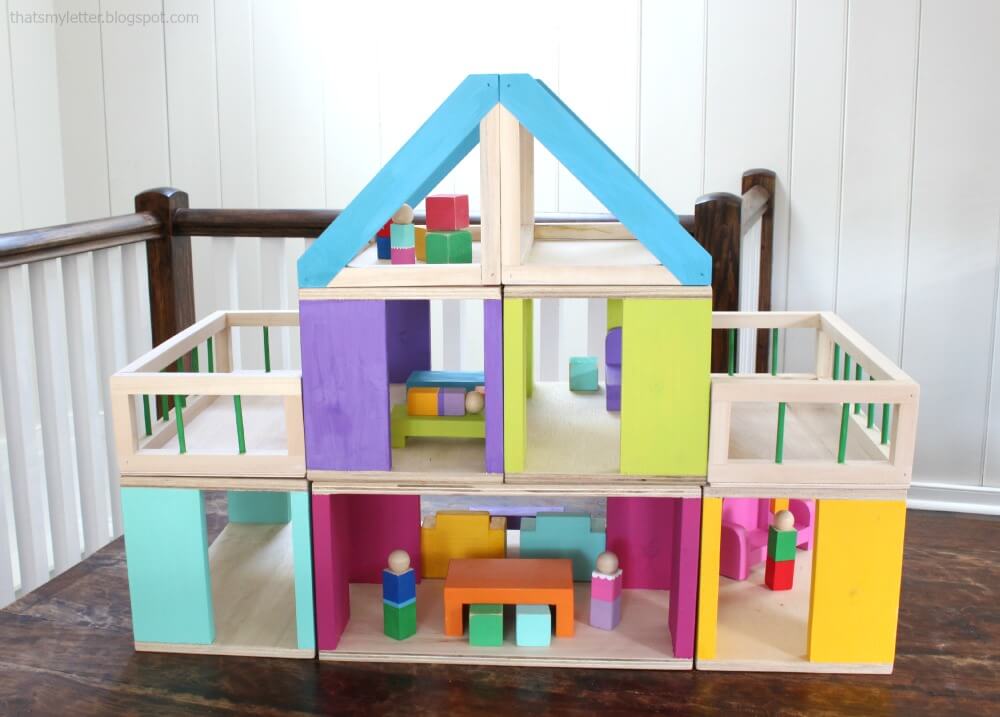
Image Source/Tutorial: Ana White
Materials required:
- Acrylic Paint
- Wood
- Molding
- Boards
- Wood Dowel
- Sandpaper
- Wood Finish
- Hot Glue Gun
- Nail Finish
- Tape Measure
- Pencil
- Safety Glasses
- Ear Protection
- Meter And Table Saw
Take a wooden board and make a first floor with a hot glue gun in the floor. Then take a drill machine and make a railing. Then nail glue on the top of the roof. Fill the holes with a roof drill and let them dry. Then apply wood finish where it is needed and dry for a minute. Lastly, remove the sandpaper from the surface. And paint the wood where you want to as per your choice. Your easy-to-develop wood house is ready in 20-25 minutes. It is budget-friendly to make, and a baby girl can play with this doll house.
Easy To Make A Wooden Scooter DIY Toddler Toys
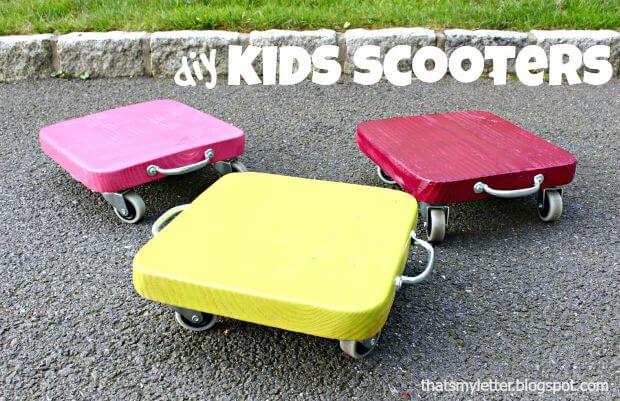
Image Source/Tutorial: Pretty Handy Girl
Materials required:
- Rotating Caster
- Handle Jigsaw
- Sandpaper
- Drill
- Tapping Screw
- Measuring Tape
- Pencil
- Curved Object
- Paint
- Wood Finish
- Wood
- Wheels
Take a wood piece and mark the corner with a pencil to make it curve. After trimming the wooden piece with a jigsaw, paint the board with the color of your choice. Now add the wheels by tapping the screw and attach the handle on both sides. Your wooden scooter is ready. Hope you like this activity and that the kids love the ride while making this wooden scooter.
Easy To Make Wood Covered Blocks Puzzle For Toddlers
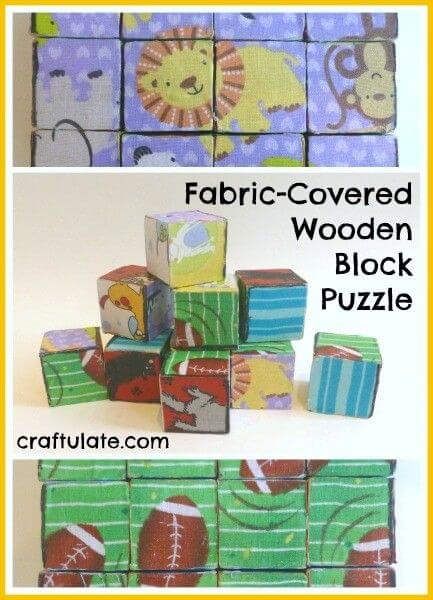
Image Source/Tutorial: Craftulate
Materials required:
- Wooden Blocks
- 6 different Fabrics For Each Side
- Scissor
- Hot Glue
- Mod Podge
Take a wooden block and 6 different fabrics for each block. Now cut the fabric of the same shape as the block and paste it into all sides or blocks. Now ask your child to play and solve this puzzle with wooden blocks. This is easy to make in 10-15 min, and also it is budget-friendly for you all.
DIY Toys For Toddlers
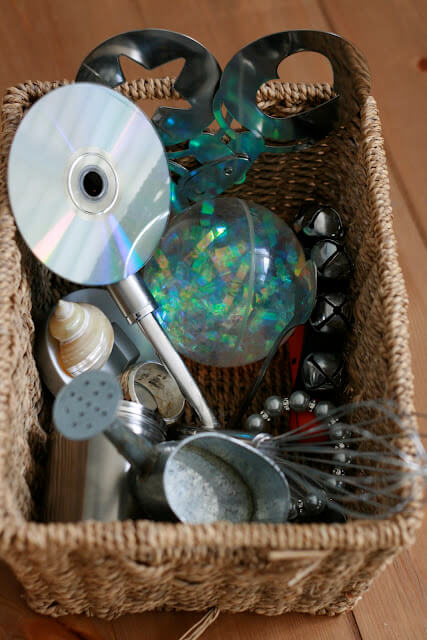
Image Source/Tutorial: The Imagination Tree
Materials required:
- Metal Whisk
- CD
- Sparkly Glitter Ball
- Mirror Ornaments
- Teaspoons
- Handbell
- Serving Spoons
- Shining Napkin Ring
- Shimmering Shell
- Bracelet
- Key
- Water Can
- Basket
This is a toy for toddlers to play with. Take a basket and put all this used and unused material inside the basket. You can play this activity by asking your child. For example: Tell your child to bring a sparkly glitter ball. By this, they understand the material and learn something new. This is an intersecting activity to play with a child. Hope you like the idea and also it is budget-friendly for you all.
Easy To Play Pom Pom Drop And Shoot Game Activity For Toddlers
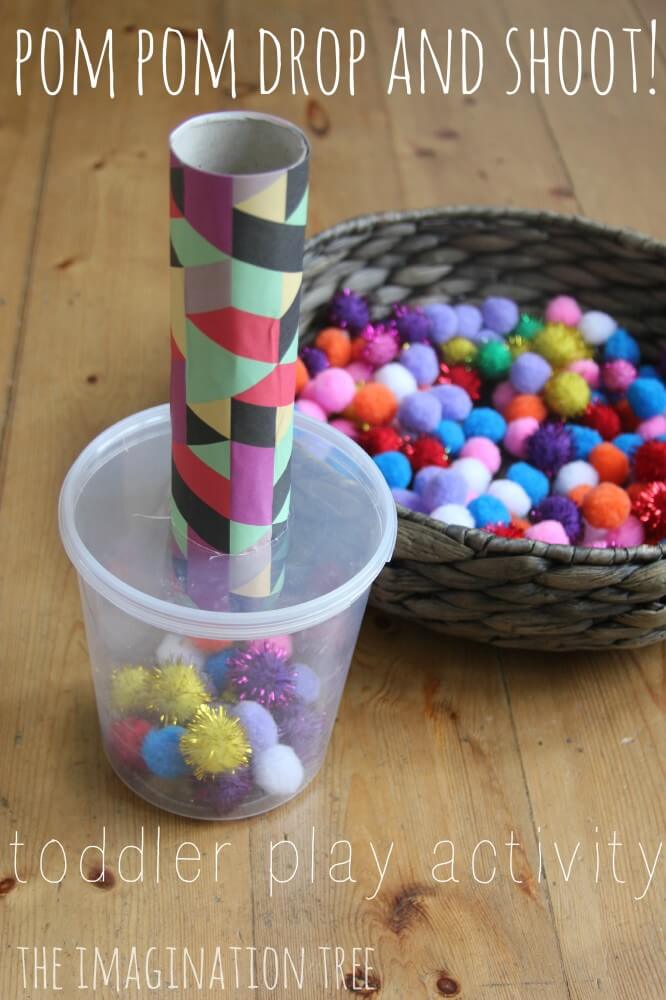
Image Source/Tutorial: The Imagination Tree
Materials required:
- Plastic Container
- Pom-Pom
- Wrapping Paper Tube
- Basket
It is an easy and simple activity for the kids to play. Take a basket and put all the pom-poms, including glitter pom-poms, in the basket. Now take a plastic container with a covered plastic and make a hole at the top of it. Now take a wrapping tube and fit the tube inside the plastic container. Now your activity is ready to play. Tell your child to make a shot of pom-pom into the container and enjoy this activity. This is budget-friendly for 2-7-year-old children to play this activity at home.
DIY Giant Threading And Stacking Beads For Kids
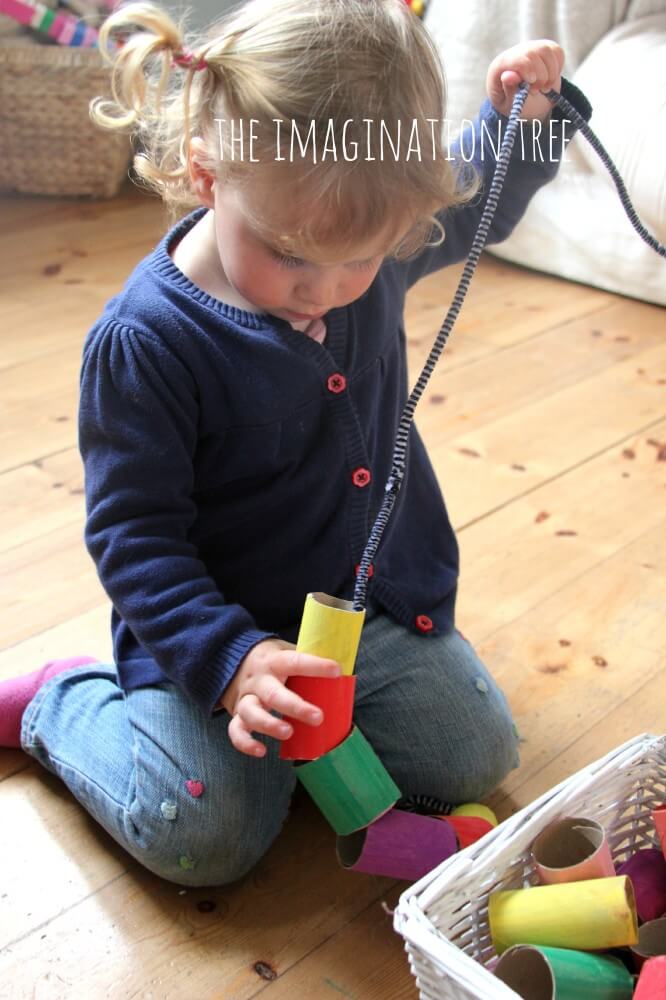
Image Source/Tutorial: The Imagination Tree
Materials required:
- Cardboard Box
- Acrylic Colors
- 4Pipes
Threading the piece of cardboard in the pipe. Firstly, take a round cardboard and cut it into the same pieces or the same sizes. Now, by using acrylic paint, paint the pieces of round cardboard into rainbow colors. Let them dry for 5-10 min. Now take the 4 pieces of pipe, insert the box into the pipe, and join the pipe from the last. It takes only 5 min to complete this activity it kids enjoy this activity while doing it.
Simple & Creative Toys With Recycled Water Bottles For Toddlers
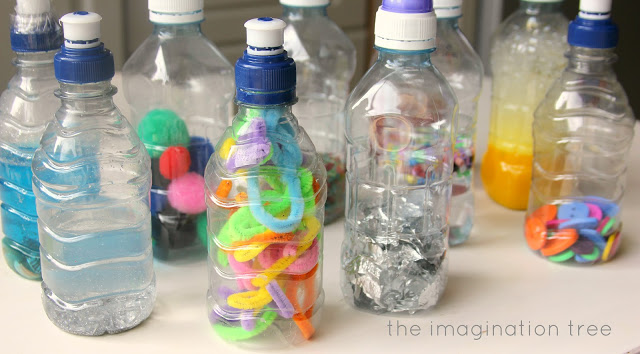
Image Source/Tutorial: The Imagination Tree
To do this, simple and easy creativity at home for your child to play and be happy by seeing. Collect 9 equal and same shapes and sizes of plastic recycling bottles. Once you collect, then place the different things inside each bottle like: foil paper pieces, rubber bands, water, yellow color liquid, buttons, pom-pom, etc., or another item which you would like to put as a seashell, etc. This is a fun activity for 7 months to 2-year-old kids, and they enjoy and do a happy dance.
DIY Easy To Make Fun Stacking Rings
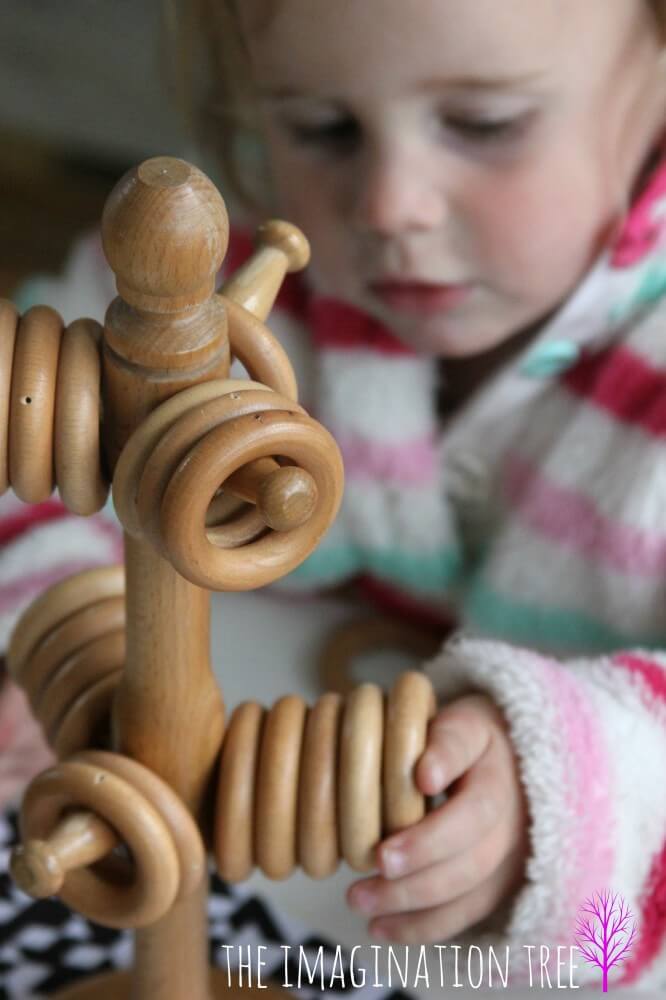
Image Source/Tutorial: The Imagination Tree
Materials required:
- Wood Curtain Rings
- Wood Tree
This is one of the easiest and simplest activities that small children of the 5-7 age group can play. Firstly, take wooden curtain rings and arrange them in 2-5 pairs in order respectively. After arranging it, then take a wooden tree and place the curtain rings into each, and your activity is completed. I hope kids really like this activity, you can also suggest and tell your kid to play. Also, it is budget-friendly or by using the home available material.
DIY Sorting And Dropping Color Pom Poms For Kids
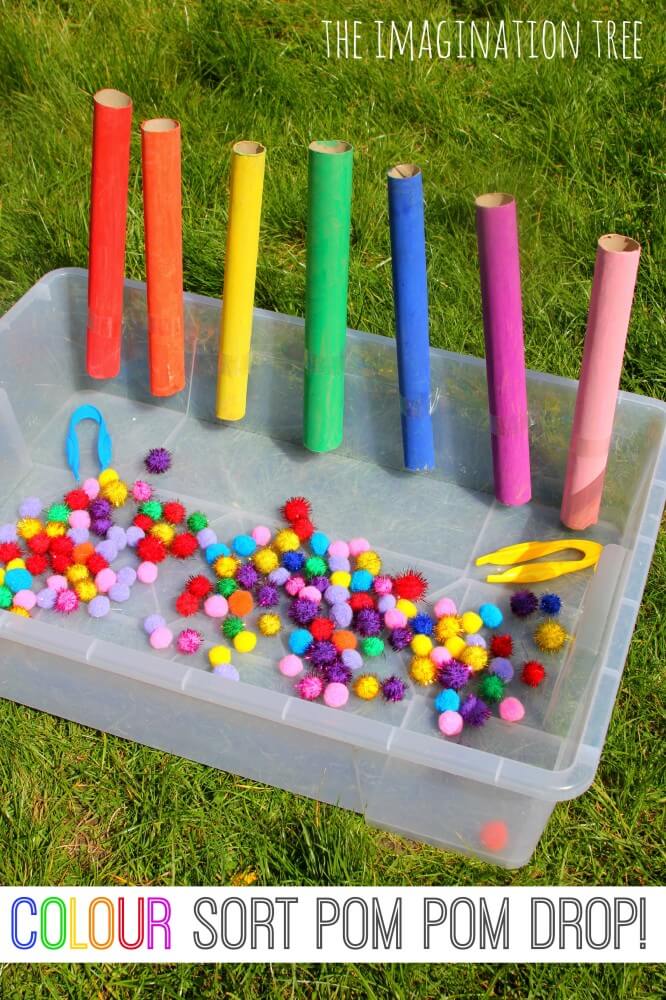
Image Source/Tutorial: The Imagination Tree
Materials required:
- Wrapping Paper Tube
- Painting Color
- Painting Brush
- Sparkle
- Colorful Pom-Pom
- Large Plastic Box
This activity is for learning kids to sort and drop the colors manually. Take the 7 wrapping tubes and paint the color in each tube so it looks like a rainbow, and make them dry for 15 min. Then put the tube, plain and sparkly pom-pom in the larger plastic box. Then ask your child to sort the color of the matching tube and drop it inside it. This is one of the simplest activities that you can ask your child to play with, and also learn and understand the color.
Easy To Develop Sculpture With Velcro Rollers For Kids

Image Source/Tutorial: The Imagination Tree
Materials required:
- Rolling
- Grasping
- Baby Grip
- Pincer Grasp
- Stacking
This is an easy-to-develop sculpture with a velcro hair roller for kids. We take pink and black rollers of different sizes. Push the pink hair roller into the round craft cardboard. Use the baby grip on the hair roller so that the baby can easily put the materials inside it. And your hair roller is ready to play. It is made by a budget-friendly material in 5 minutes.
Easy To Make A Simple Light Box For Babies
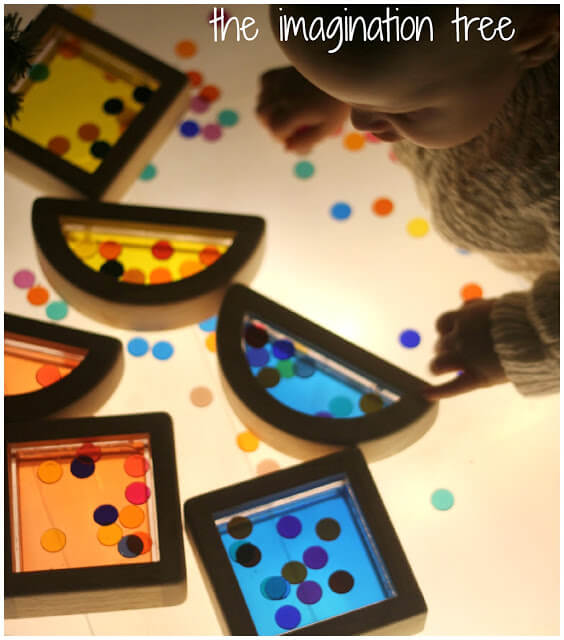
Image Source/Tutorial: The Imagination Tree
Materials required:
- Non-Transparent Box
- String Of Christmas Lights
- Tracing Paper
- Sticky Tape
- Bingo Chips
To make this simple and easy light box for kids. Take a transparent box and insert the tracing sheet paper in the box. Then add the Christmas lights in the box. Once done, add colorful bingo chips to the box. Only by using these few items did babies of the age group 2-5 years old love to play with them. Kids like this light box and have fun with this.
Simple Velcro Lids Set Of DIY Toddler Toys For Kids
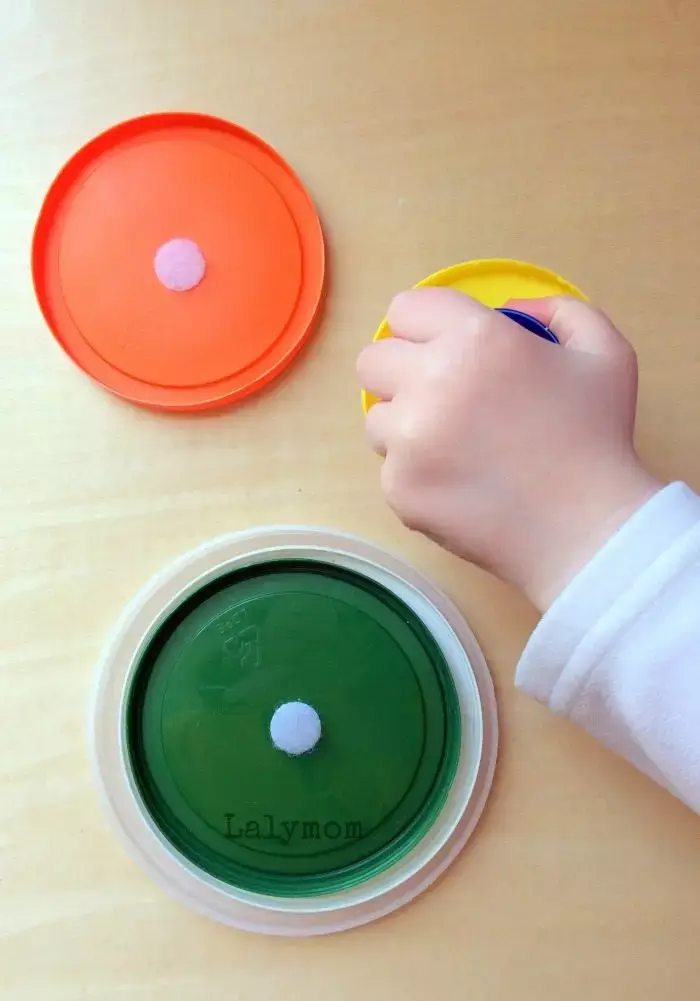
Image Source/Tutorial: Lalymom Fun Fit Family
Materials required:
- Recycling Lids
- Velcro Dots
Now to start this activity, place the velcro dots of the rough hook lid in the top and the soft part of the bottom center of every lid. Once this is done, then place all this in the felt. This is a budget-friendly activity for all of you. There are many ways to do a velcro activity in different styles, but this is one of the easiest ways to do this activity and kids can easily make this in 5 minutes.
DIY Educational Toys For Kids
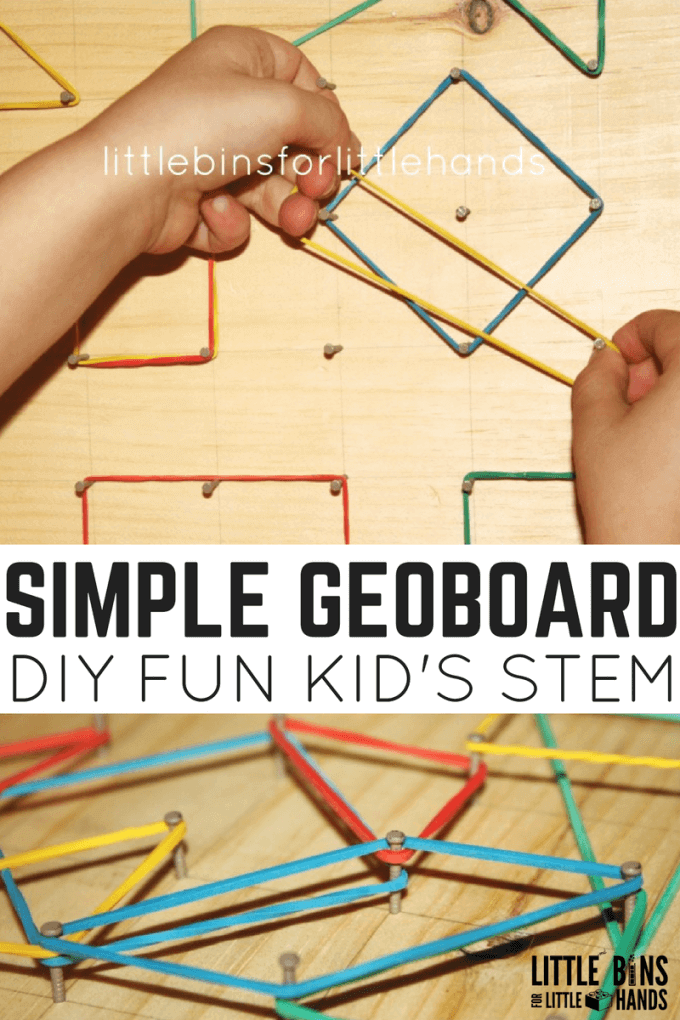
Image Source/Tutorial: Little Bins Little Hands
Materials required:
- Wooden Board
- Screw
- Rubber Band
- Ruler
- Pencil
Take a square or rectangular shape of cardboard. Now take a ruler or tape measure and pencil to mark the position for the pin. Insert the pin into the cardboard systematically. Once all the pins are placed, then grid the board and gather the various sizes of a rubber band. Now it is time to play this game. This is an educational toy for kids to learn this interesting activity. This is budget-friendly for you all, you can play this game with your friends.
Easy To Make A Guitar For Children
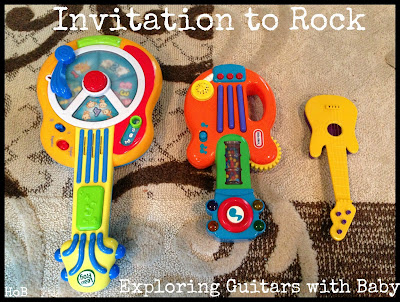
Image Source/Tutorial: The House Of Burk
Materials required:
- Elastic Band
- Cardboard Box
- Marker
- Cutter
- Tape
- Container
- Hot Glue Gun
- Pencil
- Wood
This is easy to make a guitar, but as you can see in the above image, it is a toy that is easily available in the market. But to make this guitar using some recycled material. For example, take the container and elastic band, wrap the colorful elastic band into the container, and tape the place. Now take a cardboard and make a shape of a guitar, and cut it. At the back of the cardboard tape, the container and use a hot glue gun to secure it. Now glue the elastic band into cardboard. Once you are done with this process, then take a hot glue gun and attach the long wood stick to the cardboard and your guitar is ready. This is a budget-friendly process, kids can easily make this at home.
DIY Felt Button Board For Kids
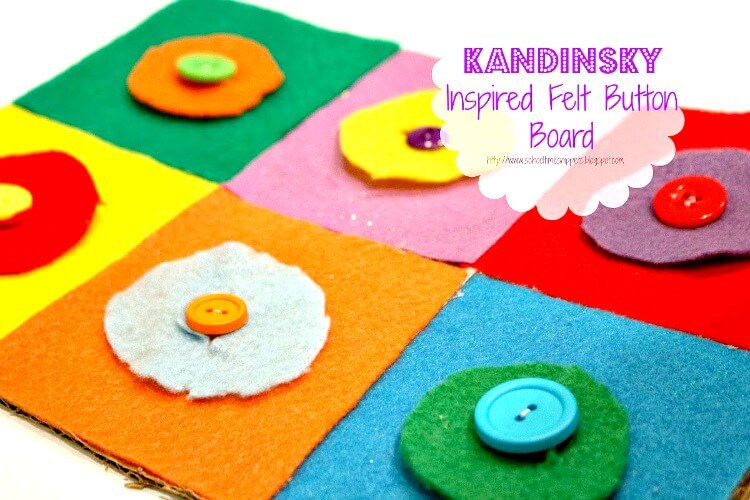
Image Source/Tutorial: School Times Nippets
Materials required:
- Cardboard Pieces
- Buttons
- Various Colors Of Felt
- Needle
- Thread
- Hot Glue Gun
- Cutter
Take the cardboard and cut it into 6 square-shaped pieces. Now take a felt and sew the color button in it. After this, hot glue the felt into the cardboard. Now cut 6 more felt circles of other colors and glue them. This button board is ready in 5-10 minutes by kids. You can also try this activity at home and see your creativity. It is budget-friendly for you all
Simple DIY Cutting Practice Spider For Toddlers
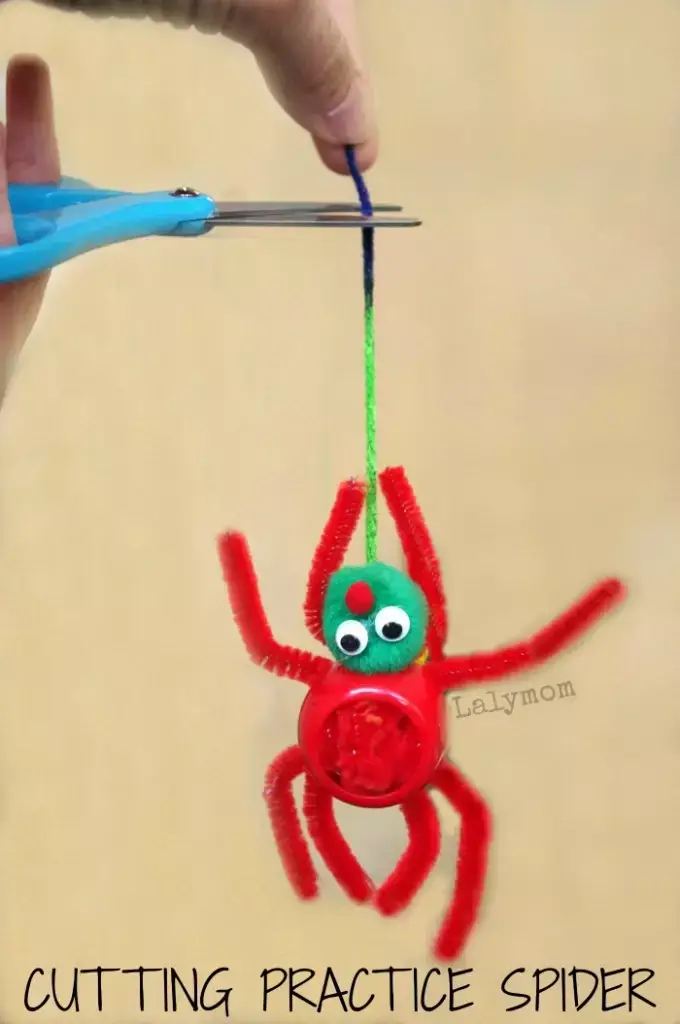
Image Source/Tutorial: Lalymom Fun Fit Family
Materials required:
- Spider Toy
- Yarn
- Scissor
This is a straightforward activity that you can try out anytime and ask your child to do. Take the yarn and tie it with a spider. Hold the spider up and cut the thread from the scissors. This is the learning stage practice spider for kids. Also, it is budget-friendly for you all, and you can learn it in 5 min.
DIY Halloween-Themed Threading Activity For Toddlers
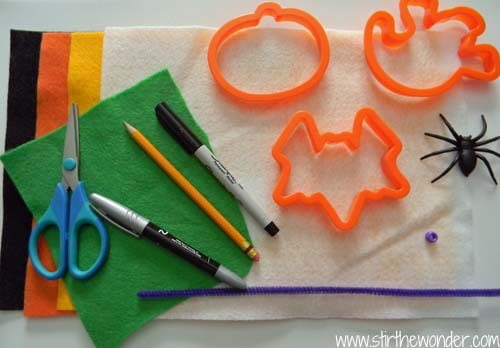
Image Source/Tutorial: Stir The Wonder
Materials required:
- Colorful Felt As Per Your Choice
- Pipe Cleaner
- Bead
- Spider Topper Cupcake
- Halloween Cookie Cutter
- Pencil
- Black And Silver Permanent Marker
- Scissor
Wrapped the spider in the topper cupcake and attached a bead on the other hand. After this, create a felt piece to thread on the pipe cleaner. Then take a cookie cutter to create the shape in the felt. Then take a scissor cut it and add or write some details by using a permanent marker. Then cut the spider felt and carefully cut it around. Then make a candy cone and cut it around. At last glue the craft and your craft is ready. This is easy to make a craft in 10 minutes. Also, it is budget-friendly for you all.
Easy Learning Craft Stick Photo Puzzle For Toddlers
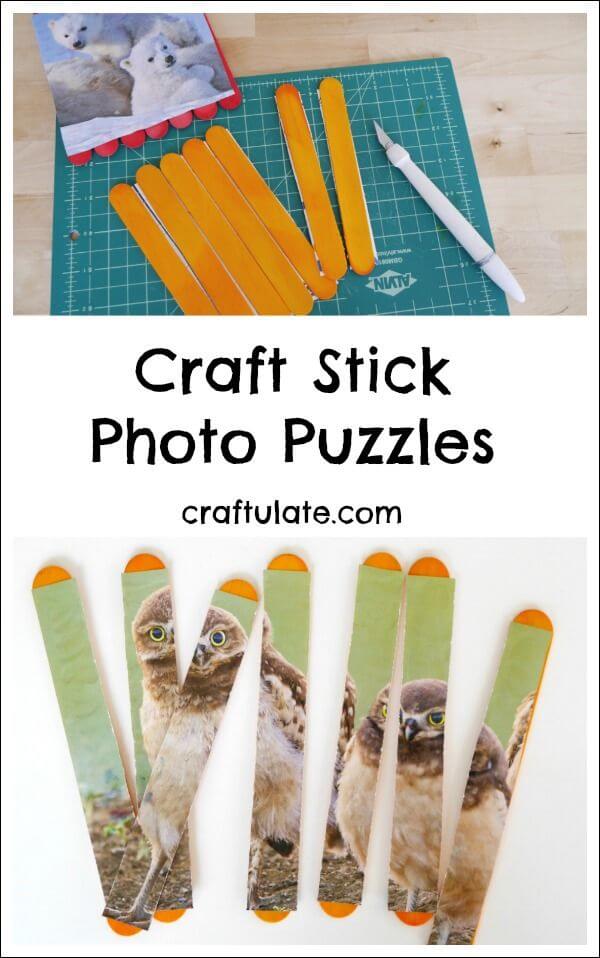
Image Source/Tutorial: Craftulate
Materials required:
- Ice Cream Stick
- Photos 4-6
- Glue
- Craft Knife
- Painting Color
- Painting Brush
To make this easy craft stick puzzle. Firstly, take the ice cream stick and color it as per your choice. Then dry it for 5-10 min. In this 5-10 min glue the photo as a thin layer and paste the ice cream sticks sequentially. After this, when the glue is dry, take the craft knife and the image from each ice cream stick. Your craft is ready, now you can play this game on your own. This is budget-friendly for you all. It takes 15 minutes to make this complete craft.
We hope you like our list of DIY toys for toddlers and will surely try to make them. If you liked our DIY toys for toddlers, read more crafts ideas at our website. Please let us know in the comment section which DIY toys for toddlers.
Follow us on YouTube for art and craft tutorials and much more.
More Articles from Kids Art & Craft
- DIY Toys for Kids – Perfect Gift Ideas
- Cool DIY Toys To Make For Kids
- Easy To Make DIY Toys For Kids To Play
- Donkey Crafts & Activities for Kids
- Dove Paper Plate Crafts for Kids


