Drawing
Owl Birds Craft On Tree Tutorial For Beginners

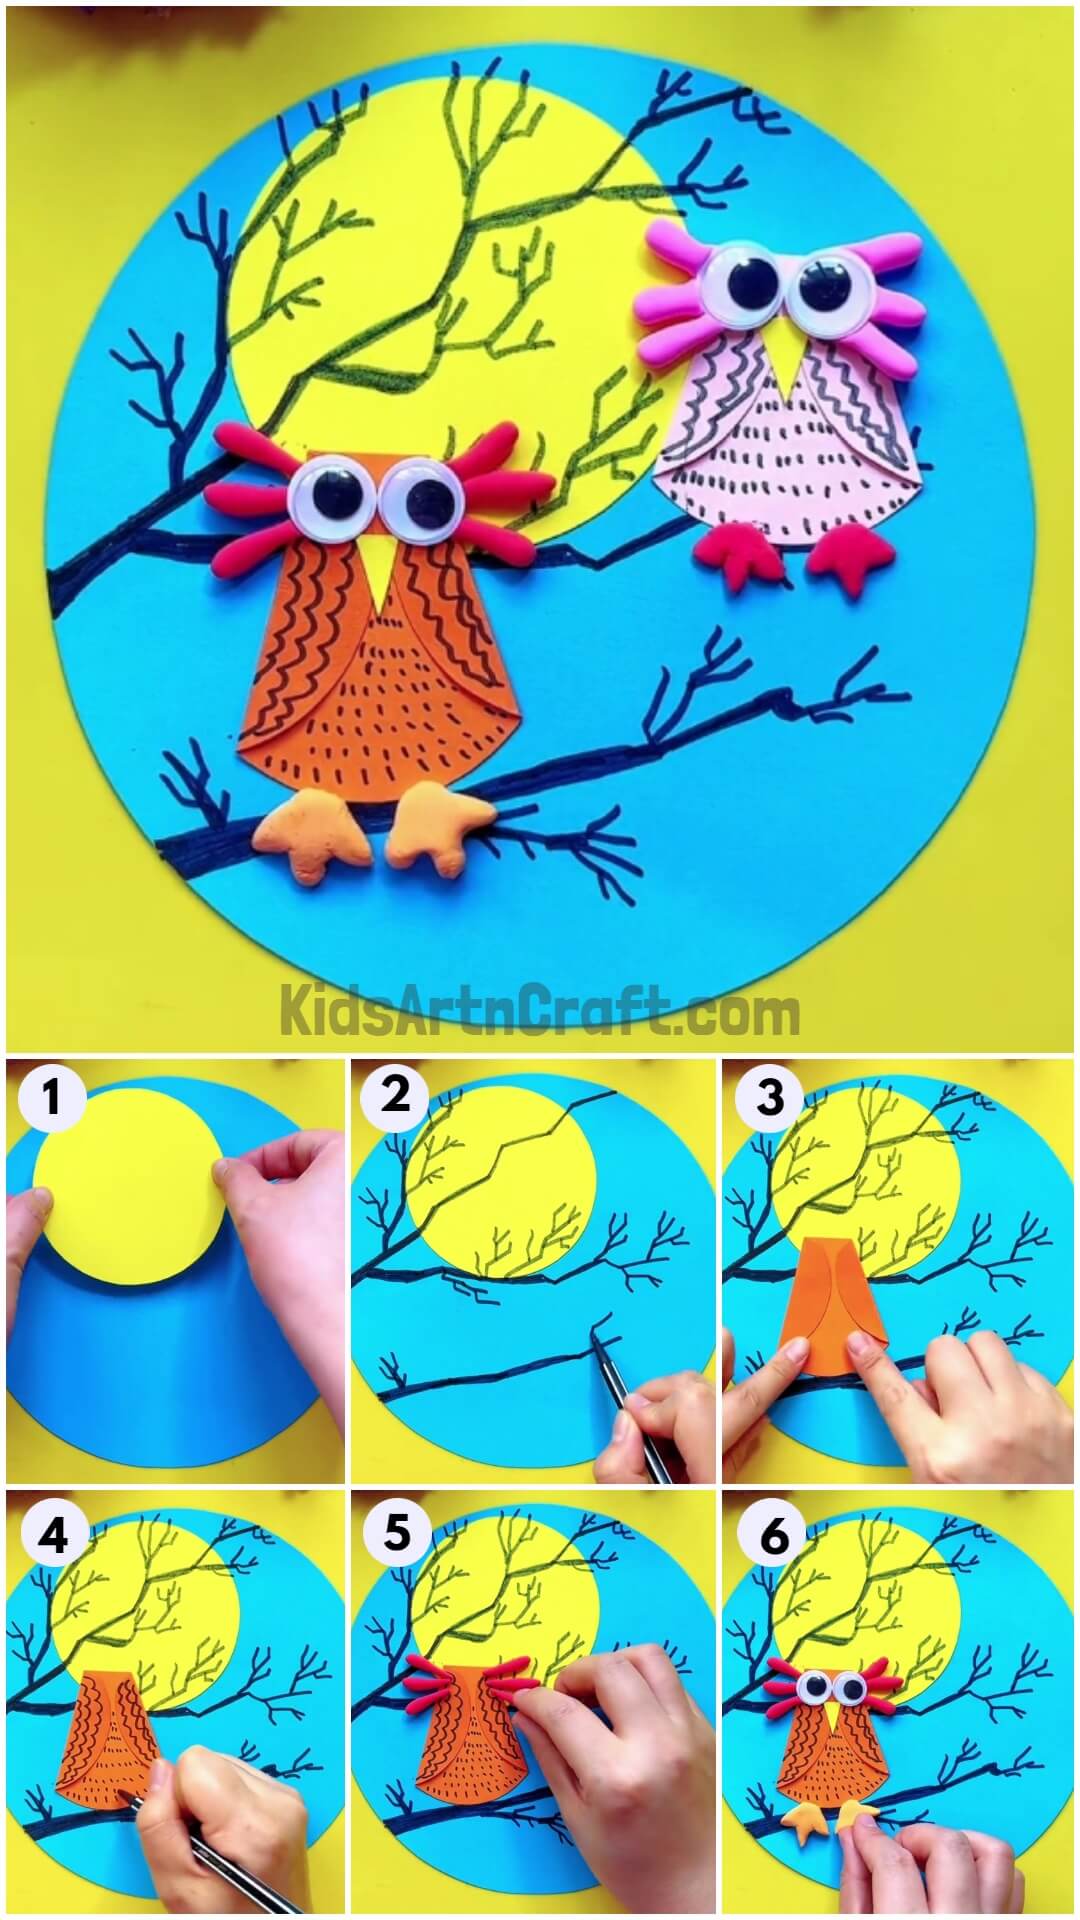
In this step-by-step tutorial, you will learn to make pretty owls on tree branches in the night scenery paper craft like a pro!
Did you know that owls are considered a symbol of wisdom in Western cultures and a symbol of foolery in Eastern cultures? Isn’t that interesting? Owls are thick-feathered nocturnal birds which means that they stay wide awake throughout the night. We will be making this particular creature through craft in this tutorial. So, collect all the material required, and let’s start making these owls.
DIY Creative Owl Birds Craft For Beginners

Read More: How To Make Ostrich Easy Tutorial For Kids
Material Required
- Colored Papers (Blue, Yellow, and Orange )
- Black Sketch Pen
- Glue Stick
- Scissors
- Colored Clay (Pink, Yellow, And Light Pink)
- Googly Eyes
Procedure
Step 1: Pasting A Yellow Moon
![]()

Take a blue sheet of paper and cut a big circle out of it to use as the base of the craft. Now, take a yellow sheet of paper and cut a much smaller circle out of it as well. Paste the yellow circle on the top right side of the big blue circle to make the moon as shown in the picture.
Step 2: Making Tree Branches
![]()
Take a black sketch pen and draw a thick horizontal branch pattern on the upper section of the blue sheet including the yellow circle pasted on it. See the picture for reference.
Step 3: Adding Small Branches To The Big Branch
![]()
Using the black sketch pen and draw a thick horizontal branch pattern on the upper section of the blue sheet including the yellow circle pasted on it and also some small branches coming out of them.
Step 4: Making The First Owl Body
![]()
Take an orange sheet and cut a circle out of it. Now, cut a piece of paper from the top circumference of the circle to separate a chord out of it. Now, fold the sides of the chord cut out in a slanting way to make creases and unfold again. This will be the owl’s body.
Step 5: Pasting The Owl’s Body
![]()
Fold the body along the crease. Now, paste the back of this sheet on the branch drawn at the bottom of the sheet. This shall serve as one of the two owls in the craft.
Step 6: Making Wing’s Details
![]()
Using the same sketch pen make small curved lines as three vertically connected lines on each fold (wings).
Step 7: Making Details Of Feathers On The Body
![]()
Now, draw tiny lines on the sheet between the side folds as shown in the picture.
Step 8: Making Owl’s Face
![]()
Take pink clay dough and roll small pieces out in a shape resembling small drops. Roll six shapes in total. Now, place three pieces horizontally, on the left side of the top section of the owl. This will be one side of the face.
Step 9: Making The Other Side
![]()
Place the other three shapes on the right side of the top section of the owl to complete the face.
Step 10: Pasting The Googly Eyes
![]()
Take the pair of big googly eyes and stick them between the clay shapes using glue stick.
Step 11: Pasting The Beak
![]()
Take a yellow sheet of paper and cut a small triangle shape out of it. Now, paste the beak below the eyes of the owl, right in the middle using a glue stick.
Step 12: Making The Claws Of The Owl
![]()
Take some yellow clay dough and mold two claws out of it. Now, place the two claws below the owl right next to each other as shown in the picture.
Step 13: Making Another Owl
![]()
Repeat the process and make another such owl using a pink sheet of paper and light pink clay dough for six rolled shapes and pink clay for the claws. Finally, stick this owl on the branch a little above the branch at the bottom.
Finally, Your Two Lovely Little Owls Are Ready!
![]()
This completes the process of making this craft with the colorful owls on the branches and a moonlit night in the background as shown in the picture.
This tutorial taught you great cutting and pasting skills. You also learned good drawing skills. You can hang it on the walls of your room or the doors of your home. Keep practicing the techniques you learn in these tutorials and keep working hard. Good luck.
Follow us on Youtube for art and craft tutorials and much more.
More Articles from Kids Art & Craft
- Easy Drawing Tricks With Your Parents Video Tutorial for Kids
- Easy to Make Animal Drawing Video Tutorial for All
- Easy Drawing Tricks Video Tutorial for Kids
- Simple Drawing Trick on Paper Video Tutorial for Kids
- Mushroom Drawing Step by Step Tutorial For Kids