


Recycled Crafts
Paper Cup Dinosaur Craft Tutorial For Kids

A dinosaur is an ancient and extinct creature that used to rule the globe before we humans even existed. These giant, ferocious Jurassic animals had reptile skin and huge carnivore teeth. The craft is dedicated to this particular creature and we will be making one using paper cups. It is simple to make and will hardly take fifteen minutes to complete. Gather all the stuff required for the craft and let’s get going.
DIY Paper Cup Dinosaur Craft For Kids

Read More: Cute Tiger Paper Cup Craft for Kids
Materials Required
- Two lavender-colored paper cups
- A pair of scissors
- A cutter
- A thread
- A toothpick
- A compass
- A Purple and a yellow sheet of paper
- A Black and white sketch pen
- A glue stick
Procedure
Step 1: Arrange The Two Cups

Find two paper cups and place them on the table. The cups need to be lavender colored.
Step 2: Cutting The Edge Of The Paper Cup

Take a cutter and trim the round edge at the top of the cup off of it. Take a look at the picture below for reference.
Step 3: Separating The Edges From The Cup

Separate this trimmed edge from the cup and place it aside.
Step 4: Making Two Cuts On The Cup

Make two vertical cuts on the sides of the cup. The cuts should stand opposite to each other. These cuts also need to be, ‘V’, shaped. See the picture below for reference.
Step 5: Making A Hole In The Cup

Working on the other cup, take a compass and punch a hole in the sides of the base of this cup. Observe the picture below for reference.
Step 6: Punching Another Hole In This Cup

Now, using the same compass and cup, punch another hole near the edges of this cup. This hole should be punched on the lines of the previous hole. See the image below for reference.
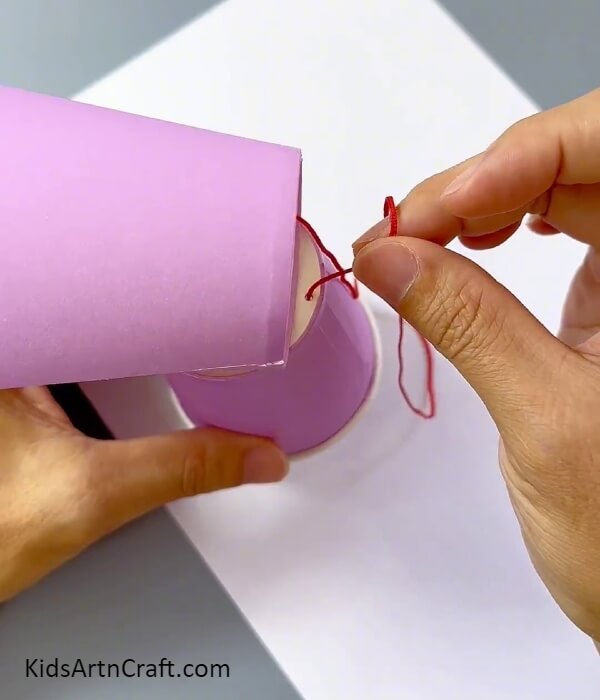
Step 7: Using The Thread

Make a hole in the base of the other cup that you worked on earlier as well. Now, pass a thick thread through it as shown in the picture below.
Step 8: Tying The Toothpick To The Thread

Take a toothpick and tie it to one of the ends of the thread that you just passed through the cup. Cut off a small piece of this toothpick and tie a knot over it using the thread. Check the image below for reference.
Step 9: Pulling The Thread Back

Pull the thread back and out of the cup. The toothpick and the knot will make the thread still remain attached to the cup.
Step 10: Placing The Cups Together

Place the cup with the side cuts, horizontally, on the base of the other cup.
Step 11: Passing The Thread Through The Other Cup
Pass the thread attached to the cup, through the hole punched in the base of the other cup.
Step 12: Passing The Thread One Last Time

Holding the end of this thread, pass it through the hole punched at the edge of the cup as seen in the picture below.
Step 13: Adding Definition To This Shape

Take a yellow sheet of paper and cut a small shape out resembling the spikes on the neck of a dinosaur. Paste it in the middle of the cup at the top. Now, cut two arms out of a purple sheet of paper and paste it on the top sides of the cup at the bottom. Take a look at the picture for a better understanding of their positioning.
Step 14: Cutting Another Shape Out Of The Yellow Sheet

Take another yellow sheet of paper and cut a semi-circular shape out of it. Now, make a circle on the left side of this shape using a black sketch pen. Make another circle inside this black circle using a white sketch pen. Finally, paste this shape below the spikes that you pasted earlier.
Step 15: Making The Teeth Of The Dinosaur

Take a white sheet of paper and cut four thin and long strips out of it. Cut a zig-zag pattern on one of the sides of these strips. Finally, paste one on each cut on the sides of the paper cup. See the image below for reference.
Step 16: Making The Tail Of The Dinosaur

Take a yellow sheet of paper and cut spikes out of it. These spikes need to be bigger than the previous ones. Paste them on the back of the vertical cup at the bottom. Now, cut a tail out of a purple sheet of paper and a small spiked strip out of a yellow sheet of paper. Paste the strip on the horizontal side of the tail and this tail to the excess thread right below the spikes that you pasted at the beginning of the step. Obverse the picture keenly to understand the positioning of the shapes.
Making The Craftwork

Pull the tail of this dinosaur which actually will pull the thread connected to the head of the dinosaur and thus allow its jaw to move as can be seen in the picture below.
So, this amazing tutorial taught you to make a moving craft that can be used to create a puppet show with your friends and classmates or you can simply submit it as an art project in school. The tutorial taught you good cutting skills and some amazing crafting ideas and techniques. Use these techniques on your own ideas to create an original piece of art and keep following the tutorials. Goodbye
Thank you for visiting the website.
Follow us on Youtube for art and craft tutorials and much more.
More Articles from Kids Art & Craft
- Paper Cup Octopus Craft Tutorial For Kids
- Cute Tiger Paper Cup Craft for Kids
- Tiger Craft From Paper Cup Easy Tutorial for Kids
- Egg Carton Crab Step-by-Step Tutorial For Kids
- DIY Cardboard Tube Owl Craft


