
Paper Crafts
How to Make Paper Flower Bouquet – Step by Step Instructions


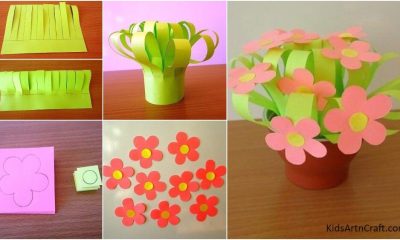
Flowers are always elegant and gorgeous. The fragrance of a fresh flower bouquet is so energizing to all. It is a symbol of life with beauty. They are such an amazing gift to give to someone. Today, we’ll make an awesome paper flower bouquet, and the major advantage is that it’s going to last for a much longer time than the actual bouquet. Are you all thrilled to make an elegant paper flower bouquet? Let’s get started.
How to Make a Paper Flower Bouquet
Materials Required:
- Light brown paper
- 10 dark brown strips
- Glue
- 20 circular sheets of a different colour (red, pink, yellow)
- Toothpick
- Scissor
- Light and dark green leaves/paper
Instructions
Let’s get started!
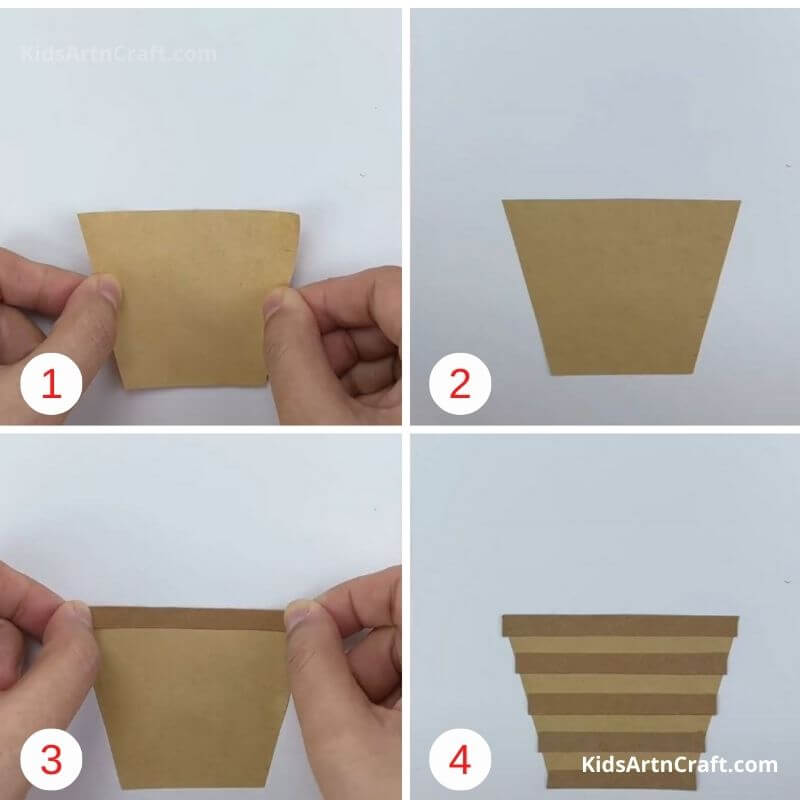
Step 1 – Brown Paper
Take the light brown paper and cut it into the shape of a pot that holds the flowers.
Step 2 – Stick
Stick the pot-like structure on a white paper.
Step 3 – Strips
Take a dark brown strip and stick it horizontally on the border of the pot.
Step 4 – Repeat
Take another strip and stick it right below the previous one, leaving a small gap. Like this, continue till the end.
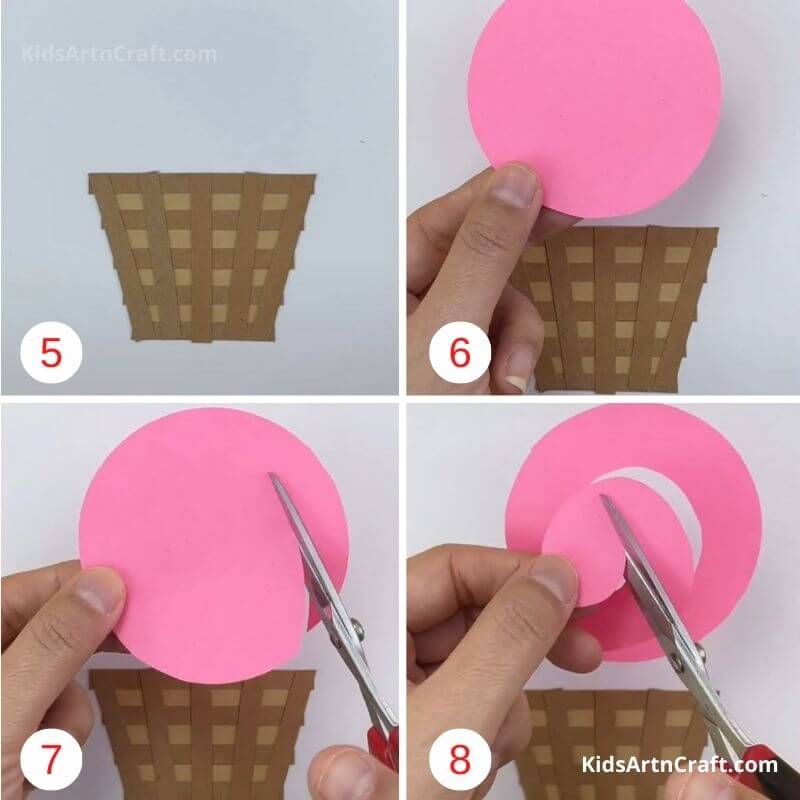
Step 5 – Strips
Now stick the rest of the strips vertically on the pot. It will look good.
Step 6 – Circle
Keep the colored paper ready.
Step 7 – Cut
Cut the circle into a swirl formation.
Step 8 – Cut
Start from the outer edge to the inner corner.
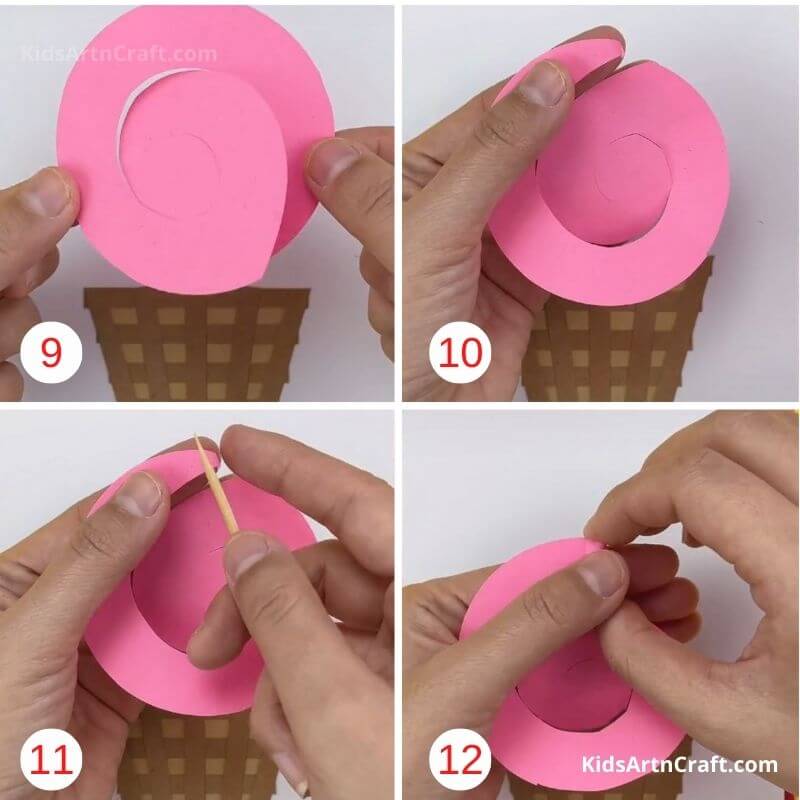
Step 9 – Swirl
The swirl-like formation is ready.
Step 10 – Fold
Fold the outer edge.
Step 11 – Toothpick
Place the toothpick at the fold of the swirl.
Step 12 – Roll
Now, using the toothpick, roll the swirl.
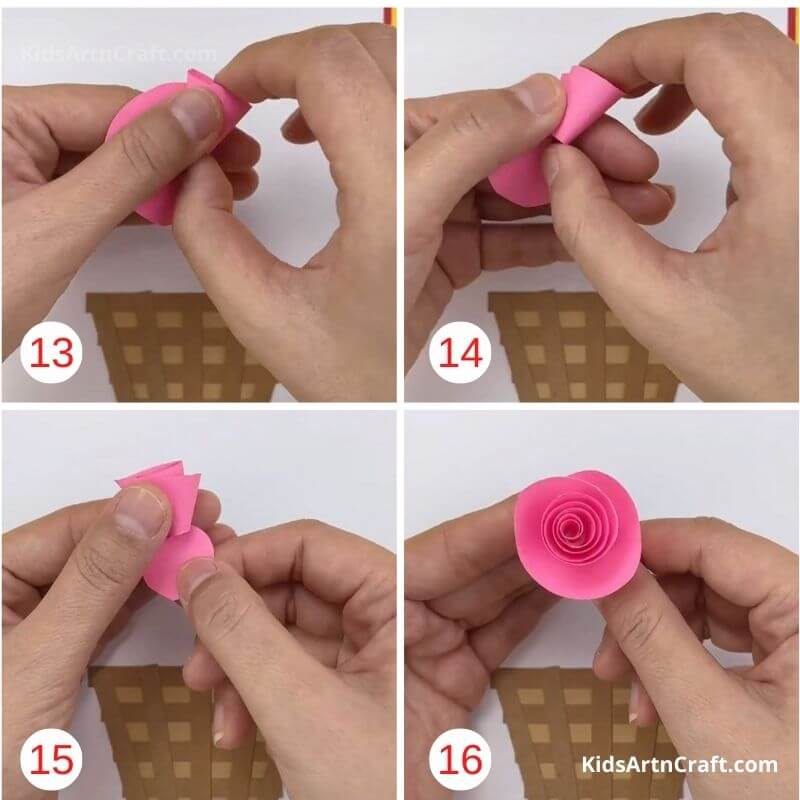
Step 13 – Roll
Keep rolling. Be careful not to tear the paper.
Step 14 – Cone
As you roll, it’ll look like a cone-like structure.
Step 15 – Edge
Once you’ve reached the inner corner, close it with the flap.
Step 16 – Flower
From the top view, it’ll look like a flower.
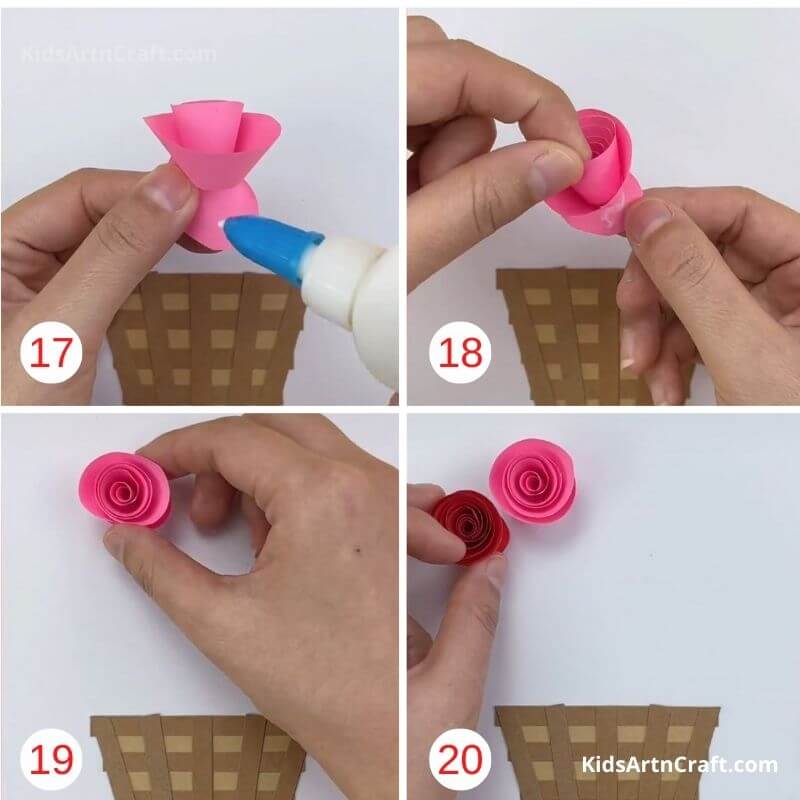
Step 17 – Glue
Glue the inner flap to the flower.
Step 18 – Stick
Make sure it sticks properly.
Step 19 – Stick
Now, stick the flower randomly, anywhere above the flower pot.
Step 20 – Another Flower
Similarly, make flowers with all the colors and start sticking them on the flower pot.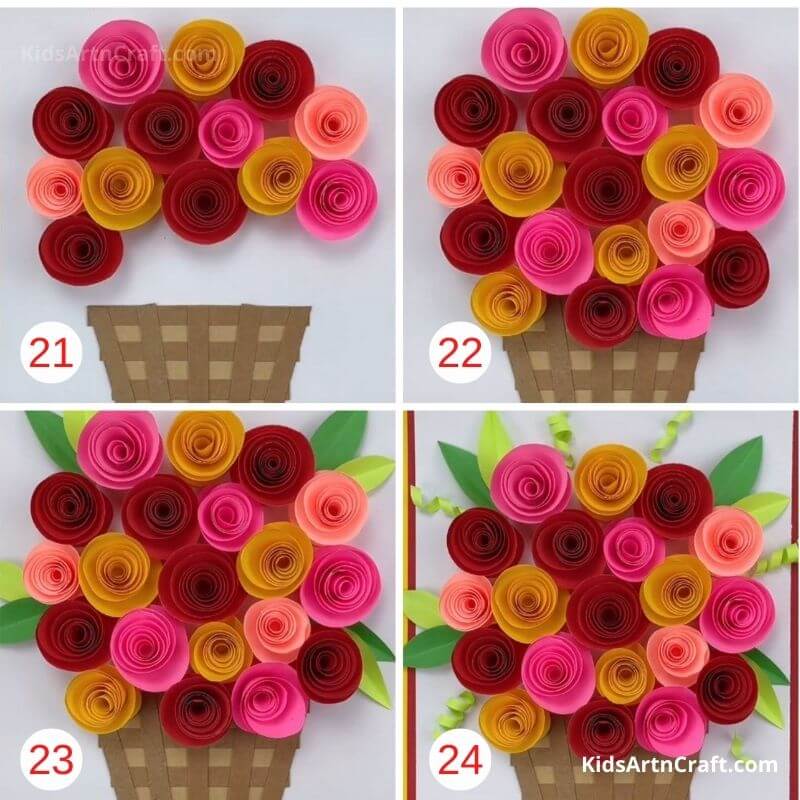
Step 21 – Colors
Arrange the flowers with different colors.
Step 22 – Flowers
Once all the flowers are stuck, it’ll look beautiful.
Step 23 – Leaves
Stick the leaves around the flowers. If you don’t have real leaves, you can make cut-outs of the leaves and stick them.
Step 24 – Swirls
Make swirls with the green paper and stick them around the flower bouquet.
The paper flower bouquet is ready!
Step-by-Step How to Make Paper Flower Bouquet Tutorial – Easy DIY Paper Flower Craft for Beginners
Learn how to make a beautiful paper flower bouquet with this step-by-step tutorial! This video shows easy DIY paper flower crafts using simple materials like colored paper, scissors, and glue. Perfect for kids, beginners, school projects, and handmade gifts. Create colorful paper flowers and enjoy fun, creative crafting at home.
Tips to Make Your Paper Flower Bouquet Look Beautiful
Here are some simple tips to make your DIY flower bouquet more colorful and attractive:
- Use bright pastel or rainbow-colored paper for a vibrant bouquet.
- Add glitter paper or stickers for decoration.
- Curl the flower petals slightly to create a realistic flower effect.
- Use green paper straws or ice cream sticks as flower stems.
- Attach small pearls or pom-poms to the flower center.
- Wrap the bouquet using craft paper or tissue paper for a gift-style look.
These simple decoration ideas can make your handmade bouquet look more professional and gift-worthy.
Educational Benefits of Paper Flower Crafts
Paper flower bouquet activities are not only fun but also educational. Kids learn:
- Color recognition
- Shape understanding
- Pattern arrangement
- Scissor control skills
- Creative problem-solving
- Craft presentation skills
Teachers often include flower bouquet crafts in classroom learning because they combine creativity with skill development.
Safety Tips for Kids During Craft Activities
- Use child-safe scissors for younger kids.
- Keep glue and small decorative items away from toddlers.
- Encourage adult supervision during cutting activities.
- Use non-toxic craft materials whenever possible.
These simple precautions help create a safe and enjoyable crafting experience for children.
Fun Facts About a Flower Bouquet
- Roses are a part of the rose family.
- Tulip bulbs were used as a food source.
- Broccoli is a fruit.
- Hydrangea’s soil determines its flower colour.
- Queen Victoria was a fashion trendsetter.
- Sunflowers saved lives.
- Daffodils are used as currency by Prince Charles.
- The very expensive spice, saffron, is from a flower.
- The juice from the bluebell flowers was historically used to make glue.
- The largest flower in the world is the titan arum, which produces flowers 10 feet high and 3 feet wide.
Why Paper Flower Bouquet Crafts Are Great for Kids
Making a paper flower bouquet is a fun and creative activity that helps children improve fine motor skills, hand-eye coordination, and artistic confidence. Cutting, folding, rolling, and arranging paper flowers also encourages patience and creativity in young learners. This easy DIY craft is perfect for preschoolers, kindergarten students, and elementary school kids.
Parents and teachers can use this paper flower bouquet craft during:
- Mother’s Day activities
- Valentine’s Day classroom projects
- Spring craft sessions
- Birthday gift-making activities
- School art competitions
- Handmade greeting card projects
This craft is affordable because it uses simple materials like colored paper, glue, scissors, and craft sticks that are easily available at home or school.
FAQ on How to Make a Paper Flower Bouquet – Step-by-Step Instructions
Q1. What materials are needed to make a paper flower bouquet?
Answer: You will need paper, scissors, a glue stick, a wooden skewer, and a vase or other container.
Q2. How long does it take to make a paper flower bouquet?
Answer: Depending on the size and complexity of the bouquet, it can take anywhere from two hours to a full day.
Q3. What type of paper should I use to make paper flower bouquets?
Answer: You can use any type of paper for this project, including cardstock, construction paper, tissue paper, crepe paper, and even pages from a magazine.
Q4. How do I make the paper flowers look realistic?
Answer: To make your paper flowers look realistic, you can use a combination of techniques such as crumpling, tearing, curling, and layering.
Q5. What techniques should I use to attach the paper flowers to the bouquet?
Answer: You can use glue dots, glue sticks, or a hot glue gun to attach the paper flowers to the bouquet.
Q6. How long will the paper flower bouquet last?
Answer: The paper flower bouquet should last several days, depending on the type of paper used and how the bouquet is handled.
Q7. Will the paper flower bouquet need to be watered?
Answer: No, a paper flower bouquet does not need to be watered.
Q8. Can I customize the paper flower bouquet?
Answer: Yes, you can customize the paper flower bouquet however you wish. You can add additional flowers, leaves, or other decorations to make it unique.
Q9. Can I use the paper flower bouquet as a gift?
Answer: Yes, paper flower bouquets make great gifts for any occasion.
Q10. What other things can I do with paper flower bouquets?
Answer: You can use paper flower bouquets to decorate your home, give as party favors, or make a unique centerpiece for any special occasion.
Paper flower bouquet crafts are simple, affordable, and enjoyable DIY activities for kids and beginners. They encourage creativity while helping children learn important crafting and coordination skills. Whether used for classroom decoration, handmade gifts, or festive celebrations, these colorful flower bouquets always bring joy and creativity to any occasion. Explore different flower designs, experiment with paper textures, and let kids enjoy the fun of handmade art and craft activities.
Make every day creative with fun crafts, simple DIY ideas, and educational projects for kids. Follow us on YouTube & Facebook and join our Telegram group for updates.
Reviewed By Rachit Gupta
Read More:
- How to Make a Paper Rabbit – Step-by-Step Instructions
- How to Make Paper Sun Toy Step-by-Step Instructions Easy Tutorial
- How to Make Paper Aquarium Fish Step-by-Step Instructions Easy Tutorial
- How to Make a Paper Bunny: Step-by-Step Instructions, Easy Tutorial
- How to Make a Paper Butterfly Step-by-Step Instructions Easy Tutorial