


Paper Crafts
How to Make Paper Rabbit – Step by Step Instructions

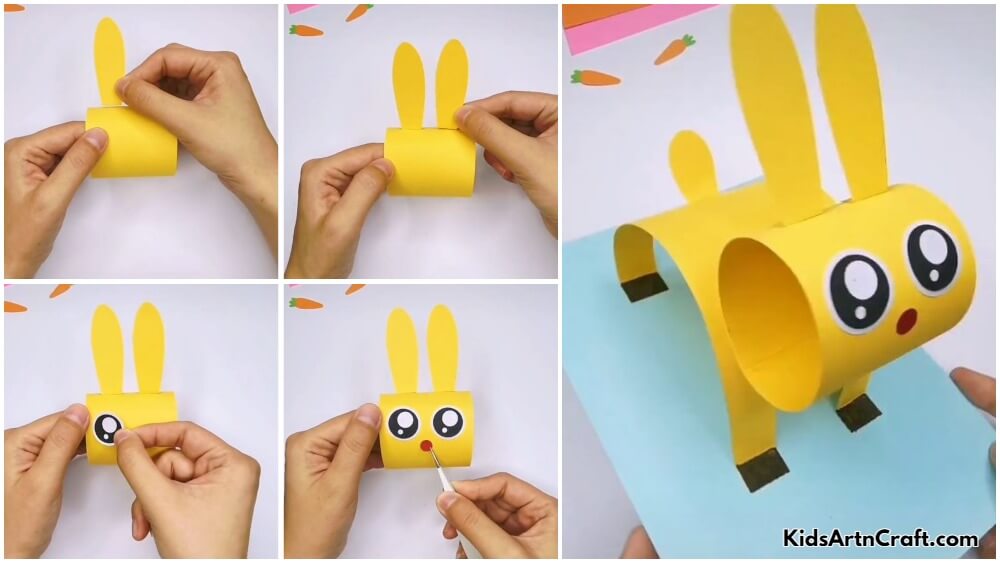
Let us learn how to make a paper rabbit step by step using the easy tutorial, using some facile folds and turns. Soon, you’ll see a masterpiece emerging through your own hands. This simple DIY paper rabbit craft improves creativity, fine motor skills, and paper folding techniques. Perfect for preschool, kindergarten, classrooms, homeschooling, Easter activities, and fun craft projects using basic materials and easy-to-follow instructions.
How to Make a Paper Rabbit Step-by-Step Instructions Easy Tutorial
Materials Required:
- Different coloured A4-sized sheets.
- Marker
- Animated eyes.
- Scissors
- Glue
- Pencil
Procedure
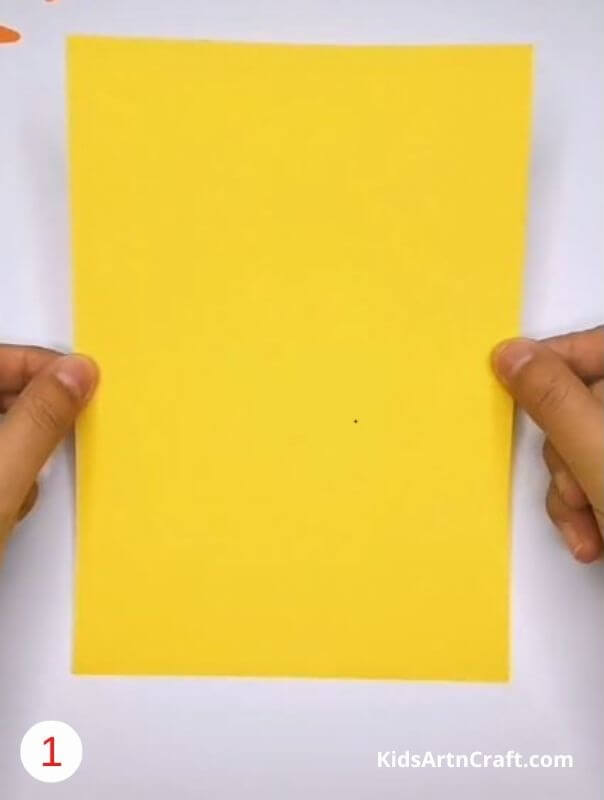
Take an A4-sized sheet of a colour of your choice.
- Mark the centre of the sheet vertically.
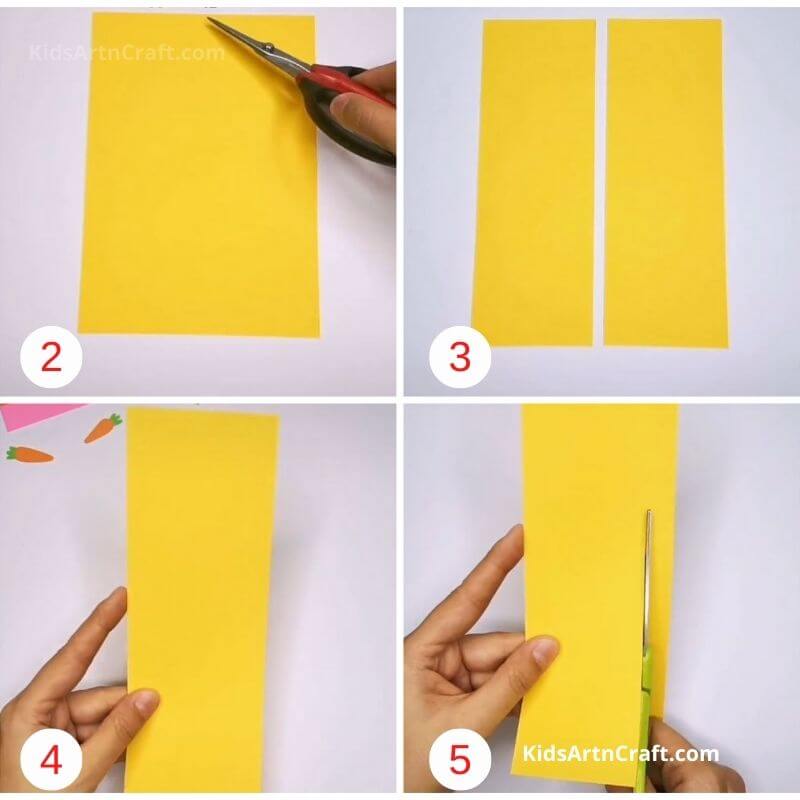
- Cut it into two halves.
- Keep one part aside and use the other at a time.
- Cut the rectangular piece along the tilted line.
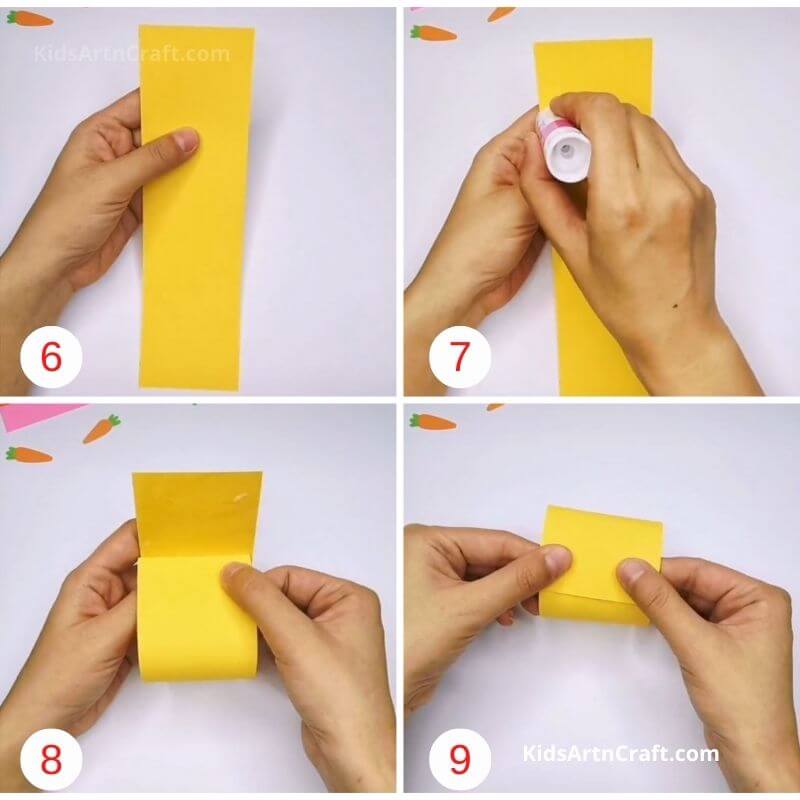
- Now apply glue to the top(broad part) of the piece and roll the lower part to form a loop.
- Paste it carefully.
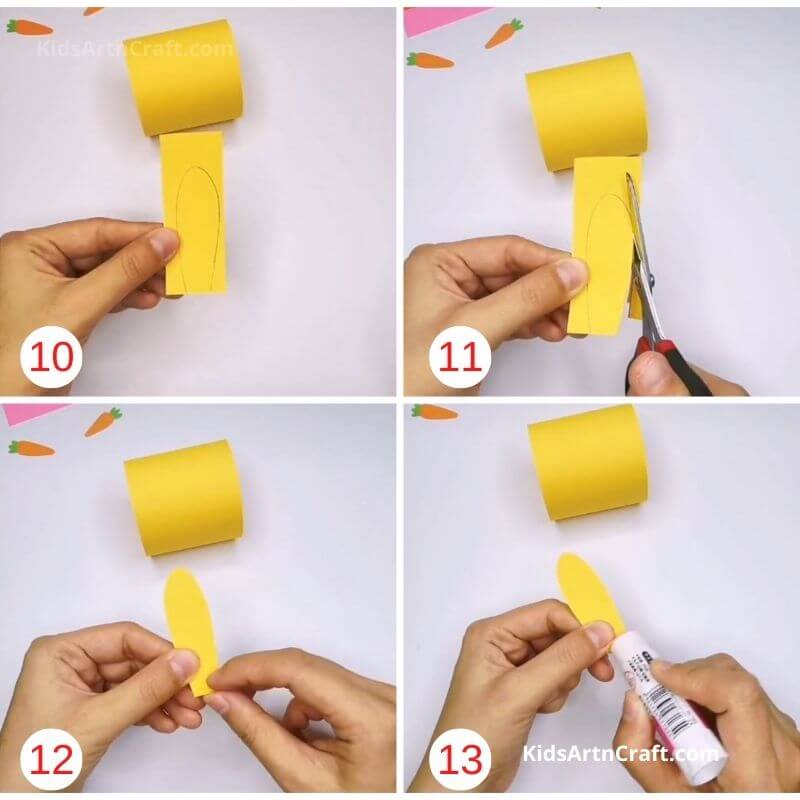
- Use a small piece to draw the shape of the rabbit’s ear.
- Take a cut-out of the same.
- Fold a small portion of the cutout.
- Use the folded part to apply glue.
- Paste the piece to the loop.
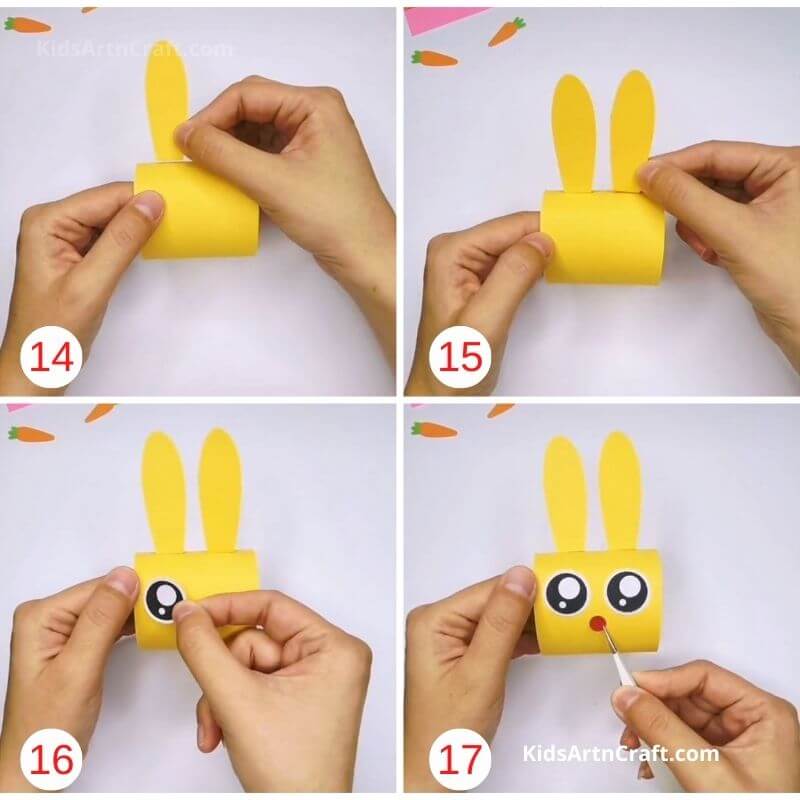
- Take another cutout of the same type and paste it on the other side of the loop beside the previous part.
- Paste handmade animated eyes on the face of the rabbit.
- Use a red circular piece to give it a cute mouth.
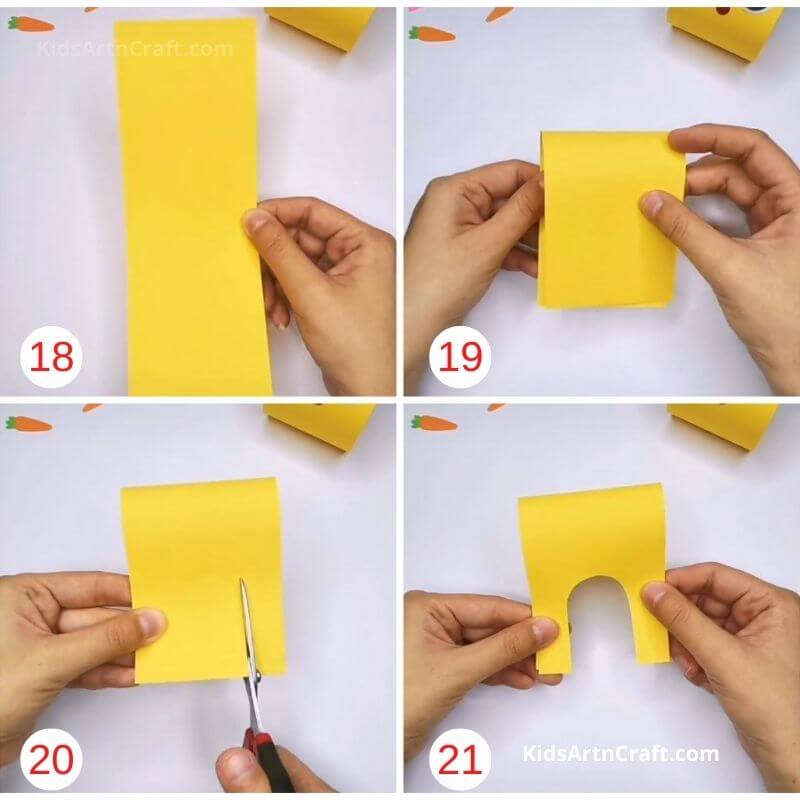
- Now, take the other rectangular half and bend it in half. Do not make a crease.
- Make an inverted U shape on the lower side of the bent sheet of paper.
- Cut the U shape. Include both the flaps of the paper.
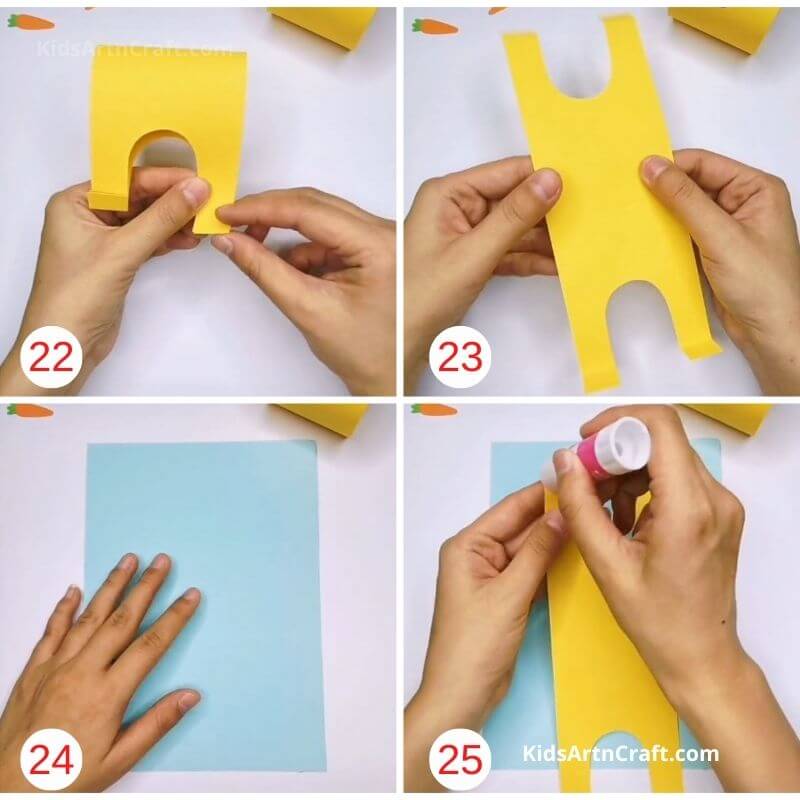
- Fold the two edges upwards.
- Open the paper and let the crease of the previous fold remain intact.
- Take another A4-sized paper, preferably of a different colour.
- Apply glue to two(adjacent) of the four corners that were folded.
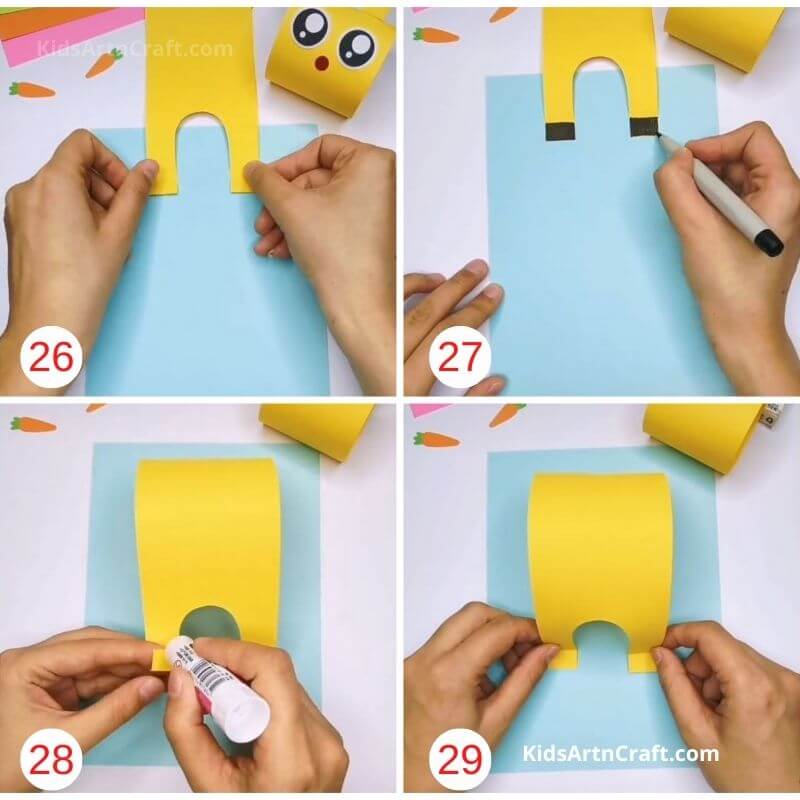
- Paste the folded corners to the new sheet.
- Colour it black using a marker.
- Apply glue to the other two corners.
- Paste them, repeating the last procedure.

- Colour the corners black.
- These will make the limbs of your rabbit.
- Extract a tail-shaped cutout of the same colour.
- Fold the bottom strip of the tail.
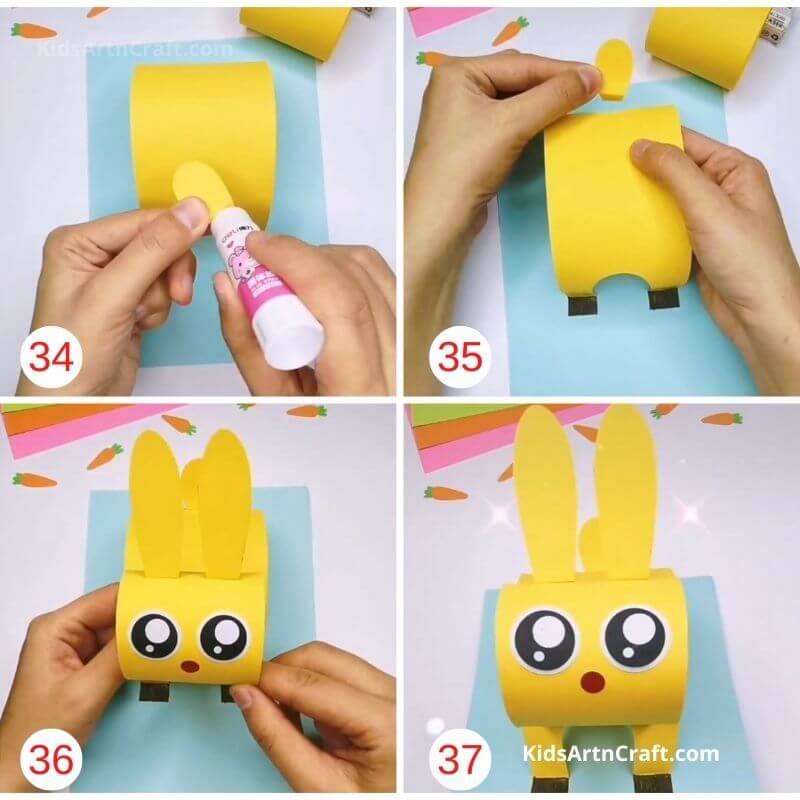
- Apply glue to the folded edge.
- Paste it on the rear of the body of the rabbit.
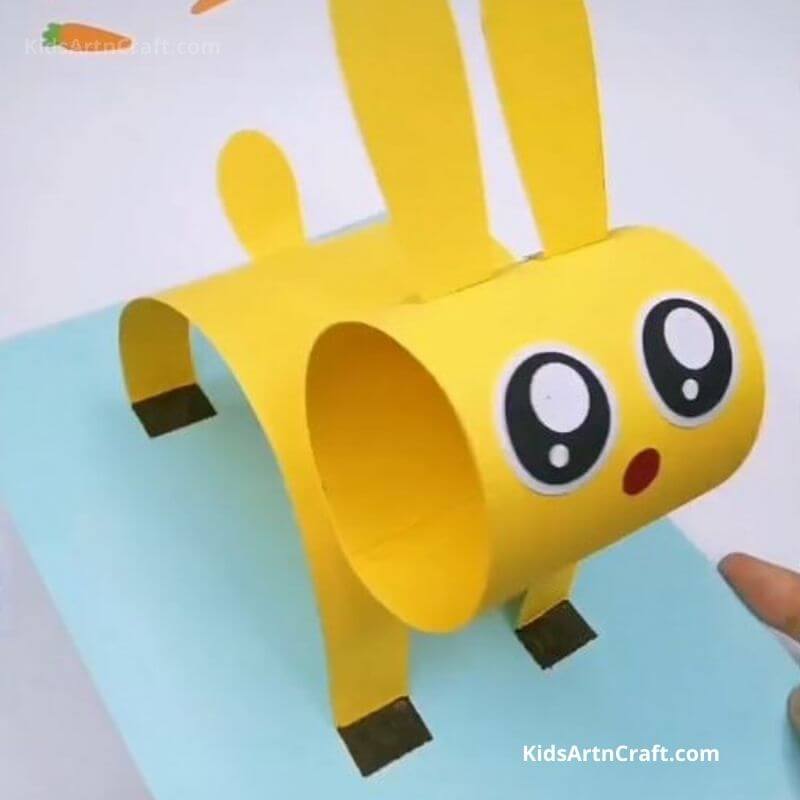
- Bring together the other parts. Paste the loop at the front of the bent portion. Further, paste the ears on the top of the face.
Your handmade paper rabbit is ready in a jiffy!
Step-by-Step How to Make Paper Rabbit Tutorial – Easy DIY Origami Rabbit Craft for Kids
Learn how to make a cute paper rabbit with this step-by-step tutorial! This video shows an easy DIY origami rabbit craft using simple paper folding techniques. Perfect for kids, beginners, and school projects. Create adorable paper bunny crafts and enjoy fun, creative learning while improving creativity, focus, and fine motor skills.
Educational Benefits of Bunny Paper Crafts
Making bunny crafts can support early childhood development in many ways:
Improves Fine Motor Skills
Kids practice safe scissor use, paper folding, and gluing techniques that strengthen finger muscles and coordination.
Encourages Creativity
Children can design unique rabbits using different colors, facial expressions, decorations, and backgrounds.
Supports Screen-Free Learning
Paper crafts provide a healthy offline activity that keeps children engaged in hands-on learning.
Builds Patience & Focus
Following step-by-step craft instructions teaches children how to complete tasks carefully and independently.
Promotes Recycling Awareness
Using old newspapers, cardboard tubes, or scrap paper encourages eco-friendly crafting habits.
Best Materials for Making Paper Rabbit Crafts
For better crafting results, use:
- Colored craft paper
- Construction paper
- Child-safe scissors
- Glue sticks
- Googly eyes
- Cotton balls
- Popsicle sticks
- Paper plates
- Cardboard rolls
- Washable markers and crayons
Using thick cardstock paper helps bunny crafts last longer and stand upright more easily.
Tips for Parents and Teachers
- Pre-cut shapes for younger kids to make the activity easier.
- Use printable rabbit templates for classroom crafting sessions.
- Encourage children to create their own bunny expressions and outfits.
- Turn the craft into a storytelling activity for better engagement.
- Display finished rabbit crafts on classroom boards or home walls to build confidence.
Easy Variations of Paper Rabbit Crafts
You can also try:
- Paper plate bunny crafts
- Origami rabbits
- Bunny finger puppets
- Toilet paper roll rabbits
- Easter bunny greeting cards
- Jumping paper rabbits
- Cotton ball bunny art
- Bunny wall hangings
These variations keep children excited and encourage repeated creative play.
Rabbit-Based Quirky Facts
- Rabbits always stay in groups, as they are very social beings:)
- A rabbit’s teeth never stop growing.
- Rabbits show their happiness by leaping in the air, called a ‘binky’.
- Though they are often associated with carrots, rabbits don’t exactly eat the root vegetables.
- Some rabbits are as big as 2.5 feet long and may weigh around 22 pounds.
- One of the most startling and uncommon facts is that rabbits actually can’t puke.
- Their vision can cover an angle of 360 degrees.
- It is really hard to catch a rabbit, hard to think, but it is the truth.
- Rabbits are really good jumpers.
- Baby rabbits are called kittens.
Rabbits, also known as bunnies, are basically mammals. There are around 305 breeds of rabbits throughout the globe. Although they are considered improper pets because of their fragile nature, no one can deny that they are one of the cutest animals you might come across. Make your own pet bunnies using paper and enjoy playing with the not-so-fragile rabbits:)
Why Paper Rabbit Crafts Are Great for Kids
Paper rabbit crafts are one of the best creative activities for preschoolers and elementary kids because they combine learning with fun. Children improve fine motor skills while cutting, folding, gluing, and decorating their bunny crafts. These activities also help boost creativity, concentration, color recognition, and hand-eye coordination.
Rabbit-themed crafts are especially popular during:
- Easter classroom activities
- Spring art projects
- Animal learning lessons
- Holiday decoration sessions
- Weekend DIY craft time at home
Parents and teachers can easily adapt paper rabbit crafts for different age groups using simple craft materials like colored paper, glue, cotton balls, markers, and recycled cardboard.
FAQs on How to Make a Paper Rabbit – Step-by-Step Instructions
Q1. What materials do I need to make a paper rabbit?
Answer: You will need paper, scissors, glue, and a black marker.
Q2. How big should I make the paper rabbit?
Answer: The size of the paper rabbit is up to you. You can make it as big or as small as you’d like.
Q3. What shape should I use for the paper rabbit?
Answer: The shape of the paper rabbit is also up to you. You can make it round, oval, or any other shape you wish.
Q4. How do I make the ears for the paper rabbit?
Answer:. Cut two pieces of paper into the shape of the rabbit’s ears. Glue them onto the back of the paper rabbit.
Q5. How do I make the eyes for the paper rabbit?
Answer: Use a black marker to draw two circles for the eyes. Then draw a smaller circle inside each one for the pupils.
Q6. How do I make the nose for the paper rabbit?
Answer: Cut a small triangle out of paper and glue it onto the face of the paper rabbit for its nose.
Q7. How do I make the whiskers for the paper rabbit?
Answer:. Cut four pieces of paper into strips. Glue two of the strips onto the sides of the nose and two onto the cheeks of the paper rabbit.
Q8. How do I make the feet for the paper rabbit?
Answer: Cut four pieces of paper into the shape of the rabbit’s feet. Glue them onto the bottom of the paper rabbit.
Q9. How do I make the tail for the paper rabbit?
Answer: Cut a piece of paper into the shape of the rabbit’s tail. Glue it onto the back of the paper rabbit.
Q10. How can I make the paper rabbit look more realistic?
Answer: You can add more details to the paper rabbit, such as fur, whiskers, and a bowtie. You can also use colored paper to make the rabbit’s fur and accessories.
All craft ideas shared on this website are designed to be kid-friendly, easy to follow, and suitable for home or classroom activities. Adult supervision is recommended while using scissors, glue guns, or small decorative items with younger children.
Learn, create, and have fun with our amazing craft ideas and DIY activities for kids. Join our Telegram group and follow us on YouTube & Facebook for more creative content.
Reviewed By Rachit Gupta
Read More:
- How to Make a Paper Flower Bouquet – Step-by-Step Instructions
- How to Make Paper Sun Toy Step-by-Step Instructions Easy Tutorial
- How to Make Paper Aquarium Fish Step-by-Step Instructions Easy Tutorial
- How to Make a Paper Bunny Step-by-Step Instructions Easy Tutorial
- How to Make a Paper Butterfly Step-by-Step Instructions Easy Tutorial


