


Painting
Polythene Stamp Flower Garden Artwork Tutorial

Explore a polythene stamp flower garden artwork step-by-step tutorial for kids to have fun. This activity is for you to learn a new crafting technique.
This polythene stamp flower garden artwork step-by-step tutorial welcomes all the creative minds. The following tutorial will teach you how to make a flower stamp out of a polythene . This is going to be easy to understand for kids. Adults as well as kids of all ages, both would enjoy this plastic flower stamp activity. They can perform this interesting and fun activity. While doing this activity, children would learn a new method of art and craft. Have fun!
by Sriya Das
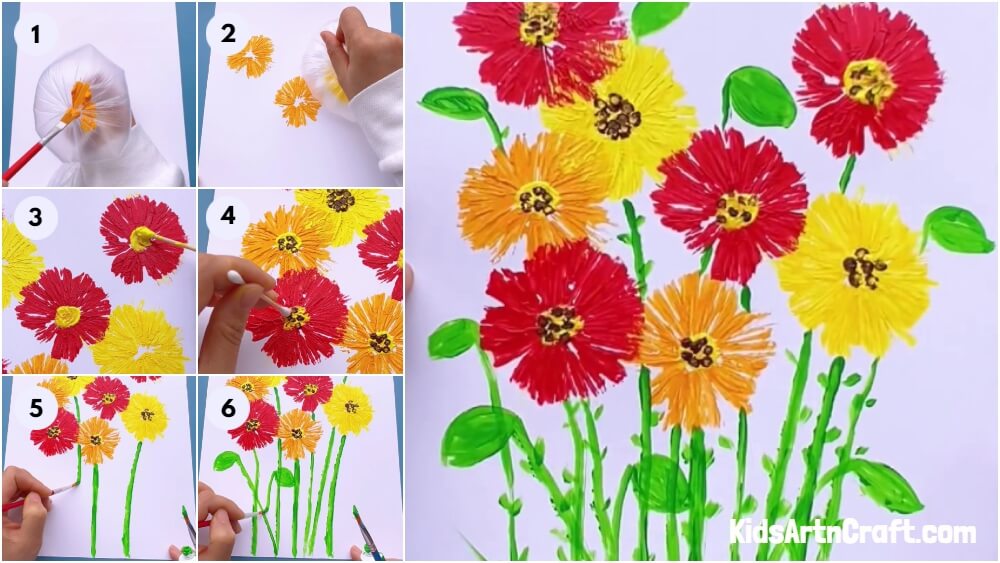
Easy Polythene Stamp Flower Garden Artwork For Kids

Read More: Christmas Wreath Artwork Tutorial Idea For Kids
Material Required
- An A4 size plain white sheet
- Polythene bag
- A tape
- Poster colors
- Paint brushes
- Earbuds
Instructions:
Step 1: Taking A Polythene

Take a polythene and an A4 size plain white sheet.
Step 2: Holding The Polythene And Twist

Now, hold the end of the polythene bag and twist it tightly. Secure the twist using the tape.
Step 3: Blowing Air Into The Polythene

Now, keep the twisted part of the polythene bag inside and blow air into the bag. Hold the end to prevent the release of air. This process would create an interesting texture on the polythene bag. This would stamp out the polythene bag.
Step 4: Texturing The Polythene With Orange Colour

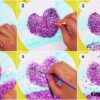
Now, paint the texture part of the polythene bag, don’t paint the central part. Paint with orange poster color using the paintbrush.
Step 5: Imprint On the Sheet

Imprint the painted portion of the polythene bag on the plain white sheet. Now, use the yellow poster color leaving the central part to imprint the impression of the stamp.
Step 6: Stamping Red Poster Color

Now, use the red poster color leaving the central part to imprint the impression of the stamp.
Step 7: Imprint All Over It

Imprint the flower pattern all over the white sheet. Don’t worry if it overlaps.
Step 8: Central Part of Flowers

Now, start working on the central part of the flower. For this, you need the yellow poster color and a paintbrush to paint the central part of the flowers.
Step 9: Anthers of the Flowers

Work on the anthers of the flowers, For this, you need earbuds and brown poster color. Just imprint the head dipped in the brown poster color on the central portions of all the flowers.
Step 10: Drawing Stems

Now, use the green poster color to draw the stems of the flowers.
Step 11: Drawing Leaves

Use the same green poster color to draw the leaves on the stems of the flowers.
Polythene Stamp Flower Garden Artwork Tutorial!

With this you have come to the end of the polythene stamp flower garden artwork step-by-step tutorial. This was a good learning experience for kids as they learnt to make flowers by using the polythene bags. They have learnt to paint a heart by this simple method. This craft idea would teach students about a new craft skill, they will end up polishing their skills. This must be fascinating for kids of 6-9 years of age. Kids have learnt about a new technique from this tutorial. They can use it as room decor.
Hope you liked this polythene stamp flower garden artwork step-by-step tutorial. Don’t forget to share your comments and inform us about your experience. Make sure to revisit this website again!
Thanks for visiting our website.
Follow us on YouTube for art and craft tutorials and much more.
More Articles from Kids Art & Craft
- Unique Flower Painting Artwork Tutorial From Cotton Earbud
- Beautiful Cherry Blossom Tree Branch Painting Tutorial For Kids
- Pretty Red flowers Artwork Step by Step Instructions
- Rainbow Parrot Painting Step by Step Tutorial For Kids
- Wobbly Flowers Creative Painting Tutorial For Kids