

Drawing
Simple Animal Drawings for Kids


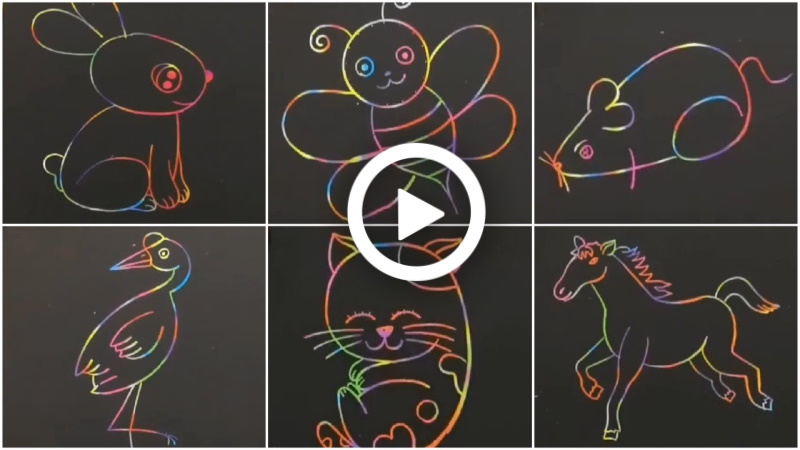
These drawings are very simple to draw, and your kids will enjoy drawing these animals. It will not take a lot of time,e and your kid will learn some new things. These will enhance their knowledge and understanding, ng and they will have fun. So teach these animal drawings to your kids and help them gain more knowledge about them. Below is the step-by-step process of drawing these 10 different animals, following them, and drawing these amazing and easy animals.
Read More: Easy Animal Drawings for Kids To Enlighten Your Budding Artist
Simple Animal Drawings for Kids
Materials required:
- Pencil
- Paper
Drawing 1: Butterfly
Steps:
- Draw a circle and make 2 circles inside that. Now, make a dot inside the small circles.
- Draw the face inside the circle.
- Now draw 2 curvy antennas on the top of the circle.
- From the bottom of the circle, draw a petal shape for the body with the pointed end.
- Now draw curvy lines inside i,t, leaving some space between them.
- Draw 2 U shapes as wings from both sides.
Drawing 2: Teddy bear
Steps:
- Draw a circle, then draw 2 ”6” one after the other on one side and 2 reverse ”6” on the opposite side, and draw a line at the bottom to attach them.
- Now, inside the circle, we draw 2 curvy lines as eyes and one small circle.
- Then draw a big circle over the small circle and 2 U’s as shown.
- Draw 2 ‘U’ shapes on the top of the circle as ears and draw 2 ‘U’ shapes inside it.
Drawing 3: Snake
Steps:
- Draw a 6 and then an outer line of that as shown.
- From that 2 lines, draw an oval shape and merge them.
- Now again make an outer line and merge it as shown.
- Draw 2 circles as eyes and 2 dots inside them,t and draw a curvy tongue.
- Draw an outer line and a tail at the bottom again.
- Now draw small flowers all over the body and curvy lines, leaving some space between them.
Drawing 4: Fish
Steps:
- Make a circle and then draw 3 lines towards the circle on all 4 sides, the last one bigger than all.
- Now draw a curvy line inside the circle and a 3 in the middle of the line.
- Draw a circle inside the big circle and a dot inside the small circle.
- Now draw some lines inside on all the 3’s, leaving the mouth.
- Draw a few circles above the mouth of the fish.
- Now draw a few horizontal and vertical lines on the body of the fish.
Drawing 5: Rat
Steps:
- Draw a 3, and from the top side, draw a U as shown in the video.
- Now draw a curvy line between and from the backside of the 3. Draw a shape like an oval, and at the bottom, just curve it and make it a reverse 6.
- Draw the tail and a circle and an 8 inside it for the eyes.
- Now draw a dot as the nose and 2 lines on each side of the dot.
- On the side of the reverse,6 draw a circle and 2 small lines inside it as legs.
Drawing 6: Duck
Steps:
- Draw a curvy 2 as shown and a pattern before 2.
- Now draw a 3 inside and extend the length of the bottom as shown.
- Draw a 3, and from the top, extend it and merge it with the other end.
- Now draw a circle, a dot, and a curvy line at the top.
- Draw 2 lines inside the 3, a nd draw 2 curvy lines at the bottom as waves.
Drawing 7: Bunny
Steps:
- Draw an oval and then a 6 at the bottom of it, and a line from the other side.
- Now draw 2 U shapes at the top side of the oval.
- Draw a circle and a line, and 2 dots inside the oval,l and a small line as a smile.
- Draw a dot outside of the oval as a nose.
- Now draw a curvy U at the bottom and 2 shapes as the legs.
- Then draw a tail as shown.
Drawing 8: Cat
Steps:
- Draw a, and then on the top of i, draw 2 ears as a curvy V.
- Now draw 2 curvy lines and a semi-circle and a 3 towards the semi-circle inside the 9.
- Then 3 lines on both sides.
- Now draw the curvy lines for the legs as well as hands.
- Draw a tail at the bottom and a few shapes on the body of the cat.
Drawing 9: Bird
Steps:
- Draw a 3 as shown, a horizontal V, and then a line crossing the V.
- Now draw a 9 at the top and a circle and a dot inside it.
- Draw a curve below the eyes and a curve from. Now, we draw a line from the curve and make it a cone shape.
- From the end of the curve, draw a line, and at the bottom, draw as shown to merge it.
- Now, on the inside, we draw a wing and at the bottom of the legs, from a few lines.
Drawing 10: Horse
Steps:
- Draw a curvy line,e then again a curvy line as shown.
- Now draw an eye and some patterns at the top and a petal-shaped ear.
- From that ear, draw a line,e then curve it, and draw as shown in the video.
- Now, from the other side, draw a line and then curve it, then draw a line touching it as in the video.
- Draw a line next to it and merge them. Now, draw another 2 curvy lines and merge them.
- From the one leg draw a curvy line and draw a line and merge with the other line.
- Again,n at the front, do not draw a line as a leg.
- Draw 2 curvy lines as a tail and merge them.
- Now, from the top drawer as shown.
All 10 drawings are ready. These are very easy and simple to draw, and kids will have fun drawing them. You can help your kids in drawing these, and they will enjoy it. They will draw it as well as know the animals, which will help them. Try these simple and beautiful animal drawings and teach your kids some new things, which will be exciting for them.
FAQs on Animal Drawing
Q1. What materials do I need for animal drawing for kids?
Answer: You will need paper, pencils, crayons, colored pencils, markers, or paint.
Q2. What are the steps for drawing animals?
Answer: First, sketch the basic shape of the animal. Then, add details like eyes, ears, and fur. Finally, add color to finish the drawing.
Q3. How can I make my animal drawings look realistic?
Answer: Pay attention to the details of the animal and try to match the colors to real life. You can also use shading to add dimension.
Q4. What type of animal should I draw?
Answer: You can draw any animal you want! Consider starting with a simpler animal, such as a cat or dog.
Q5. What tips can I use to draw animals better?
Answer: Look at real-life animals for reference. Use basic shapes to make the drawing easier. Practice often to improve your skills.
Q6. How can I make my animal drawings look more creative?
Answer: Use unique colors and patterns, or draw the animal in a different pose.
Q7. What age group is best for animal drawing?
Answer: Animal drawing is suitable for children of all ages. Younger children may need more guidance.
Q8. What are some simple animals that I can draw?
Answer: Simplest animals to draw include cats, dogs, rabbits, horses, and birds.
Q9. Should I draw animals from memory or from pictures?
Answer: You can draw animals from either memory or pictures. However, it’s easier to use pictures as a reference when you are starting.
Q10. How can I find inspiration for animal drawing?
Answer: Look at photos of animals online or in books. Visit a zoo or farm to observe animals in real life. Look at the artwork of animals for ideas.
Simple animal drawings for kids are a creative and enjoyable way to encourage artistic learning and imagination. These easy drawing activities help children practice important motor and observation skills while having fun creating cute animal artwork at home or in the classroom.
Fun-filled crafts, playful learning, and creative inspiration for kids daily! Join our community on Telegram, YouTube & Facebook
Reviewed By Rachit Gupta
Read More:
- Alphabet Drawings for Kids – Step by Step Image Tutorials
- Learn To Draw Easy Drawings From Words
- Pencil Drawings for Kids – A Walk Through The World Of Dazzling Arts
- Simple Pencil Drawings for Kids – Easy Ideas with Pictures