DIY and Crafts
How to Make A Paper Fish


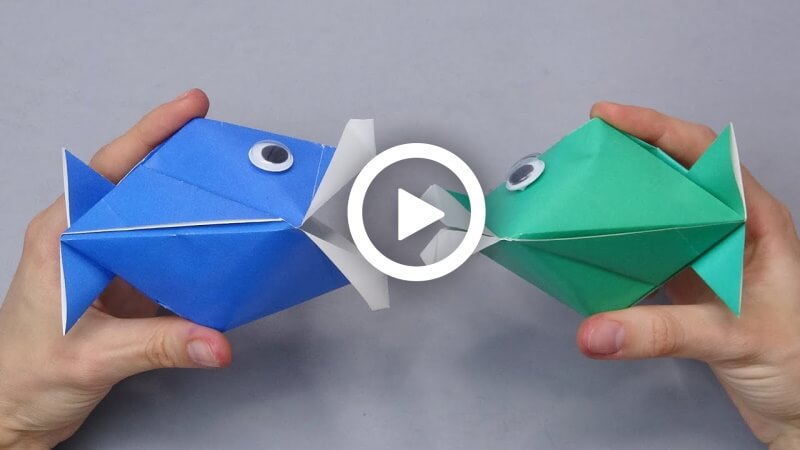
Hello everyone, I am back with my new tutorial. Like I have told you before, we will always have fun learning with paper and sheets. Remember I told you how to make an origami fish, likewise, we will today learn to make a Paper Fish.
It is easy, and it will grow interest in art and craft. So, without wasting anytime come let us do it step-wise so that we can learn it sincerely and have fun learning it.
Follow the following steps to make and learn an interesting thing today.
How to Make A Paper Fish
Step: 1 – Take a square sheet of 19*19 cm.
Step 2 – Fold the sheet as it will become a triangle.
Step : 3 – Again, fold it and it will become a right-angled triangle.
Step: 4 – Divide it into 3 equal parts by locating two points at 4.5 cm and 9 cm.
Step: 5 – Fold the triangle with the help of a scale at a point of 9 cm.
Step: 6 – Do the same at the point of 4.5 cm.
Step 7 – Fold the larger part inside.
Step: 8 – Fold it from its lower part to make another triangle and fold it towards the outside.
Step: 9 – Now rotate it towards its back and then bend the part to the end of the edge.
Step: 10 – Now come to the upper part of the sheet and fold the paper as it forms a right-angled triangle again.
Step: 11 – Fold it from the edge again.
Step 12 – The part that is left outside has to be folded inside and outside both.
Step: 13 – Unfold the whole sheet.
Step: 14 – Rotate it towards its backside.
Step: 15 – Fold it with the following lines on the sheet.
Step: 16 – Repeat the same with the triangle of another side too.
Step 17 – You can see a square shape in the center of the sheet; fold the sheet according to the lines of the square.
Step: 18 – Fold it inside from its center line.
Step: 19 – You will observe two triangles on the sides and a quadrilateral and its legs upside down.
Step: 20 – Fold the triangle into the shape of a right-angled triangle.
Step: 21 – Unfold it to its center and then lie down on its center.
Step: 22 – Do the same for the other side of the center.
Step: 23 – Bring some space in between them.
Step: 24 – Draw and paste its eyes.
Step: 25 – And your paper fish is ready.
See how simple it was and also very interesting. Go make, learn, and teach your kids and siblings. It is really fun learning, and it is learning something new and interesting.
It is very important to learn new things in life, and also learn crafting, as crafting gives you new confidence in your lifestyle.
Hope you have liked today’s tutorial.
We should spend at least 30 minutes of our day learning crafting. It will grow our interests in many new things.
Stay tuned for the next tutorial…. Till then, stay safe, stay healthy, and learn more.
FAQ’s on How to Make A Paper Fish
Q1. What materials do I need to make a paper fish?
Answer: You will need a piece of paper, scissors, and a glue stick or other adhesive.
Q2. What kind of paper should I use?
Answer: You can use any kind of paper, such as construction paper, cardstock, or even regular printer paper.
Q3. How do I fold the paper?
Answer: Fold the paper in half lengthwise and then fold it into thirds widthwise.
Q4. What shapes do I need to cut out to make the fish?
Answer: You will need to cut out the shape of a fish from the folded paper.
Q5. How do I make the fins and the tail?
Answer: Once the fish shape is cut out, fold the sides of the body to create the fins and the tail.
Q6. How do I make the eyes?
Answer: You can make the eyes by cutting out two small circles and gluing them onto the fish.
Q7. How do I make the scales?
Answer: Cut out small triangle shapes from the paper and glue them on the fish’s body to create the scales.
Q8. How do I make it look realistic?
Answer: You can use a marker to add details to the fish, such as outlining the scales and adding stripes or spots.
Q9. How do I attach the fish to a string?
Answer: Punch a hole in the top of the fish and thread a string through it to hang the fish.
Q10. How do I make a 3D paper fish?
Answer: To make a 3D paper fish, you will need to cut out several pieces of paper and glue them together to create the shape of a fish. Make sure to cut out fins, a tail, and eyes before gluing the pieces together.
Making a paper fish is a fun, creative, and educational activity for kids of all ages. With simple craft supplies and easy folding steps, children can create beautiful fish designs while improving their artistic and motor skills. This DIY paper fish craft is perfect for home activities, school art projects, and fun learning sessions with family and friends. Encourage kids to experiment with different colors, patterns, and decorations to create their own unique underwater world.
Your one-stop destination for kids’ crafts, DIY fun, and creative learning activities! Join us on Telegram today and follow us on YouTube & Facebook.
Reviewed By Rachit Gupta
Read More:
- How to Make An Antistress Transformer Paper Toy
- How to Make An Elephant – Moving Paper Toy
- How to Make An Origami Fish
- How to Make A DIY Paper Cat
- How to Make A Paper Butterfly