


Painting
Patterned Leaf Branch Artwork Tutorial For Beginners

We brought you, art lovers, a unique artwork over leaves with this step-by-step tutorial! Create it to unleash your creative madness with us!
A warm welcome to you in this amazing tutorial for making artwork over leaves! This artwork is so creative and filled with enormous joy paintings that you will love for sure! All you have to do is gather the basic art supplies that you already have at home and a fresh leaf stem you will easily find in your garden! Unleash your creative madness with us by making this wonderful new art piece for your collection! Hurry and grab the materials to begin!
DIY Patterned Leaf Branch Artwork
Read More: Make Tortoise Leaf Art Easy Tutorial For Kids
Materials Required
- Leaf Branch
- Colored Markers
Procedure
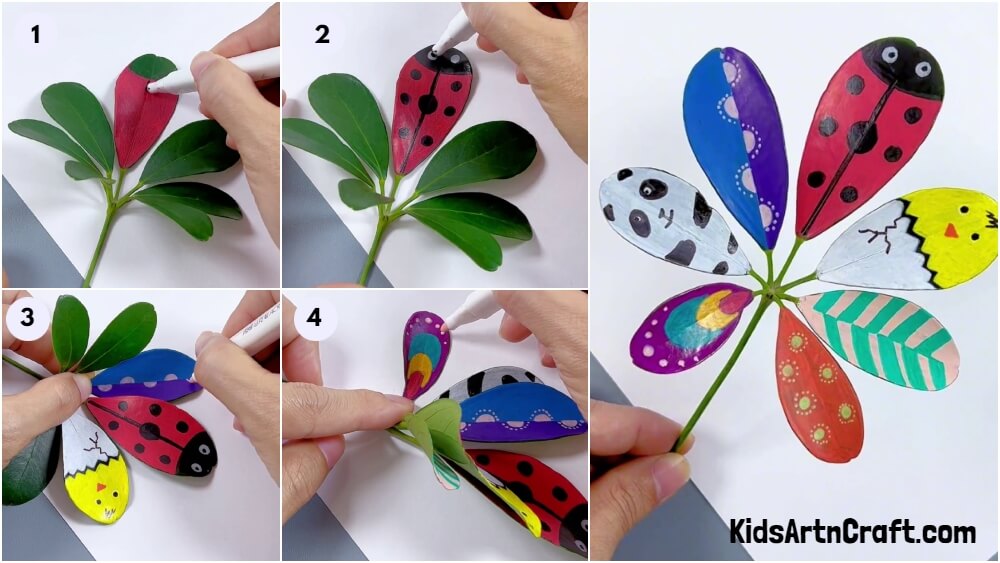
Step 1: Taking A Leaf Branch
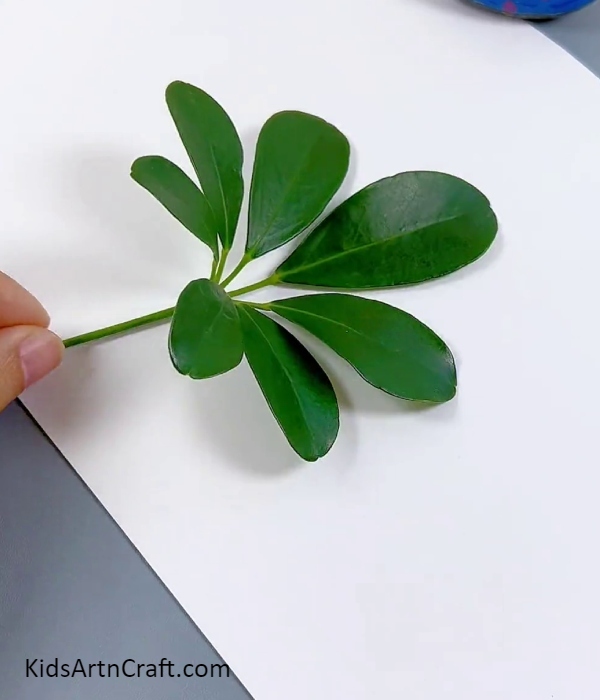
To begin this craft, take a leaf branch.
Step 2: Making A Ladybug
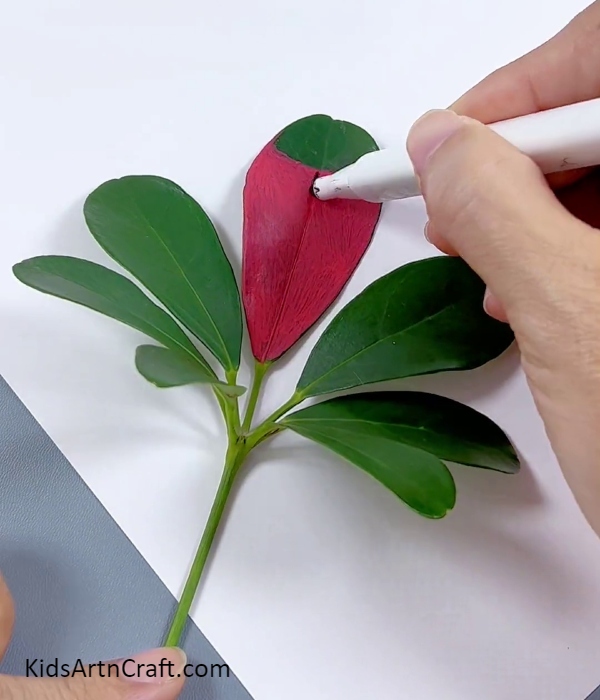
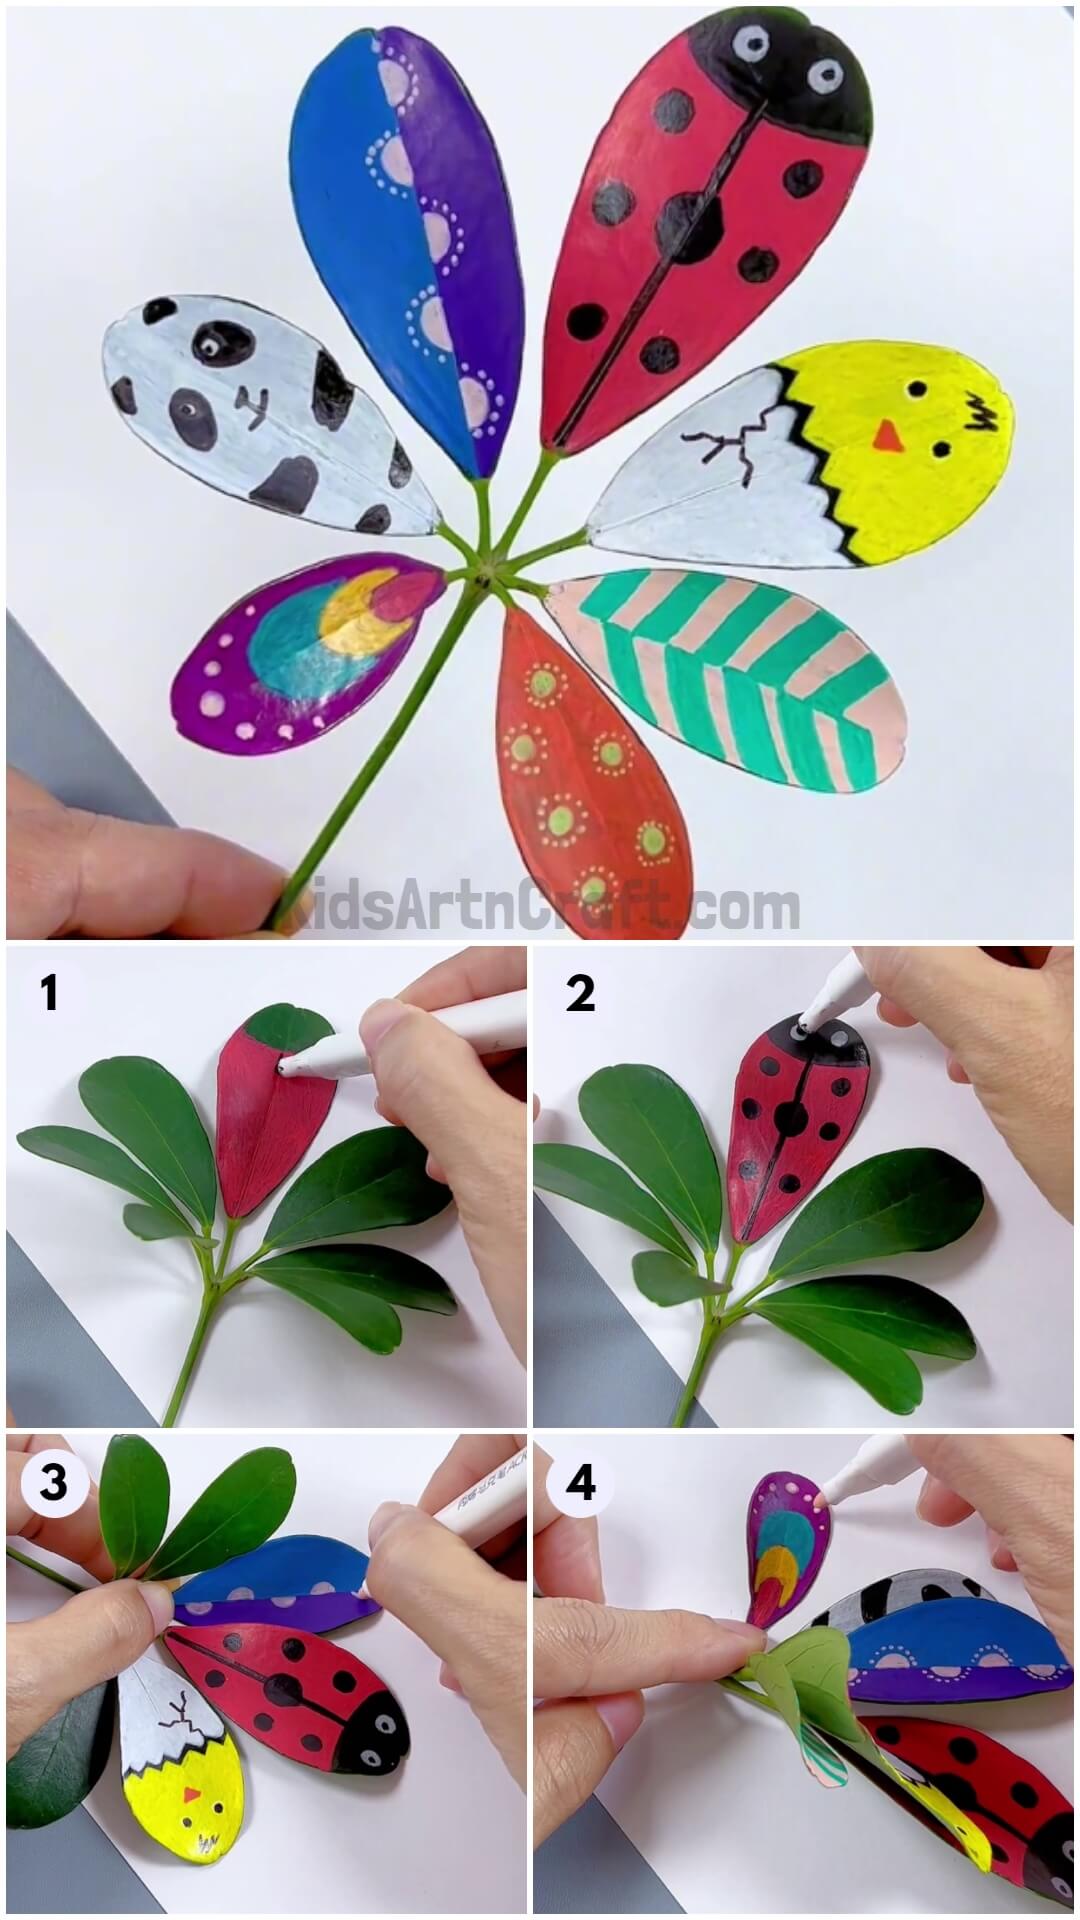
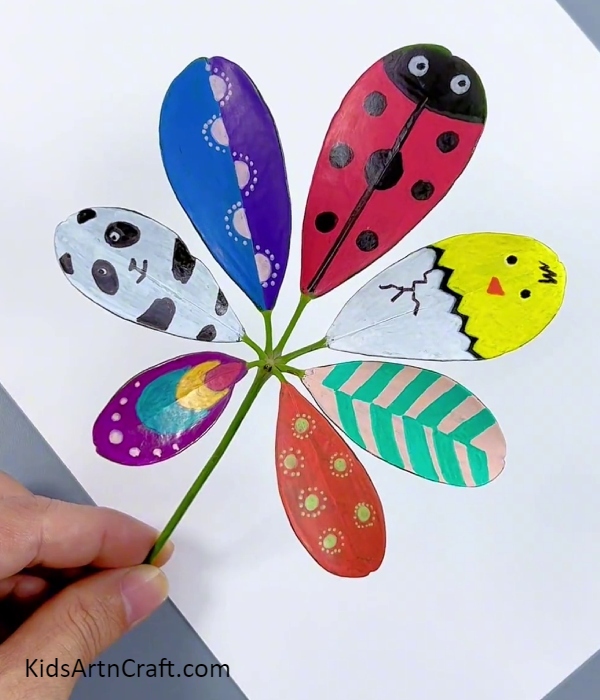
Using a red marker, color the middle leaf red to form the red body of the ladybug as shown in the image.
Step 3: Completing Making The Ladybug
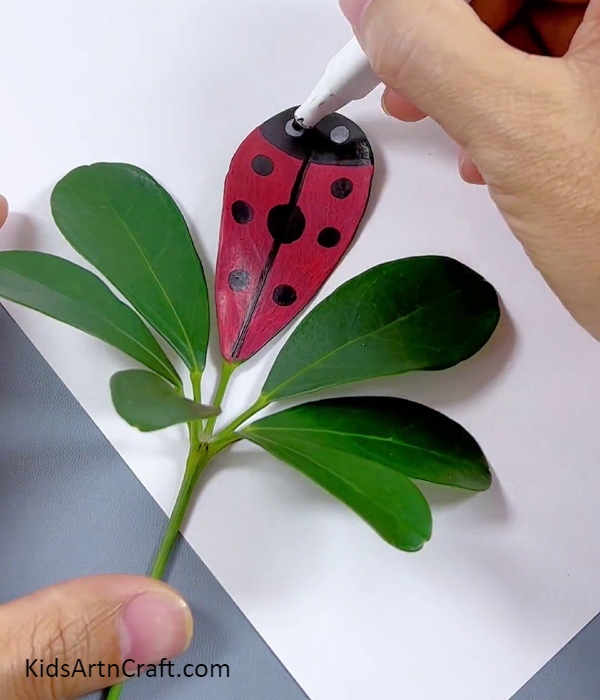
Using a black marker, draw a straight line over the middle vein of the leaf and make a circle in the middle of it, then make further 3 smaller circles on the red body on each side of the line one below the other. Then, for the face of the ladybug, use the marker to color the leftover leaf part and use a white marker to make 2 circles for the eyes, and use again black marker to make a dot in the eyes for the eyeballs.
Step 4: Making More Designs On The Leaves
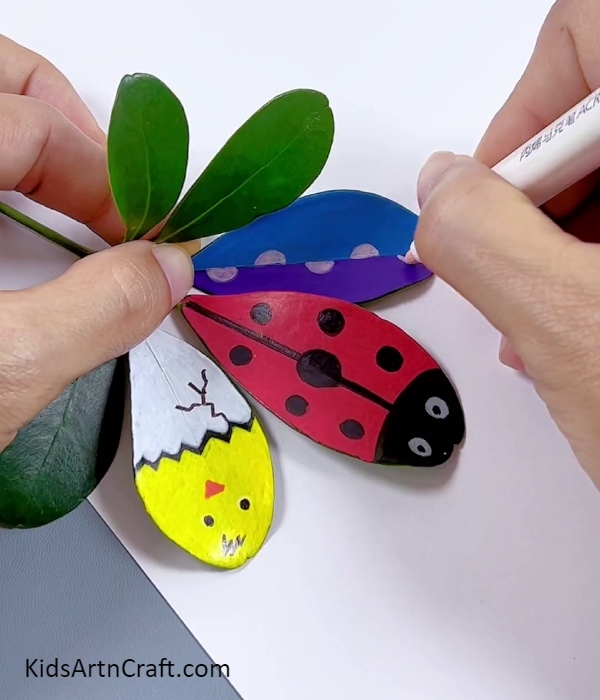
Using a white and yellow marker, make a chick hatching from the egg, making the egg of white color and the chick yellow as shown in the image. Further, using the black marker, make a zig-zag line to separate the chick and egg also make some lines on the egg to make it look broken, make 2 dotted eyes of the chick and some hair over the head, and using an orange marker make a triangular nose of the chick.
Now, using a purple and blue marker color another leaf half-half from the middle vein, and using a white marker, make semi-circles on each side alternatively one-by-one over the middle vein and then cover the curve of semi-circles with dots using a white marker.
Step 5: Completing Designing All The Leaves
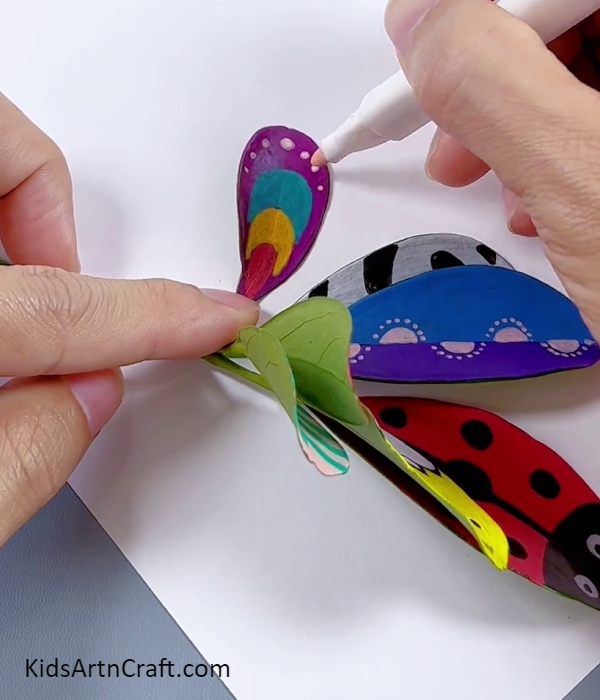
Using a black and white marker, make a panda design on the leaf beside the blue and purple one. Color the whole leaf white for the body of the panda and using black marker make the details like, curved hands on the side of the leaf and curved legs just below the hands but a little smaller. Add a smile with a small triangular nose in the middle of the leaf also the eyes above the smile and ears on the top corners.
Using a green and white marker, make a lined design on the leaf beside the chick one. Make slanting lines on each side of the middle vein with the markers one by one alternatively. Make sure to keep the lines thick.
Now, for the leaf beside the lined one, using an orange marker, color it out whole. Then using a yellow marker make small circles randomly over the orange base and then cover the circles with dots around the using the yellow marker only.
For the last leaf, take purple, pink, blue, yellow, and white markers. Using the pink marker first make a small drop shape at the bottom of the leaf along the leaf shape. Then, using the yellow marker, make a thick curve over the pink shape along it. Using the blue marker, again make a bigger thick curve over the yellow one along it. At last, using the purple marker, color out the whole remaining space of the leaf. Using the white marker, make dots over the top of the leaf along its boundary.
Your Designed Leaf Branch Is Ready!
Whoa! You are stunned too, right?! Your amazing artwork over leaves is ready in no time!
Now you can take a minute to admire your creation and don’t forget to show it off to everyone else too, give them a chance to appreciate your talent and hard work! You can even use this artwork for your school art and craft project! This is the best artwork for you to make if you are lacking materials and money too! This will be a budget-friendly creation! If not made yet, then try it out now!!!!
We are hoping you liked the tutorial, if yes, then do give it a like and share it with as many people as you can! We will be highly motivated by your positive feedback in the comments section!
Follow us on Youtube for art and craft tutorials and much more.
More Articles from Kids Art & Craft
- Rainbow Parrot Painting Step by Step Tutorial For Kids
- Cute Giraffe Face Painting Tutorial For Beginners
- Mushroom House Fantasy Painting Idea For Beginners
- Red Crabs Underwater Painting Step by Step Tutorial For Kids
- Cute Cat Easy Step By Step Artwork Painting Tutorial