

Home Decor
DIY Room Decorating Ideas for Teenagers


Let’s learn some easy DIY room decor!
DIY room decorating ideas are a fun and creative way for teenagers to personalize their living space while expressing their unique style and personality. Handmade room décor projects help teens develop creativity, confidence, organization skills, and artistic thinking. From wall decorations and photo displays to colourful lighting and desk organization, DIY crafts can completely transform a bedroom into a cozy and inspiring space.
Teen room décor projects are also budget-friendly and perfect for school holidays, weekend activities, or home improvement ideas. Parents and teenagers can enjoy these craft activities together while creating meaningful and stylish decorations for bedrooms, study corners, or gaming setups.
12 DIY Room decorating ideas for teenagers
First Decor:
Materials:
- Wooden sticks
- Hot glue gun
- Scissors
- A pom-pom.
- Golden colour paint and brush.
Procedure:
- Take the sticks and cut them with scissors.
- Arrange the sticks in a cat shape.
- Press glue on the sticks.
- Make the face of the cat with the sticks like 3D by arranging all the sticks in a lifted triangular shape.
- Press glue on the sticks.
- Take gold paint and paint the sticks with a brush.
- Glue a pom-pom on the tip of the nose.
- Your first Decor will be ready!
- Many other animals, as well, can follow these steps.
Second Decor:
Materials:
- Empty Coke can
- A pin
- Box cutter
- Small glass jar
- A candle.
Procedure:
- Take an empty Coke can and a pin, and poke holes in the sides of the label.
- Carefully cut out the bottom of the Coke can with a box cutter.
- Take a small glass jar and a candle, place the candle in the jar and light it up.
- Put your can on the glass jar
- Turn off the lights and see the magic!
Third Decor:
Materials:
- Round mirror
- Wire hanger
- Faul flowers
- A ribbon
- Hot glue gun.
Procedure:
- Take the wire hanger and bend it with your hand into the shape of a round mirror, like a ring.
- Wrap the wire circle with a ribbon.
- Apply hot glue to secure it.
- Take the foul flowers and wrap them around the ring. You can add as many flowers as you can.
- Add glue to the back of the round mirror and attach the flower ring.
- Dry it.
- Hang the mirror up!
Fourth Decor:
Materials:
- Cardboard
- Pencil and eraser
- Paper knife
- Craft glue.
- Glow-dark paint.
- Red and white paints and brushes.
- A picture of a skull and a crossbone.
Procedure:
- Take the cardboard and stick a Stop sign on it with a pencil and eraser.
- Carefully cut the sign out from the cardboard with a paper-knife.
- Paint it bright red with colour and a brush. Carefully outline the letters.
- After the red paint dried, paint the letters and outline with white paint.
- Take a picture of a skull and crossbones, and place it on the sign and cut the picture out.
- Use the picture as a stencil on the stop sign.
- Paint it over with glue and glow-in-the-dark paint.
- Take out the picture.
- Hang the sign, turn off the lights and see the difference!
Fifth Decor:
Materials:
- Transparent water glass bottle
- Silicon
- A whisk
- Paraffin wax
- A spoon
- Metallic gold paint.
Procedure:
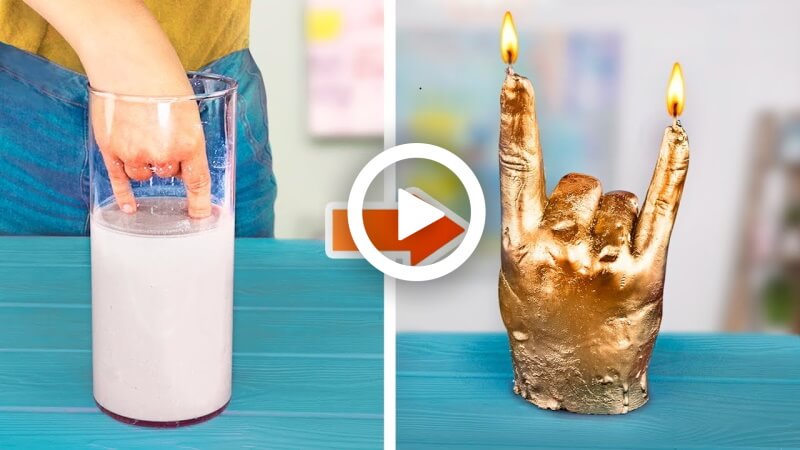
- Take silicones and pour them into a glass water bottle.
- Use a whisk and mix it thoroughly.
- Take your hand, make a peace sign and dip your hand into it.
- Wait for the silicon to harden.
- After the silicon hardens, gently take it out of your hand.
- Melt some paraffin wax, and pour it into the hardened silicone with a spoon.
- Wait for an hour.
- Take the silicon out in pieces and carefully remove the handpiece
- Paint it with metallic gold colour spray.
- Put a candle in it and lighten your room!
Sixth Decor
Materials:
- A rectangular-shaped big photo frame.
- Pieces of toys
- Hot glue
- A cord
- Gold sprays paint.
Procedure:
- Take toy wheels and a photo frame, and attach the wheels to the frame with hot glue.
- Also, add some pieces of other toys as well.
- After it dried, take a gold spray paint and spray it all over the frame.
- Put a cute photo in it and decorate your room. You can also attach a cord to the back of it to hang it up.
Seventh Decor
Materials:
- Multi-coloured sticker paper
- A chalk
- Scissors
- A pencil
Procedure:
- Take a black sticker paper sheet and draw wavy lines in the middle of it with chalk.
- Cut out the chalk lines from the sheet with scissors.
- Attach the black sheet to a more colourful sheet and draw the lines on the coloured sticker paper with a pencil.
- These curves should be a few centimetres away from the black edges.
- Cut off the extra part.
- Take off this new sheet and stick it on another colour sticker sheet.
- Repeat the previous process until it becomes a whole rainbow.
- Cut out a multicoloured sun by using the same method and stick it into the black background.
- Attach it to your door.
- You can add as many as you want, depending on your artistic value.
- You can also attach your name or any sign to it
- Your out-of-the-world door sign will be ready!
Eight Decor
Materials:
- A cardboard
- Fishing net
- Scissors
- Paint and brush
- Hot glue
- Wire hanger
Procedure:
- Take a cardboard and cut out a heptagon on it with scissors.
- Take your paints, paint the edges red and the background silver with the brush.
- Attach any basketball icons you want to add with glue.
- Take a wire hanger, attach it to the back of the frame with hot glue.
- Take the fishing net, cut it like a basketball net, but do not cut the under part and attach it to the bottom of the frame with hot glue.
- Your basketball net decor will be ready to take your clothes!
Ninth Decor:
Materials:
- Everyday glass
- Modelling clay
- Hot glue
- A spatula
- Plastic flowers
- Feathers.
Procedure:
- Take a few colours of modelling clay, mix them up to get something less vivid.
- Roll the clay out and shape it into a cone.
- Take a glass and glue it outside the glass.
- Smooth the edges of the clay cone with a spatula and make cuts in a waffle pattern.
- Take some plastic flowers and attach them to the waffle with glue.
- Attach some feathers, too.
- Look how beautiful it is! Put your make-up brushes in the glass.
Tenth Decor:
Materials:
- Microfiber cloth
- Felt
- Felting wool
- A laptop
- Scissors
- Marker
- Hot Glue
Procedure:
- Take a microfiber cloth, turn it upside down and put a laptop on it.
- Put hot glue on the corners of the cloth to make a cover.
- Take a white piece of felt, draw some eyes and a cute smile and cut them out with scissors.
- Draw a smaller circle on black felt and cut it out
- Glue them to the previous white eyeballs.
- Attach the eyes and mouth to the cloth with hot glue.
- Take a brown coloured felt, draw two triangles and cut them out.
- Place the triangles on the top sides of the back of the cloth and attach with hot glue.
- Put some felting wool in between the triangles and attach with glue.
- It will make a cute laptop cover!
Eleventh Decor
Materials:
- Picture of a fern
- A coloured paper
- Scissors
- A pencil
- Box cutter.
Procedure:
- Take a picture of the fern to cut it out with scissors.
- Place the fern on coloured paper, go over the edges and draw them with a pencil to outline.
- Cut out the fern outline with a box cutter.
- Take a piece of another colour of paper and glue it to the previous paper you made.
- Take a black piece of paper, put a cut fern on it, and draw edges on it.
- Cut the outlines of the box with a box cutter.
- Glue this paper over the previous paper. It will make a 3D picture.
- Take a frame and disable it.
- Put the picture on the base of the frame and glue the frame pieces with it.
- Take a cord and stick it on the frame’s back with glue.
- Shape the leaves with your hand.
- Hang the picture on the wall!
Twelfth Decor:
Materials:
- Piece of a magnetic board
- Foam papers
- Foam rubbers
- Hot glue
Procedure:
- Take two pieces of foam rubber and a magnetic board. Put the pieces of foam rubber up and down the board with glue.
- Cover the rubber parts with some foam paper with glue.
- Take some foam balls of different sizes and silver colour paint, and paint the balls with the brush.
- Dry them.
- Put the balls on the previous foam papers. They will be the buttons.
- Take a sheet of foam rubber and draw some Tetris shapes on it.
- Cut out the shapes with a box cutter.
- Attach the pieces with different coloured foam papers.
- Go over the pieces with a marker pen, then cut them out from the paper.
- Attach them to the bases.
- Take magnets and put them under the shapes.
- Stick them on the board.
- Your Tetris board will be ready!
- Use them on your work and decorate your room.
FAQs on DIY Room Decorating Ideas for Teenagers
Q1. What are some easy DIY room decorating ideas for teenagers?
Answer: There are many easy DIY room decorating ideas for teenagers, such as adding wall decals, making a collage of photos, painting a mural, adding a few accent pieces, or creating a headboard.
Q2. What are some budget-friendly DIY room decorating ideas for teenagers?
Answer: There are many budget-friendly DIY room decorating ideas for teenagers, such as repurposing furniture, making wall art with fabric scraps, creating your own artwork, using string lights, or using old or thrifted items.
Q3. What are some creative DIY room decorating ideas for teenagers?
Answer: There are many creative DIY room decorating ideas for teenagers, such as making a chalkboard wall, creating a photo wall, painting a patterned wall, hanging a tapestry, or making a canopy bed.
Q4. What are some tips for making DIY room decorations for teenagers?
Answer: Some tips for making DIY room decorations for teenagers include considering the teen’s style, researching Pinterest and other sites for ideas, checking out thrift stores for supplies, and keeping the project simple and manageable.
Q5. What kind of furniture should I get for my teenager’s bedroom?
Answer: The kind of furniture you should get for a teenager’s bedroom depends on the size of the room, the teen’s style, and your budget. Generally, a sturdy bed, a desk, and a comfortable chair are essential.
Q6. What colour should I paint my teenager’s bedroom?
Answer: The colour you should paint a teenager’s bedroom depends on the teen’s style and preferences. Generally, neutral colours such as whites, grays, and beiges are good choices.
Q7. What kind of lighting should I use in my teenager’s bedroom?
Answer: The kind of lighting you should use in a teenager’s bedroom depends on the teen’s style and preferences. Generally, a combination of overhead lighting, accent lighting, and task lighting is best.
Q8. How can I keep my teenager’s bedroom organized?
Answer: Keeping a teenager’s bedroom organized can be a challenge. To help, have the teen designate a place for each item and make sure they keep it there. Also, use storage bins and baskets to help keep items off the floor.
DIY room decorating ideas for teenagers are a perfect combination of creativity, self-expression, and fun. These easy and affordable decoration projects help teens create a stylish and comfortable personal space while learning valuable creative skills. Whether it is wall décor, lighting ideas, desk organization, or handmade crafts, DIY room decoration activities inspire teenagers to turn ordinary rooms into beautiful and personalized spaces.
Discover the joy of learning through fun crafts and creative activities for kids! Join our Telegram community now, and YouTube & Facebook
Reviewed by Yash Sharma
Read More:
- DIY Recycled Plastic bottle flowers with Popsicle sticks decoration (Tutorial)
- Easy Chart-Making Ideas for School Decoration
- Easy Paper Bat for Halloween Decoration
- DIY Wall Décor Ideas – Kids Room Decoration
- New Year’s Eve Craft Decoration Ideas