


Paper Crafts
Easy paper Bat for Halloween Decoration

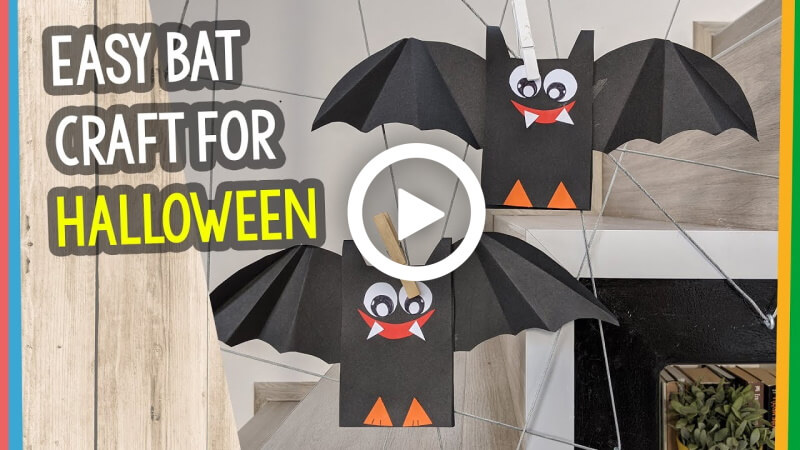
Halloween is almost here! You must have planned a scary party and family get-together. You must have wanted to decorate your house with some fun and scary stuff. You have come to the right place! Today you’re going to make a DIY Halloween bat. Kids will love them. It will be made of paper, so it’s going to be so easy and fun! So, without any words, let’s make it!
How to make a Paper Halloween bat
Materials:
- A black circle paper of 21*21 cm and 80 gsm.
- Rectangular black paper of 28*12 cm and 80 gsm.
- A small piece of white paper.
- A small piece of red paper.
- A small piece of orange paper.
- Two eye buttons.
- A glue stick.
- Scissors.
Procedure:
- Take a black circle paper of 21*21 cm and 80 gsm, fold it in half sideways by making a middle fold line.
- Cut the folded side by making waves like curves with scissors.
- Fold the paper up and down by rolling it from bottom to top.
- Separate the two pieces of the paper.
- They will be the wings of the bat.
- Take a long, rectangular black paper of 28*12 cm and 80 gsm, fold it in half up and down by making a middle fold line.
- Cut the bottom of the paper like a small upside-down flat triangle shape. To get a better idea of the shape, please look at the reference video.
- This is the body of the bat.
- Place the cut portion on your desk.
- Take a white paper, and cut out two big circles of the same size.
- Take two eye buttons, attach them to the two big circles with a glue stick. These will be the bat’s eyes.
- Take the two eyes and the body of the bat, then glue them on the body’s upper part with a glue stick.
- Take a piece of red paper, cut out a small smile-like shape with scissors.
- Take the piece and attach it under the eyes of the bat’s body with the glue stick.
- Take a white page, and cut out two little triangles which are supposed to be the bat’s teeth.
- Take the pieces and attach them to both sides of the smile on the bat’s face with the glue stick.
- Take an orange colour page, cut out two small triangles which will be the bat’s legs.
- Attach the triangles conversely to the bottom of the bat’s body’s two sides with the glue stick.
- Take the two wings you made previously, attach them under the bat’s body by revealing the wings from the front with the glue stick.
- Your scary Halloween bat will be ready!
P.S- You can use different coloured paper as per your help.
Easy Paper Bat for Halloween Decoration Step-by-Step Tutorial
Learn how to make an easy paper bat for Halloween decoration with this simple step-by-step tutorial. This fun DIY paper craft is perfect for kids, classroom activities, and spooky party décor. Create cute paper bats using basic materials and add a creative Halloween touch to your home or school decorations.
Read More:
- Halloween Decoration With Pumpkin Painting Ideas
- Halloween Cardboard Crafts for Kids
- Halloween Fork Crafts Ideas
- Easy Bat Silhouette Art Activities for Kids
- Paper Bag Crafts & Activities for Halloween


