Christmas
How to make a Christmas Bottle Decoration


Christmas is almost knocking on the door! Christmas is the favourite festival of many of you. It is celebrated in different countries all over the world. People like to decorate their houses with Christmas trees, gifts, Santa look-alike toys, and many more. There are many other decorative items people use for Christmas decorations, like lights, bulb lights, small lights, artificial snow, and many more. You must have wanted to decorate your house with some beautiful stuff.
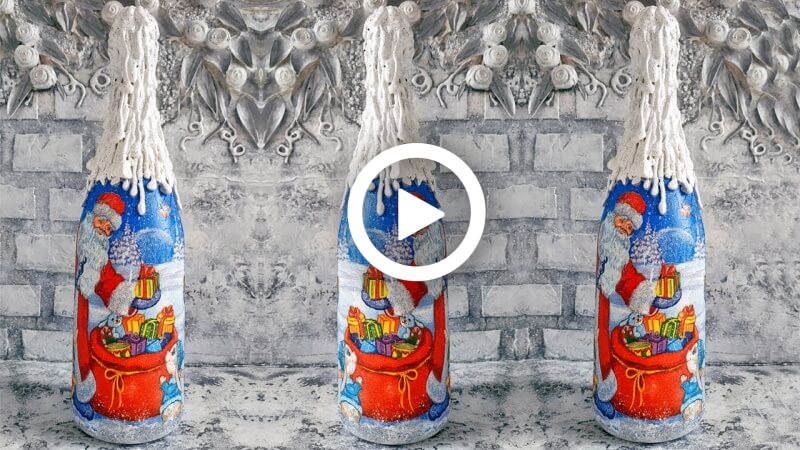
Today, you’re going to learn how to make a dazzling Christmas bottle that will make your room brighter. We all use bottles, and after using them, many of us throw them. So, without throwing them away, it will be nice to make something beautiful with them. So, without any words, let’s get started!
How to Make a Christmas Decoration Bottle
Materials:
- Bottle of champagne ( You can use any type of bottle you want to decorate)
- Decoupage napkins for Christmas or Santa Claus.
- Nail polish remover
- PVA glue
- A glue gun
- A small brush
- Hot glue
- Acrylic paint
- Glitter ( you can use any colour glitter, but we prefer the grey colour)
- Acrylic lacquer.
Procedure:
- Take a bottle of champagne and nail polish remover, use the nail polish remover, and clean the bottle.
- Use Acrylic paint to paint the whole bottle.
- Paint the cap part also properly.
- Take napkins of Christmas or Santa Claus, split them up, and stick them in the bottom-middle of the bottle with the help of PVA glue and a small brush.
- The napkins must cover all the bottom to the middle parts of the bottle.
- After using the brush, use your hand to spread the glue properly in the bottle.
- Take a glue gun, put glue in a straight line all over the upper part of the bottle.
- You should apply the glue as the snow melts over something.
- After applying the glue all over the upper part, dry the glue properly.
- Take the Acrylic paint and paint the parts of the bottle you glued previously with a brush.
- Take glitter ( you can use any colour glitter, but we prefer grey colour) and put glitter on the bottle, especially the upper white part.
- Put some Acrylic paint under the little bottom of the bottle’s circular part with the brush.
- Put glitter on the bottom part to make it shiny.
- Put the same paints and glitter on the napkins of Christmas or Santa Claus and shine them.
- Put the paint and glitter in the parts like Santa’s hats, coat’s white part, etc.
- Then your beautiful bottle will be done!
Wow, it’s so shiny! Just look at how beautiful the bottle looks! This will shine in your home. You can easily make it with the materials that are all available in the market. Santa will love it! Without buying anything, you can use your creativity to decorate your house. Your relatives, guests, and kids will love them. You can also teach them to make it. Use your sense of creativity to do something different. So, hurry up, grab a bottle,e and make a dazzling Christmas bottle.
FAQs on How to Make a Christmas Bottle Decoration
Q1. What materials do I need to make a Christmas bottle decoration?
Answer: You will need a clean glass bottle, paint, glue, glitter, ribbon, and other decorative items such as beads and sequins.
Q2. How do I prepare the bottle for decoration?
Answer: Rinse the glass bottle with warm, soapy water and allow it to dry completely before beginning.
Q3. What type of paint should I use?
Answer: Acrylic paint or craft paint is best for glass bottles.
Q4. How do I apply the paint?
Answer: You can either use a paintbrush or a sponge to apply the paint. If using a paintbrush, make sure to cover the bottle evenly.
Q5. How do I add the glitter and other decorative items?
Answer: Once the paint has dried, you can use a hot glue gun to attach the glitter and other items. Make sure to apply the glue evenly and allow it to dry before moving on to the next step.
Q6. How do I attach the ribbon?
Answer: You can use a hot glue gun to attach the ribbon. Make sure the ribbon is placed evenly around the bottle before applying the glue.
Q7. How do I make sure the decorations stay in place?
Answer: Once you have applied the paint, glitter, and other items, use a spray sealer to make sure they stay in place.
Q8. How long does it take to make a Christmas bottle decoration?
Answer: It depends on the complexity of the design, but it should take anywhere from 1 to 2 hours.
Q9. Can I make the decoration ahead of time?
Answer: Yes, you can make the decoration ahead of time. Just make sure to keep it stored in a cool, dry place until you are ready to use it.
Q10. How do I display the decoration?
Answer: You can display the decoration in a window, on a mantle, or even on a table.
Easy crafts, exciting DIYs, and creative educational activities for kids — all crafted with fun and learning together. Follow us on YouTube & Facebook and join Telegra today!
Read More:
- How to Make a Paper Swinging Horse
- How to Make a Paper Jumping Rabbit – Easy Craft for Kids
- How to Make an Origami Elephant
- How to make a Paper Butterfly – DIY Folding Butterfly – Paper Craft
- How to Make a Flying Butterfly Craft