Paper Crafts
How to Make Stork Beak – Easy Craft for Kids


Hello readers! We have come up with some interesting craft ideas! We know it must be boring to deal with your daily life and activities, and you must want to do something new. Here we come to bring you that. You must know that craft is a very good medicine to remove stress and tension. So, it will be a great experience for you. Today, you’re going to learn how to make a paper toy.
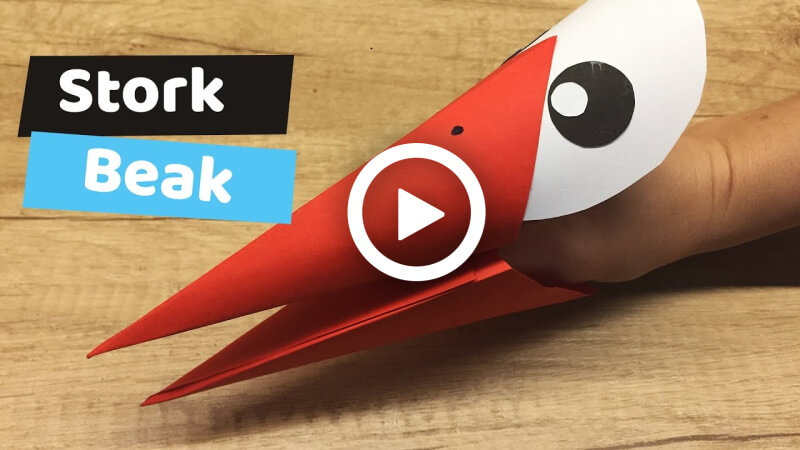
Amazing right! But you must be wondering what toy it is? So, this craft will be a bird’s face, but the most amazing part of this bird will be its moving body. This will fascinate the kids. Kids love birds for their many colours and beautiful structure. So, a big bird toy with a moving beak will amaze them. So, without wasting any time, let’s get started with the process!
This DIY bird craft is perfect for school projects, animal-themed lessons, spring activities, and weekend craft fun at home.
How to Make Stork Beak – Easy Craft for Kids
Materials:
- A red-coloured paper.
- A white paper.
- A black coloured paper.
- A glue stick.
- Scissors.
Procedure:
- Take a red coloured paper, cut out two square shapes of the same size from it with scissors.
- Take one of the square pieces of paper, and place it like a diamond shape on your desk.
- Fold it in half to make a fold line in the middle of the paper.
- Unfold it.
- Follow the middle fold line of the paper and make a half-triangle fold shape with its top corner, middle, and edge, and into the middle fold line.
- Do the same on its other side as well.
- Take the one-half triangle, fold over another fold, and then attach them with a glue stick.
- There should be space inside the piece.
- Take another square of paper you cut previously, and place it like a diamond shape on your desk.
- Fold it in half to make a fold line in the middle of the paper.
- Unfold it.
- Follow the middle fold line of the paper and make a half-triangle fold shape with its top corner, middle, base, and edge, and into the middle fold line.
- Do the same on its other side as well.
- Take the one-half triangle fold over another fold, and then attach them with a glue stick.
- There should be space inside the piece.
- Cut out a small rectangular paper piece from the red colour paper with scissors.
- Place both long pieces one over the other by placing them in the opposite way.
- Take the small square piece and attach it to the sides of the pieces to attach them with the glue stick.
- Now put your hands on the two spaces and move the piece like a bird’s beak.
- Take a while paper and cut out a circle from it with scissors.
- Place the circle on the open side of a bird’s beak tip with the glue stick.
- Take black paper, cut out two small circles of the same size with scissors.
- Place the circles on the two sides of the white area of the bird-like eyes.
- Take the white colour page, cut out two very small circles of the same size from it with scissors.
- Place these white circles on the top of the black circles to complete the eyes.
- Put your hands on the bird’s beak and move it.
- Your fun paper toy will be ready!
P.S- You can use different coloured paper as per your help.
Look how amazing it looks! The best part is the moving beak. What you can do is play with them and show them to your friends. Gift them. Make many of these by using different colours and sizes of paper. Use your sense of creativity and highlight them. So, hurry up, grab your stationery, and let’s make a cute paper toy.
Materials Needed for Stork Beak Craft
- Colored craft paper or cardstock
- Scissors
- Glue stick
- Pencil
- Black marker or crayons
- Googly eyes (optional)
- Tape or elastic band for wearable designs
Using affordable and easily available craft supplies makes this activity beginner-friendly for young children.
Educational Benefits of Bird Crafts for Kids
Paper bird crafts are excellent for improving important developmental skills in children. This stork beak activity can help kids develop:
- Fine motor skills
- Hand-eye coordination
- Creative thinking
- Color recognition
- Cutting and folding skills
- Imaginative storytelling abilities
Interactive crafts also encourage children to learn more about birds, animals, and nature, engagingly and playfully.
Fun Ways to Use the Stork Beak Craft
After making the stork beak, kids can use it for many fun activities:
- Pretend play and storytelling
- School fancy dress activities
- Bird-themed classroom decorations
- Puppet shows and educational games
- Wildlife and nature learning projects
Teachers can also combine this activity with lessons about birds and animal habitats to make learning more interactive.
Tips for Better Craft Results
- Use thick paper or cardstock for a stronger beak shape
- Fold carefully to make the beak open and close smoothly
- Decorate the craft with bright colours and patterns
- Younger kids may need adult supervision while cutting paper
Why Kids Enjoy This Stork Beak Craft
This Easy Stork Beak Craft for Kids is a fun and creative paper activity that children love because it is simple to make and exciting to play with. The moving beak design makes the craft interactive and entertaining for preschoolers and elementary-age kids. Children can pretend to be birds, create storytelling games, or use the beak during classroom roleplay activities.
FAQs on How to Make Stork Beak – Easy Craft for Kids
Q1. What materials do I need to make a stork beak?
Answer: You will need construction paper, scissors, glue, and crayons or markers.
Q2. How do I make the beak?
Answer: To make the beak, cut a triangle shape out of the construction paper. Then, use the crayons or markers to draw the details of the beak. Once you have finished the details, glue the triangle to the head of the stork.
Q3. Can I use other materials to make the stork’s beak?
Answer: Yes, you can use felt, foam, or fabric to make the beak instead of construction paper.
Q4. How do I attach the beak to the stork?
Answer: You can use glue, tape, or staples to attach the beak to the stork.
Q5. What colours should I use to make the beak?
Answer: You can use any colour that you like. You can also use two or more colours to make the beak.
Q6. How big should the beak be?
Answer: The beak should be proportional to the size of the stork.
Q7. Can I make the beak out of clay?
Answer: Yes, you can make the beak out of clay and paint it with acrylic paint.
Q8. Can I give the stork a different shape of beak?
Answer: Yes, you can make the beak any shape that you like.
Q9. How do I make the beak look realistic?
Answer: You can draw fine details on the beak with crayons or markers to make it look realistic.
Q10. Can I make the beak 3D?
Answer: Yes, you can make the beak 3D by using foam or fabric.
This Easy Stork Beak Craft for Kids is a simple and entertaining DIY activity that combines creativity, learning, and imaginative play. It is perfect for classrooms, homeschooling, craft sessions, and bird-themed educational activities. Children will enjoy creating their own colourful bird beak while improving important crafting and motor skills.
Discover fun-filled crafts and exciting learning activities designed especially for kids! Join our growing Telegram family, YouTube & Facebook today.
Reviewed by Yash Sharma
Read More:
- How to make a DIY Autumn Craft – Caterpillar
- How to Make A DIY Halloween Craft – Flying Bat
- How to make a Paper Butterfly – DIY Folding Butterfly – Paper Craft
- Learn to Make Simple & Multicoloured Fringed Quilling Flower
- Owl Craft Ideas For Kids – Art & Craft Project for Kids