


Paper Crafts
Easy Octopus Paper Craft Step-by-Step Tutorial For Kids

This guide will show children how to make a cool octopus craft out of paper. It’s perfect for when it’s raining outside, or if your kids are looking for something fun to do. This craft will keep them busy for a long time.
The inspiration for today’s craft is an eight legged aquatic creature with tentacles all over its body. Its none other than an octopus. They have not one, not two but three hearts and did you know that their blood is blue in colour? Now you do. In this tutorial, we will be making an octopus using a single sheet of paper. Its simple to make and will take just ten minutes to complete. So, without wasting any further time, collect all the material required and let’s get started.
Easy To Make Paper Octopus Craft Tutorial For Kids

Read More: Heart Shaped Paper Mouse Craft Step by Step Tutorial
Materials Required
- A sheet of chart paper in colour blue
- A pair of scissors
- A black, a white, a pink and a red sheet of paper
- A pen
- Glue stick
Procedure
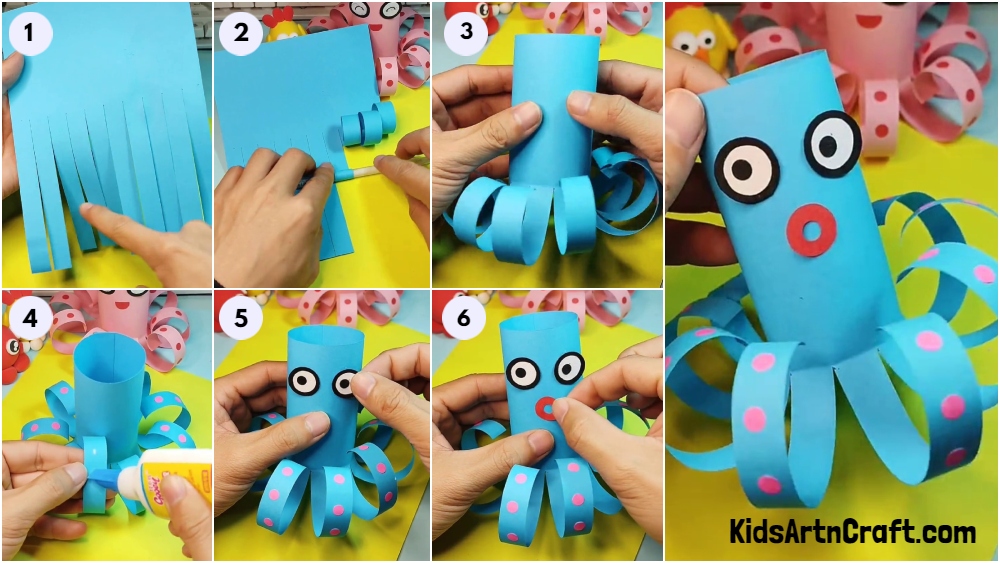
Step 1: Working On The Blue Sheet Of Paper
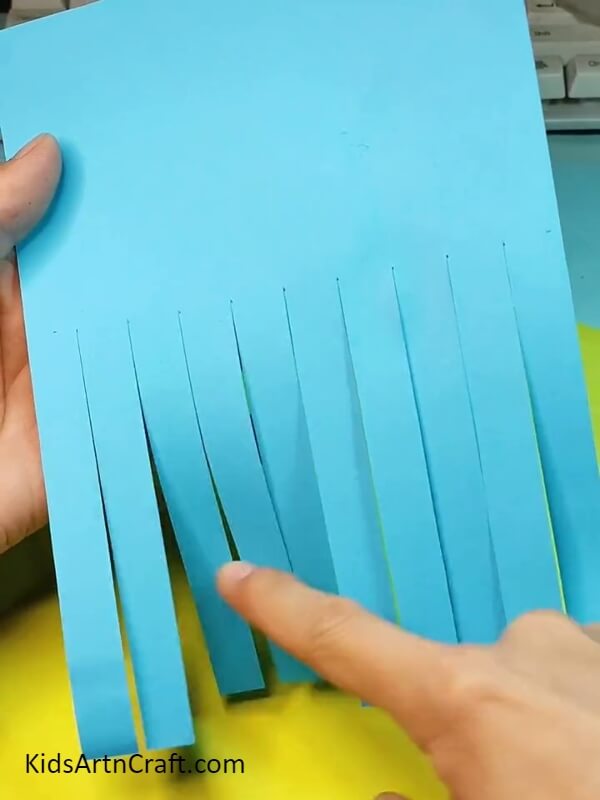
Take a blue coloured rectangular sheet of paper and cut on of the shorter sides into ten equal strips. The strips should stay connected to the sheet at the top. See the picture below for reference.
Step 2: Rolling The Strips
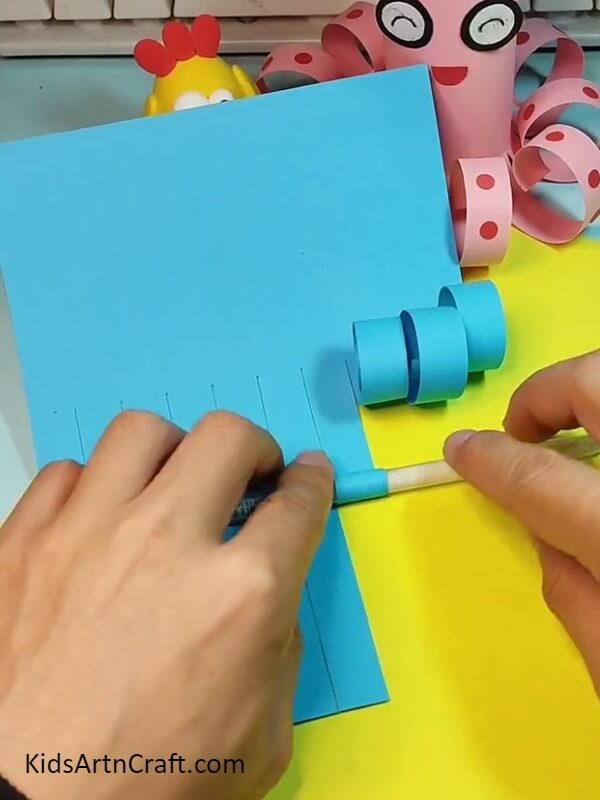
Take a pen and place it on the end of one of the strips. Now, roll the strip on the pen and press on the rolled sheet to seal the shape. Take the pen out and repeat the process on all the other strips as shown in the picture below.
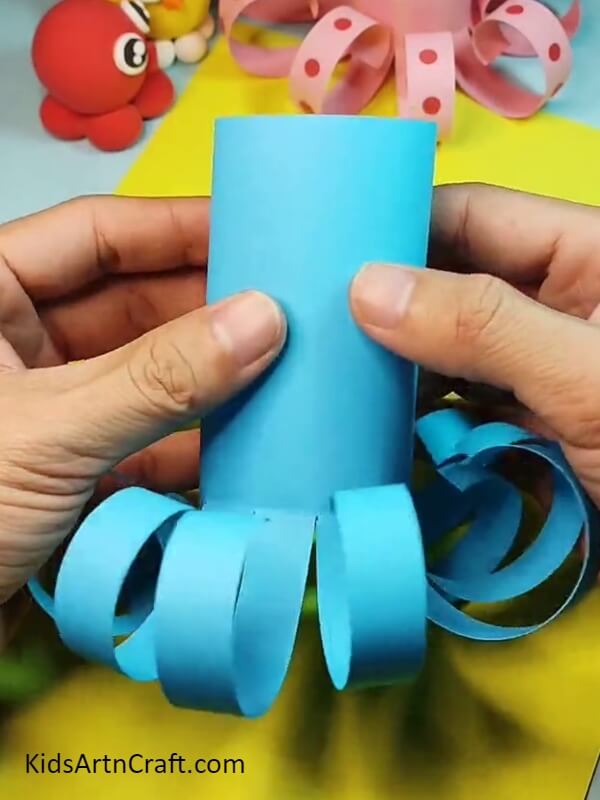
Step 3: Ten Rolled Strips At The Bottom Of The Sheet
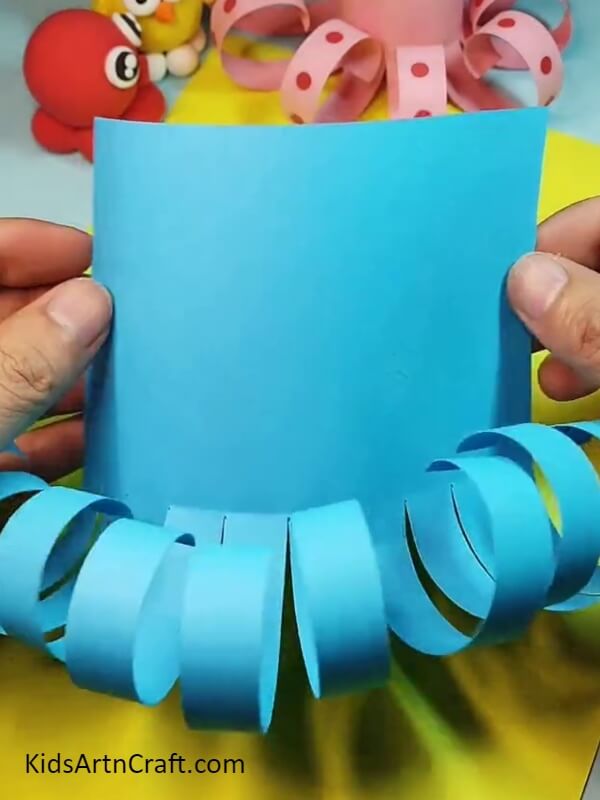
You can now see all the ten strips rolled in giving the effect of the legs of an octopus as shown in the picture below.
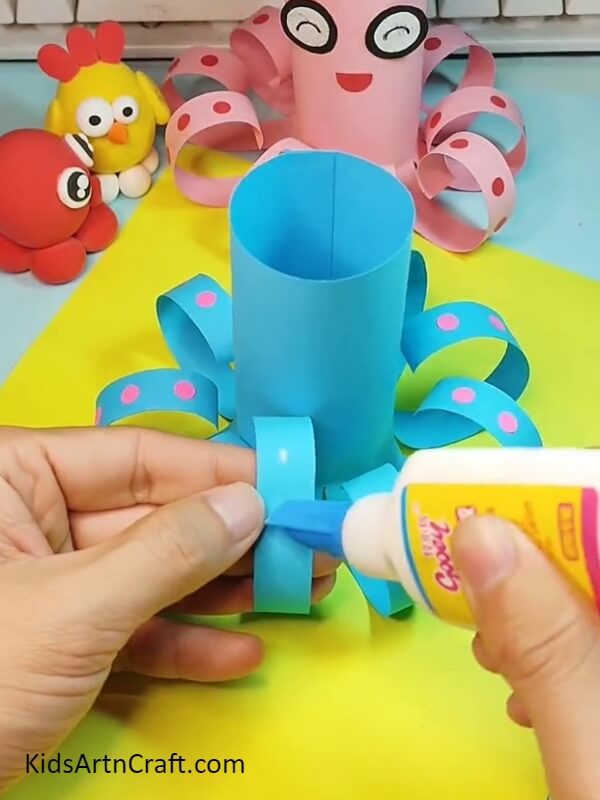
Step 4: Folding The Sheet At The Top
Fold the sheet above the strips into a cylinder and paste on of the sides on top of the other. Press on the ends to glue the two sides together properly. See the picture below for reference.
Step 5: Pasting The Tentacles On The Legs
Take a pink sheet of paper and cut thirty small circles out of it. You can do that by first drawing the circles with a pencil and the cutting them out using scissors. Now, paste three tentacles on one rolled leg from a distance from each other, following a vertical alignment. See the picture below for reference.
Step 6: Covering All The Legs With The Tentacles
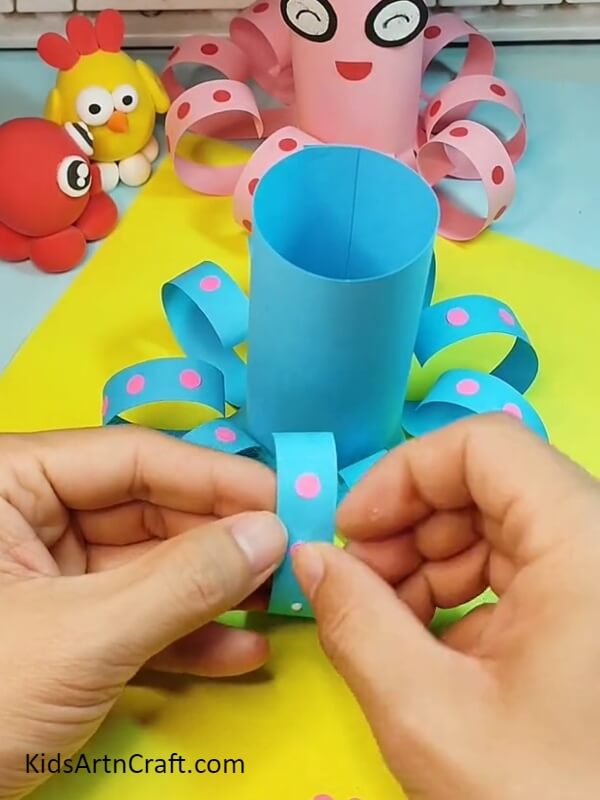
Repeat the previous step on all the other legs following the same vertical alignment with the three circles. See the picture below for reference.
Step 7: Pasting The Eyes On The Head
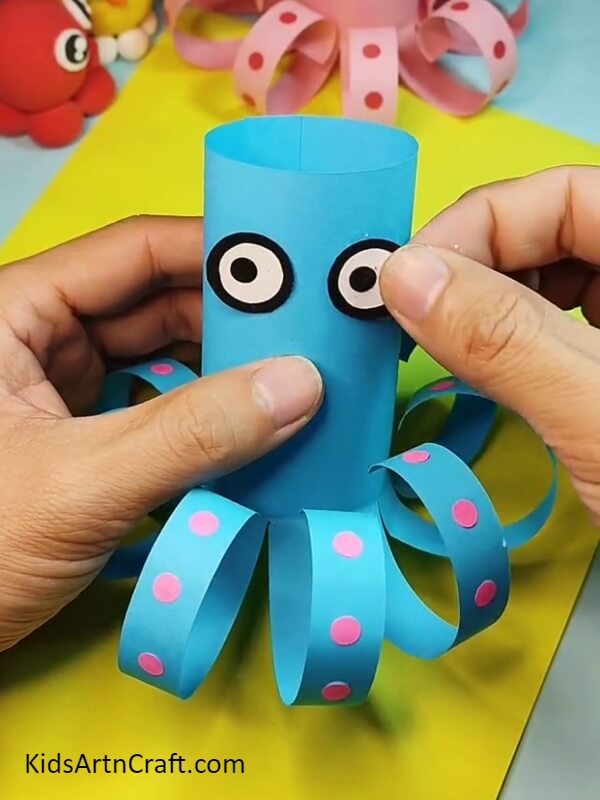
The sheet above the legs will serve as the head of the octopus. Take a black sheet of paper and cut two circles out of it. Now, cut two smaller circles out from a white sheet of paper. Cut an even smaller circle out of the black sheet of paper. Paste the smallest black circle on the left sides of the white circles and paste the white circles in the middle of the bigger black circle. These circles shall serve as the eyes of the octopus. Finally, paste these eyes on the top of the head of the octopus, right next to each other. See the picture below for reference.
Step 8: Pasting The Mouth On The Octopus
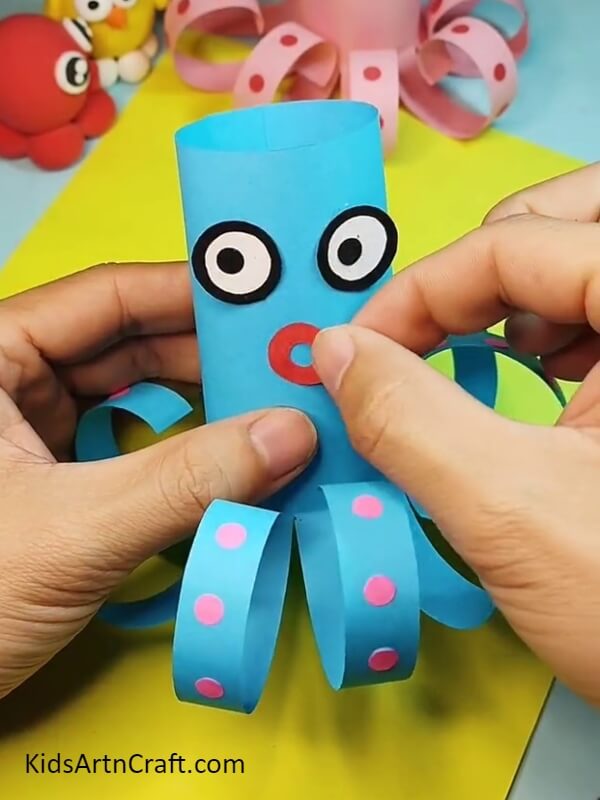
Take a red sheet of paper and cut a circle out of it. Now, draw a circle in the middle of this red circle. Finally, cut this drawn circle out of the red circle using a pair of scissors. This will leave a hole in the middle of the red circle. Paste this hollow red circle in the middle of the head, a little below the eyes of the octopus. See the picture below for reference.
Hurray !!You Made A Happy And Smiling Octopus!!
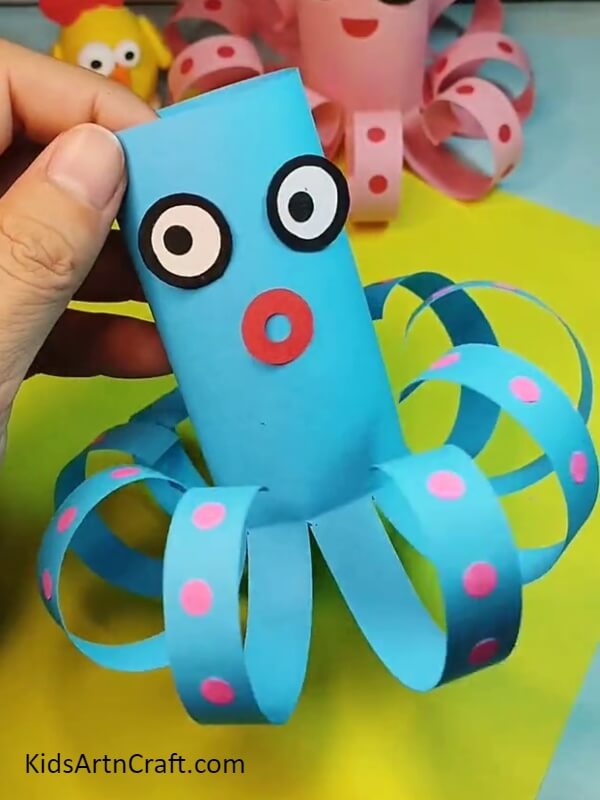
This completes the process of making this octopus craft and we have our octopus ready with all its tentacles and legs to conquer the oceans.
Some More Octopus Craft Tutorial
Handmade Paper Octopus Craft For Kids
Image Source/Tutorial: Kids Art & Craft
This fun and easy paper octopus craft is perfect for kids! With a few simple materials, kids can create a colorful octopus they can proudly display in their room. It’s a great way to bring out their creative side and have a blast while doing it.
Simple Way Paper Cup Octopus With Crown craft for kids
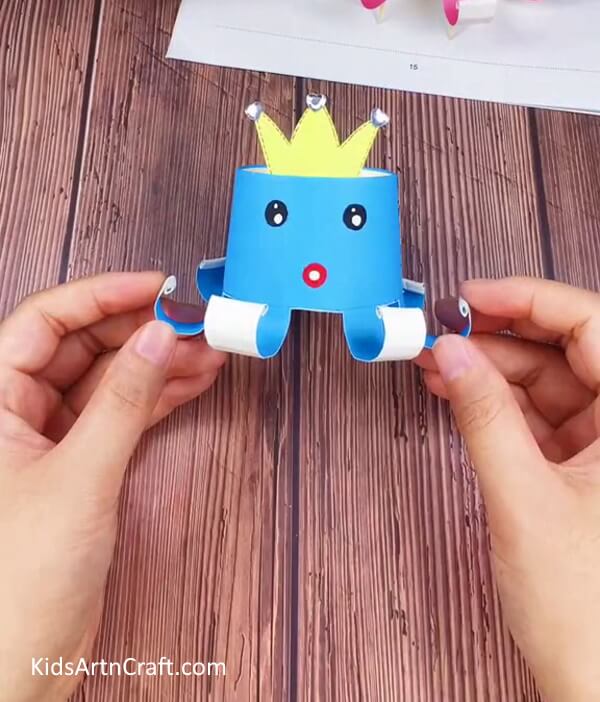
Image Source/Tutorial: Kids Art & Craft
This simple and fun paper cup octopus with crown craft is perfect for kids. It’s easy to make with basic materials and can also be used as a decoration piece. Kids will love the colorful design and creative expression of their own artwork.
Create an Octopus With Paper Cup For Kids

Image Source/Tutorial: Kids Art & Craft
Creating an octopus with a paper cup is a fun and easy craft activity for kids. They will have fun decorating and creating their own octopus with colorful paper cups. It’s a great way to get kids engaged and creative.
Today, you learned great folding and cutting skills. You also learned a lot about the anatomy of an octopus which makes this tutorial scientifically informative apart from being artistically enticing as well. You can hang it in your room next to your window or simply place it on your table as a decoration. Keep practicing the techniques you learn in this tutorial and keep inventing new ideas. See you in the next tutorial. Till then, good luck and good bye.
Follow us on Youtube for art and craft tutorials and much more.
More Articles from Kids Art & Craft
- Easy Paper Snail Craft tutorial For Kids
- DIY Paper Fish Craft Easy Tutorial for kids
- DIY Easy Paper Bee Craft for Kids
- DIY Bird Nest Paper Craft For Kids
- Paper Strips Frog Craft Step By Step Tutorial


