
DIY and Crafts
How to Make An Elephant – Moving Paper Toy


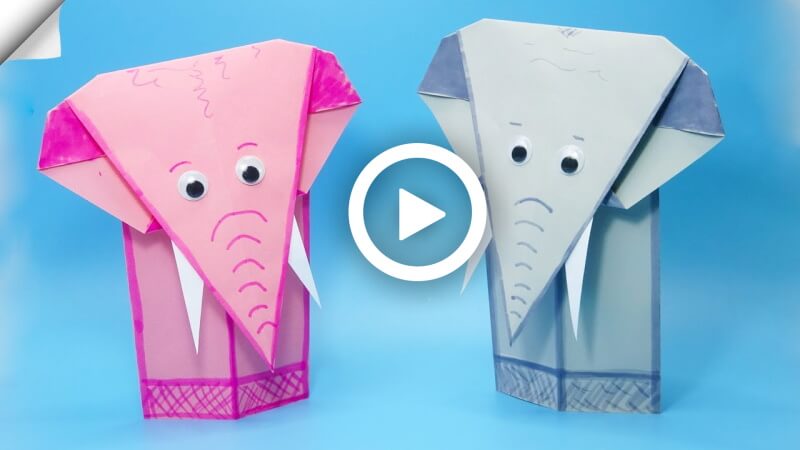
Let’s bring the elephant in the room! You all might hear this English idiom! Today’s craft is related to this idiom. You all might guess it right! We are going to learn how to make an origami elephant. But it’s going to move!! How? Then go through it. Children love this animal so much for its calm and friendly nature. They love to see elephants at zoos. In Hindu culture, elephants are worshiped as Lord Ganesha. So, we all kind of realize the impact this kind of creature has. So, let’s grab your stationery and bring life to your new friend.
How to Make An Elephant – Moving Paper Toy
Materials:
- Two 20*20 c.m. colors.
- A white paper. ( To make elephants’ teeth)
- Color sketch pens.
- Two-button eyes.
- A glue stick.
- A scissor.
Procedure:
- Take a 20*20 cm paper, place it on your desk like a diamond shape, and folded sideways into a triangle shape, left to right.
- Unfold it and follow the middle fold line, make a twofold left and right from the top like a half-triangle shape.
- Fold the bottom part of the page by making a small full triangle.
- Fold the whole paper from top to bottom by making a triangle shape. Then fold the right and left upper edges of it under the page like triangles. It will look like an elephant’s face.
- Highlight the elephant’s face. Put the eyeballs at the center of the face with a glue stick and give a complete touch to the face.
- Take a white page, fold it sideways like a rectangular shape. Then take a pair of scissors and make a narrow triangle like an elephant’s teeth. Stick them with glue under the elephant’s face.
- Stick glue under the elephant’s face and attach it.
- Take a 20*20 cm paper, then fold the paper sideways, left to right, like a half square shape.
- Then fold the upper portion of the page like a rectangular shape and stick it with glue.
- Turn over the page, fold the bottom part over and under like a small rectangular shape.
- Highlight the page with your sketch pen.
- Take the head of the elephant you made previously and put it over the body with glue.
- Put your hand on the body page of the elephant and make it open and stand it on the ground.
Just look at the trunk!! Your friend is ready for a piggyback ride! This process is so easy that anyone can easily make them by going through this process. You can decorate your room with it. You should use your own creativity and add something extra to this origami elephant. So, let’s hurry up, make these cute friends, and decorate your room and stuff.
FAQ’s on How to Make An Elephant – Moving Paper Toy
Q1. What supplies do I need to make an elephant moving paper toy?
Answer: You will need scissors, glue, a piece of paper, two sticks, and two rubber bands.
Q2. How big should the piece of paper be?
Answer: The piece of paper should be 8.5 inches by 11 inches.
Q3. How do I cut the paper?
Answer: Cut the paper into four equal parts to make four squares.
Q4. How do I make the head?
Answer: Fold one of the squares in half and cut along the fold to make a semicircle. This will be the head of the elephant.
Q5. How do I make the body?
Answer: Fold the other three squares in half and cut along the folds to make three semi-circles. These will be the body of the elephant.
Q6. How do I attach the body parts?
Answer: Glue the four pieces of paper together to form the body of the elephant.
Q7. How do I make the legs?
Answer: Take one of the sticks and cut it into four equal parts. Glue the four parts onto each corner of the elephant’s body.
Q8. How do I make the tail?
Answer: Take the other stick and cut it into two equal parts. Glue one of the parts onto the back of the elephant’s body.
Q9. How do I make the ears?
Answer: Take the two rubber bands and attach them to the sides of the elephant’s head.
Q10. How do I make the elephant move?
Answer: Push the stick connected to the elephant’s tail up and down to make the elephant move.
Making an elephant moving paper toy is a creative and entertaining craft activity for kids of all ages. This DIY paper elephant combines fun, learning, and imagination in a simple hands-on project. Whether you are a parent, teacher, or craft enthusiast, this adorable moving elephant toy is a wonderful way to encourage artistic skills and playful learning at home or in the classroom. Try using different colors and decorations to make your elephant unique and even more exciting.
Inspire young minds with colorful crafts, educational DIY projects, and fun kids’ activities. Join our Telegram group and follow us for more creative updates on YouTube & Facebook.
Reviewed By Rachit Gupta
Read More:
- How to Make A Paper Fish
- How to Make A Paper Butterfly
- How to Make a Paper Cat
- How To Make A Paper Owl
- How to Make A DIY Paper Lion