DIY and Crafts
How to Make A DIY Paper Lion


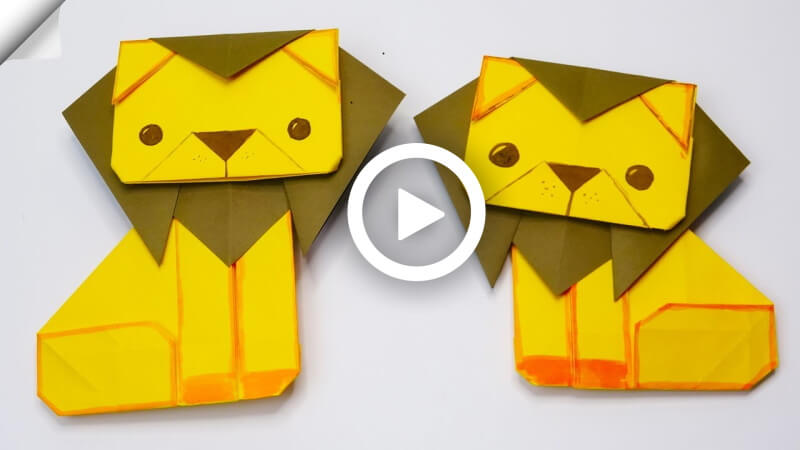
Let’s make the best paper animal today! Why I call it best, as it is called the king of the forest and powerful among all living creatures. You might guess it right! It’s The Lion King. Kids love lions for their strong nature. This favoritism partly depends on the popularity of Disney’s The Lion King. All kids watch it. So they will love this process, encourage them to make their own Simba and Mufasa. So, let’s get started with the process!
How to Make A DIY Paper Lion
Materials:
- Three 20*20 c.m color pages.
- Color marker pens or Pastel/watercolors.
- A black marker pen.
Procedure:
- Take a 20*20 cm color page, place it like a diamond shape on your desk. Fold it sideways, left to right, like a triangle shape. Unfold it.
- Fold the paper up and down like a triangle shape. Unfold it.
- Follow the middle fold line and fold the upper edge of the paper like a convex triangle and the bottom edge like a triangle.
- Fold the bottom part under in a small triangle shape. Then fold the upper part of the page into a rectangle-like shape.
- Fold both sides of the page and put the left part under the right part.
- Fold each side down to up like an arrow-like triangle shape.
- Unfold the left side a little and fold the upper edge of it up to the fold line there, like a converse triangle, and put the triangle shape over it that you made previously, and unfold a little.
- Follow the same to the right side as well.
- Turn the page, look, there must be two ear-shaped parts on the upper part of it. Fold them by making a converse triangle side-wise.
- There must be a triangle at the bottom of the page, fold its upper edge like a little converse triangle.
- This little converse triangle is supposed to be the lion’s nose, so put color on it with your marker and draw the straight line from the nose to the bottom of the page.
- Make cute round eyes on both sides of the nose with the black marker pen.
- Take a glue stick, attach both converse triangles you made previously on the edges of the page, and the nose and the under part of the nose also.
- Draw the mouth area and ears of the lion with the black marker pen.
- Highlight the ears of the lion with colors or colored marker pens. And the face of your lion will be ready!
- Take a 20*20 c.m. color paper, place it like a diamond shape on your desk. Fold it side-wise, left to right, like a triangle shape. Unfold it.
- Fold the paper up and down like a triangle shape.
- Look at the middle fold line and fold the right and left sides of it up and down by making a convex triangle. Do an equivalent with the right side.
- Fold the middle-upper edge of the paper by making a convex triangle.
- Take the glue and apply it to this upper converse triangle, take the face of the lion and put it under it, and attach. After that, the lion with his mane will be ready.
- Take a 20*20 c.m page, fold it side-wise like a rectangular shape, and then fold it again the same way. Unfold just the second fold.
- Fold it up to down by making a square shape, then unfold it.
- Follow the middle line and fold the bottom part into the middle fold line. Use the same process as the upper part.
- Unfold the whole paper, and fold the left side of it a little straighter. Then fold the upper part over and under one time.
- Fold the right part from the side to the left straight line by making a triangle shape.
- Fold the right corner edge down to up like a converse triangle. Then fold the upper part of it by rolling it one time like a triangle. Unfold it.
- Put fingers in it and make a square. Then turn it over and fold the bottom part straight a little.
- Turn it over and fold the two up and down corner edges of the right side small rectangular shape, and also of the left bottom corner.
- It will be the body of your lion, highlight it, and make the legs by using the color markers or colors.
- Take a glue stick and attach the face to its body, and your lion will be done!
Roar! Roar! Your lion is ready to play! Use them to create your own origami animal collection. Decorate them in your room, show them to your friends, parents, and teachers. They will love them. So, get hold of your stationery and make your own cute DIY paper lion.
Benefits Of Making A DIY Paper Lion Craft
Adding animal-themed crafts to kids’ activities is a great way to combine creativity with learning. This DIY paper lion craft helps children improve their fine motor skills while having fun with colorful paper art.
Educational Benefits For Kids
- Improves hand-eye coordination through cutting and folding paper.
- Boosts creativity and imagination while designing the lion’s mane and face.
- Enhances concentration and patience during step-by-step crafting.
- Introduces children to jungle animals and wildlife learning.
- Encourages color recognition and shape understanding in younger kids.
- Supports parent-child bonding through fun DIY activities at home.
This lion craft activity is ideal for preschoolers, kindergarten kids, and elementary students who enjoy easy paper crafts and animal-themed DIY projects.
Tips To Make Your Paper Lion Craft Look Better
Follow these simple tips to create a more attractive and realistic paper lion craft:
- Use bright yellow and orange craft paper for a vibrant lion mane.
- Add googly eyes for a fun and expressive face.
- Use curled paper strips to create a fluffy 3D mane effect.
- Decorate the background with jungle trees or grass.
- Laminate the craft for long-lasting classroom decoration.
These small creative details can make your paper craft stand out in school exhibitions and art competitions.
Learning Activities To Pair With This Lion Craft
After completing the craft, parents and teachers can try these engaging learning activities with children:
- Teach interesting facts about lions and wild animals.
- Read jungle-themed storybooks with kids.
- Practice the alphabet letter “L” for Lion.
- Organize animal roleplay or storytelling sessions.
- Use the lion craft as a classroom wall decoration.
Interactive activities like these make craft learning more meaningful and memorable for children.
Safety Tips For Kids During Crafting
To ensure a safe and enjoyable crafting session:
- Always supervise children while using scissors.
- Use child-safe glue and non-toxic craft materials.
- Keep small decorative items away from toddlers.
- Work on a clean and flat crafting surface.
Safe crafting habits help children enjoy DIY activities confidently.
FAQs on How to Make A DIY Paper Lion
Q1. What materials do I need to make a DIY paper lion?
Answer: You will need a sheet of paper, scissors, glue, and crayons or markers. You may also want to use a ruler or other drawing tool to help achieve the desired shapes.
Q2. How do I make the body of the lion?
Answer: Fold the paper in half and draw a half-circle shape for the body. Cut out the shape and unfold the paper to reveal a full circle.
Q3. How do I make the head of the lion?
Answer: Draw a small circle for the head and cut out the shape. You can then draw the facial features such as the eyes, nose, and mouth.
Q4. How do I make the mane of the lion?
Answer: Cut strips of paper and glue them around the head of the lion to create the mane. You can also use crayons or markers to add color.
Q5. How do I make the tail of the lion?
Answer: Draw a curved line on the back of the lion and cut out the shape. You can then glue the tail onto the body.
Q6. How do I attach the legs and feet of the lion?
Answer: Draw four short lines for the legs and two circles for the feet. Cut out the shapes and glue them onto the body of the lion.
Q7. How do I make the claws for the lion?
Answer: Draw three small triangles for each foot and cut out the shapes. Glue them onto the feet to create the claws.
Q8. How do I make the ears of the lion?
Answer: Draw two triangle shapes for the ears and cut out the shapes. Glue them onto the head of the lion.
Q9. How do I make the nose of the lion?
Answer: Draw a small triangle shape for the nose and cut out the shape. Glue it onto the head of the lion.
Q10. How do I make the whiskers of the lion?
Answer: Draw two short lines for the whiskers and cut out the shapes. Glue them onto the nose of the lion.
This DIY paper lion craft is a simple yet exciting activity for kids who love animals and creative art projects. It encourages imagination, improves crafting skills, and provides an enjoyable screen-free learning experience. Whether you make it at home, in school, or during holiday activities, this colorful lion craft is sure to bring smiles and creativity to children of all ages.
Inspiring kids through crafts, creativity, and hands-on learning projects every day! Join our Telegram community and follow us on n YouTube & Facebook for more fun ideas.
Reviewed By Rachit Gupta
Read More:
- How to Make An Elephant – Moving Paper Toy
- How to Make An Origami Fish
- DIY Art with Paper Circles – Craft Ideas for Kids
- How to Make An Antistress Transformer Paper Toy
- How to Make a Paper Cat