Kids Activities
How to Make a Paper Ballerina Toy for Kids

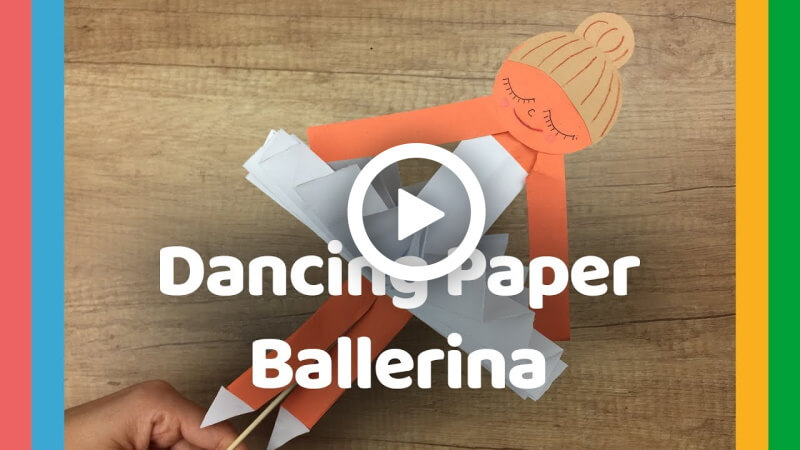
Hi guys! Here we again came to you with amazing craft ideas! So, Let’s do something beautiful and be creative today! What will you make? Today you’re going to make a paper ballerina toy! Everyone loves dancing, to love dance you don’t need to be perfectly trained. It’s art and emotion to express yourself. For our dancer and non-dancer readers who love dancing this will be a perfect toy. You will find immense joy in it. So, without dalliance, grab your stationery and make a beautiful moving ballerina.
How to Make a Paper Ballerina Toy for Kids
Materials:
- Two long-wide skin colour paper strips.
- Two small wide skin colour paper strips.
- A small skin colour circle paper.
- Two small brown colour paper circles like the skin colour circle.
- Two big white long breadth and small length rectangle papers.
- Two white small long breadth and small length rectangle papers.
- Four white small same size triangle Paper.
- A black marker pen.
- A glue stick.
- Scissors.
Procedure:
- Take two long-wide skin colour paper strips, place them together one over another.
- Cut the top and bottom middle of the strips together straightly from top-middle to inner middle and bottom-middle to the inner middle with scissors.
- Leave the middle space of both cuts.
- Apply glue inside the middle space of the strips, put a bamboo stick between the bottom of the strips two cuts, and attach them with a glue stick.
- Leave the cut portions.
- Fold the upper two cut strips in the opposite way of each other by making an arrow-like shape.
- Apply glue inside the two cut sides to attach each slide together with the glue stick.
- It will be the body of the ballerina.
- Take four white colour triangle shapes, attach them like shoes in the bottom strips on both sides.
- It will be the ballerina’s shoes.
- Attach both sides of the shoe and attach strips together with the glue stick.
- Take two white small long breadth and small length rectangle papers, attach them to the top middle of both sides of the ballerina with the glue stick.
- It will be the ballerina’s dress’s top.
- Take a small skin colour circle and the same size brown colour circles.
- Place the brown circle over the skin colour one and cut out the brown one like a half curved circle as the ballerina’s forehead while scissors.
- Attach the half circle over the skin colour circle with the glue stick.
- Take a very small brown colour circle as a bun of the ballerina’s hair.
- Attach it to the top back of the skin colour circle.
- Turn over the skin colour circle.
- Grab a black marker pen, draw cute eyes and nose on it.
- The ballerina’s face will be ready.
- Attach the face on the top of the body with the glue stick.
- Take a brown colour circle same as the previous brown and skin colour ones, attach it to the back of the ballerina’s head with the glue stick.
- The ballerina’s whole body will be ready.
- Take two big white long breadth and small length rectangle papers, take one of them.
- Place it vertically, fold the bottom side of it straightly by making a line fold.
- Roll it over and do the same.
- Keep rolling it like this until the paper is over.
- It will create a curved circle fan-like shape.
- Attach it by two sides with the glue stick by creating a half-circle.
- Apply glue on the other side and attach it under the dress of the ballerina as its skirt with the glue stick.
- Take the other white long breadth and small length rectangle paper, place it vertically on your desk.
- Fold the bottom side of it straightly by making a line fold.
- Roll it over and do the same.
- Keep rolling it like this until the paper is over.
- It will create a curved circle fan-like shape.
- Attach it by two sides with the glue stick by creating a half-circle.
- Apply glue on the other side and attach it under the dress of the other side of the ballerina as its skirt with the glue stick.
- Swing it with the paper stick.
- Your beautiful paper ballerina toy will be ready!
P.S- You can use other colours of paper as well according to your help.
Your gorgeous ballerina is ready to dance! Kids will certainly enjoy twiddling with an equivalent. You can exhibit this craft in any exhibition also. You can also improvise an equivalent and make it beautiful by adding more designs, glitters and other decoration stuff. You can play with it with your friends. Encourage them to make it also so that you can arrange a dance function with them. Gift it to your dance teacher and they will adore it. So, hurry up and obtain your hands on your personalized paper ballerina and luxuriate in it.
FAQ’s on Paper Ballerina Toy for Kids
1. What materials are needed to make a paper ballerina toy?
Answer: You will need a sheet of paper, scissors, glue, and any other decorations you would like to add.
2. How do I make the paper ballerina?
Answer: First, fold the paper into a triangle shape. Then cut out the shape of the ballerina’s body, arms, legs, and head. Glue the pieces together in the correct order and add any decorations.
3. What kind of decorations can I use?
Answer: You can use any kind of decorations you want – stickers, sequins, yarn, glitter, etc.
4. How do I make the paper ballerina’s skirt?
Answer: After you glue the body pieces together, you can wrap the paper around the waist and glue it in place.
5. What kind of paper should I use?
Answer: You can use any kind of paper you like – construction paper, cardstock, or even tissue paper.
6. How do I make the ballerina’s hair?
Answer: You can draw the hair on with a black marker or use yarn or string to make long, flowing locks.
7. How do I make the ballerina’s face?
Answer: You can draw the face on with a black marker or use small pieces of paper to make eyes, nose, and mouth.
8. Can I make the ballerina in different colors?
Answer: Yes, you can use different colors of paper for the body and decorations to make the ballerina in any color you want.
9. What age group is this toy suitable for?
Answer: This toy is suitable for children of all ages.
10. How do I store the paper ballerina?
Answer: You can store the paper ballerina in a box or a plastic bag.
Read More:
- DIY Pretty Peacock Themed Crafts for Kids!
- DIY Recycled Magazine Bangle Ideas
- DIY Recycled Plastic bottle flowers with Popsicle sticks decoration (Tutorial)
- DIY Simple Paper Crafts Ideas for Kids
- DIY Toys for Kids – Perfect gift Ideas


