


Kids Activities
How to Make a Swinging Paper Monkey

Hi dear readers! Let’s make a cute plus quirky animal today. You might be thinking about which animal has both qualities. So, before you get confused, let’s roll up the curtain. It’s a Monkey! Who doesn’t love this quirky animal, right? They are cute, smart and bring joy with their funny activities. You can see them in zoos, streets. Kids love to watch them. You might not fulfil their wish to pet a monkey, but you can make them right! And the best part of this monkey will be its swinging quality. So, without wasting any time, let’s start the process!
How to Make a Swinging Paper Monkey
Materials:
- A long, wide, brown-coloured paper strip.
- A long, brown-coloured paper strip.
- Two small brown-coloured circle papers.
- A small, white, oval-shaped paper.
- One very small white oval-shaped paper.
- Two eye buttons.
- Two very small white circles.
- A green straw.
- A green rectangle shape.
- A pencil.
- A black marker pen.
- A glue stick.
- Scissors.
Procedure:
- Take a long, wide, brown colour paper strip, cut it from the bottom-middle to the top-middle a little with scissors.
- These cuts will be used as the monkey’s hands and legs.
- Fold the inner sides of the bottom, middle, and cut the opposite way like a converse triangle shape a little.
- To understand the fold more properly, look at the reference video.
- Take a green straw and place it over the upper-middle side of the paper.
- Apply glue on the bottom cut sides of the upper-middle part of the strip with a glue stick.
- Paste the cut sides of the straw by rolling them on the straw.
- Take a small white oval-shaped paper, attach it to the middle of the piece with the glue stick.
- It will be the monkey’s belly.
- Take a small brown coloured circle paper and a very small white oval-shaped paper, place the oval paper vertically over the bottom of the brown circle.
- Attach the vertical oval shape over the brown circle with the glue stick.
- It will be the monkey’s face.
- Take two eyeball buttons, attach them over the vertical oval shape as the monkey’s eyes with the glue stick.
- Take two small brown colour circle papers and two very small white circles, place the white circles on the bottom of the brown circles.
- Attach them with the glue stick.
- These will be the monkey’s ears.
- Attach the ear to the top-back sides of the monkey’s face with the glue stick.
- Grab a black marker pen, draw nose holes and a cute smile on the vertical oval portion of the monkey’s face.
- Attach the monkey’s face over the money’s belly with the glue stick.
- Take a long brown colour paper strip, attach it to the back of the monkey like its tail with the glue stick.
- Roll the tip of the tail with scissors to give it a curved shape.
- Take a green rectangle shape, fold it from the side.
- Grab the pencil and draw a bush like a tree in its middle.
- Cut the drawing lines with scissors.
- Two bush-like tree shapes will be made.
- Attach the shapes to the tip of the front and backside of the straw with the glue stick.
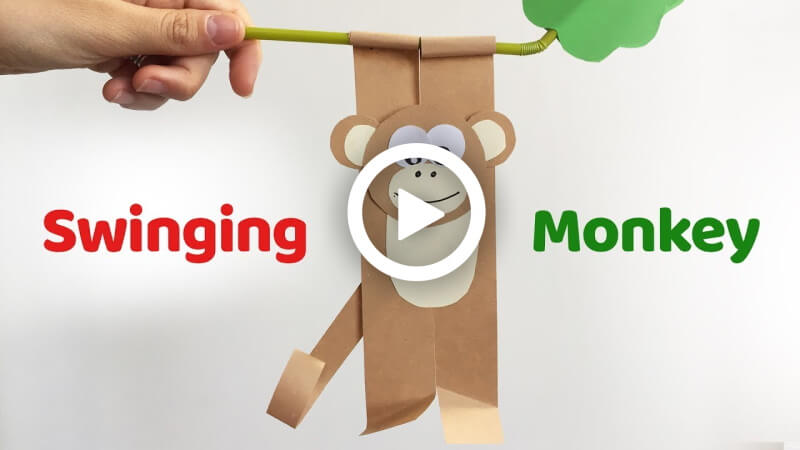
- Your cute swinging monkey will be ready!
Swing the monkey in the straw and enjoy it swinging. It’s so cute, right? Your kids are gonna love them. All our monkey-loving readers can hang them in their rooms. Kids can use them in their craft classes as the process is very easy. So, hurry up and get a hold of your staff and make a cute, quirky friend!
Benefits of Making a Swinging Paper Monkey Craft
Creating a swinging paper monkey is not only a fun craft activity for kids, but it also helps improve important developmental skills. Children learn fine motor control while cutting and folding paper, hand-eye coordination during assembly, and creativity through decoration and customization. This monkey craft also encourages imaginative play as kids can create jungle stories and interactive games with their handmade monkey toy.
Parents and teachers can use this easy paper craft activity during classroom projects, zoo animal themes, jungle lessons, summer camps, or weekend DIY sessions at home. Since the craft uses simple materials like colored paper, glue, scissors, and straws, it is budget-friendly and beginner-friendly for preschoolers and elementary school children.
Educational Value of This Monkey Craft
This swinging monkey craft can also become a playful educational activity. While making the monkey, children can learn interesting facts about monkeys, forests, and wildlife habitats. Teachers may use this activity for:
- Jungle animal lessons
- “M for Monkey” alphabet activities
- Wildlife awareness projects
- Creative storytelling sessions
- Fine motor skill practice
Interactive crafts like this help children stay engaged while learning through hands-on activities.
Tips to Make Your Swinging Monkey Craft Look Better
Here are some easy tips to make your paper monkey craft more creative and attractive:
- Use textured craft paper for a realistic monkey look.
- Add googly eyes instead of paper eyes for a fun effect.
- Decorate the background with jungle leaves and trees.
- Use colourful straws to make the swinging movement more exciting.
- Add a small banana cutout in the monkey’s hand for extra creativity.
- Curl the monkey’s tail tightly using a pencil for a natural appearance.
These simple additions can make the DIY paper monkey look more interactive and visually appealing for kids.
Safety Tips for Kids During Craft Activities
Adult supervision is recommended when children use scissors or other sharp tools during this craft project. Choose child-safe scissors and non-toxic glue for younger kids. Preparing the craft materials in advance can make the activity smoother and safer for preschool children.
Easy Variations of This Monkey Paper Craft
You can modify this swinging monkey craft in different ways:
- Create a jumping monkey puppet
- Make a hanging jungle monkey decoration
- Turn it into a classroom bulletin board craft
- Use recycled paper for an eco-friendly version
- Make different jungle animals like lions, parrots, and elephants using the same technique
These variations help kids explore creativity while reusing simple craft supplies.
Why Kids Love Monkey Crafts
Monkey crafts are popular among children because monkeys are playful, funny, and energetic animals. Swinging crafts especially attract kids because they include movement and interaction. DIY animal crafts also help children connect with nature and improve imaginative thinking through pretend play activities.
FAQs on How to Make a Swinging Paper Monkey
Q1. What materials do I need to make a swinging paper monkey?
Answer: You will need some paper, scissors, a ruler, glue, a pencil, and some string.
Q2. How do I make the body of the monkey?
Answer: Start by drawing a monkey shape on the paper. Cut out the shape and use it as a template to trace out two more identical shapes. Cut out the two shapes and use glue to attach them.
Q3. How do I make the arms and legs?
Answer: Draw two long arms and two long legs on the paper. Cut them out and use glue to attach them to the body.
Q4. How do I make the monkey’s tail?
Answer: Draw a long tail shape on the paper and cut it out. Glue it to the back of the monkey’s body.
Q5. How do I make the monkey swing?
Answer: Cut a piece of string and tie one end to the monkey’s body and the other end to a stick or a door handle.
Q6. How do I make the monkey’s eyes?
Answer: Draw two small circles on the paper and cut them out. Glue them to the monkey’s head.
Q7. How do I make the monkey’s mouth?
Answer: Draw a curved line on the paper and cut it out. Glue it to the monkey’s face.
Q8. How do I make the monkey’s ears?
Answer: Draw two small triangle shapes on the paper and cut them out. Glue them to the monkey’s head.
Q9. How do I make the monkey’s nose?
Answer: Draw a small triangle shape on the paper and cut it out. Glue it to the monkey’s face.
Q10. How do I make the monkey’s arms and legs move?
Answer: Cut two pieces of string and tie one end of each piece to the monkey’s arms and legs. Attach the other end of the strings to the stick or door handle.
This swinging paper monkey craft is a fun, interactive, and educational DIY activity for kids. It combines creativity, learning, and movement in one simple craft project. Whether you are a parent, teacher, or craft lover, this easy paper monkey activity is a wonderful way to keep children engaged while improving their artistic and motor skills. Try making this adorable monkey at home or in the classroom and enjoy watching it swing happily!
Fun learning starts here! Explore creative crafts and exciting kids’ activities. Join our Telegram group and follow us on YouTube & Facebook.
Reviewed By Rachit Gupta
Read More:
- Easy Sea Animal Colouring Pages for Kids
- Easy Sea Animal Colouring Pages for Kids
- How to Make Easy Paper Animal Crafts For Kids
- Easy Animal Drawing for Kids – Step By Step Tutorials
- Easy Animal Drawings for Kids To Enlighten Your Budding Artist


