DIY and Crafts
Colorful Pumpkin Seed Crafts for Kids


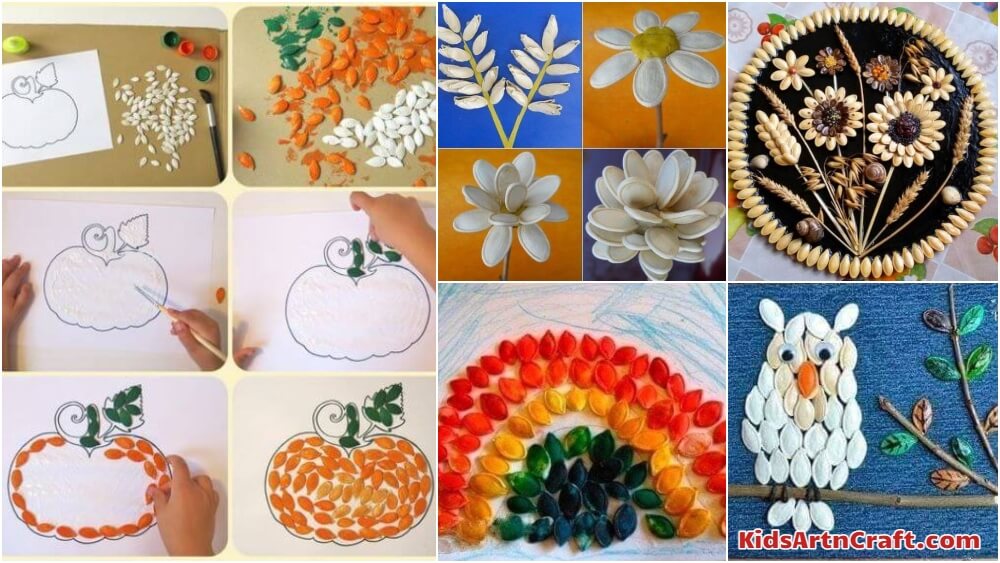
With these selected pumpkin seed crafts for kids, you can turn seeds into beautiful crafts like flowers, decorating items, jewellery, frames, and much more!
Let’s be a Hogwarts student of art, craft, and learn about doing magic with pumpkin seeds today. It is sure that not everybody likes pumpkin. Some people like pumpkin, some people dislike pumpkin, and some people hate pumpkin.
No matter whether you like pumpkins or not, the seeds of pumpkins, I’m sure you will like them, not because you have to eat them, but because in today’s article, you will learn how to create crafts using those seeds of pumpkins.
Pumpkin Seed Crafts for Kids
A Seed Border Frame
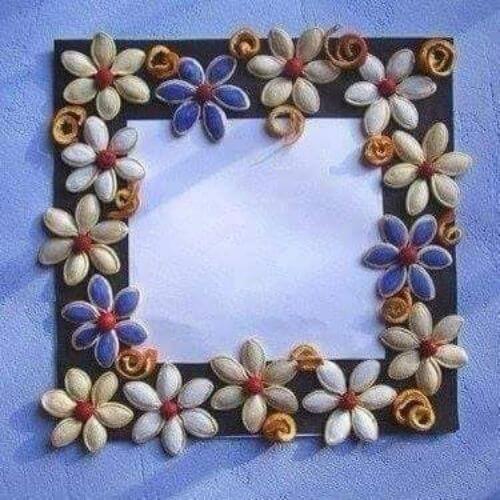
- Take a white and black chart paper. Cut the white chart paper into the shape of a square.
- Cut the black chart paper into the shape of a rectangle. Now, place the white chart paper in the middle.
- Use the black chart paper to form a rectangle frame by placing it on the borderline of the white paper.
- Take some dry pumpkin seeds. Colour them using some of your favorite choice of colors.
- Let them be for some time. In the meantime, take some small cherry-like fruit or anything you like. Place it in the border.
- After placing, take those dry pumpkin seeds and place them around the cherry-like structure using gum/glue or anything that will play as an upper hand in attaching those to the black chart paper frame.
- Use some carved-up chart paper. Roll them to form curls.
- Place them as shown in the picture. Your border frame is ready.
The Pumpkin Seed Flower Vase
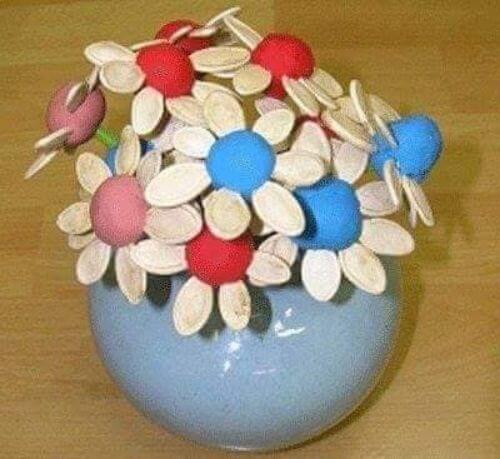
- Take some straw, clay, a flower pot, and some dry pumpkin seeds.
- Mould the clay to form the middle part of your pumpkin seeds.
- After moulding the clay, use the pumpkin seeds and attach them to the clay.
- Use a straw to form the stem of the crafty flower.
- Attach the straw to the base of the pumpkin seeds bearing clay.
- After attaching the straw to the clay, place it in the flower vase.
- Do the same with other straws, clay, pumpkin seeds, and fill your flower vase.
The Seed Bird
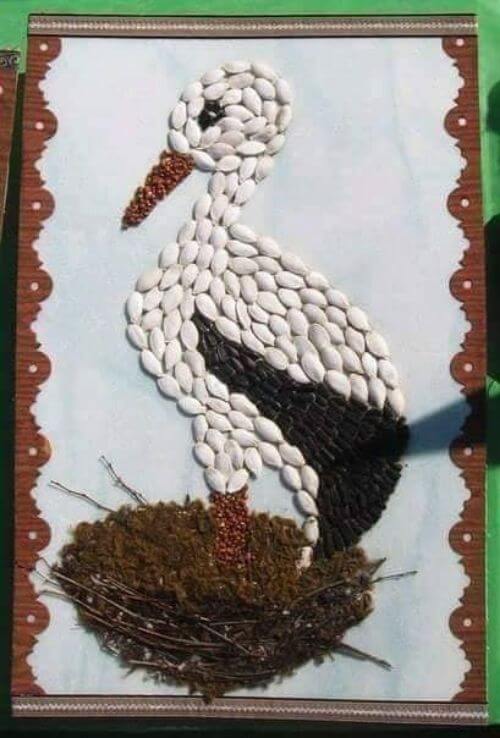
- Coat some dry pumpkin seeds with a solid white color. Draw an outline of a bird and the nest, and some border outline if you please.
- Take some black beans and some brown mustard beans.
- Make a nest with the beans and some sticks as shown in the photo.
- Use the white colored beans to form the bird. Now, take black beans to form the eye and the feathers.
- Use brown beans to form the mouth region of the bird. Your seed bird is ready.
The Seed Flower
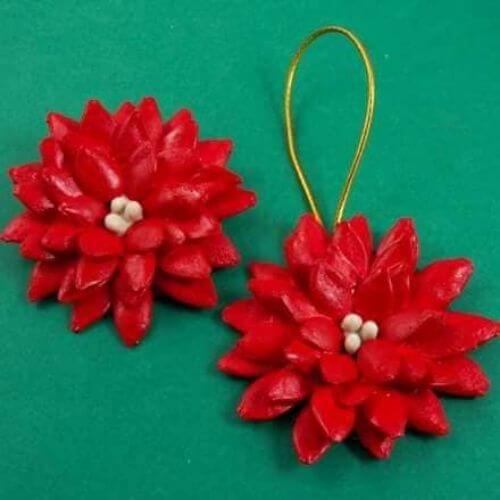
- Take some dry pumpkin seeds and a ribbon. Color those dry pumpkin seeds with pastel reds.
- Use 6-9 pumpkin seeds and color them with a white solid color. Turn red pumpkin seeds to form the petals.
- Make three to four layers of petals to form an evolving fresh flower.
- Use those white colored seeds to form the middle part of the flower.
- Now, use ribbons and attach them to the handmade flowers.
- And now, since your flowers are ready, hang them on the wall with the help of those extended ribbons.
A Sun Cum Seed Flower
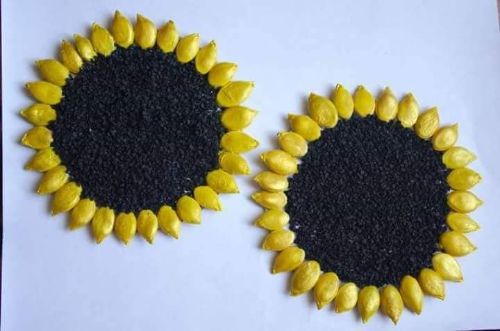
- Use a blank white piece of chart paper. Take some dry pumpkin seeds and color them pastel yellow.
- For the black region of the flower, you may use something crusty or go for a simple black chart paper.
- Now, place the black chart paper. Surround the chart paper with yellow colored pumpkin seeds.
- Voila, your sun-cum-seed flower is ready to be displayed.
The Seed Mandala
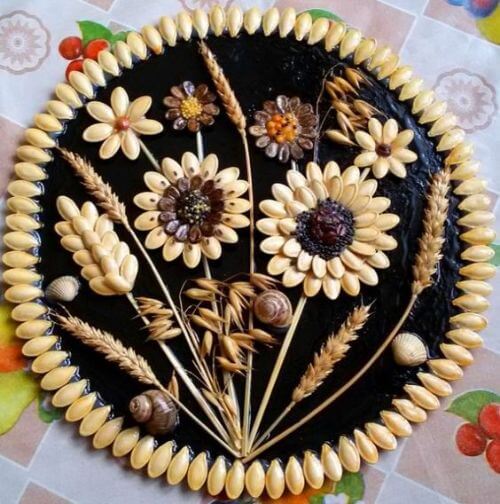
- Take lots and lots of pumpkin seeds and some wheat crops.
- Color some pumpkin seeds in cream and color some in brown.
- Use some of the cream-coloured seeds to form a circular border as shown in the photo.
- Use the rest of the seeds to form the petals of flowers.
- Now, use the brown seeds to form the middle part of the flower.
- Use the wheat crops to decorate the sides as shown.
- You can use some pumpkin seeds as well to form the shape of wheat, just like demonstrated in the photo.
The Seed-Oriented Flowers
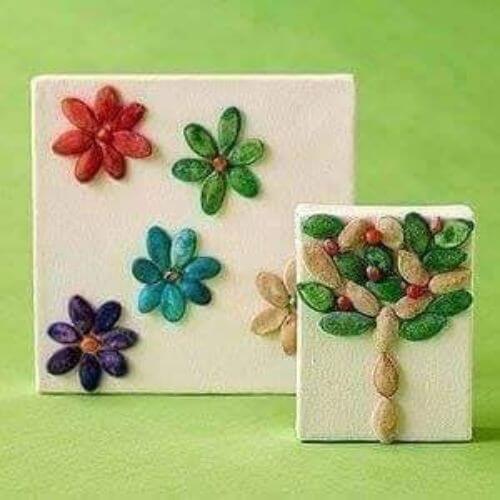
- This is very easy. Take some seeds of the pumpkin.
- Color them green, blue, purple, and red.
- Use a cardboard-like structure. Paste those colored seeds on the cardboard.
- And place a circular object in between the petals of the flower to form a complete evolved flower. Your flower is ready.
The Seed Frame Of A Leaf
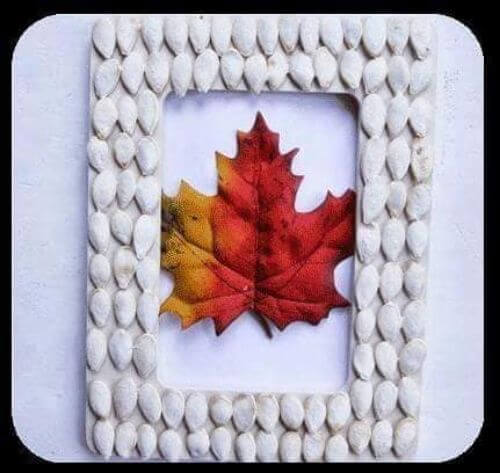
- Take cardboard. Cut it to the frame size. Paint it solid white.
- Take some dry pumpkin seeds. Place it on the cardboard.
- Take a white piece of chart paper. Cut out an outline of a leaf. Draw the leaf.
- Take another white chart. Place the drawn leaf on the white chart paper.
- Now take your pumpkin seed frame. Place it on the leaf.
- Hence, your crafty seed frame is ready for people to be displayed.
The Seed Parrot And The Frame
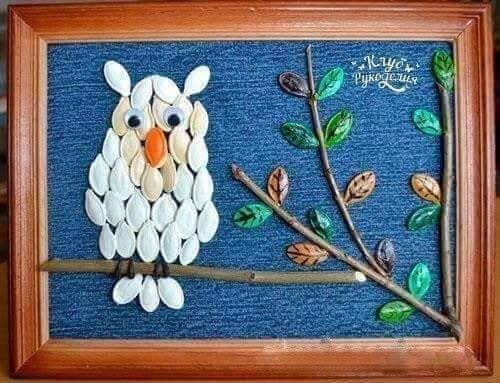
- Take a blue piece of chart paper to form a blue background.
- Take some dry pumpkin seeds and color most of them white and cream, and color a few of them green, black, orange, and light orange.
- Take some sticks to form branches for the parrot to sit and for the leaves to seem to grow.
- Now use those white seeds to form a parrot. Use some black and white buttons to form the eyes of the parrot.
- Use an orange seed to form the nose of the parrot.
- Now use the other sticks to form the branches by sticking them to the chart paper.
- Use the brown, green, and light orange seeds to form the leaves. You can use a marker to make the margin of the leaf.s
- Now place them in a photo frame. Your craft is ready
The Seed Rainbow
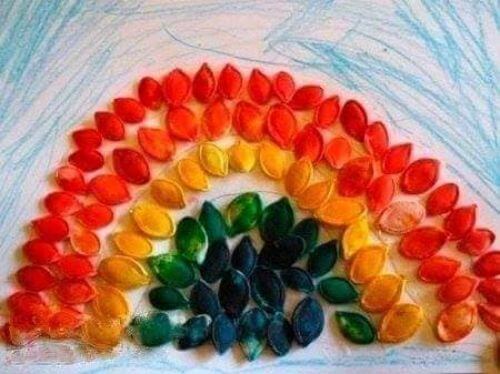
- This craft is absolutely easy to make. Just take some seeds of the pumpkin.
- Color them red, orange, light red, green, and dark blue. Make a mini-cluster using the dark blue colored seeds.
- Surround those dark blue colored seeds with some green-colored seeds.
- Now, around those green-colored seeds, place orange-colored seeds in a rainbow shape.
- Make a rainbow-shaped one again, but this time with light red colored pumpkin seeds.
- Now at last, place red colored seeds around those light red colored pumpkin seeds. Now you are officially done with the cra.ft.
The Tree From The Seeds
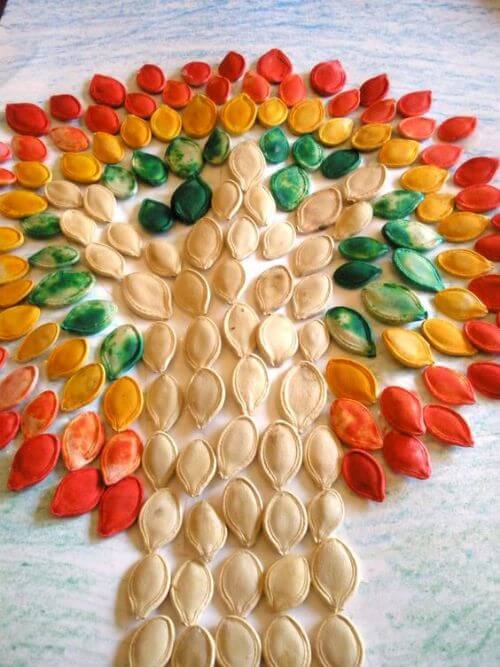
- Take a bundle of dry seeds. Paint some in green, yellow, and orange colors. Leave some seeds un-colored.
- Use the non-colored seeds to form the stem and the branches.
- Now use the green-colored seeds to form the leaves.
- Following the green-colored seeds, use yellow, orange, red colored seeds respectively to form a bunch of leaves of the tree.
- After doing all of the above, you can see a tree made from seeds.
The Autumn Tree Made Up Of Seeds
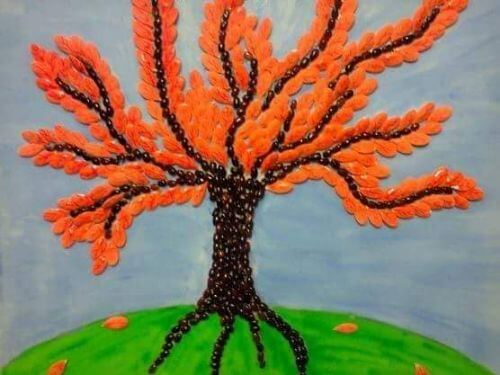
- To make a tree of the autumn season, color the seeds with a good orange.
- Take some mini black seeds to form a tree and the branches respectively.
- Now, take a white piece of chart paper. Settle those black seeds and make a tree and its branches and its roots.
- Fill the branches with orange colored seeds that will play the role of leaves.
- Now, color the surroundings of the roots with green to make the ground of the earth.
- Fill the rest of the upper part of the chart paper with a light blue crayon to make the sky. Your craft is ready now.
Say Hello To The Pumpkin Made From Its Very Seeds
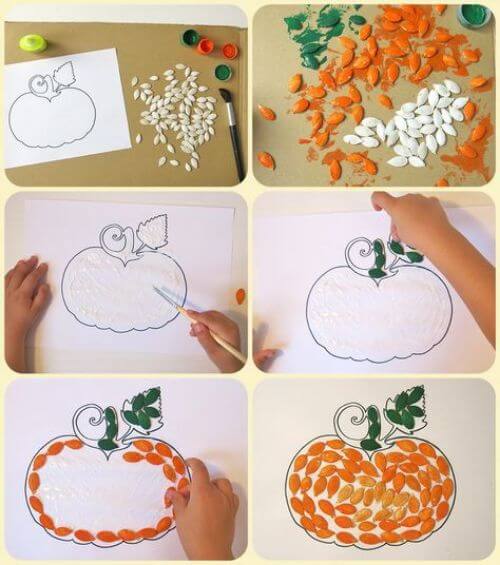
- Let’s make a pumpkin from the seeds of a pumpkin, but on a piece of chart paper and not on the ground, by burying the seeds.
- Outline the pumpkin as shown, and take some seeds of a real pumpkin. Color them in orange.
- Color a few seeds green to make leaves and the trunk part.
- Now place them in their suitable position respectively, as shown in the photo. You are done.
Make Some Other Decorations With The Seeds
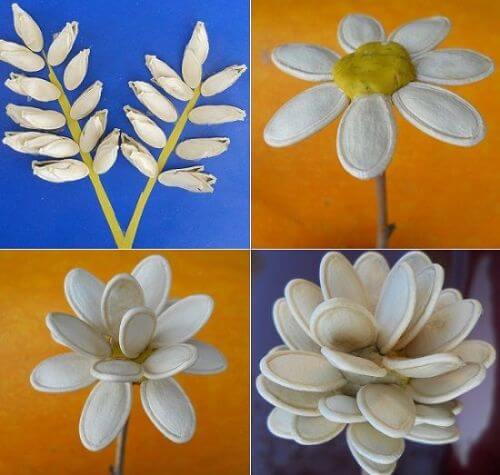
- Take some straws and some seeds, and color those seeds with a good white color.
- Now, take two straws to fill either side with an equal number of seeds to form a shape of wheat crip.
- Take some clay and attach some seeds to it to form an erect flower, and connect it to a straw.
- Attach some seeds to the straw in a bunch to form a clustered flower.
- Take some seeds and attach them in layers to form a layered flower in the shape of a rose.
Colorful Pumpkin Seed Crafts for Kids
Learn how to make colorful pumpkin seed crafts for kids with this easy step-by-step tutorial. This fun DIY craft activity shows creative ways to paint and use pumpkin seeds to create beautiful art projects. Perfect for preschool, kindergarten, and home craft time using simple materials.
FAQs on Colorful Pumpkin Seed Crafts for Kids
Q1. What supplies are needed for pumpkin seed crafts?
Answer: You will need pumpkin seeds, paint, paintbrushes, glue, and other craft supplies such as sequins, buttons, glitter, and more.
Q2. What kinds of crafts can be made with pumpkin seeds?
Answer: Anything you can imagine! You can make jewelry, decorations, toys, and more.
Q3. How long do pumpkin seed crafts take to make?
Answer: It depends on the complexity of the craft. Simple crafts can take as little as 10 minutes, while more complex projects can take up to an hour.
Q4. Are pumpkin seed crafts safe for young children?
Answer: Yes! Pumpkin seed crafts are very safe for children as long as they are supervised while using scissors and other craft supplies.
Q5. Is there a specific way to prepare the pumpkin seeds?
Answer: Yes. The pumpkin seeds should be washed and dried before use. If desired, the pumpkin seeds can be toasted or boiled before use.
Q6. What colors of paint should be used for pumpkin seed crafts?
Answer: Any colors you like! You can use acrylic paint, watercolor paint, or even food coloring.
Q7. Can pumpkin seed crafts be used as decorations?
Answer: Yes! Pumpkin seed crafts can be used to decorate your home, office, or even your Christmas tree.
Q8. Are there any helpful tips for making pumpkin seed crafts?
Answer: Yes! Use sheets of wax paper or parchment paper to help keep your work area clean and organized.
Q9. Can pumpkin seed crafts be used as gifts?
Answer: Absolutely! Pumpkin seed crafts are unique and can make unique and thoughtful gifts for friends and family.
Q10. Are there any specific rules for storing pumpkin seed crafts?
Answer: Yes. Pumpkin seed crafts should be stored in an airtight container and away from direct sunlight.
Pumpkin seed crafts for kids are a creative and educational way to turn natural materials into beautiful seasonal art projects. These fun DIY fall crafts encourage imagination, hands-on learning, and eco-friendly creativity while keeping children engaged in meaningful activities at home or in the classroom.
Making learning fun and creativity magical for kids around the world! Connect with us on Telegram, YouTube & Facebook
Reviewed By Rachit Gupta
You’ll Also Like
- Easy recycling crafts & game activities for kids
- Easy Thanksgiving And Fall Crafts Ideas for Toddlers to Make
- Potato Stamping Art Ideas for Kids
- DIY Milk Carton Lantern Ideas for Home Decor
- DIY Winter Lantern Crafts to Decorate Your Home
Don’t forget to check out our special collection of creative ideas and tutorials at K4 Craft.