


DIY and Crafts
DIY Paper Crafts for Kids

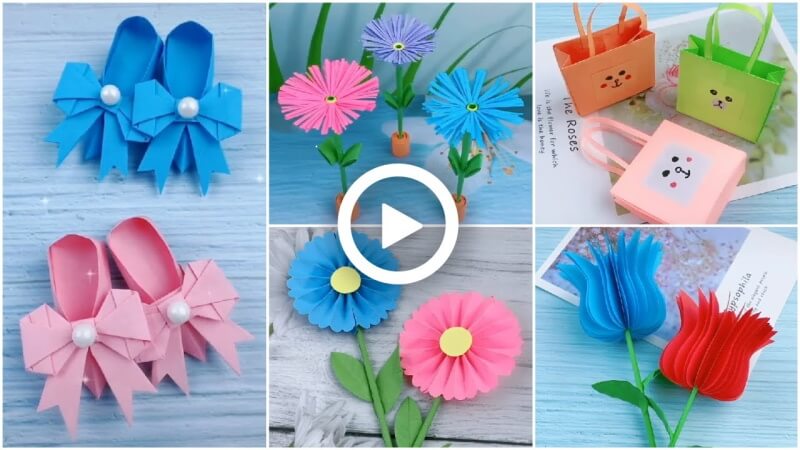
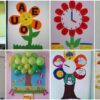
Here are 8 super fun DIY paper crafts you should try. These are very attractive as well as easy to make. Your kids can make these for themselves as well as for their friends. Here is a step-by-step process for making these amazing paper crafts. Do follow these and make your own. These will not take much time or many supplies as well. You can make these with your kids and teach them a few new things. They can make their toys and decorate them in their rooms. Try these with your kids and let them enjoy making these.
Materials Required:
- A4 sheets
- Marker
- Scissor
- Glue
- Thread
- Straw
- Paper glass
DIY Paper Crafts for Kids
Craft 1: Flower
Procedures:
- Take a rectangular piece of paper and fold it 4 times from the middle as shown in the video. You will see it looks like a paper fan.
- Now fold it, draw a curve at the top, and cut it out.
- Do the same with the other paper as well and paste both of them together from both sides.
- It will look like a circle. Now, take a paper and cut out a circle, and paste it in the middle of the flower.
- Take a green paper and roll it, and paste the end.
- Now, paste the rolled-up paper on the backside of the flower.
- Take the green colored paper and cut out 2 leaves.
- Now fold them as shown and paste them on the rolled paper.
Craft 2: Hand toy
Procedures:
- Take a paper and trace your hand, and cut it out with the help of the scissors.
- Now, put double-sided tape on the hand.
- Take a straw, cut it into small pieces, and paste it on the double-sided tape.
- Now take 5 threads and tie them at the top of the straw, and put the threads in.
- Take all the threads and tie them up at the bottom together.
- Now take a straw and put all the threads inside it.
Craft 3: Tulip
Procedures:
- Take a rectangular piece of paper, fold it in half, and draw a half flower as shown.
- Now take the scissors and cut them out.
- You need to repeat it 6 times, and you will get 7 flowers.
- Now take a green paper and roll it up, and apply glue at the end and paste it.
- Paste all the flowers together and apply double-sided tape to the back, and paste the rolled paper.
- Now open the paper and paste the ends; it will look like a flower.
- Take a green paper and cut out 2 leaves, fold them, and paste them on the rolled paper.
Craft 4: Flower
Procedures:
- Take an A4 sheet and cut out 6 strips.
- Now, at the end of the strips, apply double-sided tape and paste the strips one after the other.
- Take the strips and roll them, and paste the ends.
- Take a green rectangular piece of paper and roll it up.
- Now take a yellow strip and roll it on the green-rolled paper.
- Take a rectangular piece of paper, cut out fringes, and roll it on the paper stick.
- Now, with your fingers, press the fringes outwards.
- Take 2 green strips and fold them, and paste them on the rolled stick.
- Now put the rolled stick inside the rolled paper.
Craft 5: Mini bags
Procedures:
- Take a square of paper and fold it in half to make a triangle.
- Now fold both sides 2 times as shown.
- Open the paper and fold it from the other side.
- Now fold a little bit from the bottom, and then fold both sides a little, and then open the paper.
- After opening the fold, both sides, and then folding the paper as shown.
- Now take 2 strips and paste them on the top of the bag.
- Draw a cute design or logo and paste it on the bag.
Craft 6: Bouquet
Procedures:
- Take a rectangular piece of paper, and from both sides fold it and paste it as shown.
- Now paste it on paper and take a marker.
- Draw wavy zigzag lines from the inside of the cone-shaped paper as in the video.
- Now take an earbud and apply paint on it, and draw small leaves all over the wavy lines.
- Take a different color paint and make dots on the wavy lines.
- Now make a ribbon and paste it on the cone-shaped paper.
Craft 7: Heels
Procedures:
- Take a square of paper, fold it, make a triangle, and then again fold both sides from the middle.
- Then turn it back and fold it from both sides, and open the sides from the middle.
- Now take the bottom paper and fold it, and put it inside as shown.
- From the back, crisscross the sides and fold the edges.
- Take a square of paper and fold it, and make a triangle.
- Now open it and fold the bottom part, and then the middle.
- Fold both sides from the middle and then turn it over.
- Now, fold the sides and open the top of the paper, and put the sides and fold the top in as shown.
- Take the other part and put them together.
- Now make a ribbon and paste it.
Craft 8: Toy
Procedures:
- Take a paper glass and cut out the top part.
- Now cut fringes all over the glass, leaving little space as shown.
- Take a pen and roll the fringes.
- Take a pencil and draw the body of a girl as shown, and cut it out.
- Now, at the top of the cup, draw the face.
That’s it! All crafts are done. These crafts are super easy, and kids will have fun. You can help your kids make these amazing papercrafts. It doesn’t take a lot of time and is very easy to make. Kids will love decorating these, and they are good for gifting. So try these, and these will surely make you fall in love with the result.
Educational Benefits of Paper Craft Activities
Paper craft projects are not only entertaining but also educational. These activities help children:
- Develop hand-eye coordination
- Improve cutting and folding skills
- Learn shapes, colors, and patterns
- Boost creative thinking and problem-solving
- Enhance focus and patience during art activities
Simple DIY crafts also reduce screen time and encourage productive learning through play.
Best Materials for DIY Paper Crafts
Most paper craft activities can be created using basic materials already available at home:
- Colored craft paper
- Origami sheets
- Glue and scissors
- Crayons and markers
- Ice cream sticks
- Cardboard pieces
- Decorative stickers and glitter
Using recycled paper materials also teaches kids about eco-friendly crafting habits.
Easy DIY Paper Craft Ideas Kids Love
Children enjoy creating a variety of fun paper crafts, such as:
- Paper flowers
- Origami animals
- Paper airplanes
- Greeting cards
- Paper puppets
- 3D paper decorations
- Cartoon paper crafts
- Seasonal holiday crafts
These beginner-friendly projects are ideal for preschoolers, kindergarten students, and elementary kids.
Tips for Parents and Teachers
Parents and teachers can make paper crafting more enjoyable by:
- Providing step-by-step guidance
- Encouraging creativity instead of perfection
- Creating a clean crafting space
- Using child-safe scissors and supplies
- Praising kids for their artistic efforts
Craft sessions also create wonderful bonding moments between children and adults.
Safety Tips for Kids’ Craft Activities
Always supervise younger children while using scissors, glue, or sharp crafting tools. Choose non-toxic colors and child-safe craft materials for a safer and more enjoyable crafting experience.
Why DIY Paper Crafts Are Great for Kids
DIY paper crafts are one of the easiest and most affordable creative activities for children. Paper crafting helps kids improve fine motor skills, creativity, patience, and concentration while having fun. From origami animals to paper flowers and greeting cards, these activities encourage imagination and hands-on learning at home or in school
FAQ Questions
Q1. What are the easiest DIY paper crafts for kids?
Answer: Paper flowers, paper airplanes, origami animals, and greeting cards are some of the easiest crafts for beginners.
Q2. How do paper crafts help child development?
Answer: Paper crafts improve creativity, concentration, hand coordination, and fine motor skills in children.
Q3. Which paper is best for kids’ craft activities?
Answer: Colored craft paper, construction paper, and origami sheets work best for most DIY paper craft projects.
Q4. At what age can children start paper crafting?
Answer: Children can begin simple paper craft activities around 3–4 years old with adult supervision.
Q5. Are paper craft activities good for school projects?
Answer: Yes, DIY paper crafts are excellent for classroom projects, holiday activities, and creative learning sessions.
DIY paper crafts for kids are a wonderful way to combine creativity, learning, and fun through simple hands-on activities. These easy paper craft ideas help children develop important artistic and motor skills while encouraging imagination and self-expression. Whether at home or in the classroom, paper crafting activities provide endless opportunities for creative learning and joyful play.
Fresh craft ideas, fun learning games, and creative activities for kids every day! Stay connected on Telegram, YouTube & Facebook
Reviewed by Yash Sharma
Read More:
- How to Decorate a Party with Paper Crafts
- How to Make an Explosion Box – DIY Paper Crafts
- Interesting and Easy Paper Card Ideas for Kids
- How to Decorate a Party with Paper Crafts
- How To Make a Paper Clown Craft


