DIY and Crafts
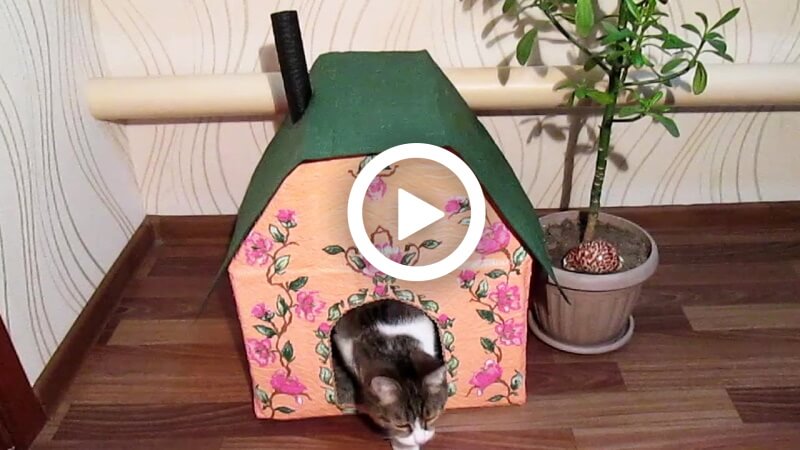
How To Make A Cat Lodging House Yourself At Home

With the constant inflation of prices it’s becoming nearly impossible to get your hands on every single supply or necessity. And so, K4 Craft has come to your aid in helping you make a lodging house for your beloved cat family.
Here is all that you will need to construct an innovative house for your cat!
How To Make A Cat Lodging House Yourself At Home
Materials Required:
- A big enough cardboard box so that your cat can live comfortably.
- Marker
- A pair of scissors
- Glue gun
- Fevicol
- 2-3 Extra sheets of cardboard (for the base and the top)
- Tape
- Paper cutter
- Any poster or pastel sheet of your choice to cover the cardboard
- Paint brush
- Stickers or other decorative material of your choice
Procedure:
- Use your marker and ruler to make measurements and cut out edges from the opening side of the cardboard box.
- Cut out these edges in such a manner that your box ends up looking like a hut without a ceiling.
- Use a glue gun to paste these edges as necessary, since glue gun is a stronger adhesive than fevicol and gluesticks.
- Once the topless hut shaped structure is ready, bring out the cello tape to strengthen the corners and edges of the structure.
- Thereafter, it’s time to make the base of the lodging house strong. To do this, use another cardboard of the same size as the hut structure’s base. Again, use your glue gun to stick the base cardboard to the lodging house structure.
- To complete the hut lookalike image of the lodging house, we need a marker and a paper cutter.
- Cut out a half oval from the front side of the lodging house to make an entrance gate for your cat’s house.
- Finally, it’s time to make your cat’s home colourful. You can use any pastel, poster or decorative paper to complete this step.
- By measuring alongside the lodging house, cut out pieces of the decorative paper in such a manner that each one of them covers a respective side, leaving out only the top, which still needs to be covered.
- Bring out a big paint brush to spread fevicol or glue on the cardboard hut.
- Repeat the same step to apply glue on the decorative paper as well.
- Now, the paper is ready to be pasted. Apply some pressure on the paper after placing it atop the cardboard box so that it sticks perfectly.
- With your lodging house all covered up, you will have to cut out the entrance gate once again. However, since you already cut out the cardboard box underneath the paper, you can simply feel the semi oval-shaped void and use a pair of scissors to cut out the paper covering the entrance.
- Again use the glue to paste the extra paper left open at the entrance gate.
- The final remaining step is to cover the top of the house. Take another cardboard sheet that completely covers the top and the two slanting sides of the hut.
- Use the same decorative paper to cover this cardboard top as well.
- Once you’re done pasting the paper to the cardboard, use the glue gun to fix this cardboard on the house, thereby finally covering the house. (make sure you use a flexible enough cardboard so that it can bend at the slanting edges of the top. Alternatively, you can also use three smaller pieces of cardboard to cover the top and the two slanting sides separately instead of folding one long sheet to cover all three sides)
- All that is left now is to decorate the house as per your preference. Bring out your stickers, paints, colourful markers to add your own flare to your cat’s house.
- You can also make a chimney hole for the hut by rolling a piece of paper into a cylindrical shape. Cut it from one end accordingly so that it can be fixed on one of the slanting ceilings of the hut. Use glue to stick it atop the structure.
And there you have it! Your cat’s new abode is ready and the best part is that it’s all personally customized by you. Not to forget how cost efficient this homemade alternative is. Your cat can finally settle into this adorable and creative setup while you can rest with a smile insinuating satisfaction glistening on your face.
FAQ’s on How To Make A Cat Lodging House Yourself At Home
1. What materials do I need to make a cat lodging house?
A. You will need a wooden box, nails, screws, saw, paint, sandpaper, a jigsaw, and a drill.
2. How much space do I need for the cat lodging house?
A. The size of the box should be around 24” x 18” x 10”.
3. What type of wood should I use?
A. A hardwood such as oak or maple is best for durability.
4. How do I cut the wood to the desired size?
A. You can use a jigsaw to cut the wood to the size you need.
5. What type of paint should I use?
A. You can use any type of paint that is suitable for outdoor use, such as acrylic or oil-based paint.
6. How do I make sure the box is secure?
A. You can use nails or screws to secure the box.
7. How do I make the cat lodging comfortable?
A. You can add some insulation or a soft material such as a blanket or towels to the inside of the box to make it more comfortable.
8. How do I prevent the cat from escaping?
A. You can add a latch, or a door that closes securely, to the outside of the box.
9. What other accessories can I add to the cat lodging house?
A. You can add a scratching post, a bed, and toys to the inside of the box to make it more comfortable and stimulating for your cat.
10. How often should I clean the cat lodging house?
A. You should clean the cat lodging house at least once a week to ensure that it remains clean and hygienic.
Read More:
- Kinesthetic Reading Activities For Kids
- Woolen Thread Craft Flowers
- Nylon Rope Craft Ideas
- Fabric Animal Craft Ideas
- Fabric Twine Crafts


