


DIY and Crafts
How to Make a DIY Paper Ship

Hi readers! Today you are going to make a very beautiful papercraft. You might be happy to read that today’s craft will be a paper ship. Don’t worry, it won’t be a Titanic as you are going to make it. This ship is going to be so beautiful that you are gonna fall in love with it. So, let’s get into the process and make a beautiful paper ship!
How to Make a DIY Paper Ship
Materials:
- A big square sky blue coloured paper.
- Six small black circles.
- A white circle.
- A red-colored long paper strip.
- Two long-wide rectangle straight white paper strips.
- A long, wide rectangle of straight blue paper strip.
- Two white, long, small, rectangular papers.
- A tea-plate.
- A red sketch pen.
- A pencil.
- A glue stick.
- Scissors.
Procedure:
- Take a big square sky blue colour paper and a tea plate. Put the tea plate over the square.
- Grab a pencil and mark the edges of the plate with the pencil.
- Cut out the marked portion with scissors, and a circle will be out.
- Fold the circle in half from sidewise by making a fold line in the middle.
- Take a white long length small breadth rectangle shape paper, apply glue on it with the glue stick.
- Paste the paper in the middle of the folded part of the circle horizontally.
- Turn over the piece.
- Take a long, wide rectangle of straight blue paper, and apply glue to it with the glue stick.
- Attach it to the top-middle of the white paper horizontally.
- Take two long-wide rectangle straight white paper strips, place them vertically on the previous blue paper strip’s sides.
- Take another white long length small breadth rectangle shape paper, apply glue on it with the glue stick.
- Paste the paper in the middle of the circle horizontally.
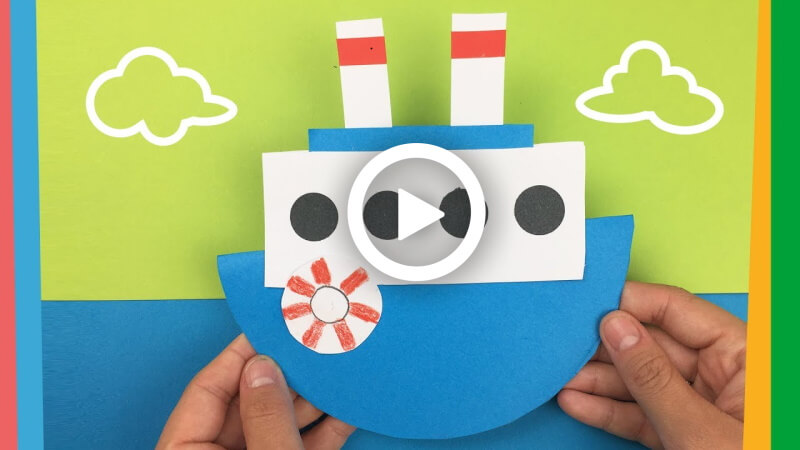
- The blue stripe and the white paper on the poles should be seen.
- Take six small black colour circles, attach them to the front and back part of the middle white portion with the glue stick, three pieces each.
- Take a white colour circle and a pencil, and draw a small circle in the middle.
- Grab a red sketch pen, draw red stripe lines around the circle like a swimming tube.
- Attach the piece to the side of the ship with the glue stick.
- Grab a red colour paper strip, cut out four pieces with scissors.
- Attach the front and back of the strip to the top of the white poles with the glue stick.
- Cut out the extra parts with scissors.
- Your beautiful paper ship will be ready!
It’s so beautiful and amazing! Right! You can also swing the ship on its circular base. Hurry up and grab your stationery and make a cool paper ship.
Benefits of Making DIY Paper Ships for Kids
DIY paper ship crafts are more than just a fun activity. They help children improve creativity, concentration, and hand-eye coordination. Folding, cutting, and decorating paper ships also supports fine motor skill development and problem-solving skills.
This simple paper craft is a great screen-free activity for preschoolers, kindergarten kids, and young learners. Parents and teachers can use it for transportation lessons, ocean themes, rainy-day activities, or summer camp crafts.
Educational Value of Paper Ship Crafts
Paper ship activities can help children learn about:
- Floating and sinking concepts
- Shapes and symmetry
- Basic engineering ideas
- Ocean transportation
- Creative storytelling
Kids can also create pirate adventures, sea exploration stories, or mini water experiments using their paper ships.
Safety Tips for Kids During Crafting
To make this paper ship craft safe and enjoyable:
- Use child-safe scissors
- Supervise younger children while cutting paper
- Avoid using too much glue to prevent the paper from tearing
- Keep the crafting area clean and dry
- Use non-toxic craft supplies
Adult guidance is recommended for toddlers and preschoolers.
Fun Ideas to Decorate Your DIY Paper Ship
Kids can personalize their paper ships using:
- Stickers
- Glitter
- Crayons and markers
- Mini paper flags
- Pirate symbols
- Cotton clouds
- Ocean wave drawings
This makes the craft more creative and visually attractive for school projects.
DIY Paper Ship Craft for School Projects
This easy paper ship craft is perfect for:
- School exhibitions
- Transportation theme activities
- Ocean and sea lesson plans
- Summer craft competitions
- Preschool classroom decorations
- Rainy-day indoor activities
Teachers can also combine this activity with storytelling or simple science experiments about water and floating objects.
FAQ’s on How to Make a DIY Paper Ship
Q1. What materials do I need to make a DIY paper ship?
Answer: You will need paper, scissors, a ruler, a pencil, glue, and a few other craft materials.
Q2. What kind of paper is best for making a DIY paper ship?
Answer: Cardstock or construction paper works best for making paper ships.
Q3. How long will it take to make a DIY paper ship?
Answer: Depending on the complexity of the paper ship you are making, it could take anywhere from an hour to several hours.
Q4. What is the best way to draw the ship?
Answer: Use a ruler and a pencil to sketch out the shape of the ship. Make sure to draw the lines straight and accurately.
Q5. How do I construct the paper ship?
Answer: Cut out the shapes you have drawn, and then glue them together.
Q6. What should I use to cut out the paper ship?
Answer: Use scissors or a craft knife to cut out the paper ship shapes.
Q7. How do I make the mast of the paper ship?
Answer: To make the mast, fold a piece of paper in half and glue it to the ship.
8. How do I add details to the paper ship?
Answer: You can add details to the paper ship using a marker, paint, glitter, or other craft materials.
Q9. How do I make the sails for the paper ship?
Answer: Cut out a rectangle of paper, fold it in half, and glue it to the mast.
Q10. How do I make the paper ship float?
Answer: Add a few drops of liquid dish soap to a bowl of water, and then place the paper ship in the water. The dish soap helps to reduce the surface tension of the water, allowing the paper ship to float.
Making a DIY paper ship is a fun and educational craft activity for kids of all ages. It helps improve creativity, hand-eye coordination, and basic paper-folding skills while providing an enjoyable screen-free learning experience. This simple craft is perfect for school projects, rainy-day activities, transportation themes, and classroom learning.
With just a few simple materials, children can create colorful paper ships and enjoy imaginative play while learning through hands-on activities. Try using different paper colors, decorations, and creative designs to make your DIY paper ship even more unique and exciting.
Read More:
- 15+ Lion Crafts Ideas for Kids to Make
- 15+ Lovely and Easy Boat Crafts for Kids
- 15+ Musical Instrument Crafts for Kids
- 17 Easy Valentine’s Day Crafts for Kids
- 20 Adorable Seashell Fun Craft Ideas for Kids
- 20 Lovely and Fun Popsicle Stick Crafts for Kids!


