DIY and Crafts
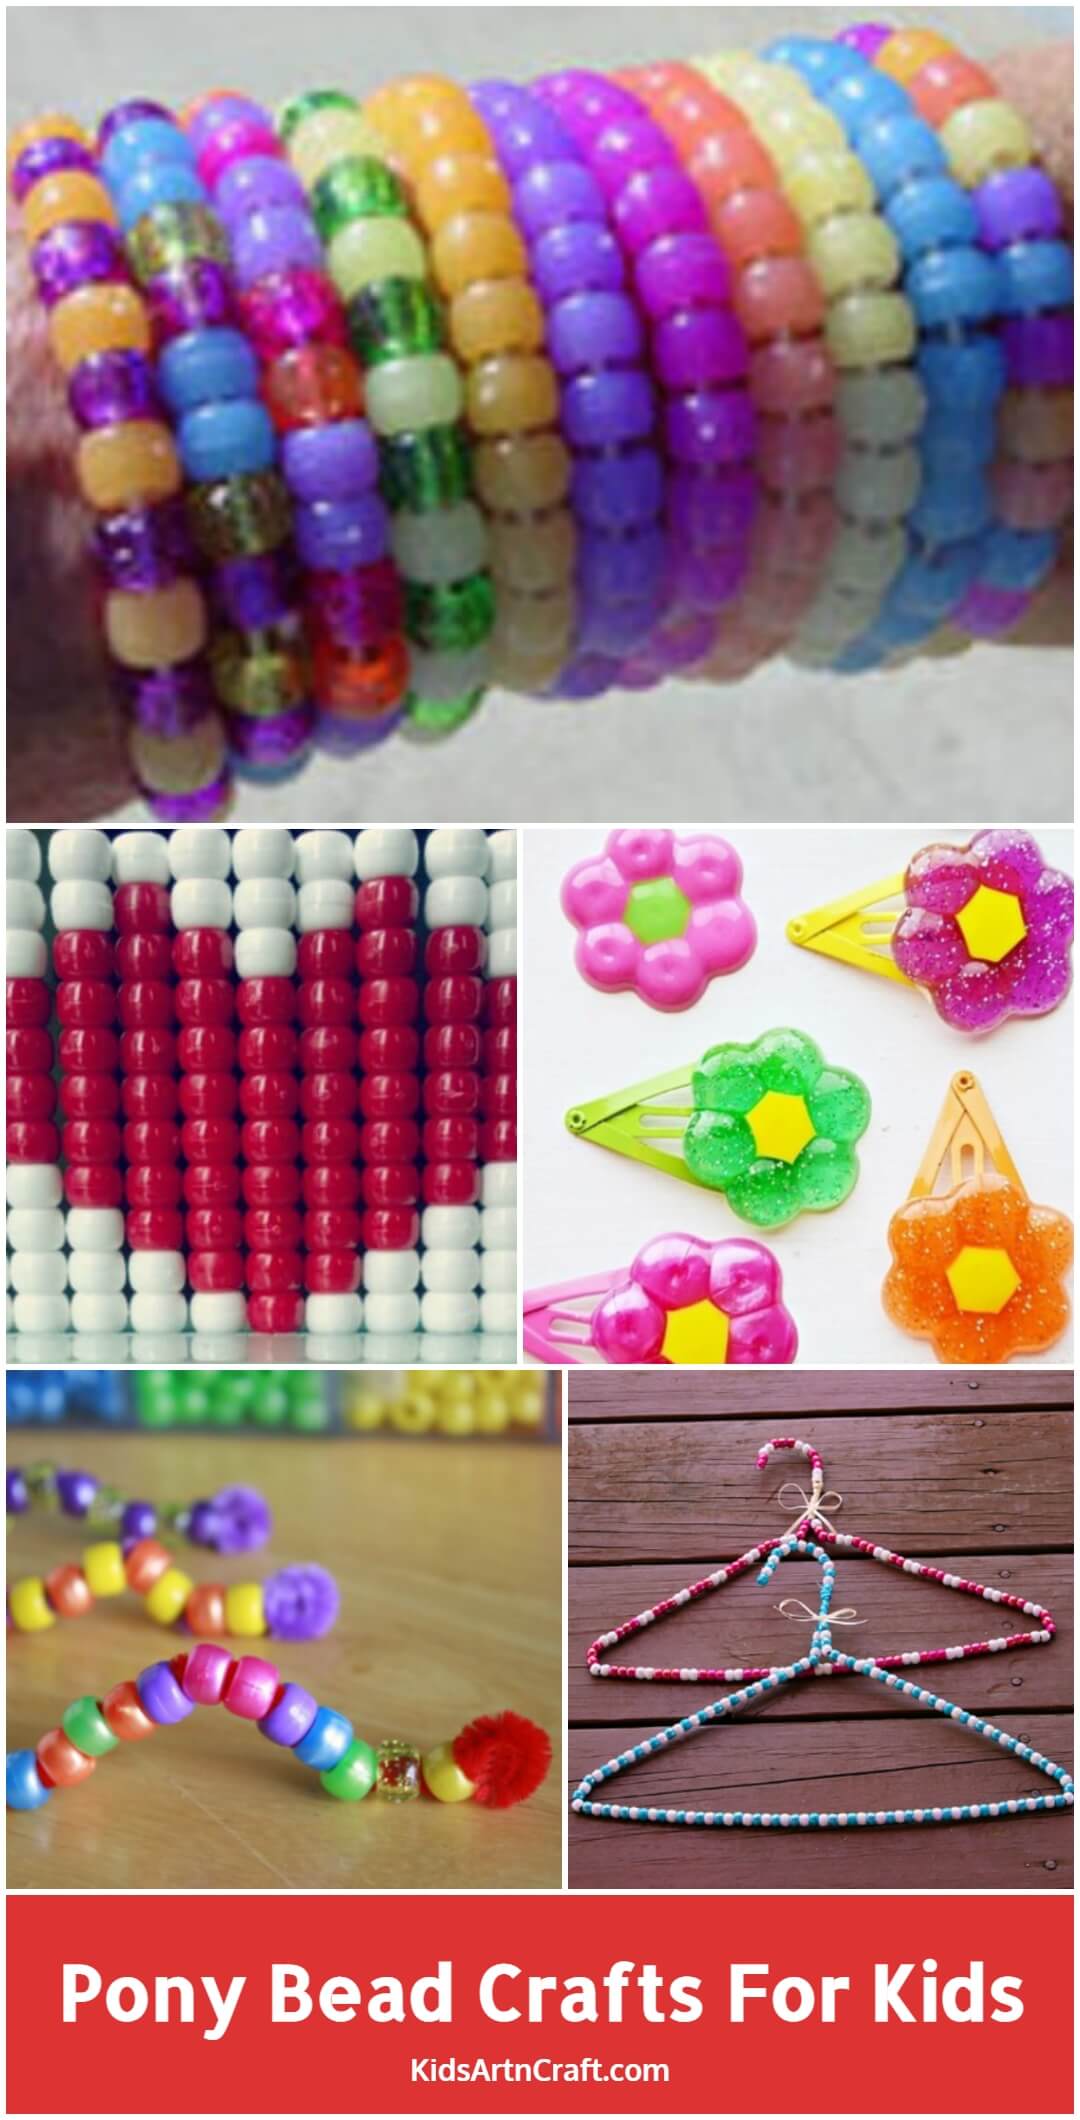
Pony Bead Crafts For Kids

We had tried lots of ideas for crafts. We had tried them too. Now, it’s time to make some different crafts.
We had seen the beads in our childhood and played a lot with them. We had learning materials and games made by them. Now we use them in our crafts. When it comes to beads, you can find various varieties of them. They are available in the market in different colors and sizes. They attract the kids as they are so colorful. So, make some new crafts by using them and gift them to your kids.
Here, I am giving some ideas made with pony beads. See them and try them. You can also involve your child in simple and easy crafts. Let them learn new things and enjoy them too.
Here are some ideas!
Pony Bead Crafts For Kids

Read More: Summer Special Fruit Decoration Ideas For Your Dining Table
Pony Bead Heart Design Activities

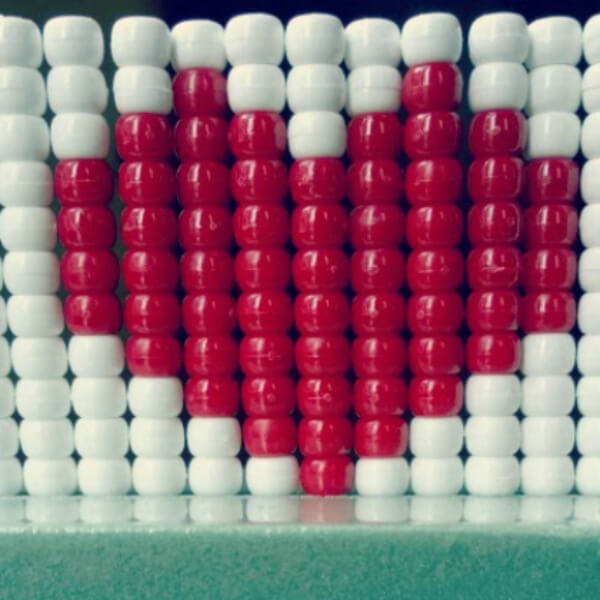
Image Source/Tutorial: De Tout Et De Rien
When I was a kid, my mother gifted me a bead game. I was fond of it. But at that time, I was not aware of the bead craft. So I tried it now for fun. You can also try it for your kid.
Materials Required:
- Red and white beads
- Popsicle sticks
- Foam
Procedure:
- Take the foam and insert the popsicle sticks into it in a horizontal straight line. Insert at least 13-15 sticks.
- Then take the beads and start putting them on the sticks. In the first two rows, put all the white beads. You are going to give a heart shape in the middle of white beads. So, in the third stick, insert four white beads and then four red beads, and again three white beads.
- In the fourth row, put three white beads, then six red beads, and again two white beads.
- In the fifth row, put two white beads, then eight red beads, and again one white bead.
- In the sixth row, put one white bead, then eight red beads, and again two white beads.
- The seventh is the middle stick. Put eight red beads and then three white beads.
- The rest of the sticks follow the same procedure I mentioned above.
After that, you are all done! Your beautiful heart-shaped bead craft is ready! You can use it on the occasion of Valentine’s Day for your kid.
Watermelon Patterned Bead Craft

Image Source/Tutorial: Free Kid Crafts
In the summer season, we all enjoy the taste of watermelons. So, in your summer holidays, try a craft related to watermelon and surprise your kid. You can involve your kids in this craft so that they can learn new things in their vocation.
Materials Required:
- keyring
- Bead cord
- Green Pony beads
- Pink bony beads
- Black pony beads
- Glue
- Scissor
Procedure:
- Start by stiffening the ends of the cord and gluing them.
- Tie the keyring in the middle of the cord
- Put your beads on the right-hand and left-hand sides of the cord.
- Pull on both the cords tightly, the beads up close to the keyring. Weave the second row by putting three pink beads.
- Weave seven rows for your watermelon.
- Tie a knot at each end and glue it.
Your beautiful watermelon is ready!
Pipe Cleaners And Beads Snakes Craft
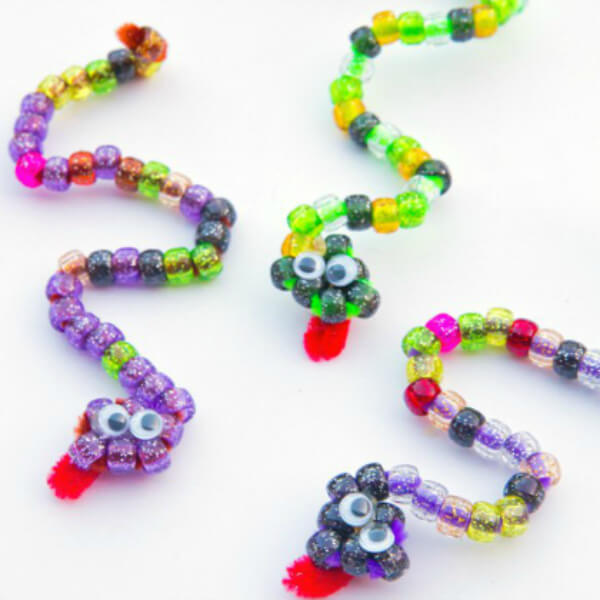
You can use your pipe cleaners for bead crafts. Yes! You can make snakes from them. It can be the best craft for your kid as it is so colorful and requires fewer materials to make. See the procedure to try.
Materials Required:
- Pipe cleaners
- Different colored beads
- Googly eyes
- Glue gun
Procedure:
- Take the pipe cleaner and bend its end so that the beads do not slip off.
- Tell your child to thread the pipe cleaner with beads. Use different designs for threading.
- Now fold or bend the pipe cleaner to make a triangular shape for the head of the snake. Use six beads of the same color for the head.
- Take a red pipe cleaner and cut a small piece of it to make the tongue of the snake. Glue it below the head.
- Twist the snake into an S shape.
- Make other snakes also use the same pattern.
Caterpillar Craft With Beads

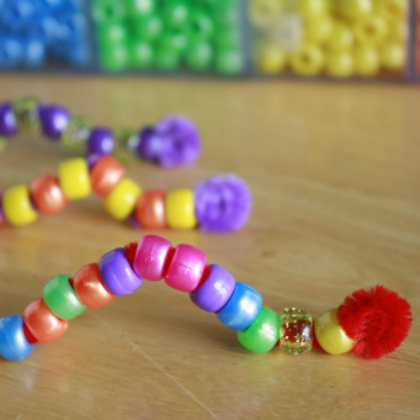
Image Source/Tutorial: Make And Takes
Has your child ever seen a caterpillar? Of course, they had seen! So give them a craft of a caterpillar by using beads. Believe me, they will enjoy it a lot while making it.
Materials Required:
- pipe cleaners
- Pony beads of different colors
Procedure:
- Take the pipe cleaners and cut them according to the size you want.
- Start threading your beads in the pipe cleaners.
- Leave one-fourth part at the tail end, and 1 inch on the head-end unthreaded.
- Now curve both ends.
- Bend the pipe cleaner from the middle to give the shape of a real caterpillar.
Beaded Craft Of Leaf Clover
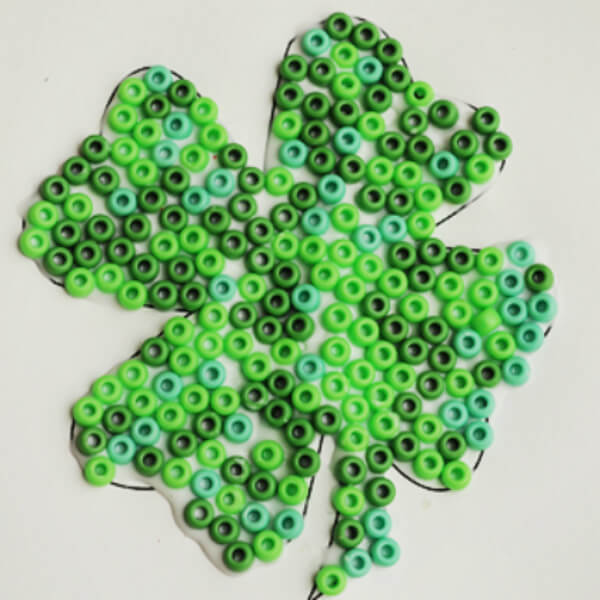
Image Source/Tutorial: Learn Create Love
You can make a simple craft with beads. Let your kid try this. It is so easy to make. Tell him/ her the procedure and let him enjoy it.
Materials Required:
- Marker
- Green beads
- White paper
- Glue
Procedure:
- Take the white paper and draw the shape of 4 clover leaves using the marker.
- Now, spread some glue on one part and start gluing your beads on it.
- Glue the beads at the different parts at different times because the glue dries easily.
- After you have completed the work of gluing the beads. Let them dry.
- And your beautiful leaf craft is ready.
Read More: Recycled Craft Ideas for Christmas!
DIY Melted Accessories
Image Source/Tutorial: The 36th Avenue
Have you ever made melted crafts like this? No? Try this one. Take some essential materials that I mentioned below and start making this beautiful craft.
Materials Required:
- Pony beads
- Toaster oven
- Parchment paper
Procedure:
- Preheat your toaster oven.
- When it heats, take the parchment paper and put it on a cookie sheet.
- Put the beads in and let them melt. Give them a shape you like.
- Then mix your favorite colors in it.
- After they dry, glue them on your clips to decorate.
Pony Beads Suncatcher
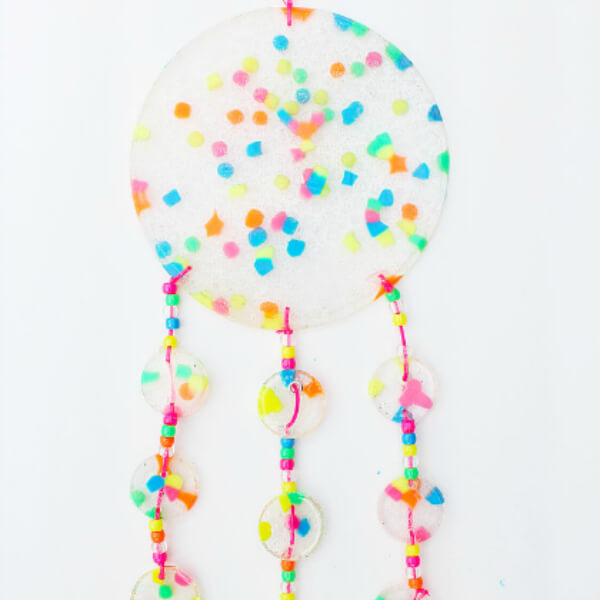
It’s time to make a wall hanging using pony beads. We had tried lots of crafts of wall hanging using sample papers, but it is a different one. So, try this out and get your kid involved in this activity.
Materials Required:
- Pony beads
- Pie tum
- Drill
- Muffin tin
- Grill
- String
Procedure:
- Place the pony beads in your pie tin and a muffin tin.
- Place your tin on a hot grill and wait for five to fifteen minutes to melt.
- When they become cool, pop them out of the tin.
- Drill a small hole in each suncatcher.
- Tie the string to your 3-4 suncatchers and then tie that to the bottom of the main suncatcher.
Pony Beads Bracelets
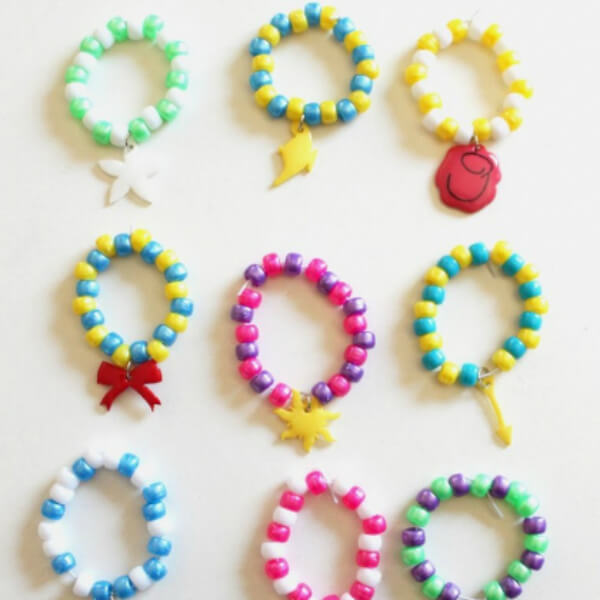
Image Source/Tutorial: Cutesy Crafts
You can try these pony bead bracelets for your little daughter. After making different princess bracelets, you can play a game of finding the bracelet that belongs to a particular princess.
Materials Required:
- Pony beads
- Plastic string
- Felt
- Scissor
Procedure:
- Take the plastic string and measure its length according to the hand size of your daughter.
- Then start threading the pony beads of different colors. Use two colors for a single bracelet.
- Give them the design you want.
- After threading the beads, tie the end of the bracelet.
- Now take the felt and cut out a bow. You can also make other things like stars, etc.
- Take another plastic string and cut out a small part of it.
- Make a hole in the bow or stern and thread the plastic string through it, and tie it on the bracelet.
- Make other bracelets by following the same procedure.
Melted Pony Beads
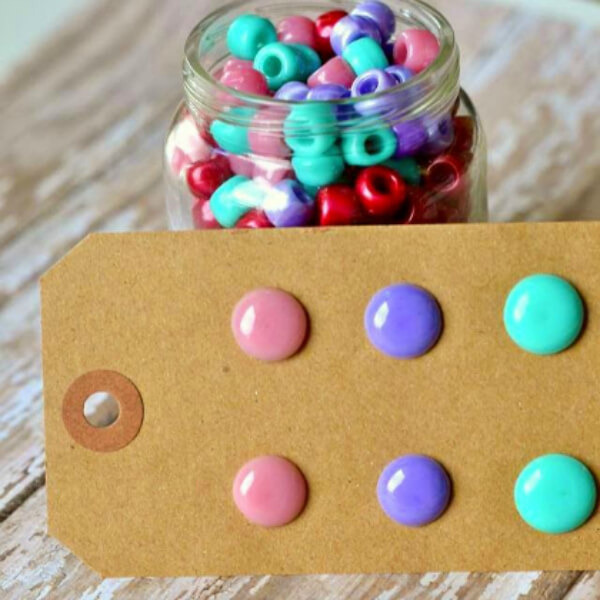
Image Source/Tutorial: The Life Of Jennifer Dawn,
let’s learn some melting creativity. See the given procedure to melt the pony beads and decorate them on cardboard. Enjoy!
Materials Required:
- Pony beads
- Oven
- Baking pan
- Cardboard
Procedure:
- Place your beads in a baking pan. You can put your beads on a cooking sheet, leaving some space between each.
- Let them melt. When they take the shape of small circles, place them out.
- After taking them out, let them cool for five minutes.
- Now, take the glue gun and the cardboard and start gluing your melted beads on the cardboard.
Pony Beads Bangles
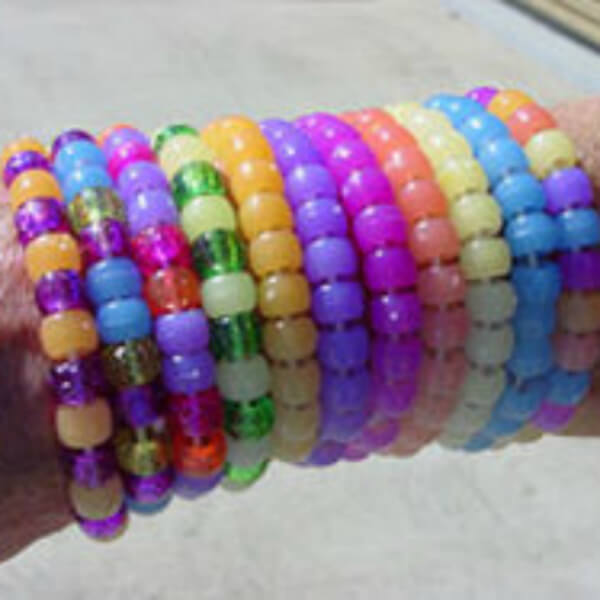
Image Source/Tutorial: Kin Folk Crafts
We had made the pony bead bracelet. Now we will try for the bead bangles for your princess. Start making with the help of the following procedure. Get all the materials and start.
Materials Required:
- Pony beads
- Plastic string
Procedure:
- Take the plastic string and cut out the length according to the size of the bangle you want.
- Then get your colored pony beads and start threading them on a plastic string.
- You can give the pattern of different designs.
- When you thread all the beads, then tie the end.
- Give them to your daughter and make her happy!
Read More: 70+ Halloween Craft Ideas for Kids
Pony Beads Hanger Craft

Image Source/Tutorial: We Made that
If you want to be creative with your old hangers, try this idea. It is so simple and easy that your kid can try this. Just tell him/ her the given procedure and let him/ her enjoy it!
Materials Required:
- Pony beads
- Hanger
- A thin ribbon or string
Procedure:
- Take the hanger and start threading the beads in it.
- Take the pattern you want to give your hanger.
- Here I have taken the pattern of blue and white beads. And the other one is 2 white and three pink beads. You can take the design of your own.
- When the whole hanger is filled with pony beads, then at last tie a string or ribbon on the upper part of it.
Step-by-Step Pony Bead Crafts Tutorial for Kids

Learn pony bead crafts for kids in this easy step‑by‑step tutorial! Perfect for beginners and parents, this fun video shows simple craft ideas with pony beads, from bracelets to shapes, helping kids learn creativity, colors, and fine motor skills. Follow along for creative, colorful DIY projects kids will love!
Why Pony Bead Crafts Are Great for Kids
Pony bead crafts are more than just colorful art projects. They give children an enjoyable way to practice important developmental skills while creating fun keepsakes. Stringing beads, choosing color patterns, and following simple instructions encourage patience, creativity, and concentration. These activities are suitable for home, classrooms, after-school programs, and holiday crafting sessions.
- Improves fine motor skills and finger strength.
- Encourages creativity through unique color combinations.
- Develops hand-eye coordination and focus.
- Introduces simple counting, sorting, and pattern recognition.
- Builds confidence by completing handmade projects.
Materials You’ll Need
Most pony bead crafts require inexpensive supplies that are easy to find in craft stores or online. Keep a small craft kit ready so children can enjoy different bead projects throughout the year.
- Colorful pony beads
- Elastic cord or craft string
- Pipe cleaners
- Key rings or split rings
- Plastic lacing cord
- Scissors
- Googly eyes (optional)
- Chenille stems and craft wire (for selected projects)
Educational Benefits of Pony Bead Crafts
These creative projects naturally combine art with early learning. Children strengthen problem-solving skills as they plan designs, repeat patterns, and complete each craft step. Teachers and parents can also incorporate bead activities into lessons on colors, shapes, numbers, and sequencing, making learning both engaging and hands-on.
Tips for Making Beautiful Pony Bead Crafts
- Choose bright, contrasting bead colors for eye-catching designs.
- Sort beads by color before starting.
- Plan simple patterns before stringing beads.
- Use sturdy cords for projects that will be handled frequently.
- Add charms, ribbons, or tassels for a personalized finish.
- Encourage children to create their own original designs instead of copying examples.
FAQs
Q1. What age is suitable for pony bead crafts?
Answer: Pony bead crafts are generally suitable for children aged 4 years and older, with adult supervision for younger kids.
Q2. What can kids make with pony beads?
Answer: Children can create bracelets, keychains, animals, flowers, ornaments, bookmarks, decorations, and many other colorful DIY crafts.
Q3. Do pony bead crafts help children’s development?
Answer: Yes, they improve fine motor skills, hand-eye coordination, concentration, creativity, and pattern recognition through fun, hands-on activities.
Q4. What materials are needed for pony bead crafts?
Answer: Basic supplies include pony beads, elastic cord, pipe cleaners, craft string, scissors, and optional decorative items like charms or ribbons.
Pony bead crafts inspire creativity while strengthening fine motor skills, patience, and imagination. These colorful DIY projects provide enjoyable learning experiences, making them perfect for classrooms, family craft sessions, and creative playtime. Bring creativity to your fingertips with finger puppets! Follow us on Telegram, YouTube & Facebook for exciting crafts and learning activities every day.
Reviewed By Rachit Gupta
More Articles From Kids’ Art & Craft
- Paper Christmas Tree Craft for Kids – Step by Step Tutorial
- Paper Circles Candy Cane Craft for Kids – Step by Step Tutorial
- 15 Beautiful Flower Crafts for Kids
- How to Make an Explosion Box – DIY Paper Crafts
- 65+ Christmas Crafts for Kids that Anyone Can Make